
Popular categories
Looking for a yarn?


Comments / Questions (34)
![]() Sandra wrote:
Sandra wrote:
Beste, Net als Sonja uit Duitsland versta ik het begin niet (* lijkt in alle stappen verkeerd aangeduid of er ontbreekt een stuk?) was de fout reeds gewijzigd of zal dit pas september of oktober opgelost zijn? Dank.
31.07.2013 - 19:49DROPS Design answered:
Het antwoord is hetzelfde, het betreft natuurlijk hetzelfde designteam :D. Zodra ze terug zijn, gaan ze aan de slag.
31.07.2013 - 20:27
![]() Aline Daelen wrote:
Aline Daelen wrote:
Bonjour, je voudrais réaliser ce modèle.y a t'il un soucis dans les tailles, cela me semble grand et je ne comprends pas bien le début où il faut faire des ms et continuer en brides? Merci d'avance, Aline
26.07.2013 - 16:30DROPS Design answered:
Bonjour Mme Daelen, Pensez à bien vérifier votre échantillon (12 B x 6 rangs = 10 x 10 cm et 2 rapports A.1b = 8 cm de large). Pour choisir la taille idéale, reportez-vous au schéma en bas de page et comparez à un vêtement qui convient. On commence ensuite par 1 rang de ms en sautant toutes les 5 ml (pour un bord plus souple), et on continue tout en brides. Bon crochet !
26.07.2013 - 16:35
![]() Jonna Tanttu wrote:
Jonna Tanttu wrote:
Takakappaleen alussa käsketään toistaa jätä väliin 1 kjs, 4 ks. Vaikka ilmeisesti pitäisi olla 4 pylvästä.
23.07.2013 - 18:54
![]() Sonja wrote:
Sonja wrote:
Hallo! Ich bin etwas verzweifelt, da ich denn Beginn der Anleitung für das Rückenteil leider nicht verstehe. Ist das * falsch gesetzt oder soll anstatt fM vielleicht Stb stehen? Wenn die Anleitung von *zu* wiederholt würde,werden keine Stb gehäkelt,es sollen aber in der kleinsten Größe 48 Stb enstehen. Ich würde mich sehr über einen Tipp freuen! Viele Grüße,Sonja
06.07.2013 - 14:06DROPS Design answered:
Liebe Sonja, Sie haben völlig Recht. Wir haben das im Team angeschaut und gesehen, dass wir unsere Designabteilung dazu befragen müssen. Sobald die Designerinnen aus den Ferien zurück sind, wird das bearbeitet. Bis dahin danken wir für Ihre Geduld!
09.07.2013 - 22:17
|
||||||||||
Little Red Riding Hood#littleredridinghoodjacket |
||||||||||
|
|
||||||||||
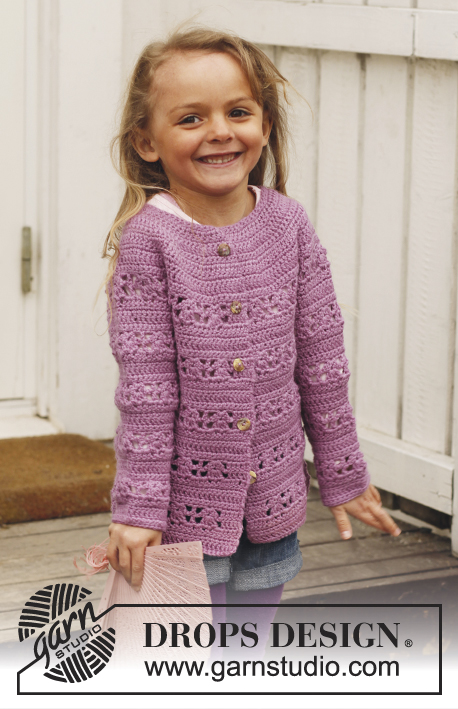
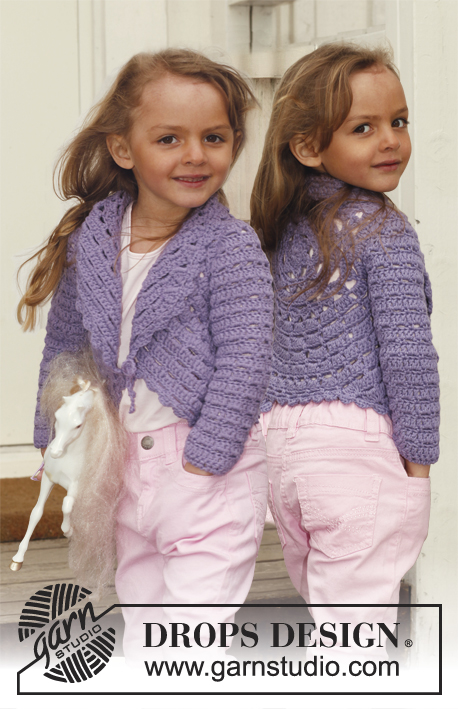
Crochet coat with hood in DROPS Paris. Size children 3 - 12 years.
DROPS Children 24-37 |
||||||||||
|
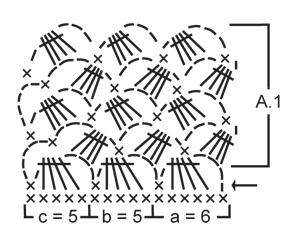
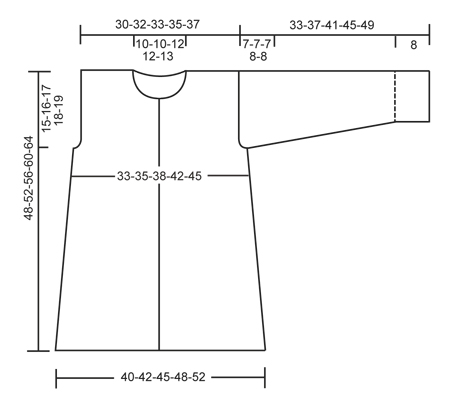
CROCHET INFO: Replace first tr on row with 3 ch. PATTERN (also see diagram A.1): ROW 1 (= row marked with 1 arrow in diagram): 1 ch up from 1st dc on previous row, [3 ch, then work 4 tr tog as follows (= 1 tr-group): * Work 1 tr in next dc but wait with last pull through *, repeat from *-* 4 times in total, make a YO and pull yarn through all 5 loops on hook, 1 ch, 1 dc in next dc], repeat from [-] the entire row. Turn piece. ROW 2: 5 ch up from first dc, 1 dc at the top of first tr-group, * 3 ch, 1 tr-group in 3-ch-space on previous row, 1 ch, 1 dc at the top of next tr-group *, repeat from *-*, finish with 3 ch and 4 tr tog in last ch-space. Turn piece. ROW 3: 1 ch, 1 dc at the top of first tr-group, * 3 ch, 1 tr-group in 3-ch-space on previous row, 1 ch, 1 dc at the top of next tr-group *, repeat from *-*, work last dc on row in 5-ch-space from previous row. Turn piece. Repeat rows 2 and 3. DECREASE TIP: Dec 1 tr by working 2 tr tog as follows: Work 1 tr in first tr but wait with last pull through, work 1 tr in next tr but on last pull through, pull thread through all 3 loops on hook. Dec 2 tr by working 3 tr tog as follows: Work 1 tr in first tr but wait with last pull through, work 1 tr in next tr but wait with last pull through, work 1 tr in next tr but on last pull through, pull thread through all 4 loops on hook. -------------------------------------------------------- BACK PIECE: Work 61-63-68-73-78 ch with Paris on hook size 6 mm. Turn and work 1 tr in 4th ch from hook, continue with 1 tr in each of the next 2-4-4-4-4 ch, * skip 1 ch, 1 tr in each of the next 4 ch *, repeat from *-* the entire row = 48-50-54-58-62 tr - READ CROCHET INFO! Continue with tr upwards on all rows. REMEMBER THE CROCHET TENSION! When piece measures 15 cm, dec 1 tr in each side by working the second and third tr and the 2 next to last tr tog – SEE DECREASE TIP! Repeat dec every 5-5-6-6-7 cm 3 more times = 40-42-46-50-54 tr. When piece measures 33-36-39-42-45 cm, dec for armholes in each side as follows: Work sl sts over the first 2-2-3-4-5 tr, then work tr until 2-2-3-4-5 tr remain, turn piece. Continue with tr, there are now 36-38-40-42-44 tr on row. Continue to work until piece measures approx. 47-51-55-59-63 cm. Now work 1 row with tr only over the outermost 12-13-13-14-14 tr in each side for shoulder (the middle 12-12-14-14-16 tr = neck). Fasten off. RIGHT FRONT PIECE: Work 34-36-38-41-43 ch with Paris on hook size 6 mm. Turn and work 1 tr in 4th ch from hook, continue with 1 tr in each of the next 5-2-4-2-4 ch, * skip 1 ch, 1 tr in each of the next 4 ch *, repeat from *-* the entire row = 27-28-30-32-34 tr. Continue with tr upwards on all rows (the 3 outermost tr towards mid front = band). When piece measures 15 cm, beg dec in the side as on back piece. When dec are done, 23-24-26-28-30 tr remain on row. When piece measures 33-36-39-42-45 cm, the outermost 2-2-3-4-5 tr towards the side are no longer worked. Continue with tr over the remaining 21-22-23-24-25 tr. When piece measures 43-47-50-54-57 cm, the outermost 7-7-8-8-9 tr towards mid front are no longer worked. Then dec 1 tr towards mid front on the next 2 rows by working the 2 next to last tr towards mid front tog = 12-13-13-14-14 tr remain on shoulder. Fasten off when piece measures 48-52-56-60-64 cm. LEFT FRONT PIECE: Work as right but reversed. SLEEVE: Work 32-32-32-39-39 ch with Paris on hook size 6 mm. Turn and work 1 dc in 2nd ch from hook, then work 1 dc in each of the next 5-5-5-2-2 ch, * skip 1 ch, work 1 dc in each of the next 4 ch *, repeat from *-* the entire row = 26-26-26-31-31 dc (first ch on row does NOT count as 1 dc). Continue with PATTERN as follows - also see explanation above and diagram A.1: Diagram a over the first 6 dc, diagram b 3-3-3-4-4 times and diagram c over the last 5 dc – beg with row marked with arrow. When 5 rows of diagram have been worked, piece measures approx. 8 cm. Continue with tr as follows: 3 ch (= 1 tr), * 1 tr at the top of first tr-group, 3 tr in 3-ch-space, 1 tr in dc *, repeat from *-* the entire row but finish with 3 tr in last 3-ch-space (do not work 1 tr in last dc) = 25-25-25-30-30 tr. Continue with 1 tr in every tr upwards. AT THE SAME TIME when piece measures 10 cm, inc 1 tr in each side by working 2 tr in second and next to last tr. Repeat inc every 2nd-2nd-2nd-3rd-3rd row 3-4-5-4-5 more times = 33-35-37-40-42 tr. When piece measures 26-30-34-37-41 cm, beg dec for sleeve cap. Work sl sts over the first 3 tr, then work tr until 3 tr remain, turn piece. Work 3 ch, then work the next 3 tr tog – SEE DECREASE TIP! Work tr until 4 tr remain, work the next 3 tr tog, then 1 tr in last tr. Continue like this by working the 3 next to last tr on every row tog until piece measures 33-37-41-45-49 cm, fasten off. ASSEMBLY: Sew shoulder seams, side seams and sleeve seams edge to edge to avoid a chunky seam. Sew in the sleeves in body. HOOD: Work (from RS) approx. 30 to 40 dc around the neckline with Paris on hook size 6 mm. Turn and work dc while at the same time inc evenly (by working 2 dc in 1 dc) to 51-51-51-61-61 dc. Continue with PATTERN as follows - also see explanation above and diagram A.1: a over the first 6 dc, b until 5 dc remain and c over the last dc – beg with row marked with 1 arrow. Continue pattern until hood measures approx. 28-29-30-31-32 cm. Fasten off and sew the hood tog at the top. BAND: Work an edge around the opening on jacket, beg at the bottom on right front piece, work up and around the hood and down along left front piece. Work with Paris on hook size 6 mm: Work approx. 181-191-201-211-221 dc, no of sts should be divisible by 5 + 11. Turn piece and continue with PATTERN according to diagram A.1: A.1a over the first 6 dc, A.1b until 5 dc remain and A.1c over the last dc – beg on row marked with arrow. Fasten off when A.1 has been worked 1 time vertically. ASSEMBLY: Fasten the buttons on left front piece, the top button approx. 2 cm from neck, the bottom button approx. 8 cm from bottom edge. Place the rest of the buttons evenly between these 2 buttons. Button through band on right front piece. |
||||||||||
Diagram explanations |
||||||||||
|
||||||||||
 |
||||||||||
 |
||||||||||
Have you finished this pattern?Tag your pictures with #dropspattern #littleredridinghoodjacket or submit them to the #dropsfan gallery. Do you need help with this pattern?You'll find 7 tutorial videos, a Comments/Questions area and more by visiting the pattern on garnstudio.com. © 1982-2026 DROPS Design A/S. We reserve all rights. This document, including all its sub-sections, has copyrights. Read more about what you can do with our patterns at the bottom of each pattern on our site. |
||||||||||


With over 40 years in knitting and crochet design, DROPS Design offers one of the most extensive collections of free patterns on the internet - translated to 17 languages. As of today we count 324 catalogues and 12290 patterns translated into English (UK/cm). 12290
We work hard to bring you the best knitting and crochet have to offer, inspiration and advice as well as great quality yarns at incredible prices! Would you like to use our patterns for other than personal use? You can read what you are allowed to do in the Copyright text at the bottom of all our patterns. Happy crafting!
Post a comment to pattern DROPS Children 24-37
We would love to hear what you have to say about this pattern!
If you want to leave a question, please make sure you select the correct category in the form below, to speed up the answering process. Required fields are marked *.