
Popular categories
Looking for a yarn?


Comments / Questions (289)
![]() Dea wrote:
Dea wrote:
Ultima parte. Oppure sostituire il gettato con un aum diverso, magari quello invisibile, ricordandosi di lavorare questa m a rov fino al rigo 23 per avere un lavoro omogeneo e simmetrico. Spero di essermi spiegata bene, per me c'è un errore. ^_^
27.01.2018 - 19:06
![]() Dea wrote:
Dea wrote:
Secondo me è che se, come aum, al rigo 20 facciamo un gettato, al rigo 21 questo aum dovrà essere lavorato a rovescio ritorto per chiudere il buco (nella foto non c'è) ed ottenere così una m rov perchè altrimenti avremmo 3 dir (alla fine della ripetizione) una rov (inizio della nuova rip) e poi due dir (sempre della nuova rip), quindi il lavoro sfalsato.
27.01.2018 - 19:05
![]() Dea wrote:
Dea wrote:
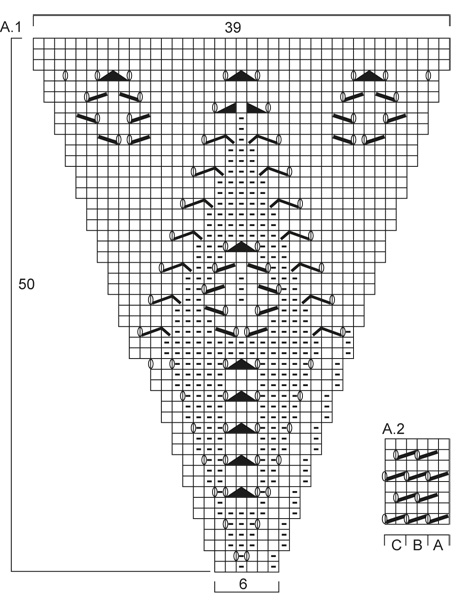
Buonasera. Ho iniziato a lavorare questo modello. Nel diagramma A1 ho trovato un problem (da me risolto) al rigo 20. Si inizia la ripetizione con 1 maglia rovescia e la si deve finire con un gettato (aumento), poi nel rigo seguente dice di lavorare la maglia gettata (aumento) a diritto, ecco qui si crea un errore ovvero si crea il buco che invece nella foto del retro della giacca non esiste e soprattutto moficherebbe il disegno. Proseguo sopra.
27.01.2018 - 18:57
![]() Silke wrote:
Silke wrote:
Ich bin jetzt bei den verkürzten Reihen. Muss ich hier dann weiterhin bei dem Maschenmarkierer( 3. und 6. ) die zunahmen davor und dahinter Stricken?
13.01.2017 - 16:02DROPS Design answered:
Liebe Silke, die Zunahmen sollen jetzt fertig sein, stricken Sie einfach die verkürzten Reihen. Viel Spaß beim stricken!
16.01.2017 - 13:12
![]() Ryter Cornelia wrote:
Ryter Cornelia wrote:
Guten Tag Ich bräuchte Eure hilfe. Ich komme auf die 127 Maschen zwischen den 2 Markirer und der 4 Markierer. dann müsste es 37 Maschen noch übrig sein. Vielen dank für Ihre schnelle erklärung. Mit Freundlichen Grüssen C.Ryter
11.12.2016 - 11:30DROPS Design answered:
Liebe Frau Ryter, jetzt stricken Sie über die 125 M (1. Größe) Hin- Und Rück-R glatt re mit verkürzten Reihen, dh von der 1. Reihe legen Sie die letzten 4 M still, wiederholen Sie so am Ende jeder Reihe bis 37 M auf der Nadel bleibt (= 44 M beidseitig wurden nach und nach nicht gestrickt). Viel Spaß beim stricken!
12.12.2016 - 10:54Donna wrote:
Still working on A2. Reading first line of A2 as- A2A-K2 tog, 1 YO between 2 sts, A2B- K2 tog, 1YO between 2 sts until 2 sts remain A2C-K2 tog, 1 YO. 2nd line of graft knit, How do you read 3rd line?
17.10.2016 - 23:34DROPS Design answered:
Dear Donna, on 3st row work the last st in A.2A tog with 1st st in A.2B (= 2 sts in A.2A), *YO (= 1st st in A.2B), work the last st in A.2B tog with the first st next A.2B (= 2 sts in A.2B)*, repeat from *-* and on last repeat in A.2B K tog the last st in A.2B with 1st st in A.2C (= 2 sts in last A.2B), YO (1st st in A.2C), K1 (= 2 sts in A.2C). Happy knitting!
18.10.2016 - 09:17Donna wrote:
I am working on A2 with 496 stitches. When I worked the 3rd round I was left with 4 stitches. The math doesn't work. A2 is over 6 stitches. Please clarify.
16.10.2016 - 19:46DROPS Design answered:
Dear Donna, you work A.2 over the 496 sts as follows: A.2 A (= 2 sts) 1 time, repeat A.2B (= 2 sts) a total of 246 times (= over the next 492 sts), finish with A.2C (= 2 sts) a total of 2 times = 2+ 492 + 2 = 496 sts. Happy knitting!
17.10.2016 - 10:26Donna Hein wrote:
Do you continue with cast off/on stitches between 1st and 2nd marker (shoulder width) on garter stitch rows only or do you continue over the stocking stitch rows?
14.10.2016 - 11:17DROPS Design answered:
Dear Mr Hein, after you have cast off sts between 1st and 2nd marker and sts between 6th and 1st marker then picked up the sts again, work 1 ridge over all sts, and continue in stocking st. Happy knitting!
14.10.2016 - 11:31
![]() KathrinJunghof wrote:
KathrinJunghof wrote:
Kann mir jemand sagen ob das Model wirklich mit Nadel und Nadelspiel 6mm gestrickt werden soll oder was bedeutet Nr. 6
19.01.2016 - 22:14DROPS Design answered:
Ja genau, Nr. 6 bedeutet 6 mm. Sie müssen allerdings die Nadelstärke verwenden, mit der Sie die angegebene Maschenprobe erhalten, Nadelstärke 6 ist nur ein Richtwert. Sie stricken die Jacke (und die Maschenprobe entsprechend auch) mit beiden Garnen zusammen.
24.01.2016 - 20:44
![]() Swen Dreiling wrote:
Swen Dreiling wrote:
Muss ich wirklich beim weiterstricken die Maschen stilllegen oder kann ich sie auf der Nadel behalten? Bzw diesen Querfaden mitstricken???
29.11.2015 - 17:24DROPS Design answered:
Der besseren Übersicht und Handhabbarkeit halber sollten Sie die je 4 M jeweils wie beschrieben stilllegen und so vorgehen wie in der Anleitung beschrieben.
05.12.2015 - 17:34
|
|||||||||||||||||||||||||||||||
Daybreak#daybreakjacket |
|||||||||||||||||||||||||||||||
 |
 |
||||||||||||||||||||||||||||||
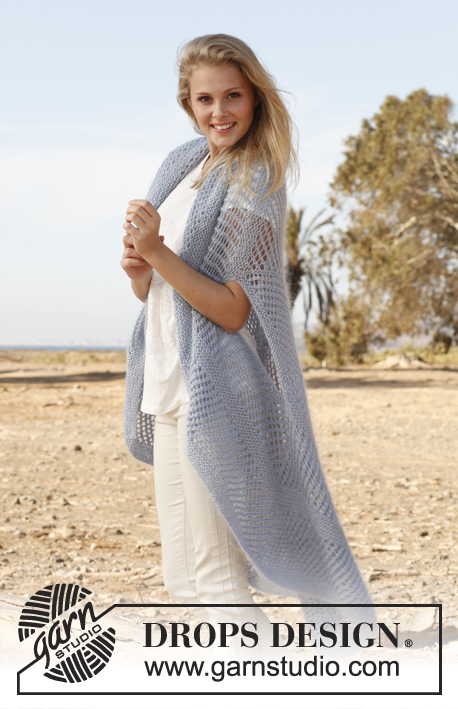
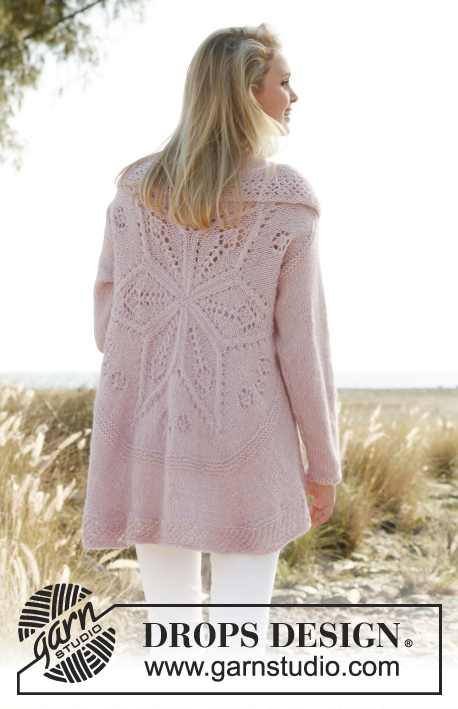
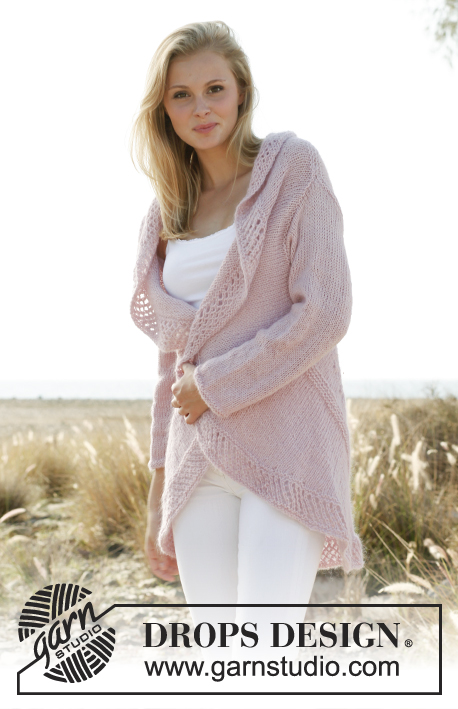
Knitted DROPS jacket worked in a circle with lace pattern in "Alpaca" and "Kid-Silk". Size: S - XXXL.
DROPS 148-1 |
|||||||||||||||||||||||||||||||
|
GARTER ST (in the round on circular needle): 1 ridge = * K 1 round and P 1 round *, repeat from *-*. PATTERN: See diagram A.1. Diagram shows all rows in pattern seen from RS. ---------------------------------------------------------- JACKET WORKED IN A CIRCLE: Worked in the round in a circle from mid back. First work on double pointed needles, then switch to circular needle when needed. Cast on 12 sts with 1 thread of each yarn and distribute them on 4 double pointed needles size 6 mm. K 1 round while AT THE SAME TIME working 2 sts in all sts = 24 sts. K 1 round without inc. On next round, work as follows: * K 1, K 2 in next st *, repeat from *-* = 36 sts. Then work according to diagram A.1 (= 6 repetitions in the round). REMEMBER THE KNITTING TENSION! Switch to circular needle when needed. When A.1 has been worked, there are 234 sts on needle. Insert 1 marker in each of the tips on the star (in the middle st in every repetition) = 6 markers in total. Work in stocking st AT THE SAME TIME inc 1 st on each side of markers. Inc with 1 YO on each side of sts with marker – on next round K yo twisted to avoid holes = 12 inc sts per round. Repeat inc every other round 1-2-3 more times (24-36-48 inc sts in total) = 258-270-282 sts (42-44-46 sts between every st with marker). Then work 2 ridges in GARTER ST – see explanation above - over all sts, without inc. On next round K while AT THE SAME TIME cast off all sts between 1st and 2nd marker, cast off the middle 32-34-36 sts between 2nd and 3rd marker and the middle 32-34-36 sts between 6th and 1st marker for armhole. P next round, AT THE SAME TIME knit up 1 new st in every cast off st between 1st and 2nd marker, and cast on 32-34-36 new sts over the cast off sts between 2nd and 3rd marker and 6th and 1st marker. (Sts between 1st and 2nd marker is equivalent to the shoulder width at the top. To avoid the shoulder width being to wide, cast off these sts and knit them up again on next row. This will stop the piece from being to long over the shoulder.) When all sts have been cast on/knitted up, there are 258-270-282 sts on needle. Work 1 ridge. Piece measures approx. 31-32-33 cm from centre. Then work in stocking st, AT THE SAME TIME inc 1 st each side of sts with markers (= 12 inc). Inc with YO (work twisted on next round to avoid holes). Repeat inc every other round 9-11-13 more times (10-12-14 inc in total) = 378-414-450 sts. Keep sts between 2nd and 4th marker on needle, slip the other sts on a stitch holder = 125-137-149 sts on needle. Then work in stocking st back and forth over sts on needle, AT THE SAME TIME at the end of every row slip the last 4 sts on stitch holder (do not work them, turn), continue until 37-49-61 sts remain on row. Slip the last 37-49-61 sts on stitch holder. Slip sts between 5th and 1st marker on circular needle size 6 mm, work the same way as in the other side. Then K all sts from RS back on to circular needle size 6 mm - between every time sts where slipped on stitch holders in each side, get the thread and twist it before slipping it on needle (i.e. between every 4th st, to avoid holes in the transitions), in addition inc evenly so that there are 452-496-540 sts in total on needle. Work 2 ridges. Then work according to A.2. Work A.2 A, repeat A.2 B until 2 sts remain and end with A.2 C. Work A.2 for 6 cm, work 1 ridge and cast off. SLEEVE: Worked in the round on double pointed needles. Cast on 36-38-40 sts on double pointed needles size 6 mm with 1 thread of each yarn. Insert 1 marker at beg of round = mid under sleeve. Work 2 ridges. Continue in stocking st. When piece measures 8 cm, inc 1 st on each side of marker mid under. Repeat inc every 4-3½-3 cm 10-11-13 more times (11-12-14 inc in total) = 58-62-68 sts. When piece measures 53-54-56 cm, cast off 6 sts mid under sleeve and work back and forth until finished measurements. Then cast off for sleeve cap at beg of every row in each side: 3 sts 3 times = 34-38-44 sts. Cast off the remaining sts, sleeve measures approx. 56-57-59 cm. Sew in sleeves. |
|||||||||||||||||||||||||||||||
Diagram explanations |
|||||||||||||||||||||||||||||||
|
|||||||||||||||||||||||||||||||
 |
|||||||||||||||||||||||||||||||
 |
|||||||||||||||||||||||||||||||
Have you finished this pattern?Tag your pictures with #dropspattern #daybreakjacket or submit them to the #dropsfan gallery. Do you need help with this pattern?You'll find 24 tutorial videos, a Comments/Questions area and more by visiting the pattern on garnstudio.com. © 1982-2026 DROPS Design A/S. We reserve all rights. This document, including all its sub-sections, has copyrights. Read more about what you can do with our patterns at the bottom of each pattern on our site. |
|||||||||||||||||||||||||||||||


With over 40 years in knitting and crochet design, DROPS Design offers one of the most extensive collections of free patterns on the internet - translated to 17 languages. As of today we count 324 catalogues and 12290 patterns translated into English (UK/cm). 12290
We work hard to bring you the best knitting and crochet have to offer, inspiration and advice as well as great quality yarns at incredible prices! Would you like to use our patterns for other than personal use? You can read what you are allowed to do in the Copyright text at the bottom of all our patterns. Happy crafting!
Post a comment to pattern DROPS 148-1
We would love to hear what you have to say about this pattern!
If you want to leave a question, please make sure you select the correct category in the form below, to speed up the answering process. Required fields are marked *.