
Popular categories
Looking for a yarn?


Comments / Questions (59)
![]() Laura wrote:
Laura wrote:
Ich weis nicht was mit hinteren mitte gemeint ist und wo ich die zweite seite anfangen soll !!
03.01.2014 - 19:28DROPS Design answered:
Liebe Laura, es wird in 2 Richtungen von der hinteren Mitte (Mittellinie am Rücken) her gehäkelt. Wenn der erste Teil fertig ist, häkeln Sie den 2. Teil in die Luftmaschenkette des Anfangs in die andere Richtung.
04.01.2014 - 14:33
![]() Laura wrote:
Laura wrote:
Hallo liebes team !! ich habe die erste seite gehäkelt aber leider komm ich bei der zweiten seite nicht weiter
02.01.2014 - 16:32DROPS Design answered:
Liebe Laura, bitte schreiben Sie uns genau, wo das Problem ist, dann helfen wir gerne weiter.
03.01.2014 - 08:59
![]() Erika wrote:
Erika wrote:
Hej! Jag vill gärna virka denna bolero men fastnade vid en teknisk term som jag inte vet vad den innebär. När jag ska mäta masktätheten så står det att jag ska virka 3 rapporter på en bredd på 10cm. Min fråga är nu denna: vad innebär "rapporter" och vad innebär då 3 rapporter av detta mönster? Tack på förhand!
28.07.2013 - 21:14DROPS Design answered:
1 rapport är som b.8 i diagrammet!
04.10.2013 - 09:58
![]() Nina wrote:
Nina wrote:
Hei. eg skjønte ikke helt når eg skal begynne på andre side. skal eg legge opp nye luftmasker? det er jo ikke noe å hekle på der. eg kan ikke hekle på andre siden av fastmaskeraden for det vil jo si at det kommer en fastmaskestrek loddrett midt på ryggen.
12.07.2013 - 23:32DROPS Design answered:
Nej, du skal ikke legge opp nye luftmasker. Du hekler langs den andre siden af den fm-raden som du startede med. Der er en fastmaskerad i midten af ryggen, men den er ikke rigtig synlig ifm mönstret du hekler
17.07.2013 - 16:33
![]() Daniela wrote:
Daniela wrote:
Hallo liebes Team von Drops, danke für die schöne Anleitung für den Bolero, er sieht genial aus, lässt sich einfach häkeln und ist ein schnelles Projekt. Hier noch eine kleine Korrektur zu dem 2. Absatz zu Teil 1: "Wiederholen sie die 1.-4. Runde von A1 fortlaufend... Danke und liebe Grüße Daniela
08.07.2013 - 09:23DROPS Design answered:
Liebe Daniela, ich habe die Anleitung geprüft und sie ist korrekt: es sind Reihen, nicht Runden. Und es wird fortlaufend R 1-4 (= die 1. - 4. R) wiederholt. Habe ich Sie falsch verstanden?
08.07.2013 - 13:20
![]() Veronika wrote:
Veronika wrote:
Dobrý den, prosím Vás o radu. Moc jsem nepochopila pracovní postup: Háčkujeme od středu zad. Nejprve uháčkujeme jednu stranu až k okraji rukávku, poté obdobným způsobem druhou stranu, vč. rukávku. Nakonec sešijeme rukávové švy a celé bolerko obháčkujeme volánkovým lemem. Znamená to, že bolerko se musí na zádech sešít??? Předem děkuji za odpověď. :o)
24.06.2013 - 12:28DROPS Design answered:
Milá Veroniko, díky za dotaz. Bolerko se nesešívá, ale háčkuje na dvě strany - nejprve uháčkujete jednu část, vč. rukávku (práci ukončíte), pak se vrátíte k první řadě ( = počáteční řetízek) a háčkujete do ní druhou část (opět včetně rukávku). Tak se vyhnete nutnosti sešívat i nepříjemnému švu uprostřed zad ("šev" vlastně tvoří ta první řada :-)). Hodně zdaru!
11.07.2013 - 12:37
![]() May wrote:
May wrote:
For the second side of the bolero, you mention in your patter the following: Work along the other side of sc row made at the beg of first side (i.e. mid back) – beg with 1st row in A.1 and work as first side. Does that mean to again cast on the same no. of stitches as for the first side & work same patter? OR I just work on other side of first sc row? Am confused - Please clarify as early as possible. Thank you in advance. May
30.05.2013 - 17:12DROPS Design answered:
Dear May, you will start 2nd side working in the foundation ch from beg of 1st side, just starting directly with 1st row in A.1. Happy crocheting!
31.05.2013 - 09:27
![]() Lone wrote:
Lone wrote:
Denne er nydelig! veldig enkel, jeg brukte en mye tynner garn og strikket i litt større str. gikk kjempe bra!
01.05.2013 - 17:54
![]() Maie Loorits wrote:
Maie Loorits wrote:
Väga ilus aitäh
01.04.2013 - 08:12
![]() ZOCLI wrote:
ZOCLI wrote:
Pouvez vous plus détailler à partir du pliage en double que je ne comprends pas tres bien...
25.02.2013 - 19:09DROPS Design answered:
Bonjour Madame Zocli, Regardez le schéma en bas de page : vous avez un long rectangle que vous pliez dans le sens de la longueur - les 2 cm en haut et en bas du schéma = volant des manches. Vous faites les coutures sur environ 10 cm à partir du volant en remontant vers le milieu du rectangle. Bon crochet !
26.02.2013 - 10:22
|
|||||||||||||
Gwendolyn#gwendolynbolero |
|||||||||||||
 |
 |
||||||||||||
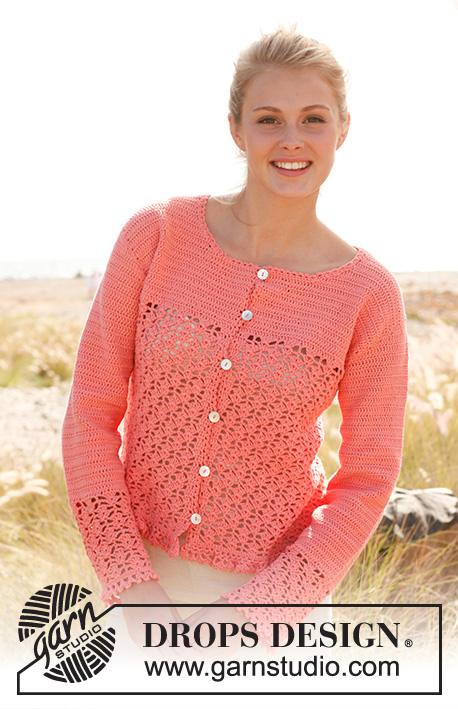
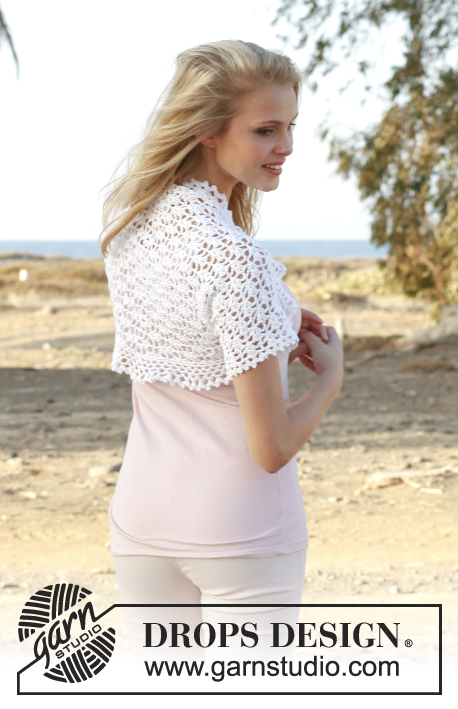
Crochet DROPS bolero with lace pattern in "Cotton Viscose". Size: S - XXXL
DROPS 148-8 |
|||||||||||||
|
CROCHET INFO: Replace first tr on every row with 3 ch. PATTERN: See diagram A.1 - NOTE: The first row with dc is not in the repetition and is NOT repeated upwards. -------------------------------------------------------- BOLERO: Worked from mid back. First work one side and down to beg of sleeve, then work the other side and down to the other sleeve. Then sew the sleeve seams and work 1 flounce around the entire opening. FIRST SIDE: Work 82-90-98 LOOSE ch with Cotton Viscose on hook size 3 mm – it is VERY important that this ch-row is not too tight. Work 1 dc in 2nd ch from hook, then work 1 dc in every ch the entire row = 81-89-97 dc. Continue pattern A.1 as follows: Diagram a over the first 9 dc, diagram b until 8 dc remain, then diagram c over these (= 10-11-12 repetitions in total on row). REMEMBER THE CROCHET TENSION! Repeat the 4 rows in diagram A.1 upwards until piece measures approx. 32-35-39 cm – finish after 4th row in diagram. Continue to work a finishing border as follows: ROW 1: 4 ch, 1 dc in first ch-loop, * 4 ch, 1 dc in next ch-loop, 4 ch, 1 dc in ch between the 4 tr, 4 ch, 1 dc in next ch-loop *, repeat from *-* the entire row, finish with 4 ch, 1 dc in last ch-loop, 3 ch and 1 dc in last tr, turn piece. ROW 2: Work as follows in every ch-loop: 1 dc + 1 picot (= 3 ch, 1 dc in first ch) + 1 dc. Cut and fasten the thread. SECOND SIDE: Work along the other side of dc row made at the beg of first side (i.e. mid back) – beg with 1st row in A.1 and work as first side. ASSEMBLY: Fold the bolero double across and sew tog from bottom of each sleeve and approx. 10 cm up in each side – sew edge to edge to avoid a chunky seam. FLOUNCE AROUND OPENING: Work around the entire opening as follows (beg mid back): ROUND 1: 1 dc in first tr, * 3 ch, 1 dc in next tr *, repeat from *-* the entire round, finish with 3 ch and 1 sl st in first dc. ROUND 2: 2 ch, 1 dc in first ch-loop, * 4 ch, 1 dc in next ch-loop *, repeat from *-* the entire round, finish with 1 sl st in first dc. ROUND 3: 2 ch, 1 dc in first ch-loop, * 4 ch, 1 dc in next ch-loop *, repeat from *-* the entire round, finish with 1 sl st in first dc. ROUND 4: 2 ch, 1 dc in first ch-loop, * 5 ch, 1 dc in next ch-loop *, repeat from *-* the entire round, finish with 1 sl st in first dc. ROUND 5: 2 ch, 1 dc in first ch-loop, * 5 ch, 1 dc in next ch-loop *, repeat from *-* the entire round, finish with 1 sl st in first dc. ROUND 6: Work as follows in every ch-loop: 2 dc + 1 picot (= 3 ch, 1 dc in first ch) + 2 dc. Cut and fasten the thread. |
|||||||||||||
Diagram explanations |
|||||||||||||
|
|||||||||||||
 |
|||||||||||||
 |
|||||||||||||
Have you finished this pattern?Tag your pictures with #dropspattern #gwendolynbolero or submit them to the #dropsfan gallery. Do you need help with this pattern?You'll find 3 tutorial videos, a Comments/Questions area and more by visiting the pattern on garnstudio.com. © 1982-2026 DROPS Design A/S. We reserve all rights. This document, including all its sub-sections, has copyrights. Read more about what you can do with our patterns at the bottom of each pattern on our site. |
|||||||||||||


With over 40 years in knitting and crochet design, DROPS Design offers one of the most extensive collections of free patterns on the internet - translated to 17 languages. As of today we count 324 catalogues and 12290 patterns translated into English (UK/cm). 12290
We work hard to bring you the best knitting and crochet have to offer, inspiration and advice as well as great quality yarns at incredible prices! Would you like to use our patterns for other than personal use? You can read what you are allowed to do in the Copyright text at the bottom of all our patterns. Happy crafting!
Post a comment to pattern DROPS 148-8
We would love to hear what you have to say about this pattern!
If you want to leave a question, please make sure you select the correct category in the form below, to speed up the answering process. Required fields are marked *.