
Popular categories
Looking for a yarn?


Comments / Questions (59)
![]() Erika Ferber wrote:
Erika Ferber wrote:
Kann mir die Passform für die arme nicht vorstellen denn ich habeetwas dickere arme kann ich diese evtl. Etwas weiter häkeln? LG Erika Ferber
25.07.2015 - 09:23DROPS Design answered:
In der Maßskizze sehen Sie die Breite, 33 cm für Größe S/M, 37 cm für Größe L/XL und 40 cm für Größe XXL/XXXL. Dies entspricht dem Ärmelumfang, da Sie den Bolero am Ende längs falten und ab den Ärmelrändern zusammennähen.
28.07.2015 - 13:29
![]() Karola Pörschke wrote:
Karola Pörschke wrote:
Wie weit muss ich die zweite Seite häkeln und wie falte ich es genau
18.07.2015 - 16:39DROPS Design answered:
Sie häkeln die zweite Seite ebenso lang wie die erste, die beiden Seiten müssen von der Länge her identisch sein. Dann falten Sie das Teil der Länge nach. Also nicht an der gestrichelten Linie in der Skizze (das ist ja die Anschlags-Lm-R, von der aus Sie in beide Richtungen häkeln), sondern in der um 90 Grad gedrehten Richtung, also quasi an einer Linie, die den Pfeilen entspricht, die in der Skizze eingezeichnet sind.
20.07.2015 - 13:04
![]() Leïla wrote:
Leïla wrote:
Bonjour, j'ai un peu de problème au niveau de l'assemblage. Lorsque vous parlez de plier en double dans le sens de la longueur, dois-je plier le travailler en deux ou à une certaine distance du bord? Je ne vois pas du tout comment cela fonctionne. Merci beaucoup
01.07.2015 - 20:39DROPS Design answered:
Bonjour Leila, vous avez obtenu un long rectangle (cf schéma en bas de page), pliez ce rectangle en double (= 2 parties égales) au milieu dans le sens de la longueur (hauteur dans le schéma = au milieu de la chaînette de base et des rangs) et faites la couture de chaque côté (en haut et en bas sur le schéma) en assemblant les fins/débuts de rangs entre eux, à partir du dernier rang crocheté en remontant vers le milieu du rectangle, sur environ 10 cm. Bon assemblage!
02.07.2015 - 09:56Aysegül Girgin wrote:
Before the pattern instructions there is a note : "Replace first dc on every row with 3 ch. " What does that mean? I can't see anything that needs replacing.
01.03.2015 - 00:15DROPS Design answered:
Dear Mrs Girgin, when you are working in dc following pattern, the first dc at the beg of every row will be replaced by 3 ch, see A.1a (at the right side, seen from RS) and A.1c (at the left side, starting rows from WS). Happy crocheting!
02.03.2015 - 08:58
![]() DROPS Design NL wrote:
DROPS Design NL wrote:
Hoi Wil. Ik heb het patroon nogmaals bekeken en het is niet fout. Er wordt een soort ruchesrand om de mouwen gehaakt, maar het staat in het patroon: Ga verder en haak een afwerkrand als volgt: TOER 1: 4 l, 1 v in de eerste l-lus, * 4 l, 1 v in de volgende l-lus, 4 l, 1 v in l tussen de 4 stk, 4 l, 1 v in de volgende l-lus *, herhaal van *-* de hele toer, eindig met 4 l, 1 v in laatste l-lus, 3 l en 1 v in laatste stk, keer het werk.
22.08.2014 - 13:05
![]() Lenka wrote:
Lenka wrote:
Promiňte, ale vaše návody jsou absolutně nepochopitelné. Ne všichni tady jsou zruční pletaři. Např. toto bolerko je nádherné, ale pro mě nedostupné, protože si ho z tohoto návodu nikdy neudělám. Škoda, jinak máte na tomto webu moc krásný kousky.
15.08.2014 - 11:17DROPS Design answered:
Dobrý den, Lenko, Vaše rozčarování mne mrzí, ale myslím, že je předčasné - bolerko je krásné a přitom dost jednoduché. Pokud byste mohla trochu přiblížit, co Vám dělá potíže a jak Vás mohu navést, jsem si jistá, že v něm brzy vyrazíte do společnosti. Hana
22.08.2014 - 15:29Sandra May wrote:
I don't understand how to assemble the bolero. If I double the finished piece, how will I put it on?
13.08.2014 - 09:13DROPS Design answered:
Dear Mrs May, fold work double lengthwise and sew sleeves from the end of each piece (last row worked on both sides) towards "inside" - the opening will be front/back pieces. Happy crocheting!
13.08.2014 - 11:05
![]() Wil Kerkmeer wrote:
Wil Kerkmeer wrote:
Patroon 148-8. Onduidelijk hoe de afwerkrand te maken a/h einde v/h haakpand, wat het randje voor het mouwtje moet worden. Wordt het randje gelijk gehaakt a/h pand of wordt er een aparte afwerkrand gehaakt en later aangezet? ik begrijp de beschrijving niet. Heel graag uw reactie want het 1e pand is af en erg mooi.
17.07.2014 - 14:38DROPS Design answered:
Hoi Wil. Je haakt dezelfde ruche om beide armsgaten als langs de hele opening van de bolero. Je doet dit als laatste na het afwerken (in elkaar zetten van de bolero). Ik zal ervoor zorgen dat dit wordt toegevoegd in het patroon.
18.07.2014 - 13:10Faiza wrote:
Hi, i will start working this bolero with size 1mm crochet hook,so how many chains should i make for size L,please help?
07.05.2014 - 23:50DROPS Design answered:
Dear Faiza, this bolero has been written on the basis of a tension of 3 repetition of the pattern = 10 cm in width - if you are not working on this basis, you will have to recalculate the required no of sts matching your gauge. Happy crocheting!
08.05.2014 - 09:02
![]() Stella wrote:
Stella wrote:
Beste, hier staat dat ik vr mijn maat 90 lossen moet haken, daarna 1 v in elke los = 89 v, ik begrijp patroon A1 niet, hoeveel keren a, b en c haken van 89 vaste? Mvg, stella
05.04.2014 - 15:38DROPS Design answered:
Van de 90 l is de eerste om de hoogte in te gaan, dus u slaat 2 l over, daarna haakt u nog 88 v = 89 v. Het aantal steken van a,b en c staat onder het patroon, dus 1x a = 9 st, dan herhaalt u b en eindigt u met 8 st c.
07.04.2014 - 18:52
|
|||||||||||||
Gwendolyn#gwendolynbolero |
|||||||||||||
 |
 |
||||||||||||
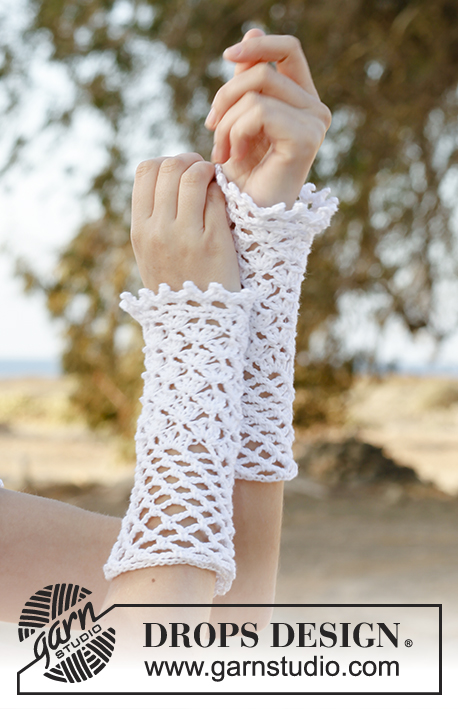
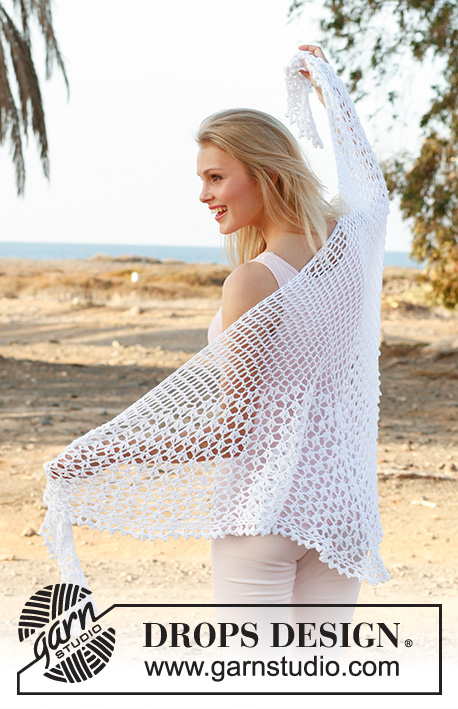
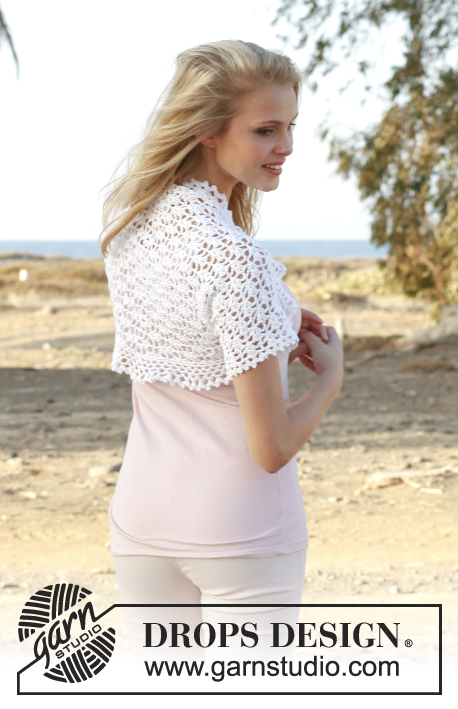
Crochet DROPS bolero with lace pattern in "Cotton Viscose". Size: S - XXXL
DROPS 148-8 |
|||||||||||||
|
CROCHET INFO: Replace first tr on every row with 3 ch. PATTERN: See diagram A.1 - NOTE: The first row with dc is not in the repetition and is NOT repeated upwards. -------------------------------------------------------- BOLERO: Worked from mid back. First work one side and down to beg of sleeve, then work the other side and down to the other sleeve. Then sew the sleeve seams and work 1 flounce around the entire opening. FIRST SIDE: Work 82-90-98 LOOSE ch with Cotton Viscose on hook size 3 mm – it is VERY important that this ch-row is not too tight. Work 1 dc in 2nd ch from hook, then work 1 dc in every ch the entire row = 81-89-97 dc. Continue pattern A.1 as follows: Diagram a over the first 9 dc, diagram b until 8 dc remain, then diagram c over these (= 10-11-12 repetitions in total on row). REMEMBER THE CROCHET TENSION! Repeat the 4 rows in diagram A.1 upwards until piece measures approx. 32-35-39 cm – finish after 4th row in diagram. Continue to work a finishing border as follows: ROW 1: 4 ch, 1 dc in first ch-loop, * 4 ch, 1 dc in next ch-loop, 4 ch, 1 dc in ch between the 4 tr, 4 ch, 1 dc in next ch-loop *, repeat from *-* the entire row, finish with 4 ch, 1 dc in last ch-loop, 3 ch and 1 dc in last tr, turn piece. ROW 2: Work as follows in every ch-loop: 1 dc + 1 picot (= 3 ch, 1 dc in first ch) + 1 dc. Cut and fasten the thread. SECOND SIDE: Work along the other side of dc row made at the beg of first side (i.e. mid back) – beg with 1st row in A.1 and work as first side. ASSEMBLY: Fold the bolero double across and sew tog from bottom of each sleeve and approx. 10 cm up in each side – sew edge to edge to avoid a chunky seam. FLOUNCE AROUND OPENING: Work around the entire opening as follows (beg mid back): ROUND 1: 1 dc in first tr, * 3 ch, 1 dc in next tr *, repeat from *-* the entire round, finish with 3 ch and 1 sl st in first dc. ROUND 2: 2 ch, 1 dc in first ch-loop, * 4 ch, 1 dc in next ch-loop *, repeat from *-* the entire round, finish with 1 sl st in first dc. ROUND 3: 2 ch, 1 dc in first ch-loop, * 4 ch, 1 dc in next ch-loop *, repeat from *-* the entire round, finish with 1 sl st in first dc. ROUND 4: 2 ch, 1 dc in first ch-loop, * 5 ch, 1 dc in next ch-loop *, repeat from *-* the entire round, finish with 1 sl st in first dc. ROUND 5: 2 ch, 1 dc in first ch-loop, * 5 ch, 1 dc in next ch-loop *, repeat from *-* the entire round, finish with 1 sl st in first dc. ROUND 6: Work as follows in every ch-loop: 2 dc + 1 picot (= 3 ch, 1 dc in first ch) + 2 dc. Cut and fasten the thread. |
|||||||||||||
Diagram explanations |
|||||||||||||
|
|||||||||||||
 |
|||||||||||||
 |
|||||||||||||
Have you finished this pattern?Tag your pictures with #dropspattern #gwendolynbolero or submit them to the #dropsfan gallery. Do you need help with this pattern?You'll find 3 tutorial videos, a Comments/Questions area and more by visiting the pattern on garnstudio.com. © 1982-2026 DROPS Design A/S. We reserve all rights. This document, including all its sub-sections, has copyrights. Read more about what you can do with our patterns at the bottom of each pattern on our site. |
|||||||||||||


With over 40 years in knitting and crochet design, DROPS Design offers one of the most extensive collections of free patterns on the internet - translated to 17 languages. As of today we count 324 catalogues and 12290 patterns translated into English (UK/cm). 12290
We work hard to bring you the best knitting and crochet have to offer, inspiration and advice as well as great quality yarns at incredible prices! Would you like to use our patterns for other than personal use? You can read what you are allowed to do in the Copyright text at the bottom of all our patterns. Happy crafting!
Post a comment to pattern DROPS 148-8
We would love to hear what you have to say about this pattern!
If you want to leave a question, please make sure you select the correct category in the form below, to speed up the answering process. Required fields are marked *.