
Popular categories
Looking for a yarn?


Comments / Questions (130)
![]() Lucia wrote:
Lucia wrote:
Buongiorno -vorrei sapere se l'aumento che si fa dopo i 10cm e' unico,solo per una volta oppure bisogna farlo ogni giro fino a raggiungere i 17cm? Grazie
13.04.2026 - 11:59DROPS Design answered:
Buonasera Lucia, l'aumento a 10 cm è sul lato destro, quello a 17 cm sul lato sinistro. Buon lavoro!
13.04.2026 - 19:53
![]() Carine wrote:
Carine wrote:
Bonjour, Je débute le crochet et ai quelques difficultés à comprendre les modèles. Concernant les marqueurs et les augmentations. Faut-il bien déplacer à chaque rang (1 sur 2 rangs) les marqueurs après avoir fait les 20 augmentations sur les 12 rangs du début ? Merci de votre aide.
24.03.2026 - 17:31DROPS Design answered:
Bonjour Carine, les marqueurs doivent suivre l'ouvrage pour bien repérer là où vous devez augmenter, car les augmentations se font à chaque marqueur (soit avant soit après). Bon crochet!
25.03.2026 - 07:23
![]() Renu Chhabra wrote:
Renu Chhabra wrote:
Skjønner ikke hvordan det blir 44 staver etter felling … under armen er det nevnt 20 st som jeg skjønner ikke
10.10.2025 - 20:09DROPS Design answered:
Hei Renu. Du har 64 staver (satser på at du hekler str M & L), så hekles det staver (kun staver = 10 +10 = 20 staver under ermet) og mønster (mønster med staver og luftmasker over 44 staver). Når arbeidet måler 4 cm starter fellingene og det felles 10 ganger = det felles 2 masker 10 ganger = 20 felte masker. Du startet med 64 staver, felt 20 staver = 64-20 = 44 staver etter fellingene. mvh DROPS Design
20.10.2025 - 10:00
![]() Villeneuve wrote:
Villeneuve wrote:
Bonjour, jai du mal a comprendre les augmentations tous les 2 rangs et tous les 4 rangs au debut pour l encoulure. jai l habitude de faire avec des numeros de rangs....et la pour la taille medium je ne sais pas combien de rangs je dois avoir. y a t il la versions avec schema on doit alterner augmentations a chaque marqueurs et ensuite un rang de bride. merci pour votre aide cest un cadeau que je souhaite faire
22.07.2025 - 19:29DROPS Design answered:
Bonjour Mme Villeneuve, vous devez augmenter 1 bride à chaque marqueur, soit 20 brides à chaque fois (car vous avez 20 marqueurs), vous aviez 92 brides + (1 rang d'augmentations, 1 rang sans augmenter)x6 (= 12 rangs et 20x6 augmentations=120 augm.) puis (1 rang d'augmentations, 3 rangs sans augmenter)x2 (= 8 rangs et 2x20=40 augm.) = 92+120+40=252 brides et 12+8=20 rangs crochetés au total. Lorsque vous augmentez, augmentez la 1ère fois avant chaque marqueur, la 2ème fois après chaque marqueur, la 3ème fois avant chaque marqueur, la 4ème fois après chaque marqueur et ainsi de suite. Bon crochet!
25.07.2025 - 10:05
![]() Anne-Marie wrote:
Anne-Marie wrote:
Bonjour, j’ai terminé le gilet mais malheureusement un pli (comme une vague) se forme dans le haut du dos. Je pense que c’est lié aux mailles chaînettes qui sont trop tendues. Pensez-vous que je puisse reprendre le premier rang en prélevant les brides du deuxième rang et créer des nouvelles brides. Puis couper le rang qui fait défaut. A faire du bas vers le haut. Merci pour votre retour.
05.01.2025 - 17:20DROPS Design answered:
Bonjour Anne-Marie, c'est possible mais je ne connais personnellement pas cette technique. Pensez à toujours bien conserver la bonne tension en largeur mais aussi en hauteur pour bien conserver la bonne forme. Bon tricot!
06.01.2025 - 10:42
![]() Paulina Dahlström wrote:
Paulina Dahlström wrote:
Hej! Hur många nystan behövs för att virka DROPS Design: Modell nr u-674 Garngrupp B, storlek large? Med vänliga hälsningar Paulina Dahlström
03.09.2024 - 20:21DROPS Design answered:
Hej Paulina. Du behöver 14 nystan av DROPS Karisma för att virka detta mönster i storlek L. Mvh DROPS Design
05.09.2024 - 11:04
![]() Kerry Eastlake wrote:
Kerry Eastlake wrote:
Hello, I would like to make the Chantal crochet cardigan but am unclear as to whether the crochet terms in the pattern are USA or UK/AU terms as it impacts the crochet stitch as well as the crochet hook size. Can you please advise. With thanks, Kerry
18.05.2024 - 08:04DROPS Design answered:
Dear Kerry, you can select your preferred terms in the horizontal bar right before the pattern instructions. The English (UK/cm) version will have UK terms and the English (US/in) version will have US terms. The crochet number is 4mm, US numeration does not use mm for crochet hooks; you can see the US equivalents in the US version of the pattern here: https://www.garnstudio.com/pattern.php?id=5786&cid=17. Happy crochetting!
19.05.2024 - 23:55
![]() Sigrun Radau wrote:
Sigrun Radau wrote:
Warum nicht beide Seiten gleichzeitig zunehmen? Hat das einen besonderen Grund ( wegen muster??) Sieht dass hinterher nicht schief aus?
13.04.2023 - 13:09DROPS Design answered:
Wie früher gesagt werden so die Zunahmen weniger unauffällig und die Jacke wird dann nicht "plötzlich" breiter. Viel Spaß beim häkeln!
13.04.2023 - 14:37
![]() Sigrun Radau wrote:
Sigrun Radau wrote:
Hallo, nach Aufteilung für die einzelnen Teilen Markierung setzen. Dann die Zunahmen: nach 10 cm re/17 cm li/24cm re/31 cm li. Warum? Verstehe die unterschiedlichen Längen nicht.
12.04.2023 - 17:27DROPS Design answered:
Liebe Frau Radau, so werden die Zunahmen gehäkelt, dh nicht alle auf einmal sondern eine nach der anderen. Viel Spaß beim häkeln!
13.04.2023 - 09:35
![]() Marion Slikkerveer wrote:
Marion Slikkerveer wrote:
Goedemorgen, er staat als ik het goed lees in de eerste toer dat je steeds een losse haakt en dan 4 stokjes vanaf en tot * ik neem aan dat je dan ook een st overslaat, maar dan krijg je hokjes en dat zie ik op het plaatje niet terug. Het meerderen geeft bij mij ook problemen, ik haak bij elke markeerder 2 stokjes in 1 stokje. Nu in de 7e toer al op het stekenaantal! Sla wel de volgende toer over maar niet na de 4e toer. Is dat het probleem ?
14.02.2022 - 10:41DROPS Design answered:
Dag Marion,
Je haakt aan het begin van de toer steeds 3 lossen (boven het laatste stokje van de vorige toer) welke het eerste stokje vervangt. Het volgende stokje haak je dus in het tweede stokje van de vorige toer.
Je meerdert eerst om de toer (dus de ene toer wel en de andere toer niet) 5-6-6-5-5-6 keer. Afhankelijk van je maat zit je dan dus op 10 of 12 toeren. Daarna meerder je 2-2-2-3-3-3 keer op elke 4e naald.
17.02.2022 - 11:23
|
|
Chantal#chantalcardigan |
|
 |
 |
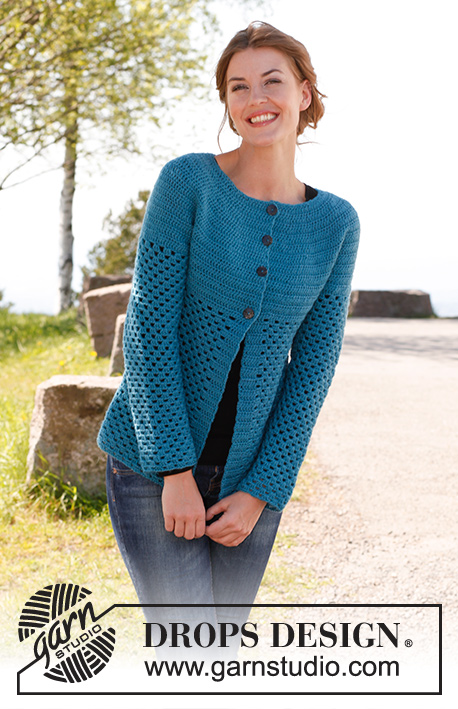
Crochet DROPS jacket in ”Karisma”. Size: S - XXXL.
DROPS 142-6 |
|
|
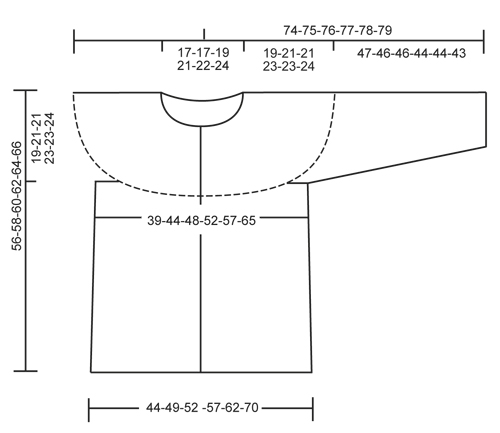
CROCHET INFO: Replace first tr on every round/row with 3 ch. Finish every round with 1 sl st in 3rd ch from beg of round. Finish every row with 1 tr in first tr from beg of previous row. INCREASE TIP: Inc by working 2 tr in 1 tr, first on one side of all markers on row, next time on the other side of all markers on row, continue inc like this. DECREASE TIP: Work 1 tr but wait with last pull through (= 2 sts on hook), then work next tr but on last pull through, pull thread through all sts on hook = 1 st dec. ---------------------------------------------------------- BODY: The piece is worked top down. Worked back and forth from mid front. Work 111-116-121-131-136-146 ch (incl 3 ch to turn with) on hook size 4 mm with Karisma. Work next row as follows: 1 tr in 4th ch (= 2 tr), 1 tr in each of the next 2 ch, * skip 1 ch, 1 tr in each of the next 4 ch *, repeat from *-* = 88-92-96-104-108-116 tr - read CROCHET INFO. Insert 19-20-21-23-24-26 markers in the piece as follows: Insert 1st marker after 8th tr, then insert 18-19-20-22-23-25 markers 4 tr apart, 8 tr remain after last marker. Work back and forth with tr while AT THE SAME TIME inc 1 tr at all markers as follows: On every other row 5-6-6-5-5-6 times and then on every 4th row 2-2-2-3-3-3 times – READ INCREASE TIP = 221-252-264-288-300-350 tr. Work 1 row while at the same time inc 14-7-7-7-19-5 tr evenly (do not inc over the first and last 6 tr = band) = 235-259-271-295-319-355 tr. Work next row as follows: 36-40-43-47-51-58 tr (front piece), 8 ch (= under sleeve), skip 52-56-56-60-64-68 tr from previous row (used for sleeve later), 59-67-73-81-89-103 tr (back piece), 8 ch (under sleeve), skip 52-56-56-60-64-68 tr from previous row (used for sleeve later) and 36-40-43-47-51-58 tr (front piece). Insert a marker and measure the piece from here. Work 1 tr in every tr/ch = 147-163-175-191-207-235 tr. Continue to work as follows: 1 tr in each of the first 6 tr (= band), * 1 ch, skip 3 tr, work 3 tr in next tr *, repeat from *-* and finish with 1 ch, skip 3 tr and work 1 tr in each of the last 6 tr (= 33-37-40-44-48-55 tr-groups with 6 tr in each side). Continue to work as follows: ROW 1: 1 tr in each of the first 6 tr, 3 tr in first ch, 1 ch, * skip 3 tr, 3 tr in next ch, 1 ch *, repeat from *-* until 1 ch and 6 tr remain, finish with 3 tr in last ch and 1 tr in each of the last 6 tr. ROW 2: 1 tr in each of the first 6 tr, * 1 ch, skip 3 tr, 3 tr in next ch *, repeat from *-* until 6 tr remain, finish with 1 ch and 1 tr in each of the last 6 tr. Repeat 1st and 2nd row upwards. When piece measures 10 cm from marker, inc 1 tr-group in the right side as follows: Work 3 tr + 1 ch in the first 8-9-10-11-12-13 ch, in next ch work as follows: 3 tr, 1 ch, 3 tr, 1 ch. When piece measures 17 cm, inc the same way in the left side – inc when 9-10-11-12-13-14 ch remain. When piece measures 24 cm, inc 1 tr-group in the right side, inc in the 10-11-12-13-14-15 ch the same way as before. When piece measures 31 cm, inc in the left side – inc when 10-11-12-13-14-15 ch remain. After all inc are done there are 37-41-44-48-52-59 tr-groups on row. Cut and fasten the thread when piece measures 37-37-39-39-41-42 cm from marker, piece measures 56-58-60-62-64-66 cm in total. SLEEVE: Worked in the round, top down. Beg by working mid under sleeve as follows: Work 1 dc in the 5th ch of the 8 ch worked for armhole on body. Work 3 ch (= 1 tr). Then work 1 tr in each of the next 3 ch. Then work 1 tr in every tr over sleeve, before working 1 tr in each of the remaining 4 ch under sleeve = 60-64-64-68-72-76 tr. Insert a marker mid under sleeve. Continue to work as follows: 1 tr in each of the first 10-10-10-12-12-14 tr, * 1 ch, skip 3 tr, work 3 tr in next tr *, repeat from *-* and work 1 tr in each of the last 10-10-10-12-12-14 tr. Continue with 1 tr in each of the 20-20-20-24-24-28 tr mid under sleeve, in every ch work 3 tr + 1 ch. Continue this pattern AT THE SAME TIME when piece measures 4 cm, dec 1 tr on each side of marker - READ DECREASE TIP. Repeat dec every 3½-3½-3½-3-3-2½ cm 9-9-9-11-11-13 more times = 40-44-44-44-48-48 tr. After all dec, work 3 tr + 1 ch in every ch. Cut and fasten the thread when sleeve measures 47-46-46-44-44-43 cm from marker – NOTE – shorter measurements in the larger sizes because of larger neck and broader shoulder width. ASSEMBLY: Sew buttons on to left front piece – the top button 1 cm from neck edge, the last in the transition between tr and tr-groups. Button the buttons between 2 tr on right front piece. |
|
 |
|
Have you finished this pattern?Tag your pictures with #dropspattern #chantalcardigan or submit them to the #dropsfan gallery. Do you need help with this pattern?You'll find 7 tutorial videos, a Comments/Questions area and more by visiting the pattern on garnstudio.com. © 1982-2026 DROPS Design A/S. We reserve all rights. This document, including all its sub-sections, has copyrights. Read more about what you can do with our patterns at the bottom of each pattern on our site. |
|


With over 40 years in knitting and crochet design, DROPS Design offers one of the most extensive collections of free patterns on the internet - translated to 17 languages. As of today we count 324 catalogues and 12290 patterns translated into English (UK/cm). 12290
We work hard to bring you the best knitting and crochet have to offer, inspiration and advice as well as great quality yarns at incredible prices! Would you like to use our patterns for other than personal use? You can read what you are allowed to do in the Copyright text at the bottom of all our patterns. Happy crafting!
Post a comment to pattern DROPS 142-6
We would love to hear what you have to say about this pattern!
If you want to leave a question, please make sure you select the correct category in the form below, to speed up the answering process. Required fields are marked *.