
Popular categories
Looking for a yarn?


Comments / Questions (232)
![]() Monica wrote:
Monica wrote:
Buongiorno, non mi è chiaro se una volta messe in sospeso le 39 maglie, devo aumentare, a ferri alterni, 2 maglie ai lati del collo, oppure ai lati di ogni angolo, quindi 6 maglie ogni due ferri. Grazie e complimenti
24.04.2016 - 06:42DROPS Design answered:
Buongiorno Monica. Dopo aver messo le m in attesa, aumenta a ferri alterni solo ai lati del collo. Deve fare 1 m gettata da ciascun lato dei due angoli. Quindi ad ogni ferro con aumenti, aumenta 4 m (2 per ogni angolo). Buon lavoro!
24.04.2016 - 08:15IOANA DETESAN wrote:
Thank you, now I understand
12.10.2015 - 19:56IOANA DETESAN wrote:
Hello! I need an explination, please. I knit the S size and when you say " AT THE SAME TIME continue inc as before in the 2 corners in the opposite side of where sts were slipped on a stitch holder", it mens that after the 4 rows , I have 175+4=179 sts? Best regards
10.10.2015 - 20:24DROPS Design answered:
Dear Mrs Detesan, you continue inc as before, ie 1 YO at each of both corners = 4 inc per inc row. You work a total of 4 rows before armhole (= 2 rows from RS = 2 YOs x 2 corners x 2 rows from RS = 8 inc): 175 + 4 + 4 = 183 sts before starting armholes. Happy knitting!
12.10.2015 - 09:42
![]() Ingrid wrote:
Ingrid wrote:
Jag har just stickat klart. Den här koftan är bland det roligaste jag stickat och resultatet blev jättebra.Lite klurigt mönster så jag blir imponerad av den som komponerat det.
14.09.2015 - 18:49
![]() Carrie wrote:
Carrie wrote:
How can I make this another 20 cm longer?
25.11.2014 - 00:40DROPS Design answered:
Dear Carrie, you can continue working back and forth back & front pieces until desired measurement, or work as stated in pattern and pick up sts along the bottom edge to add extra length. Remember your DROPS store may help you for any individual assistance. Happy knitting!
25.11.2014 - 10:29Debbie Lucas wrote:
I can't get the bands to work, any advice please
24.11.2014 - 20:39DROPS Design answered:
Dear Mrs Lucas, neck edge and bands are worked as follows : 2 sts in garter st, repeat digram M.3A a total of 9-10-11 times (see size), then work 1 time diagram M3B (3 sts) and finish with 2 sts in garter st. Number of sts should be constant, check you have always same number of sts - placing a marker between each repeat may help to keep the pattern. Happy knitting!
25.11.2014 - 10:24
![]() Sandrine wrote:
Sandrine wrote:
Une fois que toutes les augmentations sont faites dans les 101 m centrales les mailles des coins sont comprises ?
17.11.2014 - 09:10DROPS Design answered:
Bonjour Sandrine, les augmentations sont comprises dans les 101 m centrales à tricoter à l'end sur 3 rangs, pensez bien à continuer à augmenter en même temps (= au rang suivant, on tricote 103 m end sur l'env). Bon tricot!
17.11.2014 - 11:06
![]() Sandrine wrote:
Sandrine wrote:
Vous dites augmenter aux 2 coins en bas, côté encolure il faut augmenter mais pas du coté des mailles en attente ? après le diagramme
12.11.2014 - 10:52DROPS Design answered:
Bonjour Sandrine, vous travaillez maintenant en allers et retours, c'est bien ça ? donc effectivement, à ce niveau là, vous augmentez aux 2 coins du bas seulement, pas côté encolure (les augm. sont représentées par les diagonales dans le schéma), donc pas d'augm en début ni en fin de rang, seulement aux 2 coins opposés à l'encolure (=mailles en attente). Bon tricot!
12.11.2014 - 14:09
![]() Sandrine wrote:
Sandrine wrote:
J'ai terminé mon diagramme, il faut continuer en jersey les augmentations se font donc dans les 4 coins,?
12.11.2014 - 10:39
![]() Sandrine wrote:
Sandrine wrote:
Les augmentations sont faites aux 4 coins ? faut il tricoter les jetés torse à l'envers du travail?
12.11.2014 - 09:28DROPS Design answered:
Bonjour Sandrine, les augmentations des 4 coins sont comprises dans les diagrammes. On tricote les diagrammes en rond, soit toujours sur l'endroit, les jetés se tricotent à l'end au rang suivant pour créer un jour (trou). Bon tricot!
12.11.2014 - 10:06
|
|||||||||||||||||||
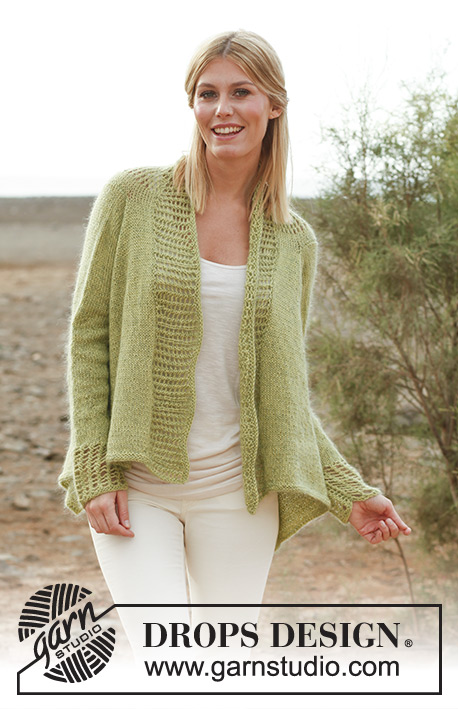
Secret Garden#secretgardencardigan |
|||||||||||||||||||
 |
 |
||||||||||||||||||
DROPS square knitted jacket with lace pattern on the back, cuffs and bands in ”Alpaca” and ”Kid-Silk”. Size S-XXXL.
DROPS 138-1 |
|||||||||||||||||||
|
PATTERN: See diagrams M.1, M.2, M.3 and M.4. Diagrams show pattern from RS. GARTER ST (back and forth on needle): K all rows. -------------------------------------------------------- JACKET: Worked from mid back in a square, then worked down the back piece and outwards in each side for front piece. Finish by working the sleeves. BACK PIECE: Cast on 8 sts with 1 thread Alpaca and 1 thread Kid-Silk and divide them on 4 double pointed needles size 5 mm (= 2 sts on every needle). Insert a marker in the first, third, fifth and seventh st (= 4 markers). Then work diagram M.2 3 times (i.e. over the first 6 sts), then diagram M.1 over the last 2 sts (= up towards neck). Sts with markers are corner sts, let the markers follow when working outwards. Switch to circular needle when needed. REMEMBER THE KNITTING TENSION! When diagrams M.1 and M.2 have been worked, there are 214 sts on needle. Work next round as follows: K the first 175 sts (all corner sts are here), then K the last 39 sts before slipping them on a stitch holder (= up towards neck). NOW MEASURE PIECE FROM HERE! Continue in stocking st back and forth over the remaining 175 sts – AT THE SAME TIME continue inc as before in the 2 corners in the opposite side of where sts were slipped on a stitch holder (i.e. inc on each side of corner sts by making 1 YO on every other row). When 4-8-12 rows have been worked back and forth (next row = RS), cast off for armholes. This is done as follows: K 10, cast off the next 32-36-39 sts, then work as before with inc until 42-46-49 sts remain, cast off the first 32-36-39 sts and K the last 10 sts. On next row cast on 32-36-39 new sts over the cast off sts. Work and inc until there are 247-263-279 sts on needle (adjust so that next row is worked from WS, approx. 16-20-24 cm in stocking st have been worked). Now K 3 rows over the middle 93-101-109 sts (= bottom of back), work the other sts in stocking st as before and continue inc as before (i.e. there will be 95-103-111 sts which are worked K on next row from WS). Work next row from RS as follows: K the first 79-83-87 sts (incl 1 st which is inc at the corner) and slip them on a stitch holder (= right front piece), LOOSELY cast off the next 97-105-113 sts (incl 2 sts which are inc), and K the last 79-83-87 sts (incl 1 st which is inc at the corner (= left front piece). LEFT FRONT PIECE: Continue in stocking st on circular needle size 5 mm, back and forth over the 79-83-87 sts – but work the bottom 2 sts (in the left side seen from RS) K on all rows (= garter st). When piece measures 41-44-48 cm - measured outwards from where armhole was cast off (adjust so that next row is from WS), K 3 rows back and forth, then LOOSELY cast off. RIGHT FRONT PIECE: Slip sts from stitch holder back on circular needle size 5 mm and work as left front piece but now work the 2 sts at the bottom in the right side (seen from RS) in garter st. NECK EDGE AND BANDS: Worked back and forth on circular needle. Knit up on circular needle size 5 mm with 1 thread Alpaca and 1 thread Kid-Silk: 74-84-94 sts at the top along right front piece, then work the 39 sts from stitch holder in the neck on to needle, then knit up 74-84-94 sts at the top along left front piece (= 187-207-227 sts). K 1 row from WS. Work next row as follows: 2 sts in garter st, diagram M.3A 9-10-11 times, diagram M.3B (= 3 sts), and 2 sts in garter st. Continue like this until edge measures approx. 10-11-12 cm (adjust so that next row is worked from WS). Now K 3 rows over all sts, then LOOSELY cast off – it is very important to avoid a tight cast off edge. SLEEVE: Worked back and forth on circular needle. Cast on 42-46-50 sts (incl 1 edge st in each side) on circular needle size 5 mm with 1 thread Alpaca and 1 thread Kid-Silk. K 3 rows back and forth. Continue with diagram M.4 with 1 edge st in garter st in each side. When piece measures 12 cm, work in stocking st until finished measurements. AT THE SAME TIME when piece measures 15 cm, inc 1 st in each side. Repeat inc every 4-3½-3 cm a total of 9-10-11 times = 60-66-72 sts. When piece measures 50 cm in all sizes, cast off for sleeve cap at beg of every row in each side: 3 sts 1 time, 2 sts 3 times and 1 st 2 times, then cast off 2 sts in each side until piece measures 59 cm, then cast off 3 sts 1 time in each side. Cast off the remaining sts. Piece measures approx. 60 cm. ASSEMBLY: Sew sleeve seams inside 1 edge st and sew in the sleeves. |
|||||||||||||||||||
Diagram explanations |
|||||||||||||||||||
|
|||||||||||||||||||
 |
|||||||||||||||||||
 |
|||||||||||||||||||
Have you finished this pattern?Tag your pictures with #dropspattern #secretgardencardigan or submit them to the #dropsfan gallery. Do you need help with this pattern?You'll find 16 tutorial videos, a Comments/Questions area and more by visiting the pattern on garnstudio.com. © 1982-2026 DROPS Design A/S. We reserve all rights. This document, including all its sub-sections, has copyrights. Read more about what you can do with our patterns at the bottom of each pattern on our site. |
|||||||||||||||||||


With over 40 years in knitting and crochet design, DROPS Design offers one of the most extensive collections of free patterns on the internet - translated to 17 languages. As of today we count 324 catalogues and 12290 patterns translated into English (UK/cm). 12290
We work hard to bring you the best knitting and crochet have to offer, inspiration and advice as well as great quality yarns at incredible prices! Would you like to use our patterns for other than personal use? You can read what you are allowed to do in the Copyright text at the bottom of all our patterns. Happy crafting!
Post a comment to pattern DROPS 138-1
We would love to hear what you have to say about this pattern!
If you want to leave a question, please make sure you select the correct category in the form below, to speed up the answering process. Required fields are marked *.