
Popular categories
Looking for a yarn?


Comments / Questions (6)
![]() Jackie wrote:
Jackie wrote:
Make sure you have the stitch markers in place. Think of M1a chart as the 1st stitch, then repeat M1b 3 times, so you reach the 2nd stitch marker or the half way point. Now M1a becomes your next stitch and then repeat M1b another 3 times. When you come to the 6th row of the pattern remember to put in that stitch from M1a after each stitch marker. The M1a chart is the line of stitches you will use to crochet into when you make the border. Good luck. Jackie
14.11.2023 - 17:54
![]() Kelly Robertson wrote:
Kelly Robertson wrote:
I would call myself an intermediate knitter. I understood the pattern right away. I am not putting anyone down in anyway, I just want to help. I am taking pictures as I progress if they are any use to you. I think people just need to see the start of it in picture form. And then they will say ahhhh now I get it!!! So easy and cute. I want others to be able to whip these up :)
10.01.2023 - 23:42
![]() Paula wrote:
Paula wrote:
I have tried all ways to use this pattern but cannot make any sense. I have even tried to mark out on a graph.
14.12.2019 - 18:34DROPS Design answered:
Dear Paula, should you need any individual assistance, you are welcome to contact the store where you bought the yarn, even per mail or telephone. Happy knitting!
16.12.2019 - 09:40
![]() Patti wrote:
Patti wrote:
I am an experienced knitter, but this pattern does not make sense. I understand that it is double side, but it does work woth the diagram. Is there just a written pattern for row to row and you could just sew both sides together or crochet them together with the crochet edging?
11.12.2019 - 03:02DROPS Design answered:
Dear Patti, you will work the potholder in the round, ie cast on 74 stitches and then work the diagrams in the round as follows: M.1A (= first stitch at beg of each round = side of piece), repeat M.1B a total of 3 times (= snowmenn) = 1 st + 3x 12 sts= 37 sts. Then repeat one more time M.1A (= 38th stitch = other side of potholder) and M.1B. When piece is knitted, just crochet the 2 rounds for the edge around whole potholder (working in cast-on edge, sides and cast off edge). But you can just sew bottom and top without crochet edge if your rather. Happy knitting!
11.12.2019 - 08:45
![]() Salli Bordfeld wrote:
Salli Bordfeld wrote:
Is there a tutorial for this pattern? I am an experienced knitter but can’t figure out the pattern whatsoever! How can you knit a circular way for a flat cloth? Also casting on 74 stitches doesn’t seem To work out w the graph of stitches!
07.09.2019 - 06:24DROPS Design answered:
Dear Sali, this is a double-side pot holder, so you'll knit it in the round, then fold it and work a crochet finishing border through both layers. Happy crafting!
08.09.2019 - 10:47
![]() Marit Haug wrote:
Marit Haug wrote:
Jeg forsøker å strikke disse grytelappene, men jeg sliter med å forstå mønsteret.Jeg får det ikke til å stemme.For det første , er det " snømenn" på begge sider av grytekluter? For det andre, skal både mønster M1A og M1B fortsette rundt det hele.For hvis jeg starter på M1A på 6 omgang blir det fire hvite masker først.Er det riktig? Gjentar jeg dette omgangen rundt ,stemmer det ikke på neste omgang. Jeg er ingen dreven strikker.😄
05.01.2019 - 15:37DROPS Design answered:
Hei Marit. Ja, det er snømenn på begge sider: Du strikker M.1A (=1 m) og så gjentas M.1B 3 ganger = 37 m (den ene siden av grytekluten). Så gjentar du dette mønsteret 1 gang til. Du fortsetter slik oppover, med M.1A over maskene med merker i. På 6 omgang vil du få 4 m med hvit etter hverandre akkurat i overgangen mellom A.1A og A.1B (starten og midten av omgangen). Du vil avslutte 6 omgang med 3 hvite og 1 rød m, og videre starte 7 omgang med 1 hvit, 1 rød, 1 hvit, 3 rød osv. mønsteret vil derfor «brytes» i overgangen mellom A.1A og A.1B. Husk at du skal brette arbeidet ved merkene så dette vil ikke synes like godt når det er ferdig. God fornøyelse.
07.01.2019 - 09:56
|
||||||||||||||||
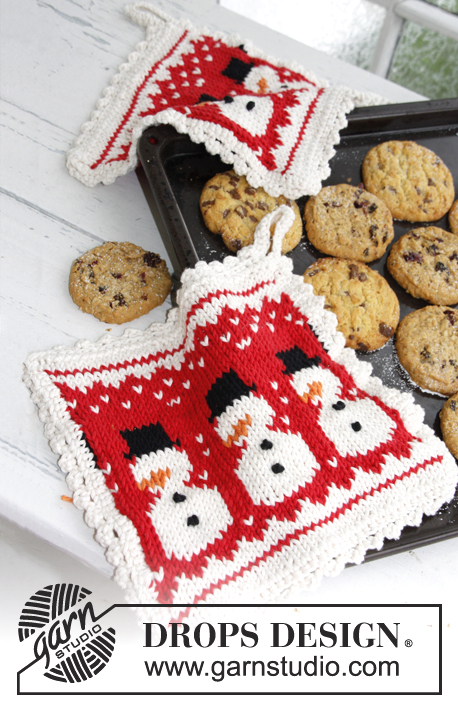
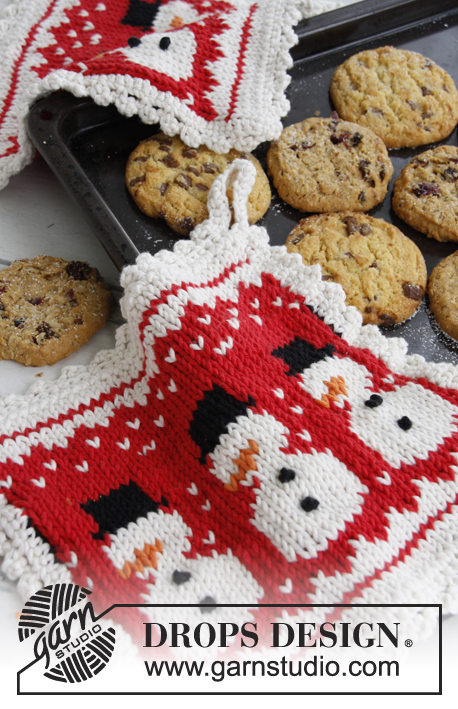
3 Little Snowmen#3littlesnowmenpotholders |
||||||||||||||||
 |
 |
|||||||||||||||
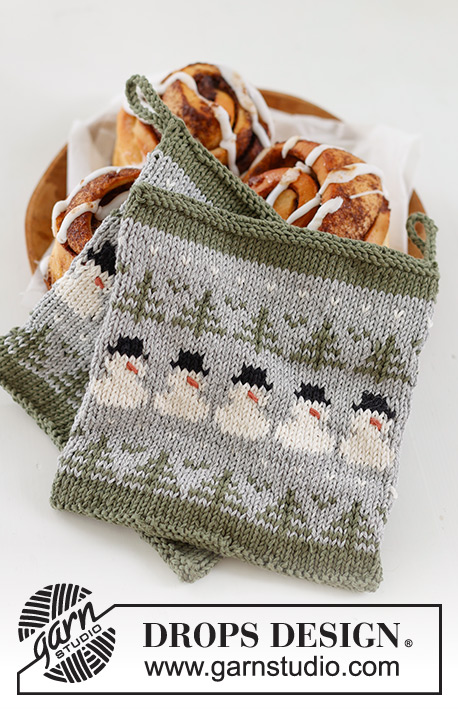
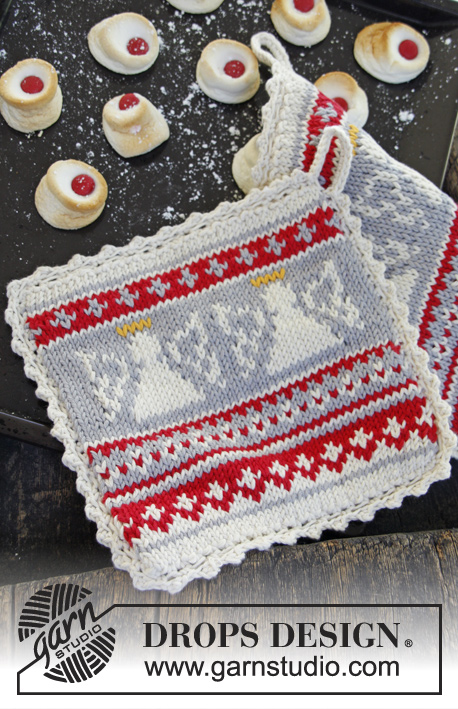
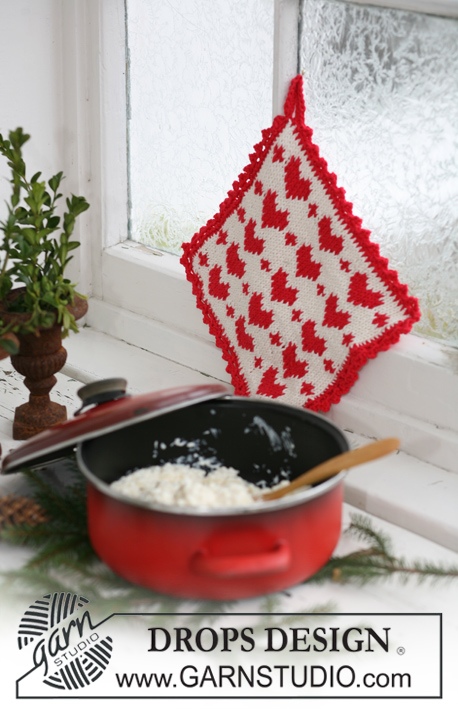
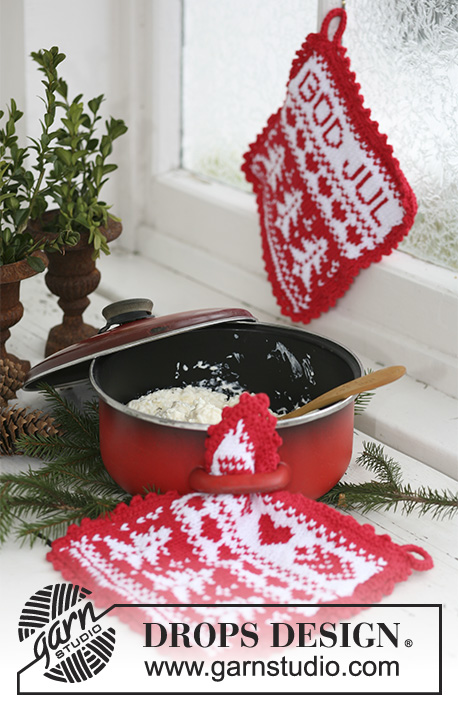
Knitted DROPS pot holders with pattern for Christmas in "Paris".
DROPS Extra 0-792 |
||||||||||||||||
|
PATTERN: See diagrams M.1A and M.1B. FRENCH KNOT: Bring the threaded needle from WS to RS in the st where the knot should be. Place the needle tip against piece and twine the loop tightly 2 times around the needle tip. Pull the needle through these loops so that there is a double knot on the thread. Insert the needle as close as possible to the st where the thread first came through (not in the exact same place, or it will pull back through) and fasten on the back - see Fig.1. -------------------------------------------------------- POT HOLDER: Worked in the round on circular needle. Cast on 74 sts on circular needle size 4 mm with off white. Insert 1 marker in the 1st st at beg of round and 1 marker in the 38th st (= side edges). Continue to work as follows: * 1 time diagram M.1A, 3 times diagram M.1B *, repeat from *-* a total of 2 times. Continue until diagram M.1A and M.1B have been worked 1 time vertically. Cast off with off white. Embroider French knots with black where there is a star in the diagram. Fold the pot holder so that the sts with markers are in the sides. CROCHET BORDER: Work the entire border with off white on hook size 4 mm. Work from RS through both layers. Start at the top in the left corner and crochet around the edge of the pot holder as follows: ROUND 1: Crochet 1 dc in the corner, then crochet 1 dc in every st around the entire edge and finish with 14 ch for strap. Fasten the strap with 1 sl st in dc in the corner at beg of round. ROUND 2: Work * 3 ch, 1 dc in the first of the 3 ch (= 1 picot), skip 2 dc, 1 dc in next dc *, repeat from *-* and finish with 14 dc around the strap and 1 sl st in sl st from previous round. Cut and fasten the thread. |
||||||||||||||||
Diagram explanations |
||||||||||||||||
|
||||||||||||||||
 |
||||||||||||||||
Have you finished this pattern?Tag your pictures with #dropspattern #3littlesnowmenpotholders or submit them to the #dropsfan gallery. Do you need help with this pattern?You'll find 13 tutorial videos, a Comments/Questions area and more by visiting the pattern on garnstudio.com. © 1982-2026 DROPS Design A/S. We reserve all rights. This document, including all its sub-sections, has copyrights. Read more about what you can do with our patterns at the bottom of each pattern on our site. |
||||||||||||||||


With over 40 years in knitting and crochet design, DROPS Design offers one of the most extensive collections of free patterns on the internet - translated to 17 languages. As of today we count 324 catalogues and 12290 patterns translated into English (UK/cm). 12290
We work hard to bring you the best knitting and crochet have to offer, inspiration and advice as well as great quality yarns at incredible prices! Would you like to use our patterns for other than personal use? You can read what you are allowed to do in the Copyright text at the bottom of all our patterns. Happy crafting!
Post a comment to pattern DROPS Extra 0-792
We would love to hear what you have to say about this pattern!
If you want to leave a question, please make sure you select the correct category in the form below, to speed up the answering process. Required fields are marked *.