
Popular categories
Looking for a yarn?


Comments / Questions (152)
![]() Natalia wrote:
Natalia wrote:
Disculpad tanta pregunta, la última... La chaqueta quedaría bien si la hago únicamente con drops Air? O sería demasiado liviana o con poco cuerpo? Es que tiene más pelito que la Nepal parece y lo mismo queda mejor. Mil gracias!
31.03.2025 - 19:01DROPS Design answered:
Hola Natalia, puedes trabajar el patrón con DROPS Air pero sí, la labor quedaría más ligera.
31.03.2025 - 22:50
![]() Natalia wrote:
Natalia wrote:
Hola! Y el hilo kid silk suelta pelo? Y al llevar mohair pica? Porque por experiencia las prendas de mohair que he tenido no he sido capaz de ponermelas... Gracias!
26.03.2025 - 16:23DROPS Design answered:
Hola Natalia, DROPS Kid-Silk no suelta mucho pelo, similar al resto de lanas. El hilo no pica de por sí, pero cada persona tiene diferente sensibilidad a cada tipo de lana. Si te han picado otras prendas con mohair entonces significa que tienes mayor sensibilidad al mohair y que este probablemente también te va a picar. Puedes acercarte a tu tienda DROPS más cercana para poder tocar el ovillo y notar si te pica o no.
30.03.2025 - 20:19
![]() Natalia Galan wrote:
Natalia Galan wrote:
Buenas, si no quiero usar el hilo kid silk con que otro puedo sustituirlo para tejer junto al karisma en esta chaqueta? Gracias!
21.03.2025 - 23:42DROPS Design answered:
Hola Natalia, DROPS Kid-Silk no aporta mucho peso a la prenda; es solo para el efecto de pelo. Por sus características, no es posible sustituirlo por otro hilo del Grupo A, ya que este aportará demasiado peso a la prenda y la tensión variará. Lo que sí puedes hacer es trabajar con 1 solo hilo de una lana del grupo C, en vez de DROPS Karisma y Kid-Silk. Por ejemplo, puedes trabajar con DROPS Nepal o DROPS Alaska. Comprueba siempre la tensión del tejido antes de empezar a trabajar la labor.
23.03.2025 - 19:21
![]() Sally wrote:
Sally wrote:
Hi! I’m looking to knit this pattern but would like to use just one strand of wool rather than 2 different ones so would you be able to recommend a Drops yarn that would work for this please? Many thanks.
14.02.2025 - 19:01DROPS Design answered:
Dear Sally, you could try working with a group C yarn, like DROPS Nepal or DROPS Alaska. Happy knitting!
16.02.2025 - 22:09
![]() Prouteau Agnès wrote:
Prouteau Agnès wrote:
Bonjour, je ne vois pas le diagramme pour ce modèle ? Pouvez vous m’éclairer pour le point fantaisie ? Merci Cordialement Mme Prouteau
29.12.2024 - 15:54DROPS Design answered:
Bonjour Mme Prouteau, vous trouverez le diagramme A.1 en bas de page, à droite du schéma des mesures, sous la manche. Bon tricot!
02.01.2025 - 14:20
![]() Andrea Wills wrote:
Andrea Wills wrote:
Hello, I would like to knit a longer version of this cardigan (size xxxl) so approximately how many more balls of wool would I need please. Also, if I use a slightly chunkier wool, am I correct in thinking it would turn out slightly larger than stated ? I would like it to be a bit larger because my husband wants this to be a very baggy cardigan and xxxl is the max size and i’m having great difficulty in finding a suitable cardigan pattern for his size. Thank you. Andrea x
11.07.2024 - 15:56DROPS Design answered:
Dear Andrea, please understand, that these patterns are made available for free to support DROPS yarns, so we cannot help with yarns from other brands. ALSO the amount of yarn needed for a bigger piece depends on many factors, thus we cannot tell, just how much yarn you would need. However, yes, you are correct, if you use thicker needles, and/ or thicker yarn (which has a gauge swatch with less stitches/rows in 10 cm) and using the given stitchcount in the pattern, you will end up with a sweater that should be bigger than the schematic drawing. Happy Stitching!
16.07.2024 - 00:36
![]() Frauke wrote:
Frauke wrote:
Hallo liebes Drops Team. In der deutschen Anleitung fehlt bei dem Vorderteil der Hinweis das die Abnahmen f+r den Armausschnitt in jeder Hinreihe gestrickt werden. (In der englischen Anleitung steht: „at beg of every row from the side“ das fehlt in der Deutschschweizerin leider. Lieben Gruß Frauke
06.07.2024 - 13:32DROPS Design answered:
Liebe Frauke, vielen Dank für den Hinweis, die Anleitung wurde korrigiert!
16.07.2024 - 17:07
![]() Joanna wrote:
Joanna wrote:
Dzień dobry. Mam pytanie odnośnie sposobu wykonania kołnierza. We wzorze napisano, żeby kołnierz przerabiać *1 o.p., 2 o.l.* i jest to widok na prawej stronie robótki. Jednak kołnierz będzie wywinięty i będzie się go nosić lewą stroną do góry, więc wzór będzie się układał *1 o.l., 2 o.p.*. Czyli wzór kołnierza będzie odwrotny niż wzór ściągacza. Czy tak ma być, czy coś źle zrozumiałam?
26.03.2024 - 16:07DROPS Design answered:
Witaj Joanno, dobrze zrozumiałaś. Na kołnierzu będzie widoczny wzór ściągacza 2 oczka prawe, 1 oczko lewe jak na zdjęciu. Pozdrawiamy!
26.03.2024 - 16:32
![]() Brigitte Hoepner wrote:
Brigitte Hoepner wrote:
Was bedeutet: Die Arbeit wird von der Mitte her hin und zurück gestrickt.
21.03.2024 - 15:15DROPS Design answered:
Liebe Frau Hoepner, man strickt das Rumpfteil bis Armausschnitt in einem Stück, in Hin- und Rückreihen so: rechtes Vorderteil, Rückenteil, linkes Vorderteil (von der Vorderseite gesehen). Viel Spaß beim Stricken!
21.03.2024 - 16:06
![]() Ida Beyer wrote:
Ida Beyer wrote:
Soll für die Armkugel von Anfang an auf beiden Seiten abgenommen werden oder nur auf einer Seite?
20.10.2023 - 09:42DROPS Design answered:
Liebe Frau Beyer, die Maschen sollen am Anfang jeder Reihe = jeder Hin- sowie Rückreihe damit die Armkugel symmetrisch wird. Vie Spaß beim stricken!
20.10.2023 - 14:08
|
|||||||
Lewis#lewisjacket |
|||||||
|
|
|||||||
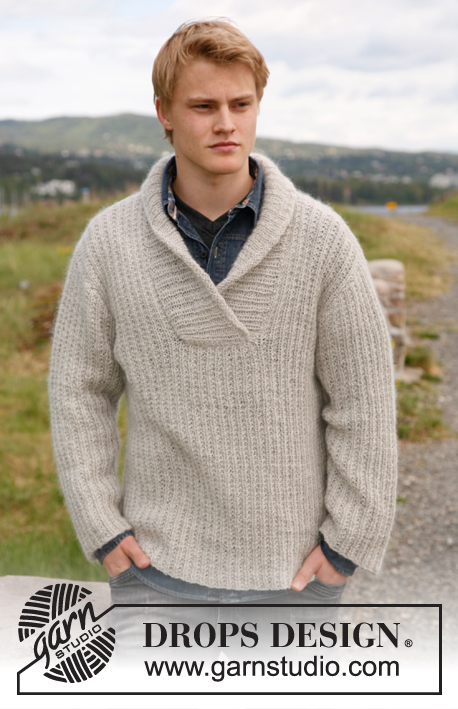
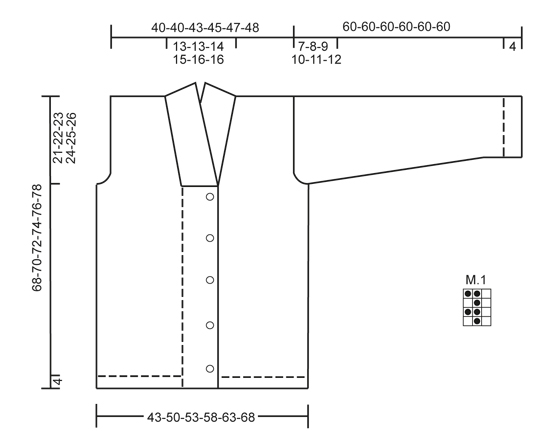
Knitted jacket for men with broad bands and shawl collar in DROPS Karisma and DROPS Kid-Silk. Size: S to XXXL.
DROPS 135-20 |
|||||||
|
GARTER ST (back and forth on needle): K all rows. PATTERN: See diagram M.1 – diagram shows pattern from RS. BUTTON HOLES: Cast off for 5 button holes from RS on left front band. 1 button hole = cast off 5th st from mid front and cast on 1 new st on next row over this st. Cast off for button holes when piece measures: SIZE S: 14, 22, 30, 38 and 46 cm SIZE M: 15, 23, 31, 39 and 47 cm SIZE L: 16, 24, 32, 40 and 48 cm SIZE XL: 17, 25, 33, 41 and 49 cm SIZE XXL: 18, 26, 34, 42 and 50 cm SIZE XXXL: 19, 27, 35, 43 and 51 cm DECREASE TIP (applies to neck): Dec from RS inside 1 edge st in garter st. Dec AFTER 1 st as follows: Slip 1 st as if to K, K 1, psso. Dec BEFORE 1 st as follows: K 2 tog. ---------------------------------------------------------- BODY: Worked back and forth on circular needle from mid front. Cast on 176-200-212-227-248-263 sts (incl 20 band sts in each side towards mid front) on needle size 4.5 mm with 1 thread Karisma and 1 thread Kid-Silk. Work rib as follows (seen from from RS): 20 band sts in GARTER ST - see explanation above - * K 1, P 2 *, repeat from *-* until 21 sts remain, K 1 and 20 band sts in garter st. Then work K over K and P over P and band sts in garter st. When piece measures 4 cm, switch to needle size 5.5 mm. Continue with diagram M.1 and band sts in garter st – diagram M.1 starts and ends with 1 K st (seen from RS). When piece measures 14-15-16-17-18-19 cm, cast off for BUTTON HOLES on left front band - see explanation above! When piece measures 47-48-49-50-51-52 cm, work next row as follows: Cast off the first 19 sts, insert a marker (this marks where to start the knit up for collar), work 27-33-36-39-45-48 sts (= right front piece), cast off 6 sts for armhole, work 72-84-90-99-108-117 sts (= back piece), cast off 6 sts for armhole and work the rest of row (= 46-52-55-58-64-67 sts on left front piece). Turn and cast off the first 19 sts, insert a marker (this marks where to end the knit up for collar), work the rest of row = 27-33-36-39-45-48 sts. Finish each part separately. LEFT FRONT PIECE: = 27-33-36-39-45-48 sts. Continue with diagram M.1 as before and outermost st towards mid front in garter st. AT THE SAME TIME cast off for armhole at beg of every row from the side: 2 sts 0-2-2-3-4-5 times and 1 st 0-2-2-3-4-5 times. AT THE SAME TIME when piece measures 49-50-51-52-53-54 cm, dec 1 st towards the neck - SEE DECREASE TIP! Repeat dec every 5-5-5-5-3-4 cm a total of 3-3-4-3-5-4 times. After all cast offs and dec are done, 24-24-26-27-28-29 sts remain on needle. Cast off when piece measures 68-70-72-74-76-78 cm. RIGHT FRONT PIECE: Work as left front piece but reversed. BACK PIECE: = 72-84-90-99-108-117 sts. Continue with diagram M.1 while at the same time casting off for armholes at the beg of every row in each side as on front piece = 72-72-78-81-84-87 sts. When piece measures 66-68-70-72-74-76 cm, cast off the middle 22-22-24-25-26-27 sts for neck and finish each shoulder separately. At beg of next row from neck, dec 1 st = 24-24-26-27-28-29 sts remain on shoulder. Cast off when piece measures 68-70-72-74-76-78 cm. SLEEVE: Worked back and forth on needle. Cast on 50-53-53-56-56-59 sts (incl 1 edge st in each side) on needle size 4.5 mm with 1 thread Karisma and 1 thread Kid-Silk. Work as follows (seen from from RS): 1 edge st in garter st, * K 1, P 2 *, repeat from *-* and finish with 1 edge st in garter st. When piece measures 4 cm, switch to needle size 5.5 mm. Continue with diagram M.1 with 1 edge st in each side in garter st. AT THE SAME TIME when piece measures 10 cm, inc 1 st in each side. Repeat inc every 5-5-3½-3-2½-2½ cm a total of 9-9-12-12-15-15 times = 68-71-77-80-86-89 sts – work the inc sts gradually in diagram M.1. When piece measures 53-52-51-50-49-48 cm (shorter measurements in the larger sizes because of longer sleeve cap and broader shoulder width) cast off at beg of every row in each side: 4 sts 1 time, 2 sts 3 times and 1 st 1-2-4-5-7-8 times. Then cast off 2 sts in each side until piece measures 59 cm, then cast off 3 sts 1 time in each side. Cast off, the piece measures approx. 60 cm in all sizes. ASSEMBLY: Sew the shoulder seams. SHAWL COLLAR: Knit up sts (inside 1 edge st) on circular needle size 4.5 mm with 1 thread Karisma and 1 thread Kid-Silk - start mid front at marker on right front piece: Knit up approx. 40 to 50 sts up to shoulder, then 26 to 32 sts along the neck, and 40 to 50 sts down along left front piece until marker = 106 to 132 sts. K 1 row from WS while AT THE SAME TIME inc no of sts to 132-138-144-150-156-162. Then work rib as follows (seen from RS): 1 st in garter st, * K 1, P 2 *, repeat from *-* and finish with K 1 and 1 st in garter st. Continue like this until collar measures approx. 5 cm. Now inc 1 st in each of the middle 12 P-sections, seen from RS (= back of neck) = 144-150-156-162-168-174 sts. Continue with K over K and P over P until collar measures approx. 10 cm - adjust so that next row is from WS. K 3 rows over all sts, then cast off all sts with K from RS. Fasten collar with stitches in each side towards band – sew edge to edge to avoid a chunky seam. MORE ASSEMBLY: Sew in sleeves and sew on buttons. |
|||||||
Diagram explanations |
|||||||
|
|||||||
 |
|||||||
Have you finished this pattern?Tag your pictures with #dropspattern #lewisjacket or submit them to the #dropsfan gallery. Do you need help with this pattern?You'll find 14 tutorial videos, a Comments/Questions area and more by visiting the pattern on garnstudio.com. © 1982-2026 DROPS Design A/S. We reserve all rights. This document, including all its sub-sections, has copyrights. Read more about what you can do with our patterns at the bottom of each pattern on our site. |
|||||||


With over 40 years in knitting and crochet design, DROPS Design offers one of the most extensive collections of free patterns on the internet - translated to 17 languages. As of today we count 324 catalogues and 12290 patterns translated into English (UK/cm). 12290
We work hard to bring you the best knitting and crochet have to offer, inspiration and advice as well as great quality yarns at incredible prices! Would you like to use our patterns for other than personal use? You can read what you are allowed to do in the Copyright text at the bottom of all our patterns. Happy crafting!
Post a comment to pattern DROPS 135-20
We would love to hear what you have to say about this pattern!
If you want to leave a question, please make sure you select the correct category in the form below, to speed up the answering process. Required fields are marked *.