
Popular categories
Looking for a yarn?


Comments / Questions (67)
![]() Debbie wrote:
Debbie wrote:
Combien doit mesurer la hauteur du tour de cou de la torsade au haut du cou car avec le nombre de mailles en point mousse, ça ne peut être rabattus pour former un col roulé. Merci pour la réponse.
27.02.2019 - 00:08DROPS Design answered:
Bonjour Debbie, on tricote au point mousse sur 26 mailles (+ les 12 m de la torsade), on doit donc avoir environ 23 cm de mailles au point mousse - pensez à bien vérifier votre tension, vous devez avoir 11 m x 15 rangs point mousse = 10 x 10 cm. Si votre échantillon est juste, vous devriez obtenir le même résultat que sur la photo. Bon tricot!
27.02.2019 - 08:55
![]() Anita Aittomäki wrote:
Anita Aittomäki wrote:
Miksi ohjeessa ei ole tai ehkä voisi sen lisätä 1.kerros neulo ....silmukkaa (jää ....silmukkaa) ja käännä 2.kerros neulo ....silmukkaa (jää ....silmukkaa) ja käännä 3.kerros .... 4.kerros....Tai ....kerros neulo kaikki silmukat. toista kerrokset 1. 2. 3. Jne järjestyksessä Eli onko lyhennetty kerros aina ?- kuinka monessa ja monellako silmukalla se neulotaan?Palmikon teossa ei ollut ongelmaa mutta juuri tuo lyhennetty kerros
05.01.2018 - 21:13
![]() Anita Aittomäki wrote:
Anita Aittomäki wrote:
Sekava ohje.Videossa kun yritin laskeskella montako silmukkaa tehdään ja montako jäi mutta siihen 29 silmukkaan en osunut kuin ehkä kerran, joten jossain on vikaa.
05.01.2018 - 21:12DROPS Design answered:
Hei, lyhennetyt kerrokset neulotaan seuraavasti: Neulot aluksi kaikki silmukat, käännät työn ja neulot taas kaikki silmukat. Käännät työn ja neulot 29 silmukkaa, käännät työn ja neulot nämä 29 silmukkaa. Käännät työn ja neulot 23 silmukkaa, käännät työn ja neulot nämä samat 23 silmukkaa. Nämä kerrokset toistetaan.
09.01.2018 - 17:52Paulina wrote:
Gracias por compartir todo lo que haces esta hermoso, quisiera saber como hacer para conseguir un video del paso a paso de tus prendas
30.11.2016 - 07:32DROPS Design answered:
Hola Paulina. Publicamos vídeos continuamente. Aquí puedes consultar todos los vídeos que tenemos publicados a día de hoy: https://www.garnstudio.com/video.php?lang=es
04.12.2016 - 18:49
![]() Julia Leist-Heiermann wrote:
Julia Leist-Heiermann wrote:
Hallo, ich möchte gerne die Rosebud-Mütze stricken und frage mich, wie ich die 7. Reihe des M1 stricke. Lege ich tatsächlich die ersten 4 Maschen auf die Zopfnadel? Wie bekomme ich denn den Faden zu den dann zuerst zu strickenden Maschen? Leider endet das Video genau vor dieser Stelle. Danke und herzliche Grüße , Julia Leist-Heiermann
11.10.2016 - 21:34DROPS Design answered:
Liebe Frau Leis-Heiermann, bei der 7. Reihe legen Sie die 4 ersten M. auf der Zopfnadel hinter die Arbeit - passen Sie nur mal auf daß der Faden nicht zu locker nor zu eng ist, dann stricken Sie die nächste 4 M, und dann die 4 M. von der Zopfnadel.
12.10.2016 - 09:35
![]() Britta Andersson wrote:
Britta Andersson wrote:
Har stickat mössan men förstår inte hur jag skall montera ihop den haft 34 maskor fr början- stickat 29 m resp 23 m fram och tillbaka fem maskor har suttit på stickan utan att sticka dom har jag gjort fel eller hur monterar jag ihop mössan tacksam för svar
26.01.2016 - 14:36DROPS Design answered:
Hej. När du stickar de förkortade varven så stickar du först alla maskor fram och tillbaka, sedan 29 m fram och tillbaka, sedan 23 m fram och tillbaka. Sedan stickar du återigen alla m fram och tillbaka, 29 m fram och tillbaka, 23 m fram och tillbaka och så fortsätter du så. Under fliken videor finns en video som heter ”Fläta och förkortade varv i DROPS 131-47” som du kan se på. Lycka till!
04.03.2016 - 08:58
![]() Martina wrote:
Martina wrote:
Buonasera!trovo questo modello molto interessante..sto provando a fare il cappello ma non riesco a capire come farlo. monto 32 maglie e le prime 12 le lavoro secondo lo schema, le restanti a legaccio..ma quali sono le maglie che devo lavorare sui ferri accorciati? e da quale ferrro devo iniziare a farlo? grazie :)
13.01.2016 - 01:44DROPS Design answered:
Buongiorno Martina, deve avviare 32 m, lavorare le prime 12 m secondo M.1 e le altre m (verso la parte superiore del berretto) a legaccio e poi lavori il ferro di ritorno a dir fino alle ultime 12 m e poi secondo M.1. §Dal ferro successivo (diritto del lavoro) inizi a lavorare a ferri accorciati come indicato nelle spiegazioni, facendo attenzione che le prime 12 m del f di andata e le ultime 12 m del f di ritorno sono il diagramma M.1. Ci riscriva se ha altri dubbi. Buon lavoro!
13.01.2016 - 14:34
![]() Mam'Yveline wrote:
Mam'Yveline wrote:
Bonjour, Tout d'abord merci pour votre réponse si rapide. En fait la question que je me posais était de savoir si, selon vous, il fallait effectivement obtenir une hauteur totale de bonnet de 20/22 cm ? Personnellement avec l'éch de 11m pour 10 cm en montant 34m dont 12 de torsades j'arrive à presque 30 cm de hauteur. Je pense donc qu'il faut que je recalcule le nombre de mailles à monter, n'est-ce pas ? Un grand merci pour votre disponibilité. PS : j'adore votre site
21.07.2014 - 12:31DROPS Design answered:
Bonjour Mam'Yveline, n'oubliez pas que les 11 m pour 10 cm ne fonctionnent que pour le point mousse, la torsade resserre et la largeur sera différente. Effectuez plusieurs torsades sur un échantillon pour en recalculer la largeur. Si votre tension est correcte, vous aurez un résultat analogue à celui de la photo. Bon tricot!
21.07.2014 - 12:55
![]() Mam'Yveline wrote:
Mam'Yveline wrote:
Bonjour, Pour ce bonnet vu que l'échantillon est de 11 m = 10 cm et que dans la plus petite taille on nous demande de monter 32 mailles, on va donc obtenir une hauteur de bonnet d'environ 29 cm vu qu'il y a une torsade, et jen fonction du modèle 30 cm de haut, ça me parait vraiment trop haut. Moi je pense que 20 cm de haut ça devrait être plus dans l'esprit du modèle. Qu'en pensez-vous ? D'avance merCipour votre réponse.
20.07.2014 - 19:16DROPS Design answered:
Bonjour Mam'Yveline, dans les 32 mailles à monter se trouve également la torsade M1 sur 12 m, l'échantillon est de 11 m point mousse = 10 cm de large, mais la torsade sera plus petite. Vous pouvez faire un échantillon des 2 points et recalculer si nécessaire pour avoir le bonnet à la taille souhaitée. Bon tricot!
21.07.2014 - 10:07Maria Teresa Inzunza Castro wrote:
Queda bellìsimo. Instrucciones muy claras fäciles de comprender. Gracias!!!!! Saludos desde México
09.04.2014 - 03:40
|
||||||||||
Rosebud#rosebudset |
||||||||||
|
|
||||||||||
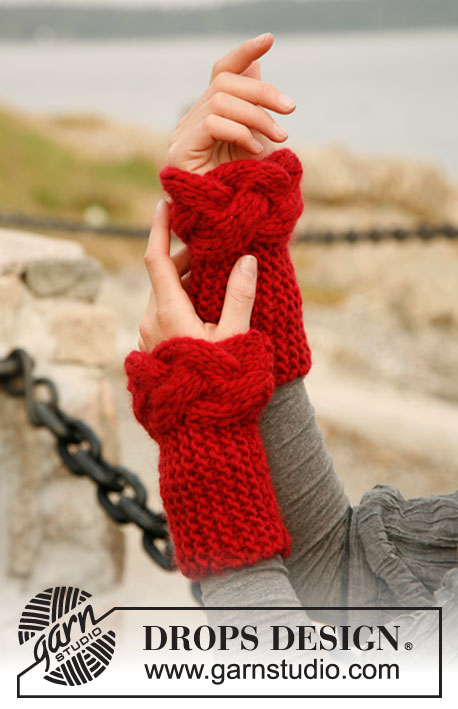
Knitted DROPS hat and neck warmer in garter st with cable in ”Snow”.
DROPS 131-47 |
||||||||||
|
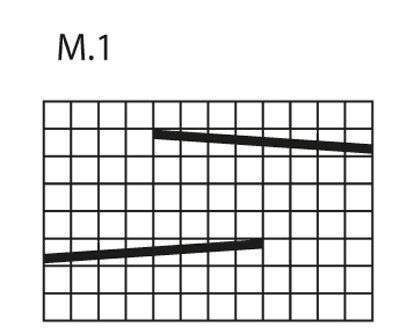
PATTERN: See diagram M.1. The diagram shows the pattern from RS. GARTER ST (back and forth on needle): K all rows. KNITTING TIP: Every time piece is turned in the middle of piece, slip first st as if to K, tighten the thread and return, this is done to avoid holes in the transitions. -------------------------------------------------------- HAT: Worked back and forth on needle. Cast on 32-33-34 sts on needle size 8 mm with Snow. 1st row (= from RS) begins at bottom edge of hat. Work diagram M.1 (= 12 sts), then work in GARTER ST -see explanation above - out towards the top of the hat. Continue like this while AT THE SAME TIME working short rows starting from RS - read KNITTING TIP: * Work back and forth over all sts. Work 29 sts, turn piece and work back. Work 23 sts, turn piece and work back *. Repeat from *-* until piece measures approx. 52-54-56 cm (at the widest). Cast off all sts. ASSEMBLY: Sew hat tog mid back. Sew edge to edge in front loop of outermost st to avoid a chunky seam. Tighten tog sts at the top and fasten the thread tightly. NECK WARMER: The piece is worked back and forth on needle and sewn together afterwards. The whole piece is worked in diagram M.1 and garter st. Cast on 38 sts on needle size 8 mm with Snow. Now work as follows - read KNITTING TIP: * Work diagram M.1 (= 12 sts), turn piece and work back in M.1. Work M.1, then work 4 sts in GARTER ST - see explanation above (= 16 sts in total), turn piece and work back in garter st and M.1. Work 4 rows over all sts while AT THE SAME TIME continuing first 12 sts in M.1 and remaining sts in garter st *. Repeat from *-* until piece measures approx. 46 cm at the top around neck, finish after one whole repetition. Cast off all sts. ASSEMBLY: Sew tog edge to edge in front loop of outermost st to avoid a chunky and visible seam. Fold down the neck. |
||||||||||
Diagram explanations |
||||||||||
|
||||||||||
 |
||||||||||
Have you finished this pattern?Tag your pictures with #dropspattern #rosebudset or submit them to the #dropsfan gallery. Do you need help with this pattern?You'll find 11 tutorial videos, a Comments/Questions area and more by visiting the pattern on garnstudio.com. © 1982-2026 DROPS Design A/S. We reserve all rights. This document, including all its sub-sections, has copyrights. Read more about what you can do with our patterns at the bottom of each pattern on our site. |
||||||||||


With over 40 years in knitting and crochet design, DROPS Design offers one of the most extensive collections of free patterns on the internet - translated to 17 languages. As of today we count 324 catalogues and 12290 patterns translated into English (UK/cm). 12290
We work hard to bring you the best knitting and crochet have to offer, inspiration and advice as well as great quality yarns at incredible prices! Would you like to use our patterns for other than personal use? You can read what you are allowed to do in the Copyright text at the bottom of all our patterns. Happy crafting!
Post a comment to pattern DROPS 131-47
We would love to hear what you have to say about this pattern!
If you want to leave a question, please make sure you select the correct category in the form below, to speed up the answering process. Required fields are marked *.