
Popular categories
Looking for a yarn?


Comments / Questions (50)
![]() Ann wrote:
Ann wrote:
What measurement in cm are Small & Medium in this pattern please?
18.08.2025 - 17:42DROPS Design answered:
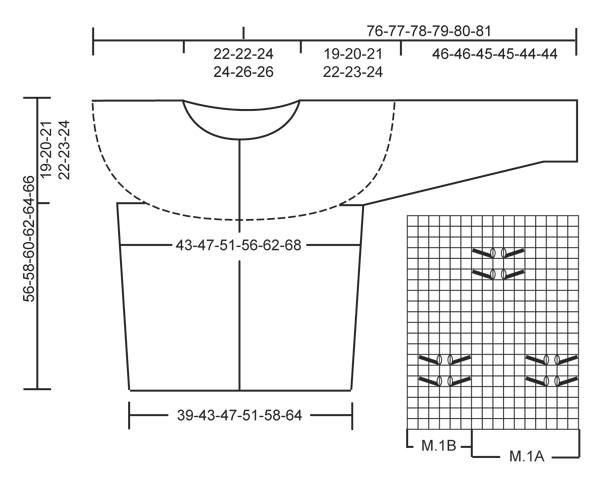
Dear Ann, you will find all finished measurements for each size in the chart at the bottom of the page, read more about sizing and chart here. Happy knitting!
19.08.2025 - 10:12
![]() Minne wrote:
Minne wrote:
Grosses difficultées non resolues pour reprendre les mailles des manches tricotées en rond avec le corps du gilet ?? Merci de vos conseils
13.05.2020 - 01:31DROPS Design answered:
Bonjour Minne, cette vidéo montre comment glisser les mailles des manches sur la même aiguille circulaire que le dos et les devants. Les premiers rangs sont parfois un peu compliqués, vous pouvez vous aider d'une deuxième aiguille circulaire ou bien des aiguilles doubles pointes pour les manches jusqu'à ce que vous soyez plus confortable pour avoir toutes les mailles sur une seule aiguille. Bon tricot!
13.05.2020 - 09:04
![]() Viktorija wrote:
Viktorija wrote:
Hi, my mom is knitting this jacket currently and asked me to take a look into the description of the jacket, however I cannot understand it either. "37-38-39-40-41-42 cm - adjust so that next row is worked from RS and so that 3 or 5 rows in stocking st are worked after 1 row with lace pattern" - Does this mean that e.g. 13th row of M1A has to be knitted, then 3/5 rows in stocking st, and then proceed with cast off for armholes? Thanks in advance.
18.09.2019 - 19:57DROPS Design answered:
Dear Viktorija, depending on which row in M.1A you worked, you should stop after either row 10 or 13 (= if your last lace pattern was the one on row 7) or after last row in diagram or after the first 2 rows in diagram (if your last lace pattern was the 2nd in height in the diagram). Happy knitting!
19.09.2019 - 09:33
![]() Sterenn wrote:
Sterenn wrote:
Bonjour, j'ai besoin d'un conseil. Dans les explications de l'empiècement, les diminutions sont bien expliquées mais il n'y a pas d'infos sur le motif. Si je diminue le nombre de mailles régulièrement, comment faire pour que le motif ne change pas (meme nombre de mailles pour le motif M1 A et B) et qu'il soit toujours au meme niveau verticalement? Merci. sterenn
12.07.2015 - 15:31DROPS Design answered:
Bonjour Mme Sterenn, l'empiècement se tricote au point mousse, puis en suivant le diagramme M.2 (avec les diminutions aux rangs 5, 17 et 25 comme indiqué). Bon tricot!
27.07.2015 - 10:12
![]() Bine wrote:
Bine wrote:
Hallo Drops-Team, da ich noch einige Knäul Drops Baby Merino übrig habe und bei dieser Anleitung als Garnalternative Drops Baby Merino angegeben ist, möchte ich gerne diese Jacke damit stricken. Worauf muss ich beim Verbrauch achten, wenn ich auf eine der vorgeschlagenen Garnalternativen zurückgreifen möchte: benötige ich gleich viel Gewicht oder kommt es auf die Lauflänge an?
22.08.2014 - 10:47DROPS Design answered:
Liebe Bine, es kommt immer auf die Lauflänge an. Sie müssen ausrechnen, wie viel Lauflänge Sie beim Originalgarn benötigen (die Angaben finden Sie ja beim Garn) und rechnen das dann zur Lauflänge des Alternativgarns um.
23.08.2014 - 09:52
![]() Michaela wrote:
Michaela wrote:
Guten Tag. Sind bei der Anleitung M2 die Vor- und die Rückreihen dargestellt (=1 Zeile gleich 1 Reihe?)? Oder ist eine Zeile= Vor- und Rückreihe? Besten Dank im Voraus für Ihre Antwort. Mit freundlichen Grüssen, Michaela
29.04.2014 - 08:09DROPS Design answered:
Liebe Michaela, jede Zeile ist eine R, es sind also alle R dargestellt. Viel Spaß beim Stricken!
30.04.2014 - 21:12
![]() Elisabeth wrote:
Elisabeth wrote:
Werden die Knopflöcher in die Blende gestrickt?
01.04.2014 - 17:17DROPS Design answered:
Liebe Elisabeth, ja richtig. Die genaue Vorgehensweise erfahren Sie über der eigentlichen Anleitung unter "KNOPFLÖCHER" (d.h. die 4. M ab dem Rand wird abgekettet).
02.04.2014 - 11:04Aleksandra wrote:
Hello, I plan to knit this cardigan in one colour of your Babysilk yarn for all its lacy parts and in another, contrasting colour, for the upper part of the body and both sleeves that are knitted in garter stitch according to the pattern. Could you please give me an advice on how much yarn/skeins could that "garter stitch part" take me per size M piece? Many thanks in advance!
18.11.2013 - 19:57DROPS Design answered:
Dear Aleksandra, we are sorry but are not able to answer individuel request, please ask your Drops store, that could help and advice you. Happy knitting!
19.11.2013 - 09:59
![]() Alice wrote:
Alice wrote:
Nachtrag zu meinem vorherigen Kommentar: die erste Markierung muss dann nach 35 Maschen eingezogen werden, nicht nach 34...
23.07.2013 - 14:38
![]() Alice wrote:
Alice wrote:
Hallo liebes Drops Team, ich habe einen kleinen Fehler in der Anleitung entdeckt. Wenn man bei der Passe für Größe XL 3 Maschen von insgesamt 415 M. abnimmt, bleiben 412 M. übrig, nicht 411. Beste Grüße Alice
23.07.2013 - 13:33DROPS Design answered:
Liebe Alice, vielen Dank! Wir haben die Info an unsere Designabteilung weitergeleitet und dort wird die entsprechende Korrektur vorgenommen.
25.07.2013 - 14:55
|
|||||||||||||
Tender Temptation#tendertemptationcardigan |
|||||||||||||
|
|
|||||||||||||
Knitted DROPS jacket with round yoke and lace pattern in "BabyAlpaca Silk". Size: S - XXXL.
DROPS 134-2 |
|||||||||||||
|
GARTER ST (back and forth on needle): K all rows. GARTER ST (in the round on double pointed needles): * K 1 round and P 1 round *, repeat from *-*. PATTERN: See diagrams M.1 and M.2. The diagrams show the pattern from RS. 1st row = RS: BUTTON HOLES: Cast off for button holes on right front band. 1 BUTTON HOLE = cast off 4th st from edge. On next row cast on 1 new st over the cast off st. Cast off for button holes when piece measures: SIZE S: 2, 11, 19, 28, 36, 45 and 54 cm SIZE M: 2, 11, 20, 29, 38, 47 and 56 cm SIZE L: 2, 10, 18, 26, 34, 42, 50 and 58 cm SIZE XL: 2, 10, 18, 27, 35, 43, 51 and 60 cm SIZE XXL: 2, 11, 19, 28, 36, 45, 53 and 62 cm SIZE XXXL:2, 11, 20, 29, 38, 47, 56 and 64 cm I.e. approx. 2 cm remains until finished measurements after last button hole. -------------------------------------------------------- JACKET: Worked back and forth on circular needle from mid front. Cast on 199-219-239-259-289-319 sts (incl 6 band sts each side towards mid front) on circular needle size 2.5 mm with BabyAlpaca Silk. Work in GARTER ST - see explanation above. When piece measures 2 cm, switch to circular needle size 3 mm. REMEMBER BUTTON HOLES ON BAND - see explanation above. Work next row from RS as follows: 6 band sts in garter st, 1 st in stocking st, diagram M.1A until 12 sts remain, finish with diagram M.1B (= 6 sts) and 6 band sts in garter st. Continue the pattern like this. REMEMBER THE KNITTING TENSION! Insert 2 markers in the piece after 53-58-63-68-75-83 sts in from each side = 93-103-113-123-139-153 sts between markers on back piece. When piece measures 8-8-9-9-10-10 cm, inc 1 st on each side of both markers (= 4 sts inc). Repeat inc every 6 cm a total of 5 times = 219-239-259-279-309-339 sts - NOTE: Work inc sts in stocking st until they can be worked in pattern each side. When piece measures approx. 37-38-39-40-41-42 cm - adjust so that next row is worked from RS and so that 3 or 5 rows in stocking st are worked after 1 row with lace pattern - cast off 10-10-10-12-12-12 sts in each side for armholes (i.e. 5-5-5-6-6-6 sts on each side of both markers) = 93-103-113-121-137-151 sts on back piece and 53-58-63-67-74-82 sts on each front piece. Put piece aside and knit the sleeves. SLEEVE: Worked in the round on double pointed needles. Cast on 56-56-58-60-62-64 sts on double pointed needles size 2.5 mm with BabyAlpaca Silk. Work in GARTER ST - see explanation above. Insert a marker at beg of round (= mid under sleeve). When piece measures 3 cm, switch to double pointed needles size 3 mm and work next round as follows: 0-0-1-2-3-4 sts in stocking st, diagram M.1A until 6-6-7-8-9-10 sts remain, finish with diagram M.1B (= 6 sts) and 0-0-1-2-3-4 sts in stocking st. Continue like this. When piece measures 8-8-9-10-10-8 cm, inc 2 sts mid under sleeve (i.e. inc 1 st on each side of marker). Repeat inc every 4-3-2.5-2-2-2 cm a total of 10-13-14-16-17-18 times = 76-82-86-92-96-100 sts on needle - NOTE: Work inc sts in stocking st until they can be worked in pattern. When piece measures approx. 46-46-45-45-44-44 cm (NOTE! Shorter measurements in the larger sizes because of longer sleeve cap and broader shoulder width) - adjust so that same no of rounds in stocking st have been worked after 1 round with lace pattern as on body - cast off 10-10-10-12-12-12 sts mid under sleeve (i.e. 5-5-5-6-6-6 sts on each side of marker) = 66-72-76-80-84-88 sts. Slip sts on a stitch holder and knit another sleeve. YOKE: Slip sleeves on to same circular needle as body where armholes were cast off = 331-363-391-415-453-491 sts. Work 1 row in stocking st (1st row = P from WS and work bands in garter st as before until finished measurements) while AT THE SAME TIME dec 5-13-5-3-3-5 sts evenly (do not dec over bands) = 326-350-386-412-450-486 sts. Switch to circular needle size 2.5 mm, K 1 row from RS and insert 10-10-10-10-11-11 markers in the piece as follows: Insert 1st marker after 28-31-31-34-35-38 sts, then insert 9-9-9-9-10-10 markers 30-32-36-38-38-41 sts apart, after last marker there are 28-31-31-35-35-38 sts. The yoke is worked in garter st (1st row = from WS): Work 1-1-3-3-1-1 row without dec, then dec 1 st on right side of every marker by working 2 sts tog. Repeat dec on every 4th row on left and right side of markers alternately a total of 16-17-17-19-21-22 times = 166-180-216-222-219-244 sts. K 1 row from WS after last row with dec. Then work diagram M.2 with 6 band sts in each side (on 9th and 23rd row K last st before band) while AT THE SAME TIME dec on 5th, 17th and 25th row as follows: On 5th row dec 15-19-29-29-28-33 sts evenly = 151-161-187-193-191-211 sts. On 17th row dec 18-20-30-32-30-34 sts evenly = 133-141-157-161-161-177 sts. On 25th row dec 14-18-30-30-26-36 sts evenly = 119-123-127-131-135-141 sts. After diagram M.2, loosely cast off with K from RS. ASSEMBLY: Sew the openings under the sleeves. Sew on buttons. |
|||||||||||||
Diagram explanations |
|||||||||||||
|
|||||||||||||
 |
|||||||||||||
 |
|||||||||||||
Have you finished this pattern?Tag your pictures with #dropspattern #tendertemptationcardigan or submit them to the #dropsfan gallery. Do you need help with this pattern?You'll find 13 tutorial videos, a Comments/Questions area and more by visiting the pattern on garnstudio.com. © 1982-2026 DROPS Design A/S. We reserve all rights. This document, including all its sub-sections, has copyrights. Read more about what you can do with our patterns at the bottom of each pattern on our site. |
|||||||||||||


With over 40 years in knitting and crochet design, DROPS Design offers one of the most extensive collections of free patterns on the internet - translated to 17 languages. As of today we count 324 catalogues and 12290 patterns translated into English (UK/cm). 12290
We work hard to bring you the best knitting and crochet have to offer, inspiration and advice as well as great quality yarns at incredible prices! Would you like to use our patterns for other than personal use? You can read what you are allowed to do in the Copyright text at the bottom of all our patterns. Happy crafting!
Post a comment to pattern DROPS 134-2
We would love to hear what you have to say about this pattern!
If you want to leave a question, please make sure you select the correct category in the form below, to speed up the answering process. Required fields are marked *.