
Popular categories
Looking for a yarn?


Comments / Questions (99)
![]() Praturlon wrote:
Praturlon wrote:
Pour ce modèle il est indiqué qu’il faut prendre 2 fils kid Silk. Est-ce que cela signifie qu’il faut prendre 2 pelotes pour avoir ces 2 fils ? Si oui, est-ce que la quantité de laine indiquée prends bien en compte cet élément ? Merci de votre réponse
27.09.2020 - 18:11DROPS Design answered:
Bonjour Mme Praturlon, ce pull se tricote effectivement avec le fil en double, autrement dit 1 fil de 2 pelotes différentes - la quantité indiquée correspond effectivement à celle requise avec le fil en double = la quantité nécessaire en fonction de la taille - notez que DROPS Kid-Silk se présente sous forme de pelotes de 25 g -plus d'infos sur son nuancier. Bon tricot!
28.09.2020 - 10:27
![]() Anita wrote:
Anita wrote:
Hei. Når du strikker sammen de 4 delen skal du strikke 2 rette masker sammen før og etter overgangen, og minsker dermed antall masker med 4 på første runde. Skal du fortsette å felle ved hver overgang, eller kun denne ene gangen? På bildet ser det som det skal bli en slags raglan, derfor jeg lurer på om du skal felle hver runde?
10.05.2020 - 15:12DROPS Design answered:
Hei Anita. Nei, det felles kun den ene gangen.Patentstrikken trekker seg godt sammen, slik at det ikke er noen felling før etter forhøyningen bak i nakken. God Fornøyelse!
18.05.2020 - 10:00
![]() Anita K wrote:
Anita K wrote:
Hei. Når du strikker sammen de 4 delen skal du strikke 2 rette masker sammen før og etter overgangen, og minsker dermed antall masker med 4 på første runde. Skal du fortsette å felle ved hver overgang, eller kun denne ene gangen? På bildet ser det som det skal bli en slags raglan, derfor jeg lurer på om du skal felle hver rund.
03.05.2020 - 16:03
![]() Gry wrote:
Gry wrote:
Hei! Jeg strikket denne i størrelse L, og så ble den altfor stor for meg viste det seg så jeg ga den videre. Men jeg har fått den tilbake, for den har blitt veldig vid og slaskete! Setter den seg/strammer seg om jeg vasker den? For dette garnet tover seg vel ikke? (Hvis jeg må rekke opp vil jeg helst ikke vaske den først).
01.03.2020 - 21:46DROPS Design answered:
Hei Gry. Om ikke den opplyste strikkefastheten er overholdt kan det ferdig plagget nok bli litt slaskete/miste formen. Om du vil rekke den opp, anbefaler jeg ikke å vaske den først. Kid-Silk kan i utgangspunktet være vrien å rekke opp uten å være vasket og ettersom den allerede er blitt brukt kan fibrene i garnet ha tvunnet seg godt sammen. Dette garnet tover seg i vaske(maskinvaske), men følger du vaskeanvisningen og legger genseren i den formen du ønsker det, kan det være en løsning. mvh DROPS design
02.03.2020 - 13:51
![]() Maria wrote:
Maria wrote:
Framstycket: man lägger upp 73 m (M) och efter första varvet har man 49 m kvar. På första varvet ökas maskorna genom omslag till totalt 72 m. När arb mäter 33 cm minskas för ärmhålen med totalt 6 m, vilket ger totalt 66 m och inte 43 m som det står i beskrivningen. Det måste väl vara ett korrekturfel? (Ni har utgått från 49 m efter första varvet men glömt att man är uppe på 72 efter varv 1 i helpatenten. Alla varv därefter stickas enl varv 2 och 3 i helpatent.)
26.01.2019 - 09:29DROPS Design answered:
Hei Maria. Det stemmer at man legegr opp 73 masker, som etter 2 omgang er minsket til 49. Videre strikkes helpatent, men maskeantallet endrer seg ikke. På første pinne av helpatent lages kast, som på neste pinne strikkes sammen med masken som ble tatt løst av - du kan på en måte si at kastet og den løse masken hører sammen, fordi de alltid strikkes som 1. Det er derfor ingen endring i maskeantallet. Når du så feller 6 masker til ermhull sitter du igjen med 43 masker på pinnen. God fornøyelse.
31.01.2019 - 13:06Maria wrote:
In the yoke I get confused it says: ... then knit up 1 new st behind each of the 7 band sts how do you do that? and do you knit on or go back and forth? thank you!
28.09.2018 - 22:19DROPS Design answered:
Dear Maria, this video shows how to pick up 1 st in each of the 7 band sts (the other sts are worked in stocking st in the video, just work in pattern as before), then how to continue working back and forth. Happy knitting!
01.10.2018 - 07:57
![]() Gbi wrote:
Gbi wrote:
Ich habe alle Einzelteile gestrickt, jetzt komme ich dazu alle Maschen zusammenzuführen. Die Blende ist klar, jedoch das Hin und her im Patentmuster bleiben? wie mach eich die Abnahmen gibt es ein Video im Patentmuster von diesem Modell? LG Gabi
05.02.2018 - 13:36DROPS Design answered:
Liebe Gabi, die Passe wird jetzt hin und zurück gestrickt, mit Anfang in der Mitte vom Vorderteil (Blende), bei den Abnahmen genauso stricken, wie in der Anleitung beschrieben, dh in jedem Übergang zwischen Ärmel und Vorder- bzw Rückentel 1 M abnehmen, damit das Patentmuster von jetzt ab aufgeht. Viel Spaß beim stricken!
05.02.2018 - 16:44
![]() Leroy wrote:
Leroy wrote:
J'ai repris l'empiècement de ce pull (commencé l'année dernière; j'ai du mal à comprendre les diminutions( 2x2m = 4m diminuées aux transitions) et le nbre de maille: mais 1seule fois ou chaque rang(ce que j'ai fait) ; à la moitié de l'empiècement plus assez de mailles pr poursuivre et surtout pr attaquer la rehausse dos : on ns parle de 2x72m+le reste!!! ; je suis perdue - pouvez-vous m'aider? car par ailleurs j'aime beaucoup la laine utilisée Merci
15.12.2016 - 14:14DROPS Design answered:
Bonjour Mme Leroy, les diminutions aux transitions ne se font qu'une seule fois, quand on reprend toutes les mailles ensemble, vous devez ensuite avoir 127-139-151-159-175-191 m - continuez ensuite sur ces mailles en côtes anglaises et côtes 1/1 (avec les rangs raccourcis) jusqu'à 17-21 cm de hauteur d'empiècement. Bon tricot!
15.12.2016 - 14:53
![]() Brigitte wrote:
Brigitte wrote:
Hallo liebes Drops-Team! Erst einmal möchte ich mich bedanken für die schnelle und erfolgreiche Hilfe bei meinem letzten Problem. Aber schon habe ich das nächste,das ich nicht alleine lösen kann. Wie stricke ich die Erhöhung im hinteren Halsbereich? Ab wann beginne ich zu zählen? L.G.Brigitte
21.11.2016 - 11:52DROPS Design answered:
Liebe Brigitte, die Erhöhung wird nach 2 R. im Bündchenmuster (1 re./1 li.) gestrickt: jetzt stricken Sie nächste R. (= 1 re/1 li) bis 20 M übrig sind, wenden und nächste R (= 1 re/1 li) bis 20 M übrig sind (= 20 M sind jetzt beidseitig nicht gearbeitet). Und so weiterarbeiten. Viel Spaß beim stricken!
21.11.2016 - 13:17
![]() Eva Andersson wrote:
Eva Andersson wrote:
Hur ska jag minska för oket, 4m varje/ varv. Eller bara på första varvet i oket?
07.09.2016 - 20:17DROPS Design answered:
Hej Eva. Saa vidt jeg kan laese i teksten, saa tager du kun 4 m ind i förste p patent. Du skal derefter bare strikke videre som der staar i mönstret.
08.09.2016 - 11:34
|
|
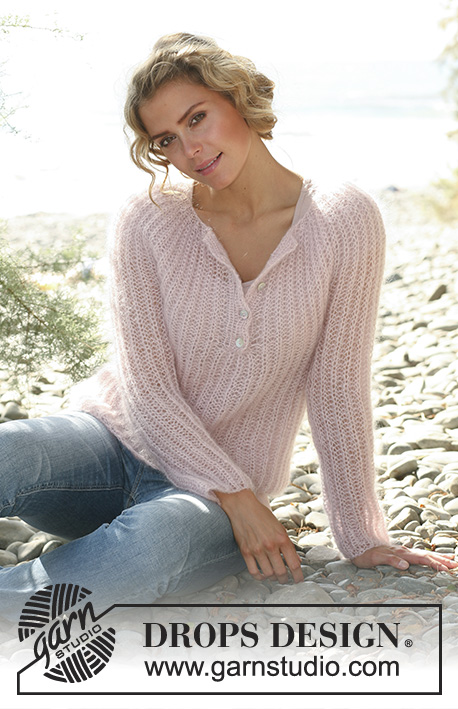
My Muse#mymusesweater |
|
 |
 |
DROPS sweater in English rib in 2 threads ”Kid-Silk”. Size: XS - XXL.
DROPS 127-1 |
|
|
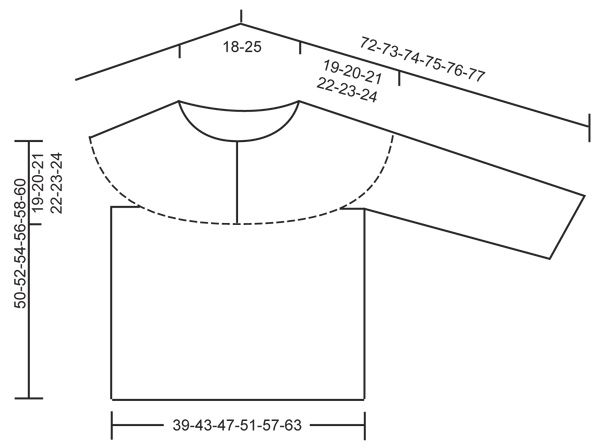
GARTER ST (back and forth on needle): K all rows. INCREASE TIP: Inc 1 st inside 1 edge st in garter st each side. Inc 1 st by making 1 YO, on next row work YO twisted (i.e. work in the back loop of st instead front). Work the inc sts in the pattern. PATTERN (back and forth on needle): ROW 1 (= RS): 1 edge st in garter st, * K 1, 1 YO, slip 1 st as if to P *, repeat from *-* until 2 sts remain and finish with K 1 and 1 edge st in garter st. ROW 2 (= WS): 1 edge st in garter st, * 1 YO, slip 1 st as if to P, K tog YO and slipped st *, repeat from *-* until 2 sts remain, finish with 1 YO, slip 1 st as if to P and 1 edge st in garter st. ROW 3 (= RS): 1 edge st in garter st, * K tog YO and slipped st, 1 YO, slip 1 st as if to P *, repeat from *-* until 3 sts remain (1 YO + 2 sts), K tog YO and slipped st, finish with 1 edge st in garter st. Repeat 2nd and 3rd row upwards. SHORT ROWS FOR NECK SLIT: To avoid the band being worked too long mid front in neck slit when working pattern, work short rows in each side as follows: * start from RS and work 3 rows in pattern over all sts, turn piece. Work in pattern until 7 band sts remain, turn piece and work in pattern until 7 band sts remain in the other side - NOTE: Work first st after each turn a little tight to avoid holes in the transitions. Turn piece, work back over all sts (incl band) *, repeat from *-* up along the entire band until pattern is finished. Then work back and forth over all sts. BUTTON HOLES: Cast off for button holes on right front band. 1 BUTTON HOLE = P tog third and fourth st from edge and make 1 YO. Cast off for button holes when piece measures: SIZE XS: 2, 6, 11 and 15 cm. SIZE S: 2, 7, 12 and 17 cm. SIZE M: 2, 7, 12 and 17 cm. SIZE L: 2, 7, 13 and 18 cm. SIZE XL: 2, 7, 13 and 18 cm. SIZE XXL: 2, 8, 14 and 20 cm. I.e. approx. 3 to 5 cm remain until finished measurements after last button hole. -------------------------------------------------------- SWEATER: Worked in several pieces back and forth on circular needle. FRONT PIECE: Loosely cast on 61-67-73-79-88-97 sts (incl 1 edge st in garter st in each side) on circular needle size 7 mm with 2 threads Kid-Silk. Work first row from WS as follows: 1 edge st in GARTER ST - see explanation above -, * P 2 tog, K 1 *, repeat from *-* until 3 sts remain, finish with P 2 tog and 1 edge st in GARTER ST = 41-45-49-53-59-65 sts. Then work PATTERN - see explanation above (1st row = RS) - with 1 edge st in Garter st in each side. REMEMBER THE KNITTING TENSION! When piece measures 31-32-33-34-35-36 cm - adjust so that next row is worked from RS - cast off the first 3 sts at beg of the next 2 rows for armhole = 35-39-43-47-53-59 sts remain on needle. Cut the thread, put piece aside and work back piece. BACK PIECE: Cast on and work as front piece. SLEEVE: The sleeve is worked back and forth on circular needle. Cast on 37-40-43-43-40-43 sts (incl 1 edge st in garter st in each side) on circular needle size 7 mm with 2 threads Kid-Silk. Work first row from WS as follows: 1 edge st in garter st, * P 2 tog, K 1 *, repeat from *-* until 3 sts remain, finish with P 2 tog and 1 edge st in garter st = 25-27-29-29-27-29 sts. Then work PATTERN - see explanation above – with 1 edge st in garter st in each side (1st row = RS). When piece measures 8 cm, inc 1 st in each side - READ INCREASE TIP! Repeat inc every 10-10-10-10-5½-5½ cm a total of 4-4-4-4-6-6 times = 33-35-37-37-39-41 sts - NOTE: Remember to work the inc sts in the pattern. When piece measures 43-42-42-41-41-40 cm (NOTE! Shorter measurements in the larger sizes because of longer sleeve cap and broader shoulder width) - adjust so that next row is worked from RS - cast off the first 3 sts at the beg of the next 2 rows for armhole = 27-29-31-31-33-35 sts remain on needle. Put aside and knit the other sleeve. YOKE: Slip the first 14-16-18-20-23-26 sts at beg of row (from RS) on front piece on a stitch holder = 21-23-25-27-30-33 sts remain on needle. READ ALL OF THE FOLLOWING SECTION BEFORE CONTINUING! Work first row from RS as follows: K 1 (= YO + slipped st K tog), P 1, K 1 (= YO + slipped st K tog), P 1, K 1 (= YO + slipped st K tog), P 1 and K 1 (= YO + slipped st K tog) = 7 band sts, work in pattern (= 3rd row pattern), i.e. start with 1 YO and slip 1 st as if to P and continue with pattern as before over the remaining sts on front piece, continue over the sleeve, then over back piece, then over the other sleeve and then over the 14-16-18-20-23-26 sts from stitch holder on front piece and then knit up 1 new st behind each of the 7 band sts, AT THE SAME TIME in all transitions between body and sleeve, work last st (1 YO + K 1) before and first st after the transitions K tog (i.e. 4 sts dec on row) = 127-139-151-159-175-191 sts on needle. The pattern should now be correct around the entire piece. Continue in pattern back and forth as before but work the outermost 7 sts in each side (= bands) in rib, i.e. K 1, P 1, K 1, P 1, K 1, P 1 and K 1 mid front (seen from RS). AT THE SAME TIME work SHORT ROWS - see explanation above - so that the bands are the same length as the pattern. REMEMBER BUTTON HOLES ON RIGHT BAND - see explanation above. When yoke measures 17-18-19-20-21-22 cm (adjust so that next row is worked from RS), work rib (= K 1/P 1) over all sts (instead of pattern) - NOTE: I.e. on 1st row K tog YO and slipped st (= K 1), P next st. When 2 rows in rib have been worked, work an elevation in the back of neck as follows (1st row from RS): Work rib until 20 sts remain on needle, turn piece and work rib until 20 sts remain on needle in the other side. Turn piece and work rib until 40 sts remain on needle, turn piece and work rib until 40 sts remain on needle in the other side. Turn piece and work rib until 60-64-69-72-78-83 sts remain on needle, turn piece and work rib until 60-64-69-72-78-83 sts remain on needle in the other side. Turn piece and work the rest of the row, then work 1 row in rib over all sts from WS. Now work next row from RS as follows: 7 band sts as before, * P 2 tog, K 2 twisted (i.e. work in back loop of st instead of front) tog *, repeat from *-* until 8 sts remain and finish with P 1 and 7 band sts as before = 71-77-83-87-95-103 sts. Work 1 row with K over K and P over P. Then LOOSELY cast off with K over K and P over P, sweater measures approx. 50-52-54-56-58-60 cm up to shoulder. ASSEMBLY: Sew side seams tog edge to edge in front loop of outermost sts. Sew underarm seams tog edge to edge in front loop of outermost sts. Sew the opening under the sleeves. Sew on buttons. |
|
 |
|
Have you finished this pattern?Tag your pictures with #dropspattern #mymusesweater or submit them to the #dropsfan gallery. Do you need help with this pattern?You'll find 17 tutorial videos, a Comments/Questions area and more by visiting the pattern on garnstudio.com. © 1982-2026 DROPS Design A/S. We reserve all rights. This document, including all its sub-sections, has copyrights. Read more about what you can do with our patterns at the bottom of each pattern on our site. |
|


With over 40 years in knitting and crochet design, DROPS Design offers one of the most extensive collections of free patterns on the internet - translated to 17 languages. As of today we count 324 catalogues and 12290 patterns translated into English (UK/cm). 12290
We work hard to bring you the best knitting and crochet have to offer, inspiration and advice as well as great quality yarns at incredible prices! Would you like to use our patterns for other than personal use? You can read what you are allowed to do in the Copyright text at the bottom of all our patterns. Happy crafting!
Post a comment to pattern DROPS 127-1
We would love to hear what you have to say about this pattern!
If you want to leave a question, please make sure you select the correct category in the form below, to speed up the answering process. Required fields are marked *.