
Popular categories
Looking for a yarn?


Comments / Questions (93)
![]() Olga Pacheco wrote:
Olga Pacheco wrote:
No entiendo la parte que dice: " recoger 1 pt nuevo detrás de cada uno de los 7 pts de la cenefa", lo leo y lo leo pero nada más no sé como hacerlo, tenéis algún vídeo donde pueda ver como se hace? Gracias
06.10.2024 - 20:03
![]() Diana Péter wrote:
Diana Péter wrote:
A magyar fordításban az összeáállításnál kétszer lett ugyanaz leírva az ujjakkal kapcsolatban, de az oldalvarrásról nincs információ. :(
27.09.2024 - 10:30
![]() Mary wrote:
Mary wrote:
I’ve done first row of yoke successfully. On subsequent rows do I decrease at transitions between sleeves and back and fronts ? And if so on RS or WS or both . I cannot continue until this is explained!
16.04.2024 - 19:09DROPS Design answered:
Dear Mary, no, you knit back and forth as the pattern was set up, until the yoke is 17-18-19-20-21-22 cm, then knit ribbing and elevation for the back of the neck. Only after that will you decrease. Happy Knitting!
16.04.2024 - 21:41
![]() Barbro Otterström wrote:
Barbro Otterström wrote:
Hej! Jag undrar vilket omfång storlek M resp. L har? Utifrån det undrar jag också om jag kan gå upp i storlek i stället för att byta till större stickor eftersom jag tycker det blir för glest med strl 8 på stickor? Vänliga hälsningar Barbro
11.01.2024 - 15:02DROPS Design answered:
Hei Barbro. Patentstrikk blir veldig tøyelig. Anbefaler deg å se på målskissen. Finn de målene du syns passer deg best og velg så størrelse, og ha i tankene at plagget blir tøyelig. mvh DROPS Design
15.01.2024 - 14:11
![]() Ann wrote:
Ann wrote:
I am working My Muse in Large. I have followed the pattern rows commencing these with 53 stitches as per the front piece instructions. Following pattern row one increases my stitch count to 78 as each 1 YO increases count by 1. Pattern rows 2&3, the repeated ones, do not change stitch count (as 2 stitches are knitted together following YO, slip 1, I now see armhole instructions are to decrease 3 stitches at each edge leaving 47 - I will have 72 -HELP please.
13.06.2023 - 16:38DROPS Design answered:
Dear Ann, note that the yarn overs worked over the slipped stitches do not count a one stitch but count together with their slipped stitch, so that after the firt row you will go down from 79 to 53 stitches (by working P2 tog, K1 all the row), then work these 53 stitches as explained under ENGLISH RIB over these 53 st - casting off 3 sts at the beg of next 2 rows for the armhole will decrease to 47 sts. Happy knitting!
14.06.2023 - 07:28
![]() Jenny wrote:
Jenny wrote:
Is it possible to knit this in the round??? I already did the front and back in the round , but now that I'm reading instructions for the yoke , I'm wondering if I should undo and go back to knitting flat????
01.05.2023 - 23:19DROPS Design answered:
Dear Jenny, body and sleeves are worked in the round to the armhole, then yoke will be worked back and forth from mid front (from neckline for slit). Happy knitting!
02.05.2023 - 10:36
![]() Gitte Brag wrote:
Gitte Brag wrote:
Strikker str L. Slået 79 m op. Efter 1. Pind nede på 53 m, det er forståeligt. Strikket 1. Pind i helpatent og efter følgende gentaget pind 2 og 3. Tilbage på 79 m. Hvilket passer i bredden. Hvordan kan det passe at der efter ærmegab luk 6 m kun skal være 47 m tilbage?
12.04.2023 - 10:11DROPS Design answered:
Hei Gitte. Du har 53 masker når du starter med patentstrikk og dette maskeantallet skal være det samme til du skal felle til ermhull. Kastet du gjør i patentstrikk skal ikke telles som en maske ettersom kastet tilhører masken den strikkes sammen med. Så når arbeidet måler 34 cm skal du ha 53 masker og nå skal det felles 3 masker i hver side = 53 masker - 3 masker i høyre side og - 3 masker i venstre side = 47 masker. mvh DROPS Design
17.04.2023 - 14:08
![]() Vera wrote:
Vera wrote:
Wenn ich die Teile zur Passe zusammengefügt habe stricke ich die Passe dann 18cm für Größe S hoch ohne Abnahmen Ist das dann nicht zu weit? Danke für die Antwort! Lg Vera
04.02.2023 - 19:13DROPS Design answered:
Liebe Vera, ja genauso wird es gestrickt, es sind keine Abnahme bei der Passe gestrickt; erst nach dem Bündchen (2 Reihe Bündchen + verkürzten Reihe für die Erhöhung). Viel Spaß beim stricken!
06.02.2023 - 09:27
![]() Guðrún Sigríður Eyjólfsdóttir wrote:
Guðrún Sigríður Eyjólfsdóttir wrote:
FÖRKORTADE VARV I HALSSPRUNDET Är det riktigt förstått at man stickar 3 varv patent innanför de 7 kant maskerna i halsprundet och i den fjerde omgangen stickar man 1 r 1 vr, dvs stickar sprundet var fjerde omgang??? Vänliga hälsningar Gudrun
10.05.2022 - 19:10DROPS Design answered:
Hej Gudrun, du strikker 3 pinde over alle masker, 4:e pind vender du lige før kantmaskerne og 5:e pind vender du lige før kantmaskerne, så strikker du over alle masker igen :)
11.05.2022 - 08:08
![]() Hilde Aerts wrote:
Hilde Aerts wrote:
Bij de aanzet van de pas heb ik bij het samenbreien van lijf en mouwen telkens bij de overgangen tussen lijf en mouw (in de eerste naald) in totaal 4 steken geminderd zoals beschreven. Het aantal steken klopt met 151 voor maat (M). Moet ik deze mindering van 4 steken blijven herhalen bij de overgangen, in de nog te breien naalden tot de pashoogte van 19 cm bereikt is? Dit lijkt me niet duidelijk in de patroon beschrijving van de pas. Hartelijk dank - Hilde Aerts
07.04.2022 - 17:29DROPS Design answered:
Dag Hilde,
Nee, je hoeft nu niet meer steeds 4 steken te minderen bij iedere overgang, dus je kunt gewoon door breien volgens de instructies, zonder te minderen.
20.04.2022 - 10:23
|
|
My Muse#mymusesweater |
|
 |
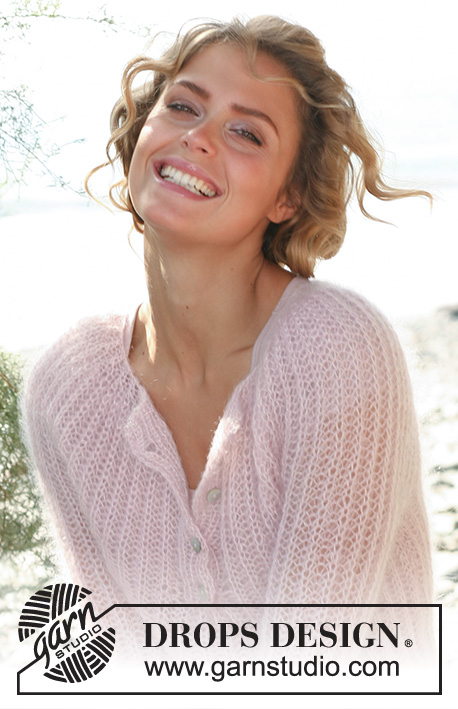 |
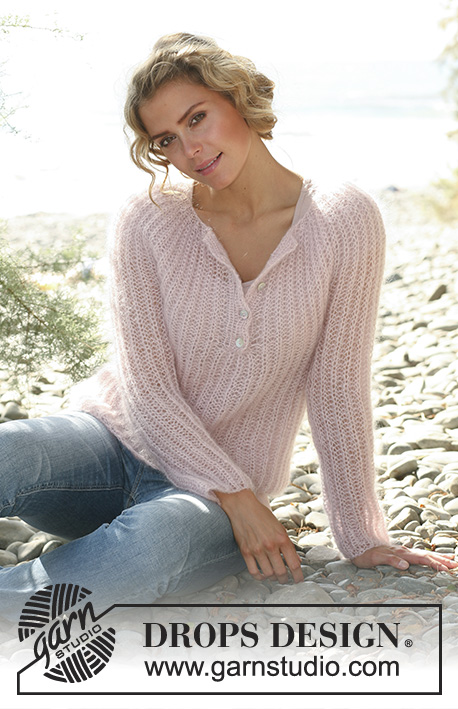
DROPS sweater in English rib in 2 threads ”Kid-Silk”. Size: XS - XXL.
DROPS 127-1 |
|
|
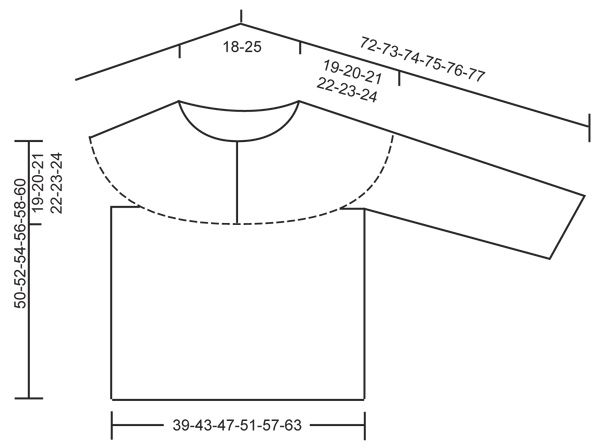
GARTER ST (back and forth on needle): K all rows. INCREASE TIP: Inc 1 st inside 1 edge st in garter st each side. Inc 1 st by making 1 YO, on next row work YO twisted (i.e. work in the back loop of st instead front). Work the inc sts in the pattern. PATTERN (back and forth on needle): ROW 1 (= RS): 1 edge st in garter st, * K 1, 1 YO, slip 1 st as if to P *, repeat from *-* until 2 sts remain and finish with K 1 and 1 edge st in garter st. ROW 2 (= WS): 1 edge st in garter st, * 1 YO, slip 1 st as if to P, K tog YO and slipped st *, repeat from *-* until 2 sts remain, finish with 1 YO, slip 1 st as if to P and 1 edge st in garter st. ROW 3 (= RS): 1 edge st in garter st, * K tog YO and slipped st, 1 YO, slip 1 st as if to P *, repeat from *-* until 3 sts remain (1 YO + 2 sts), K tog YO and slipped st, finish with 1 edge st in garter st. Repeat 2nd and 3rd row upwards. SHORT ROWS FOR NECK SLIT: To avoid the band being worked too long mid front in neck slit when working pattern, work short rows in each side as follows: * start from RS and work 3 rows in pattern over all sts, turn piece. Work in pattern until 7 band sts remain, turn piece and work in pattern until 7 band sts remain in the other side - NOTE: Work first st after each turn a little tight to avoid holes in the transitions. Turn piece, work back over all sts (incl band) *, repeat from *-* up along the entire band until pattern is finished. Then work back and forth over all sts. BUTTON HOLES: Cast off for button holes on right front band. 1 BUTTON HOLE = P tog third and fourth st from edge and make 1 YO. Cast off for button holes when piece measures: SIZE XS: 2, 6, 11 and 15 cm. SIZE S: 2, 7, 12 and 17 cm. SIZE M: 2, 7, 12 and 17 cm. SIZE L: 2, 7, 13 and 18 cm. SIZE XL: 2, 7, 13 and 18 cm. SIZE XXL: 2, 8, 14 and 20 cm. I.e. approx. 3 to 5 cm remain until finished measurements after last button hole. -------------------------------------------------------- SWEATER: Worked in several pieces back and forth on circular needle. FRONT PIECE: Loosely cast on 61-67-73-79-88-97 sts (incl 1 edge st in garter st in each side) on circular needle size 7 mm with 2 threads Kid-Silk. Work first row from WS as follows: 1 edge st in GARTER ST - see explanation above -, * P 2 tog, K 1 *, repeat from *-* until 3 sts remain, finish with P 2 tog and 1 edge st in GARTER ST = 41-45-49-53-59-65 sts. Then work PATTERN - see explanation above (1st row = RS) - with 1 edge st in Garter st in each side. REMEMBER THE KNITTING TENSION! When piece measures 31-32-33-34-35-36 cm - adjust so that next row is worked from RS - cast off the first 3 sts at beg of the next 2 rows for armhole = 35-39-43-47-53-59 sts remain on needle. Cut the thread, put piece aside and work back piece. BACK PIECE: Cast on and work as front piece. SLEEVE: The sleeve is worked back and forth on circular needle. Cast on 37-40-43-43-40-43 sts (incl 1 edge st in garter st in each side) on circular needle size 7 mm with 2 threads Kid-Silk. Work first row from WS as follows: 1 edge st in garter st, * P 2 tog, K 1 *, repeat from *-* until 3 sts remain, finish with P 2 tog and 1 edge st in garter st = 25-27-29-29-27-29 sts. Then work PATTERN - see explanation above – with 1 edge st in garter st in each side (1st row = RS). When piece measures 8 cm, inc 1 st in each side - READ INCREASE TIP! Repeat inc every 10-10-10-10-5½-5½ cm a total of 4-4-4-4-6-6 times = 33-35-37-37-39-41 sts - NOTE: Remember to work the inc sts in the pattern. When piece measures 43-42-42-41-41-40 cm (NOTE! Shorter measurements in the larger sizes because of longer sleeve cap and broader shoulder width) - adjust so that next row is worked from RS - cast off the first 3 sts at the beg of the next 2 rows for armhole = 27-29-31-31-33-35 sts remain on needle. Put aside and knit the other sleeve. YOKE: Slip the first 14-16-18-20-23-26 sts at beg of row (from RS) on front piece on a stitch holder = 21-23-25-27-30-33 sts remain on needle. READ ALL OF THE FOLLOWING SECTION BEFORE CONTINUING! Work first row from RS as follows: K 1 (= YO + slipped st K tog), P 1, K 1 (= YO + slipped st K tog), P 1, K 1 (= YO + slipped st K tog), P 1 and K 1 (= YO + slipped st K tog) = 7 band sts, work in pattern (= 3rd row pattern), i.e. start with 1 YO and slip 1 st as if to P and continue with pattern as before over the remaining sts on front piece, continue over the sleeve, then over back piece, then over the other sleeve and then over the 14-16-18-20-23-26 sts from stitch holder on front piece and then knit up 1 new st behind each of the 7 band sts, AT THE SAME TIME in all transitions between body and sleeve, work last st (1 YO + K 1) before and first st after the transitions K tog (i.e. 4 sts dec on row) = 127-139-151-159-175-191 sts on needle. The pattern should now be correct around the entire piece. Continue in pattern back and forth as before but work the outermost 7 sts in each side (= bands) in rib, i.e. K 1, P 1, K 1, P 1, K 1, P 1 and K 1 mid front (seen from RS). AT THE SAME TIME work SHORT ROWS - see explanation above - so that the bands are the same length as the pattern. REMEMBER BUTTON HOLES ON RIGHT BAND - see explanation above. When yoke measures 17-18-19-20-21-22 cm (adjust so that next row is worked from RS), work rib (= K 1/P 1) over all sts (instead of pattern) - NOTE: I.e. on 1st row K tog YO and slipped st (= K 1), P next st. When 2 rows in rib have been worked, work an elevation in the back of neck as follows (1st row from RS): Work rib until 20 sts remain on needle, turn piece and work rib until 20 sts remain on needle in the other side. Turn piece and work rib until 40 sts remain on needle, turn piece and work rib until 40 sts remain on needle in the other side. Turn piece and work rib until 60-64-69-72-78-83 sts remain on needle, turn piece and work rib until 60-64-69-72-78-83 sts remain on needle in the other side. Turn piece and work the rest of the row, then work 1 row in rib over all sts from WS. Now work next row from RS as follows: 7 band sts as before, * P 2 tog, K 2 twisted (i.e. work in back loop of st instead of front) tog *, repeat from *-* until 8 sts remain and finish with P 1 and 7 band sts as before = 71-77-83-87-95-103 sts. Work 1 row with K over K and P over P. Then LOOSELY cast off with K over K and P over P, sweater measures approx. 50-52-54-56-58-60 cm up to shoulder. ASSEMBLY: Sew side seams tog edge to edge in front loop of outermost sts. Sew underarm seams tog edge to edge in front loop of outermost sts. Sew the opening under the sleeves. Sew on buttons. |
|
|
|
Have you finished this pattern?Tag your pictures with #dropspattern #mymusesweater or submit them to the #dropsfan gallery. Do you need help with this pattern?You'll find 17 tutorial videos, a Comments/Questions area and more by visiting the pattern on garnstudio.com. © 1982-2025 DROPS Design A/S. We reserve all rights. This document, including all its sub-sections, has copyrights. Read more about what you can do with our patterns at the bottom of each pattern on our site. |
|


With over 40 years in knitting and crochet design, DROPS Design offers one of the most extensive collections of free patterns on the internet - translated to 17 languages. As of today we count 314 catalogues and 11822 patterns translated into English (UK/cm).
We work hard to bring you the best knitting and crochet have to offer, inspiration and advice as well as great quality yarns at incredible prices! Would you like to use our patterns for other than personal use? You can read what you are allowed to do in the Copyright text at the bottom of all our patterns. Happy crafting!
Post a comment to pattern DROPS 127-1
We would love to hear what you have to say about this pattern!
If you want to leave a question, please make sure you select the correct category in the form below, to speed up the answering process. Required fields are marked *.