
Popular categories
Looking for a yarn?


Comments / Questions (19)
![]() Gunilla wrote:
Gunilla wrote:
Var i strukturmönstret står det att jag ska virka två st i maska nr 2 efter att börjat med tre lm. Varvet med fm börjar med lm, i vilken maska gör jag första fm
05.06.2024 - 15:41DROPS Design answered:
Hei Gunilla. Husk å lese VIRKINFO: Den första fm på varje varv med fm ersätts med 1 lm och den första st på varje varv med st ersätts med 3 lm. Varje varv med fm avslutas med 1 fm i den 3:e lm från början av föregående varv och varje varv med st avslutas med 1 st i den 1:a lm från början av föregående v. Så når du skal hekle 1.rad av Strukturmønster startes det med 1 luftmaske (som erstatter 1 fasmaske) og når du skal hekle 2. rad av Strukturmønster starter du med 3 luftmasker (som erstatter 1. stav). Det hekles ikke 2 staver i 2. maske i Strukturmønstret. mvh DROPS Design
10.06.2024 - 08:30
![]() Gunilla wrote:
Gunilla wrote:
När jag ska göra stolpvarvet, i vilken maska från start börjar jag när jag gjort tre luftmaskor, och kör jag då direkt mellan * och*
08.05.2024 - 15:31DROPS Design answered:
Hei Gunilla. Når du har heklet 1. rad og har 54 masker på raden hekler du etter Strukturmønster og når du skal hekle raden med staver starter du med 3 luftmasker (= 1. stav) og så hekler du 2. stav i nest maske (maske nr. 2 på raden). Litt usikker på hva du mener med : .. direkt mellan * och* . mvh DROPS Design
13.05.2024 - 09:58
![]() Sabine Skåreby wrote:
Sabine Skåreby wrote:
Hej! När det står " virka genom hela maskan" menas det då genom båda maskbågarna? Eller menas det något mer speciellt nedtag? Blev lite fundersam om jag förstått rätt. Mvh Sabine
05.03.2024 - 09:51DROPS Design answered:
Hej Sabine, ja det stemmer :)
07.03.2024 - 15:40
![]() Anne-Mona Kambestad wrote:
Anne-Mona Kambestad wrote:
Jeg forstår ikke dette "Hver rad med fm avsluttes med 1 fm i 3.lm fra beg av forrige rad og hver rad med st avsluttes med 1 st i 1.lm fra beg av forrige rad." Kan noen forklare ?
07.01.2023 - 15:11DROPS Design answered:
Hej Anne-Mona, når du hækler rundt, afslutter du raden ved at hækle i luftmasken fra starten af raden :)
08.03.2023 - 10:05
![]() Valentina wrote:
Valentina wrote:
Eine wunderschöne Tasche die dank der guten und wie immmer sehr übersichtlichen Strickanleitung, ganz einfach nach zu häkeln ist. Ich stricke und häkele seit Jahren fast nur Modelle von Drops Design und hatte noch nie Schwierigkeiten beim umsetzen, es macht jedes mal viel Spaß. Großes Lob und vielen Dank.
07.06.2022 - 11:01
![]() Lena wrote:
Lena wrote:
Can I use Muskat for the entire bag? Or will it be much bigger/ smaller? Thanks!
31.05.2019 - 16:30DROPS Design answered:
Dear Lena, you can use DROPS Muskat for the entire bag - try our yarn converter to get the new amount of yarn; To get the same measurements, make sure your tension is right, ie you should have 22 tr/dc (UK-English) / dc/sc (US-English) = 10 x 10 cm. Happy crocheting!
03.06.2019 - 08:15
![]() Ulla Jørgensen wrote:
Ulla Jørgensen wrote:
Opskrift DROPS 129-6 Super sød taske som jeg vil lave til min datter , hun mangler en lille taske til hendes banko brikker og hvad hun nu ellers har med onsdag aften. Så navnet kunne være Bingo banko taske .Mvh Ulla
06.06.2017 - 17:08
![]() Linnea wrote:
Linnea wrote:
Vilket garn kan jag använda istället för DROPS Lin eftersom det utgått? Kan jag avända "bomull-lin"?
05.03.2017 - 11:30DROPS Design answered:
Hej Linnea. Du kan bruge DROPS Belle - det er et rigtig fint alternativ til Lin. God fornöjelse.
06.03.2017 - 13:43
![]() Louise wrote:
Louise wrote:
Pourquoi ne pas tout simplement coudre la bandouillère sur les côtés repliés du sac? Il me semble que la couture des côtés les rapprochera et le sac n'aura pas l'extension nécessaire pour contenir des objets un peu plus volumineux. Merci de m'expliquer votre façon de faire.
03.02.2017 - 18:22DROPS Design answered:
Bonjour Louise, on coud la bandoulière de chaque côté du sac, au niveau des coutures des côtés, à l'intérieur pour que la couture soit invisible et sur 2-3 cm pour plus de solidité. Bon crochet!
06.02.2017 - 09:02
![]() Michelle wrote:
Michelle wrote:
Thank you for your replay. I still don't understand how to do the shell stich around that. Could you explain?
28.07.2014 - 21:19DROPS Design answered:
Dear Michelle, the fan pattern is worked over the last row (dc) in textured pattern, when bag has been sewn on the side and bottom. Start with sl st in 1st dc, *ch2, skip 2 dc, 1 sc in next dc*, repeat around from *-* to get a total of 36 ch-spaces and then work round 2 of Fan pattern in each ch-space. Happy crocheting!
29.07.2014 - 10:00
|
|
Lazy Daisies#lazydaisiesbag |
|
 |
 |
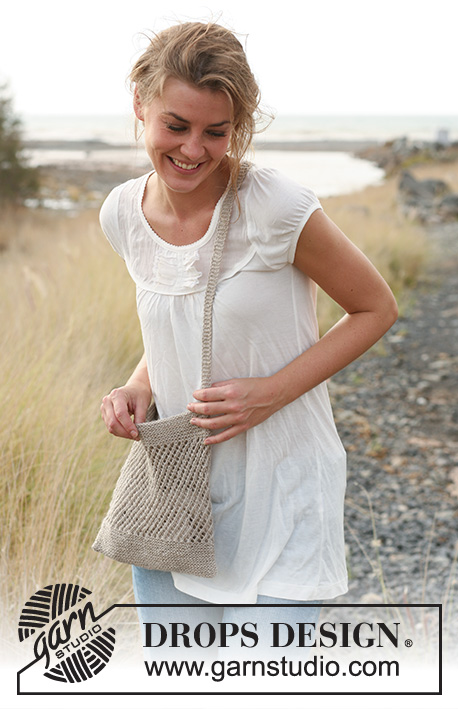
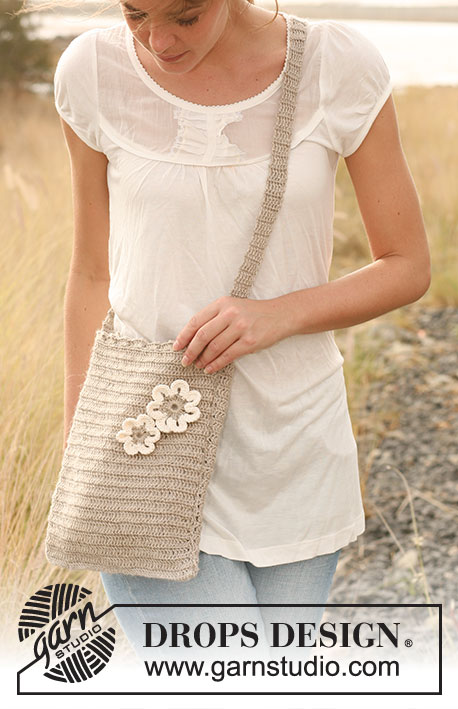
Crochet DROPS bag in "Lin" with flower in "Lin" and "Muskat".
DROPS 129-6 |
|
|
CROCHET INFO: Replace first dc on every dc row with 1 ch and replace first tr on every tr row with 3 ch. Finish every dc row with 1 dc in 3rd ch from beg of previous row and finish every tr row with 1 tr in 1st ch from beg of previous row. TEXTURED PATTERN: * 1 row dc, 1 row tr *, repeat from *-* until finished measurements - NOTE: Work in every dc/tr from previous row and not between. FAN PATTERN: ROUND 1: 1 sl st in first st, * 2 ch, skip 2 sts, 1 dc in next st *, repeat from *-* the entire round and finish with 2 ch and 1 sl st in sl st at beg of round so that there are 36 ch-loops. ROUND 2: Work sl st in the middle of first ch-loop, 3 ch, * 3 tr + 2 ch + 3 tr in next ch-loop, 1 tr in next ch-loop *, repeat from *-* the entire round and finish with 1 sl st in 3rd ch at beg of round = 18 fans. -------------------------------------------------------- BAG: Crochet 73 ch on hook size 3 mm with Lin. Work first row as follows: 1 tr in 4th ch from hook, 1 tr in next ch, * skip 1 ch, 1 tr in each of the next 3 ch *, repeat from *-* the rest of the row = 54 tr on the row, turn piece. READ CROCHET INFO! Continue to work back and forth with TEXTURED PATTERN - see explanation above. REMEMBER THE CROCHET TENSION! When piece measures approx. 57 cm, adjust after 1 row with tr, cut and fasten the thread. ASSEMBLY: Fold the bag double and sew side seams edge to edge with neat little stitches. Work a final edge with FAN PATTERN - see explanation above - around the opening of the bag. LARGE CROCHET FLOWER FOR DECORATION: Crochet 7 ch on hook size 3 mm with Lin and form a ring with 1 sl st in first ch. ROUND 1: 3 ch (= 1 tr), 2 tr in ch-ring, * 6 ch, 1 dc in last tr made, 3 tr in ch-ring *, repeat from *-* a total of 6 times and finish with 6 ch and 1 sl st in 3rd ch from beg of round = 7 ch-loops with 3 tr between each. Cut and fasten the thread. ROUND 2: Switch to Muskat. Work 1 dc in the middle of the first 3 tr on round, * 12 tr in ch-loop, skip 1 tr, 1 dc in next tr, skip 1 tr *, repeat from *-* the entire round and finish with 1 sl st in first dc from beg of round. Cut and fasten the thread. SMALL CROCHET FLOWER FOR DECORATION: Crochet 6 ch on hook size 3 mm with Lin and form a ring with 1 sl st in first ch. ROUND 1: 2 ch (= 1 htr), 2 htr in ch-ring, * 5 ch, 1 dc in last htr made, 3 htr in ch-ring *, repeat from *-* a total of 5 times and finish with 5 ch and 1 sl st in 2nd ch from beg of round = 6 ch-loops with 3 htr between each. Cut and fasten the thread. ROUND 2: Switch to Muskat. Work 1 dc in the middle of the first 3 htr on round, * 10 tr in ch-loop, skip 1 htr, 1 dc in next htr, skip 1 htr *, repeat from *-* the entire round and finish with 1 sl st in first dc from beg of round. Cut and fasten the thread. Sew flowers to front side of bag. SHOULDER STRAP: Crochet 8 ch on hook size 3 mm with Lin. Work first row as follows: 1 tr in 4th ch from hook, 1 tr in each of the last 4 ch = 6 tr on row. Continue to work textured pattern back and forth until shoulder strap measures approx. 115 cm (or desired measurements), cut and fasten the thread. Sew the shoulder strap to each side of the bag (sew it on the inside of the bag so that the side seams on the bag are in the middle of the width of the shoulder strap and so that approx. 2-3 cm of the strap is inside the bag on each side). |
|
Have you finished this pattern?Tag your pictures with #dropspattern #lazydaisiesbag or submit them to the #dropsfan gallery. Do you need help with this pattern?You'll find 6 tutorial videos, a Comments/Questions area and more by visiting the pattern on garnstudio.com. © 1982-2026 DROPS Design A/S. We reserve all rights. This document, including all its sub-sections, has copyrights. Read more about what you can do with our patterns at the bottom of each pattern on our site. |
|


With over 40 years in knitting and crochet design, DROPS Design offers one of the most extensive collections of free patterns on the internet - translated to 17 languages. As of today we count 324 catalogues and 12290 patterns translated into English (UK/cm). 12290
We work hard to bring you the best knitting and crochet have to offer, inspiration and advice as well as great quality yarns at incredible prices! Would you like to use our patterns for other than personal use? You can read what you are allowed to do in the Copyright text at the bottom of all our patterns. Happy crafting!
Post a comment to pattern DROPS 129-6
We would love to hear what you have to say about this pattern!
If you want to leave a question, please make sure you select the correct category in the form below, to speed up the answering process. Required fields are marked *.