
Popular categories
Looking for a yarn?


Comments / Questions (92)
![]() Ricarda Maria wrote:
Ricarda Maria wrote:
Hallo, folgendes Problem: Rechter unterer Teil: nach 23cm soll man am re. Rand die Zunahmen für den Kragen machen, gleichzeitig die Zunahmen für die Seite. Das müsste dann links sein auf der Seite wo die Maschen sind die nicht gestrickt werden. Ich kann dort nur zunehmen wenn ich eine Reihe bis dorthin stricke und zurück, aber das scheint nicht richtig. Wie soll ich alle 2,5cm 1M. aufnehmen? Danke Ricarda Maria
25.08.2014 - 06:33DROPS Design answered:
Sie stricken die Zunahmen ja erst, wenn die verkürzten R abgeschlossen sind. D.h. Sie stricken die verkürzten R 5x, danach dann kraus re und erst jetzt arbeiten Sie die Zunahmen rechts und links. Sie müssen beachten, dass ab den verkürzten R neu gemessen wird, daher die 3 cm, die gelten für den kraus re gestrickten Teil ab dem Ende der verkürzten R.
30.08.2014 - 12:48
![]() Ricarda Maria wrote:
Ricarda Maria wrote:
Hallo, ich habe mir die Anleitung jetzt mehrere Male durchgelesen und verstehe einfach nicht, wo die Vorderteile sind, es steht auch nichts in der Anleitung. Oder werden sie vom Rückenteil über die Schulter nach vorn rüber gestrickt? Bitte helfen Sie mir auf die Sprünge. Danke. LG
19.08.2014 - 16:23DROPS Design answered:
Die Vorderteile sind in den Randteilen enthalten. Die Randteile gehen unten vom Rücken, an dem sie anschließend festgenäht werden, jeweils nach vorne und bilden dort die Vorderteile. Die Anschlagkante ist die Mitte am Rücken in Längsrichtung. Durch die verkürzten R ergibt sich die "Biegung", damit das Vorderteil nach oben weitergestrickt wird, sowie die Rundung, die Sie auf dem Foto sehen, Sie stricken das Randteil also sozusagen "um die Ecke".
19.08.2014 - 18:54
![]() Vibeke Marschall wrote:
Vibeke Marschall wrote:
Kan det passe der ikke er en kort side når man skal tage ind til ærmegab på kantstk.
07.02.2014 - 14:08
![]() Else Mohr Poulsen wrote:
Else Mohr Poulsen wrote:
Smuk model - men jeg forstår ikke opskriften forklaret i højre kantstk. Man skal strikke 18 cm før vendingerne - iflg. skitsen bør man starte fra ærmegabet, men jeg formoder man skal starte nedefra???
30.10.2013 - 11:04DROPS Design answered:
Hej Else. Du starter nedefra, men fordi du strikker vendinger former du en bue, saa underkanten faktisk kommer til at ligge indtil rygstk. Det kan du se paa billedet.
31.10.2013 - 14:01Lucie wrote:
Hello, has anybody tried this very nice model with another yarn? Is it so effective also without the stripes? Thanks for answer.
23.07.2013 - 20:58DROPS Design answered:
Dear Lucie, do not hesitate to ask your Drops store for more informations about the colour. You may also see this jacket worked in other colour in Ravelry. Happy knitting!
24.07.2013 - 09:55Lucie wrote:
Hello, has anybody tried this very nice model with another yarn? Is it so effective also without the stripes? Thanks for answer.
20.07.2013 - 21:12Madeleine wrote:
Aucune couleur brun mixte dans fabel?
17.07.2013 - 15:39DROPS Design answered:
Bonjour Madeleine, il s'agit de la couleur DROPS Fabel 520, désormais appelée "brun/bleu". Bon tricot !
17.07.2013 - 15:44
![]() Corrie wrote:
Corrie wrote:
Ik heb het vest gebreid.nu wil ik er nog een breien, maar de kraag zou ik groter willen. Hoe kan ik dat doen.
21.05.2013 - 11:57
![]() Marianne Poulsen wrote:
Marianne Poulsen wrote:
Er det virkelig rigtigt, at ærmerne skal strikkes i glatstrikning, som der står i opskriften, når man er kommet 3 cm op? Det undrer mig, når resten af jakken er i ren retstrikning, og der også i overskriften står, at det er en retstrikket jakke.
25.03.2013 - 14:38DROPS Design answered:
Ja, det er korrekt. Du strikker ganske rigtig jakken selv i retstrik, men aermerne er i glat. Det giver en fin struktur naar den er faerdig.
27.03.2013 - 09:55
![]() Jalle wrote:
Jalle wrote:
Vielen Dank! Da hätte ich ja durchaus selber drauf kommen können. Liebe Grüsse
20.03.2013 - 20:12
|
|
Magic Ride |
|
 |
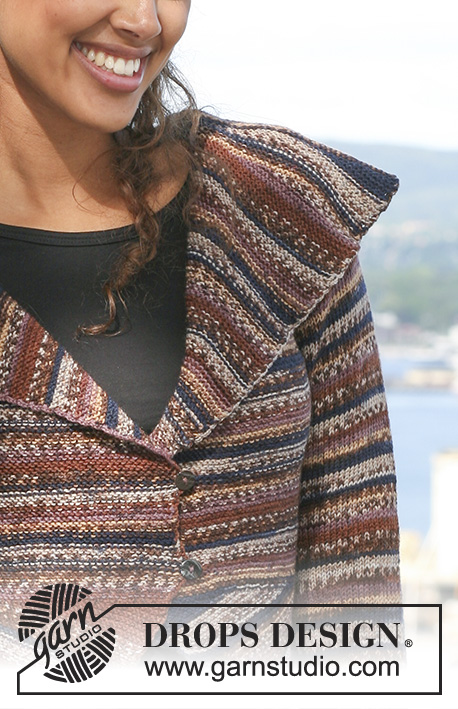 |
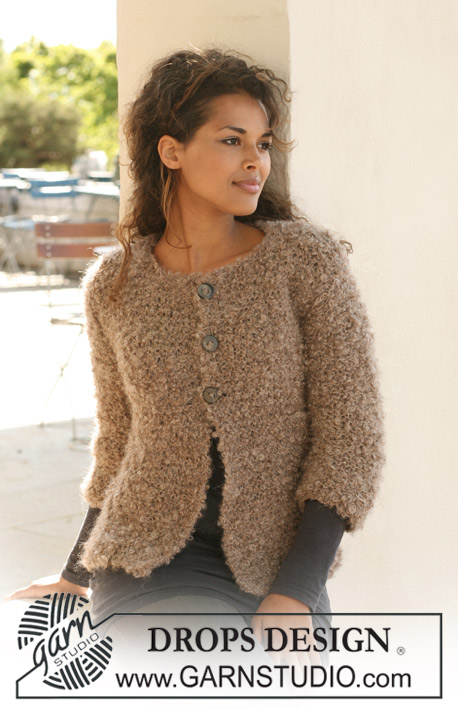
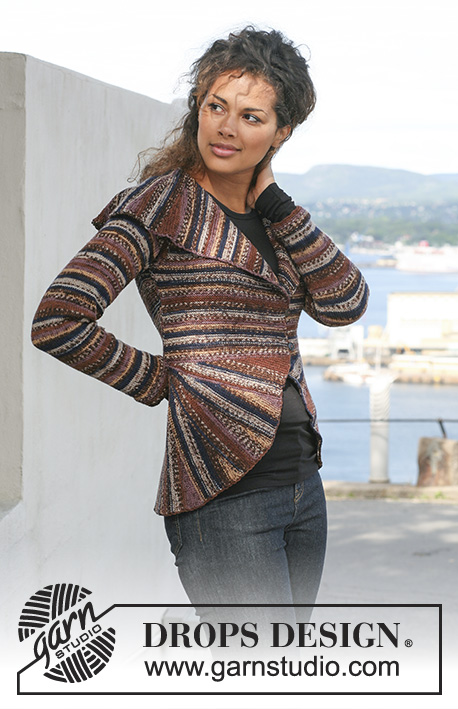
DROPS jacket in garter st in ”Fabel” with shawl collar, curved front pieces and turns. Size S to XXXL.
DROPS 125-36 |
|
|
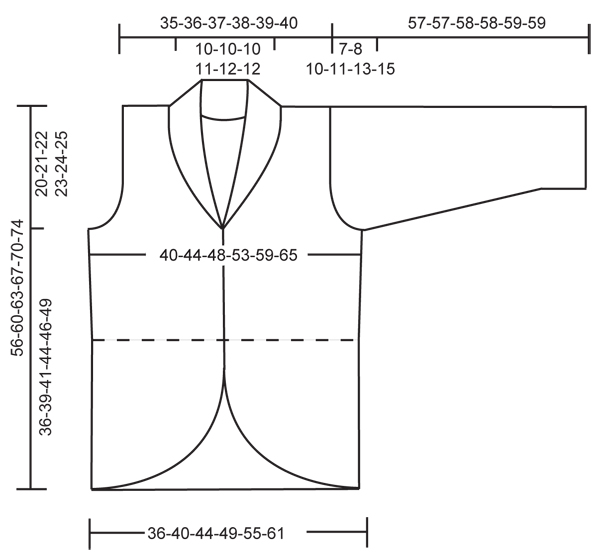
GARTER ST (back and forth on needle): K all rows. TURNS: Work turns to create the curved front pieces as follows: Row 1: Work 48-54-60-66-72-78 sts, turn piece. Row 2: Work return row. Row 3: Work 45-51-57-63-69-75 sts, turn piece. Row 4: Work return row. Row 5: Work 42-48-54-60-66-72 sts, turn piece. Row 6: Work return row. Row 7: Work 39-45-51-57-63-69 sts, turn piece. Row 8: Work return row. Continue like this with 3 sts less before each turn until you have knitted back and forth on only the first 6 sts. Now work 2 rows on all sts. There are now 32-36-40-44-48-52 rows garter st on the outside and 2 rows garter st on the inside. Repeat from Row 1 a total of 5 times. The curve now measures approx 33-38-42-46-50-54 cm on the outside and 1 cm on the inside. ---------------------------------------------------------- BACK PIECE: Worked back and forth on needle. Cast on 88-98-108-120-134-148 sts on needle size 3 mm with Fabel and work GARTER ST – see above. REMEMBER THE KNITTING TENSION! When piece measures 3 cm inc 1 st each side, and repeat the inc on every 2.5 cm a total of 5 times = 98-108-118-130-144-158 sts. When piece measures 15 cm cast off for armhole at the beg of every row each side as follows: 3 sts 1-1-1-2-2-2 times, 2 sts 1-3-4-4-7-10 times and 1 st 2-2-4-5-5-5 times = 84-86-88-92-94-96 sts. When piece measures 33-34-35-36-37-38 cm cast off the middle 24-26-28-32-34-36 sts for neck and complete each shoulder separately. Cast off 1 st on neckline on next row = 29 sts left on shoulder. Cast off when piece measures 35-36-37-38-39-40 cm. RIGHT EDGE PIECE: MAKE ALL MEASUREMENTS ON THE SHORT SIDE! Cast on 51-57-63-69-75-81 sts on needle size 3 mm with Fabel. Work garter st. When piece measures 18-20-22-25-28-31 cm work TURNS with start from RS – see above. When all the turns are completed continue in garter st on all sts. NOW MEASURE PIECE FROM HERE! When piece measures 3 cm inc 1 st towards front edge, and repeat the inc on every 3.5 cm a total of 10 times. AT THE SAME TIME when piece measures 3 cm inc at the side as described for back piece. AT THE SAME TIME when piece measures 15 cm cast off for armhole at the side as described for back piece (cast off for armhole on the shortest side) = 59-61-63-65-65-65 sts. Continue in garter st until piece measures 35-36-37-38-39-40 cm. On next row from WS cast off 29 sts at the side for shoulder, work remaining sts on row = 30-32-34-36-36-36 sts left for collar. Continue with shortened rows on collar sts as follows – from RS: * back and forth on the first 15-16-17-18-18-18 sts, back and forth on all sts *, repeat from *-* until collar measures approx 7-8-8-9-9-10 cm where shortest (measured from shoulder). Cast off. LEFT EDGE PIECE: Like right piece, but mirrored. Work turns with start from WS. SLEEVE: Worked back and forth on needle. Cast on 56-58-60-62-64-68 sts (includes 1 edge st each side) on needle size 3 mm with Fabel and work garter st. When piece measures 3 cm continue in stocking st. When piece measures 8 cm inc 1 st each side, repeat the inc on every 3-2.5-2-1.5-1.5-1.5 cm a total of 13-15-17-20-22-23 times = 82-88-94-102-108-114 sts. When piece measures 50-49-48-47-46-44 cm - NOTE: Less for the larger sizes because of longer sleeve cap and wider shoulder- cast off for sleeve cap at the beg of every row each side as follows: 3 sts 1 time, 2 sts 5 times, 1 st 1-2-4-6-9-12 times, then 2 sts each side until piece measures 56-56-57-57-58-58 cm, cast off 3 sts 1 time each side, and cast off remaining sts of. Piece measures approx 57-57-58-58-59-59 cm. ASSEMBLY: Sew cast on row of edge pieces tog mid back and sew them to bottom edge of back piece. Sew shoulder seams. Set in sleeves and sew under arm seams and side seams in inside 1 edge st. Sew collar tog mid back and sew to neckline. CROCHET BORDER: Crochet a border round the opening of jacket with crochet hook size 3 mm as follows: 1 dc, * 2 ch, skip approx ½ cm, 1 dc *, repeat from *-* and finish with 1 sl st in first dc. Sew buttons on left front piece, approx 2 and 10 cm over the turns and use crochet border as buttonholes. |
|
 |
|
Have you finished this pattern?Tag your pictures with #dropspattern or submit them to the #dropsfan gallery. Do you need help with this pattern?You'll find 15 tutorial videos, a Comments/Questions area and more by visiting the pattern on garnstudio.com. © 1982-2026 DROPS Design A/S. We reserve all rights. This document, including all its sub-sections, has copyrights. Read more about what you can do with our patterns at the bottom of each pattern on our site. |
|


With over 40 years in knitting and crochet design, DROPS Design offers one of the most extensive collections of free patterns on the internet - translated to 17 languages. As of today we count 324 catalogues and 12290 patterns translated into English (UK/cm). 12290
We work hard to bring you the best knitting and crochet have to offer, inspiration and advice as well as great quality yarns at incredible prices! Would you like to use our patterns for other than personal use? You can read what you are allowed to do in the Copyright text at the bottom of all our patterns. Happy crafting!
Post a comment to pattern DROPS 125-36
We would love to hear what you have to say about this pattern!
If you want to leave a question, please make sure you select the correct category in the form below, to speed up the answering process. Required fields are marked *.