
Popular categories
Looking for a yarn?


Comments / Questions (26)
![]() SILVIA BARBERA wrote:
SILVIA BARBERA wrote:
Hola estoy tejiendo este modelo pero no entiendo el Tip 2 me podrían explicar. Desde ya muchas gracias!!!
07.09.2023 - 16:19DROPS Design answered:
Hola Silvia, quiere decir: se trabajan el primer punto en la aguja izquierda (el que estamos trabajando) y el 1º punto en la aguja derecha (el que acabamos de trabajar). Se trabajan estos 2 puntos juntos de revés y después, sin deslizar este punto, se trabaja 2 puntos juntos de derecho (sacando 2 puntos de los mismos 2 puntos).
10.09.2023 - 19:30
![]() Sylke Wildenhain wrote:
Sylke Wildenhain wrote:
Ich möchte dieses Modell gerne aus dem Garn 'Soft Tweed' stricken. Wieviel würde ich dafür in Größe XL benötigen und müsste ich es evtl. in einer größeren Größe stricken, um auf die selben Maße zu kommen? Danke für eure Hilfe!
17.05.2022 - 10:27DROPS Design answered:
Liebe Frau Wildenhain, diese Jacke wurde mit einem Garn der Garngruppe C (= Silke Alpaca) gestrickt, Soft Tweed gehört der Garngruppe B und wird hier keine Alternative dafür sein - aber wenn Sie Soft Tweed mit Kid-Silk zusammen stricken, können Sie mal schauen, ob Sie die richtigen Maschenprobe bekommen, und ob Ihnen diese neue Textur Ihnen gefallen wird. Siehe Beispiel hier. Gerne wird Ihnen Ihr DROPS Laden auch telefonisch oder per E-Mail damit weiterhelfen. Viel Spaß beim stricken!
17.05.2022 - 14:19
![]() Birgitte Hollerup wrote:
Birgitte Hollerup wrote:
Hej. Jeg kan ikke finde ud af mønster 1 , hvordan man ender med 2 masker, når der står i strikketips-1, man skal stramme tråden. Og ej heller mønster 2. Jeg kan ikke finde en video, det ville være smart. Håber i kan hjælpe, God weekend
01.11.2020 - 09:34DROPS Design answered:
Hej Birgitte, det er når du strikker vendepinde ifølge opskriften som du strammer tråden og det gør du lige når du vender midt på en pind. Slå det antal masker op i din størrelse som står i opskriften og strik hver pind som beskrevet. Først når du har strikket 3 pinde over alle masker fortsætte du med M.1. God fornøjelse!
05.11.2020 - 12:23
![]() Joli Caillou wrote:
Joli Caillou wrote:
Bonjour, j’adore ce modèle mais je n’ai pas obtenu de proposition en utilisant le convertisseur. Pensez vous que je puisse obtenir un bon résultat avec Karisma ou puna ? Merci pour vos modèles et tout et tout...
17.02.2019 - 17:06DROPS Design answered:
La laine original etat du groupe de fils C. Le convertisseur nos donne les alternatives suivantes (j;ai pris la taille S, donc 800 g de laine a remplacer): 640g DROPS Nepal (1 fil), 640g DROPS Big Merino (1 fil), 576g DROPS BabyAlpaca Silk (2 fils), 576g DROPS Alpaca (2 fils). Vous pouvez bien sur utiliser chaque laine du du groupe de fils C. Puna et Karisma sont toutes les deux du groupe B. Bon travail!
18.02.2019 - 07:56
![]() Marie Foulon wrote:
Marie Foulon wrote:
Dos : En taille M, monter 88 mailles (donc moins que pour la taille S?) et diminuer 7 fois 2 mailles. Ça ne peut pas donner 84 mailles ? Pouvez-vous m'expliquer, j'ai peur de me lancer.... merci
18.12.2018 - 22:54DROPS Design answered:
Bonjour Mme Foulon, il faut monter 98 m en taille M - la correction a été faite, merci pour votre retour. Bon tricot!
19.12.2018 - 09:02Maree English wrote:
Thanks so much for your quick reply. I understand about the cable set up, but aren't there moss rows before I start on M.1?
24.05.2018 - 10:01DROPS Design answered:
Dear Mrs English, no there are no moss st row before starting set up row and M.1 - the cast on edge will be sewn along the side of back piece (from bottom edge to armholes), just start working 1 row from RS as explained then work M.1. Happy knitting!
24.05.2018 - 10:04Maree English wrote:
I love the design, I hope I can knit it. For the left front piece, the instructions read ***Work first row from RS as follows: 25-30-33-37-43-48 moss sts, P1, K6, P1, K6, P1, 8 moss sts*** Why knit the P1, K6, P1, K6? It doesn't seem to follow the pattern in any way. Also, are we meant to purl a first row for the left and front pieces like the back before we start the moss pattern?
24.05.2018 - 07:10DROPS Design answered:
Dear Mrs English, these (P1, K6, P1, K6, P1) are for the cable worked at the end of row - as shown in M.1. On front piece you cast on the sts and work in pattern from 1st row from RS (= do not start with P1 from WS as for back piece). Happy knitting!
24.05.2018 - 09:52
![]() Silke wrote:
Silke wrote:
Strickt man die Seiten C und E zusammen während man M2 strickt oder näht man sie hinterher zusammen, wenn das komplette Vorderteil fertig ist?
22.02.2015 - 16:18DROPS Design answered:
Sie stricken die Vorderteile mit verkürzten R. Die C/E-Kante ist die Stelle, an der die verkürzten R enden bzw. wo anschließend wieder die M, die bei der verkürzten R nicht gestrickt wurden, weitergestrickt werden. Sie müssen also an dieser Stelle nichts zusammennähen. Im Verlauf des Strickens wird Ihnen sicherlich klar, wie es gemeint ist. Zu den Grundlagen für verkürzte R können Sie sich übrigens bei Bedarf ein Video anschauen, unter "Videos" im Kopf neben dem Foto.
22.02.2015 - 23:49
![]() DROPS Design wrote:
DROPS Design wrote:
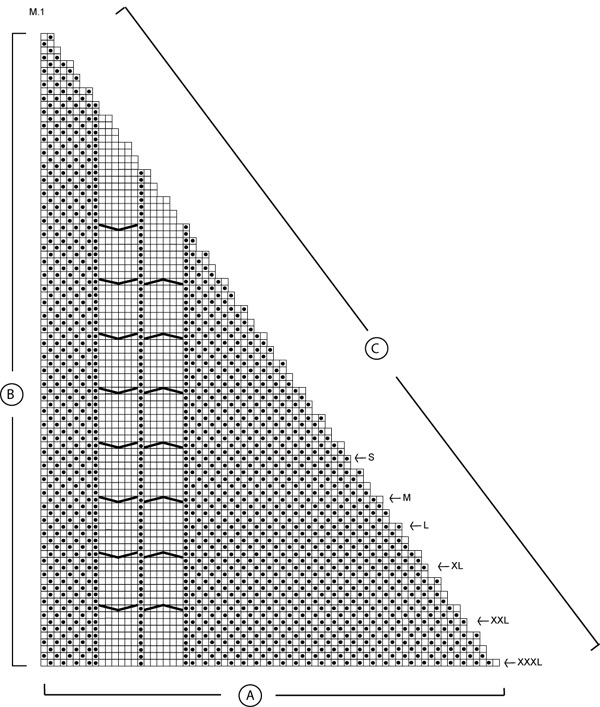
1. yes, the 3 last rows are worked completely as normal rows over all sts. 2. there was a row missing in the chart. chart is updated. thank you!
03.10.2008 - 19:42
![]() Leslie Campos wrote:
Leslie Campos wrote:
Hello.. I need some help!!! 1. Where says "Now continue – from WS – with shortened rows as follows (continue in moss sts and K over P): 2 rows on the first 13 sts, 2 rows on the first 25-26-27-28-29-30 sts, 2 rows on the first 37-39-41-43-45-47 sts and 3 rows on all sts." Are those 3 last rows worked completely as normal rows not shortened? 2. Is a row missing in the second graphic(M2) after the M size finishes?
02.10.2008 - 13:05
|
|||||||||||||||||||||||||||||||
Moon Light |
|||||||||||||||||||||||||||||||
 |
 |
||||||||||||||||||||||||||||||
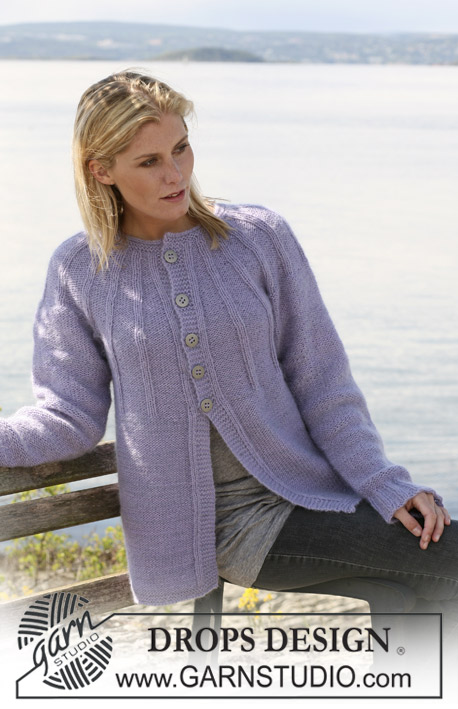
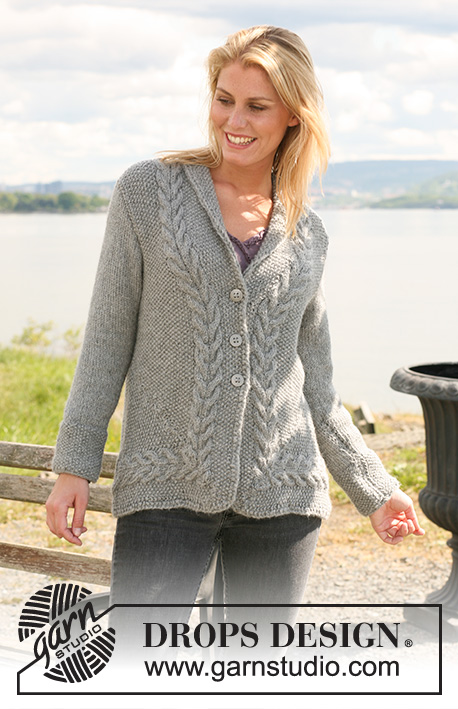
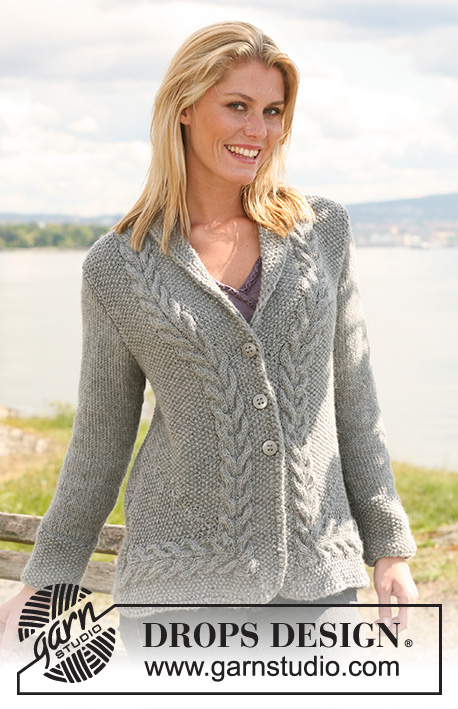
Knitted DROPS Jacket in moss st with cables in ”Silke-Alpaca”. Size S - XXXL.
DROPS 108-52 |
|||||||||||||||||||||||||||||||
|
Moss st: Row 1: * P1, K1 *, repeat from *-*. Row 2: K over P and P over K. Repeat row 2. Pattern: See diagram M.1 and M.2. Diagram shows the pattern from the RS. Work M.1 as follows: Work 1 row in M.1 (= RS). Work row 2, but turn piece when 1 or 2 sts remain – see Knitting tip-1. Work row 3 in M.1. Work row 4, but turn piece when 1 or 2 sts remain. Continue in M.1 until there are 2 sts left. Work M.2 as follows: Work the first 2 rows in M.2 (row 1 = WS). Work row 3, at the end of row work 1 st back into pattern – see Knitting tip-2. Work row 4. Work row 5, at the end of row work 2 sts back into pattern. Continue in M.2 until all sts have been worked back into pattern. Knitting tip-1: Every time you turn mid piece, tighten thread to avoid a hole. Knitting tip-2: To avoid holes when sts are worked back into pattern, work first st from right needle and first st from left needle (i.e. the st worked back into pattern) tog as follows: P through both sts, leave st on needle, K into back of loop of both sts (= 2 sts). Buttonholes: Cast off for buttonholes on right front piece. 1 buttonhole = cast off 4th st from mid front and cast on 1 new st on return row. Cast off for buttonholes when piece measures: Size S: 20, 28 and 36 cm. Size M: 21, 29 and 37 cm. Size L: 22, 30 and 38 cm. Size XL: 23, 31 and 39 cm. Size XXL: 24, 32 and 40 cm. Size XXXL: 25, 33 and 41 cm. Decreasing tip, applies to neckline: Make all dec from the RS as follows: Before 23 sts: slip 1 st as if to K, K1, psso. After 23 sts: K2 tog. Increasing tip, applies to neckline: Make all inc from the RS as follows: Inc 1 st by working 2 sts in 1 st, work inc sts in moss st. Back piece: Cast on 90-98-104-112-124-134 sts (includes 1 edge st each side) on needle size 4.5 mm with 2 threads Silke-Alpaca. P 1 row from WS and continue with 1 thread in moss st – see above. Remember the knitting tension! When piece measures 10 cm dec 1 st each side on every 3-3.5-3.5-4-5-5 cm a total of 7 times = 76-84-90-98-110-120 sts. When piece measures 41-42-43-44-45-46 cm cast off for armhole each side at the beg of every row: 3 sts 1-1-1-1-2-2 times, 2 sts 1-2-3-4-4-6 times and 1 st 2-3-3-4-6-6 times = 62-64-66-68-70-72 sts. When piece measures 58-60-62-64-66-68 cm cast off the middle 16-16-18-20-22-24 sts for neck and dec 1 st on neckline on next row = 22-23-23-23-23-23 sts left on each shoulder. Cast off when piece measures 60-62-64-66-68-70 cm. Left front piece: Work 2 sts towards mid front (the last 2 of the 8 moss sts) with 2 threads throughout. Use a separate ball and let it follow the piece. Cast on 48-53-56-60-66-71 sts with Silke-Alpaca on needle size 4.5 mm. Work first row from RS as follows: 25-30-33-37-43-48 moss sts, P1, K6, P1, K6, P1, 8 moss sts. Now continue – from WS – with shortened rows as follows (continue in moss sts and K over P): 2 rows on the first 13 sts, 2 rows on the first 25-26-27-28-29-30 sts, 2 rows on the first 37-39-41-43-45-47 sts and 3 rows on all sts. Now continue in M.1 (first row = RS). See Pattern and Knitting tips! See start arrow for your size! After 1 vertical repeat of M.1 (= 2 sts on needle) continue in M.2. See Pattern and Knitting tips! After 1 vertical repeat of M.2 – see arrow for your size – there are 48-53-56-60-66-71 sts on needle. Continue with cables and moss st on all 48-53-56-60-66-71 sts (now work all sts on every row without turns). When piece measures 37-38-39-40-41-42 cm (measured from B in measurement chart) inc 1 st after the 8 sts towards mid front and dec 1 st after 23 sts from mid front – see Decreasing and Increasing tips! I.e. number of sts remain the same but no of sts before the cable inc and no of sts after the cable dec. Dec and inc on the same row on every 2-2-2-1.5-1.5-1.5 cm a total of 10-11-12-13-14-15 times. At the same time when piece measures 41-42-43-44-45-46 cm cast off for armhole at side as described for back piece = 41-43-44-45-46-47 sts. When piece measures 59-61-63-65-67-69 cm dec 4 sts on the cable (work the 13 sts on cable as follows: K2 tog, K2, K2 tog, P1, K2 tog, K2, K2 tog) = 37-39-40-41-42-43 sts. When piece measures 60-62-64-66-68-70 cm cast off the outermost 22-23-23-23-23-23 sts for shoulder and continue on the remaining 15-16-17-18-19-20 sts for collar with shortened rows as follows: * work 2 rows on all sts, work 2 rows on 8-8-9-9-10-10 sts towards mid front only *, repeat from *-* until collar measures approx 7-7-8-8-9-9 cm (measured where shortest) from shoulder. Cast off. Right front piece: Like left front piece, but mirrored. Remember to cast off for buttonholes – see above. Mirrored pattern: Cast on 48-53-56-60-66-71 sts with Silke-Alpaca on needle size 4.5 mm. Work shortened rows – in the following pattern, as seen from the RS : 8 moss sts, P1,K 6, P1,K 6, P1, 25-30-33-37-43-48 moss sts – as follows – from RS: 2 rows on the first 13 sts, 2 rows on the first 25-26-27-28-29-30 sts, 2 rows on the first 37-39-41-43-45-47 sts, and 4 rows on all sts. Then continue in M.1, but mirrored, i.e. beg at the left side of diagram and work the turns at the end of row from RS. Sleeves: Worked in the round on double pointed needles. Cast on 41-41-43-45-45-47 sts on needle size 4.5 mm with 1 thread Silke-Alpaca. Insert 1 Marking Thread (MT) at beg of round. P 1 round and continue in moss st. When piece measures 10 cm continue in stocking st, at the same time inc 1 st on each side of MT on every 4-3.5-3.5-2.5-2-2 cm a total of 9-10-11-13-15-16 times = 59-61-65-71-75-79 sts. When piece measures 48-47-47-46-45-44 cm – less on the larger sizes because of longer sleeve cap and wider shoulder - cast off 3 sts on each side of MT and complete piece back and forth on needle. Cast off to shape the sleeve cap each side at the beg of every row: 2 sts 3 times, 1 st 1-2-3-4-6-8 times, then 2 sts each side until piece measures 55-55-56-56-57-58 cm, now cast off 3 sts each side 1 time and cast off remaining sts. Sleeve measures approx 56-56-57-57-58-59 cm. Assembly: Sew shoulder seams. Set in sleeves. Sew side seam inside 1 edge st. Sew collar tog mid back and sew to neckline. Sew on buttons |
|||||||||||||||||||||||||||||||
Diagram explanations |
|||||||||||||||||||||||||||||||
|
|||||||||||||||||||||||||||||||
 |
|||||||||||||||||||||||||||||||
 |
|||||||||||||||||||||||||||||||
Have you finished this pattern?Tag your pictures with #dropspattern or submit them to the #dropsfan gallery. Do you need help with this pattern?You'll find 18 tutorial videos, a Comments/Questions area and more by visiting the pattern on garnstudio.com. © 1982-2026 DROPS Design A/S. We reserve all rights. This document, including all its sub-sections, has copyrights. Read more about what you can do with our patterns at the bottom of each pattern on our site. |
|||||||||||||||||||||||||||||||


With over 40 years in knitting and crochet design, DROPS Design offers one of the most extensive collections of free patterns on the internet - translated to 17 languages. As of today we count 324 catalogues and 12290 patterns translated into English (UK/cm). 12290
We work hard to bring you the best knitting and crochet have to offer, inspiration and advice as well as great quality yarns at incredible prices! Would you like to use our patterns for other than personal use? You can read what you are allowed to do in the Copyright text at the bottom of all our patterns. Happy crafting!
Post a comment to pattern DROPS 108-52
We would love to hear what you have to say about this pattern!
If you want to leave a question, please make sure you select the correct category in the form below, to speed up the answering process. Required fields are marked *.