
Popular categories
Looking for a yarn?


Comments / Questions (72)
![]() Camilla Bunne wrote:
Camilla Bunne wrote:
Mitt garn räckte inte heller men hade tur med tanke på att jag påbörjade västen förra semestern och färdigställde den idag. Den garnaffär där jag handlar mycket av mitt garn hade kvar garn i samma färgbad. Trots felet jag upptäckte samma som även Mona skriver om härnedan och att garnet inte räckte är jag mycket nöjd med resultatet, denna väst kommer jag att använda.
14.05.2014 - 13:32
![]() Marie wrote:
Marie wrote:
Hej! Har nu virkat klart västen i storlek XL (köpte 12 nystan), men även fastän jag hållt virkmåtten, så räcker inte garnet :( har hela kanten runt kvar att göra och inget mer garn... Är jättebesviken.
02.04.2013 - 16:09
![]() Ingrid P. wrote:
Ingrid P. wrote:
Am Anfang der Reihe 7 des Quadrates soll eine Kettmasche mittig in den ersten Luftmaschenbogen gehäkelt werden. Geschieht dies ohne Überbrückung durch Luft- oder weitere Kettmaschen? So ziehe ich nämlich den Luftmaschenbogen zusammen und es ist mir nicht klar, ob das gewollt ist oder nicht.
16.02.2013 - 16:50DROPS Design answered:
Liebe Ingrid, Sie haben völlig Recht, das (Kett-M bis zur Mitte des Bogens) hat in der Übersetzung gefehlt. Wir ergänzen es gleich.
18.02.2013 - 09:41
![]() Jenny wrote:
Jenny wrote:
I am having trouble understanding how the top is done. Is it all one piece, separated from the bottom, because it looks like there are shoulder seams which would meant there are two front pieces. I wish there was a video of a crochet item like this one so I could see how to use the pattern diagrams.
04.08.2012 - 03:10DROPS Design answered:
Once you finish the squares at the waist, you work back piece and 2 front pieces separately as explained in pattern.
24.08.2012 - 21:41
![]() Patricia M. wrote:
Patricia M. wrote:
Hallo, ich habe nun die Quadrate zu einer Kette zusammengehäkelt, in meinem Fall 9Stk, die weitere Verarbeitung fM verteilt zu häkeln habe ich auch durchgeführt. Es lt. Anleitung 21 fM pro Quadrat gehäkelt werden, das wäre dann 189 fM und nicht wie vorgegeben 186fM, habe ich einen Rechenfehler oder stimmt dann die Anleitung nicht? Der nächste Schritt wäre dann M1A 3fM M1B 6fM M1C 3fM. in meinem Fall 3 - 183 - 3 geht also nicht auf. Bin gerade etwas ratlos.
21.05.2012 - 23:32DROPS Design answered:
Sie haben in der Grösse XL 192 Maschen, die sich wie folgt aufteilen: 3 M + 186 M im Muster M1B + 3 M = 192 M
22.05.2012 - 17:12
![]() Michelle wrote:
Michelle wrote:
I mønsterdiagrammet står der, at man skal hækle st.masker, men i virkeligheden er det dbl.st.masker man skal hækle. Kan I ikke rette navnet på symbolet, så det passer? Det er så ærgeligt, når man tror, at man gør det rigtigt og så skal til at pille op.
04.07.2011 - 17:33
![]() DROPS Design wrote:
DROPS Design wrote:
The translations for the Diagrams for all Garnstudio patterns are included within the text of the Pattern itself. If you look immediately above the diagram, you will find lines starting with an = sign. These are the translations, and they are given in the same vertical order as the chart symbols within the diagram.
13.07.2008 - 22:11Fran wrote:
Can someone give me the translations for the pattern diagram. We're just having a a few problems. Thanks
13.07.2008 - 03:22
![]() DROPS Design NL wrote:
DROPS Design NL wrote:
Hoi Marjan. Je hebt gelijk. In de teltekening moet je dubbelstokjes (dstk) haken. Ik heb het nu gewijzigd. Mvg. Tine
08.04.2008 - 16:55
![]() Marjan Noor wrote:
Marjan Noor wrote:
Patroon 99-2 volgens vertaling van symbolen-patroon moet je met stokjes werken maar de beschrijving van de patroon geeft zowel stokjes en dubbele stokjes aan.
08.04.2008 - 09:55
|
|||||||||||||
Enjoy#enjoycardigan |
|||||||||||||
|
|
|||||||||||||
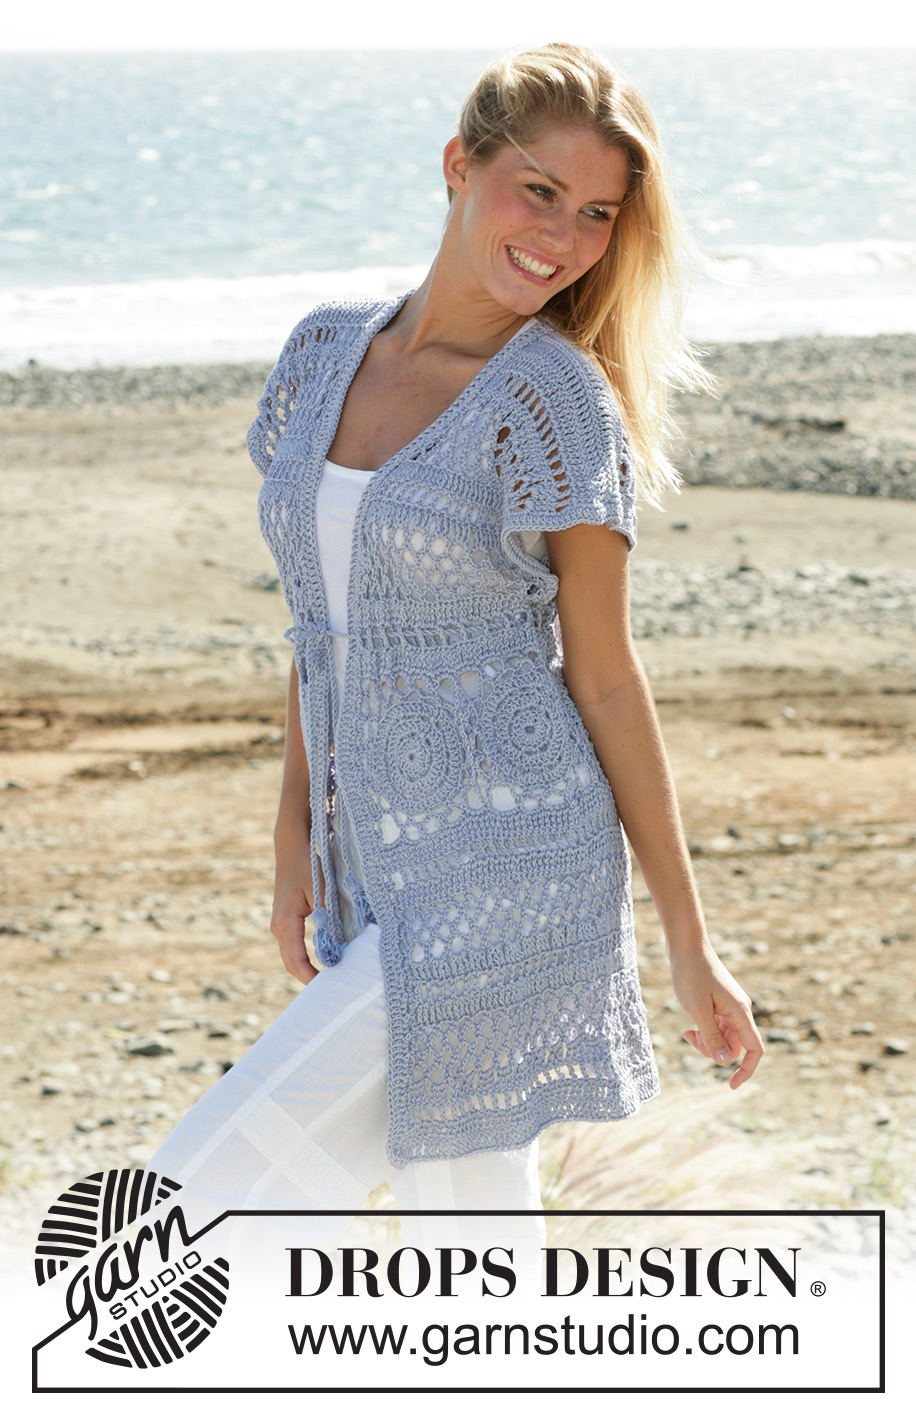
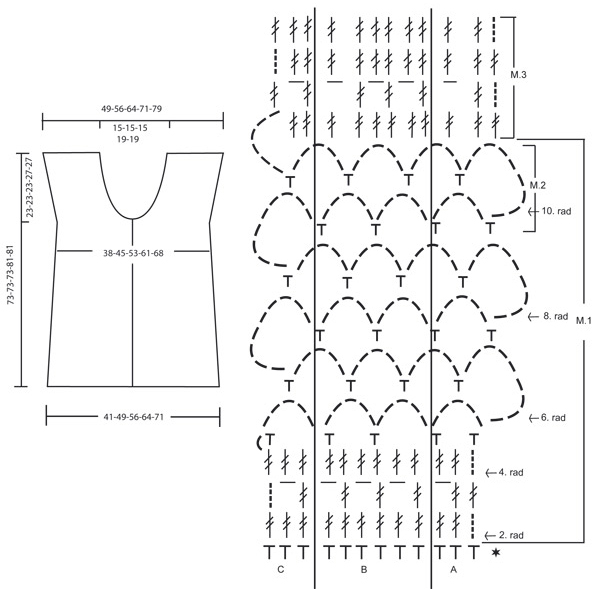
DROPS long sleeves less cardigan with wide shoulders crochet in “Muskat”. Sizes XS - XXL
DROPS 99-2 |
|||||||||||||
|
Crochet tension: 16 tr x 10 rows using hook size 4 mm and Muskat =10 x 10 cm. Crochet info: At the beg. of row substitute the tr with 3 ch. Pattern info: See diagram M.1, M.2 and M.3. M.2 is crochet only in size XL and XXL - one time after M.1 Size XS/S–M-L: 1 repeat = M.1 Size XL-XXL: 1 repeat = M.1 + M.2 The diagrams are seen from the RS. English Translations for the wording in the diagrams are given at the bottom of this pattern, and they are given in the vertical order in which they appear in the diagram. Increasing tips: For inc. crochet 1 extra ch-loop at the end of a row with ch-loops. Crochet until finish, then crochet 8 ch, 1 dc in the last dc. Turn and crochet the first dc in the new ch-loop. Cast off tips: For rows with dtr: Cast off as follows at beg. of row: Substitute 3 dtr with 3 sl sts. Cast off as follows at the end of row: Turn when there are 3 dtr left to cast off. For rows with ch-loops: Cast off as follows from beg. of row: Crochet sl sts over the the last ch-loop from previous row. Cast off as follows at the end of row: Turn when 1 ch-loop is left. Crochet squares: 1 crochet square measures approx. 13 x 13 cm. Crochet squares: Crochet 5 ch and make a ring with a sl st. Read crochet info! 1st round: crochet 16 tr in the ring. 2nd round: 1 dc in the first tr, *3 ch, skip 1 tr, 1 dc in the next tr*, repeat from *-* and finish with 3 ch and a sl st in the first dc = 8 ch-loops. 3rd round: *1 tr in each dc, 3 tr in each ch-loop*, repeat from *-* and finish with a sl st in the first tr = 32 tr 4th round: 1 dc in the first tr, *3 ch, skip 1 tr, 1 dc in the next tr*, repeat from *-* and finish with 3 ch and a sl st in the first dc = 16 ch-loops 5th round: *1 tr in each dc and 2 tr in each ch-loop*, repeat from *-* until finish round and finish with a sl st in the first tr = 48 tr 6th round: *1 dc in the first tr, 5 ch, skip 2 tr, 1 dc in the next tr*, repeat from *-* and finish with 5 ch and a sl st in the first dc = 16 ch-loops 7th round: Crochet sl sts until the middle of the first ch-loop *(7 ch, 1 dc in the next ch-loop), repeat from (-)a total of 3 times, 10 ch (=corner), 1 dc in the next ch-loop*, repeat from *-* until finish round. Cut and sew the thread. Crochet a total of 6-7-8-9-10 squares. Put the squares on top of each other 2 by 2 and crochet as follows: 1 dc in the outer most ch-loop of both squares, * 5 ch, 1 dc in the next ch-loop of both squares*, repeat from *-* until the squares are crochet tog. as a long string. Continue to crochet the sleeves less cardigan from the squares and down in one piece, and then the top part. Bottom piece: Crochet the first row from the WS. Crochet 120-144-168-192-216 dc in the bottom edge of the string of crochet squares (crochet approx. 20-20-21-21-22 dc in each square) Turn and crochet according to M.1A over the first 3 dc, repeat M.1B over the next 114-138-162-186-210 dc and finish with M.1C. Work M.1 (M.1 + M.2 for size XL and XXL) – read pattern info, 2 times in total. AT THE SAME TIME when M.1 is worked for the 2nd time, on 1st row inc 6 dtr evenly distributed = 126-150-174-198-222 dtr. Them work according to M.3, AT THE SAME TIME on 1st row inc 6 dtr evenly distributed = 132-156-180-204-228 dtr. Cut and sew the thread tight. The piece measures approx. 30-30-30-34-34 cm. Top piece: Crochet the first row from the WS. Crochet 120-144-168-192-216 dc in the top edge of the string of squares. Split the work and finish front and back pieces separately. All measures are done from the top edge of the string of squares. Right front: 1st row = RS. Crochet M.1 (M.1 + M.2 for size XL and XXL) – read pattern info over 30-36-42-48-54 dc at the right side of the piece. (crochet M.1A over the first 3 dc then repeat M.1B over the next 24-30-36-42-48 dc and finish with M.1C). At the same time at the end of the 6th, 8th and 10th row of M.1 inc. for wide shoulder – read increasing tips above. At the same time cast off 3 dtr/ 1 ch-loop for the neck shaping on every 2.5 cm a total of 4-4-4-5-5 times – read casting off tips. After a total of 2 vertical repeats of M.1 (M.1 + M.2 for size XL and XXL) are completed crochet M.3. After all dec. and inc. are completed there are 27-33-39-42-48 dtr left for each shoulder. Cut and sew the thread tight when the piece measures approx. 30-30-30-34-34 cm. The total length of the cardigan is approx. 73-73-73-81-81 cm Left from piece: Crochet as right front but reverse. NB: To get the cast off edges look the same each side, beg. the left front piece at the mid front. 1st row is the WS. Back piece: 1st row =RS. Crochet M.1 (M.1 + M.2 for size XL and XXL) – read pattern info over the mid 60-72-84-96-108 dc. (Crochet M.1A over the first 3 dc, repeat M.1B over the next 54-66-78-90-102 dc and finish with M.1C). At the same time at the end of the 6th to 11th row inc. for wide shoulder as done for the front pieces. Crochet a total of 2 repeats of M.1 (M.1 + M.2 for size XL and XXL) then crochet M.3 (after all inc. for the wide shoulder there are 78-90-102-114-126 dtr) At the same time on the 3rd row of M.3 crochet 1 row but only over the outer most 27-33-39-42-48 dtr/ch each side (do not crochet over the mid 24-24-24-30-30 dtr/ch= neck line). Crochet the last row of M.3, cut and sew the thread, the piece measures approx. 330-30-30-34-34 cm. Assembly: Sew the shoulder seams with small neat stitches. Sew approx. 4 cm tog. under neath the armhole, i.e. up to where the inc. for the shoulder beg. Crochet edge: Crochet and edge around the armholes and up along the opening of the sleeve less cardigan as follows: Crochet up along one side of the front piece around the neck opening and down along the other front piece: 1st row: Crochet 1 dc, *3 ch, skip over approx. 1-1.5 cm, 1 dc*, repeat from *-* until finish. 2nd row: 1 dc in each dc and 2 dc in each ch-loop (in the transitions between the neck and front pieces crochet 4 dc in each ch-loop). 3rd row: 1 tr in each dc. Twisted string: Cut 4 threads Muskat of approx 3 meters. Twist them tog until they resist, double thread and let it twist tog. Tie knot approx 5 cm from each end of the string. Pull thread up and down through the 2nd round of dtr above the crochet squares. Make a tassel for each end: cut 25 threads Muskat of approx. 25 cm each. Split the string above the knot and pull the threads through the split. Knot the threads tog. and twist 1 of them around the top of the tassel to keep it tog. Cut and sew the thread. |
|||||||||||||
Diagram explanations |
|||||||||||||
|
|||||||||||||
 |
|||||||||||||
Have you finished this pattern?Tag your pictures with #dropspattern #enjoycardigan or submit them to the #dropsfan gallery. Do you need help with this pattern?You'll find 10 tutorial videos, a Comments/Questions area and more by visiting the pattern on garnstudio.com. © 1982-2026 DROPS Design A/S. We reserve all rights. This document, including all its sub-sections, has copyrights. Read more about what you can do with our patterns at the bottom of each pattern on our site. |
|||||||||||||


With over 40 years in knitting and crochet design, DROPS Design offers one of the most extensive collections of free patterns on the internet - translated to 17 languages. As of today we count 324 catalogues and 12290 patterns translated into English (UK/cm). 12290
We work hard to bring you the best knitting and crochet have to offer, inspiration and advice as well as great quality yarns at incredible prices! Would you like to use our patterns for other than personal use? You can read what you are allowed to do in the Copyright text at the bottom of all our patterns. Happy crafting!
Post a comment to pattern DROPS 99-2
We would love to hear what you have to say about this pattern!
If you want to leave a question, please make sure you select the correct category in the form below, to speed up the answering process. Required fields are marked *.