
Popular categories
Looking for a yarn?


Comments / Questions (14)
![]() Jackie wrote:
Jackie wrote:
Står det fel i beskrivningen angående höger vante? För jag har stickat en vänster vante och håller nu på med höger vante men trots att jag följer A.x diagrammet får jag fram ännu en vänstervante. Känner mig förvirrad
25.11.2025 - 14:17DROPS Design answered:
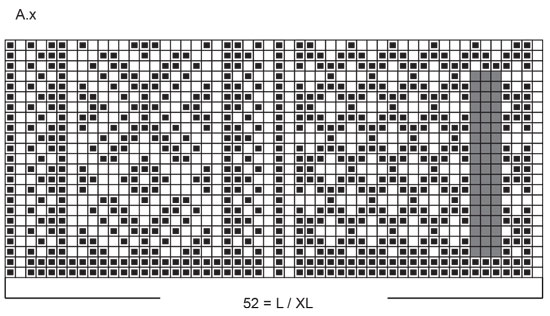
Hei Jackie. Usikker på hva som er blitt feil hos deg, men om du følger A.X så er det gråe feltet i diagrammet på høyre side av 1. del av diagrammet = tommelen er på høyre vott, mens når du strikkes A.1 er det gråe feltet på venstre side av første del av diagrammet. Har du starten på vottene på samme sted? mvh DROPS Design
01.12.2025 - 10:40
![]() Sara wrote:
Sara wrote:
Hei, strikker man rundt eller frem og tilbake i oppskriften?
11.12.2023 - 13:25DROPS Design answered:
Hei Sara. Man strikker rundt: ) Slik står det i oppskriften: Legg opp 48-48 masker på settpinner 3 med bunnfargen, strikk vrangbord RUNDT med 2 masker rett og 2 masker vrang til arbeidet måler 5 cm. mvh DROPS Design
11.12.2023 - 13:38
![]() Mia wrote:
Mia wrote:
Hei! Voiko Drops merino extra fine langalla neulotut lapaset silittää lopuksi? Vai miten ne kannattaisi viimeistellä?
15.11.2023 - 20:21DROPS Design answered:
Hei, voit silittää lapaset, mutta enintään 110 asteessa.
17.11.2023 - 14:29
![]() Agnieszka wrote:
Agnieszka wrote:
Wydaje mi się, że jest rozbieżność pomiędzy schematem i opisem. Ostatni rzad na schemacie wskazuje, że zostaje 4 oczka. W opisie jest "gdy schemat jest zakończony, zostaję 8 oczek ". Co jest poprawne?
20.10.2022 - 14:38DROPS Design answered:
Witaj Agnieszko, wydaje mi się, że masz rację. Zgłoszę korektę do tego wzoru. Pozdrawiam!
22.10.2022 - 09:00
![]() Anu wrote:
Anu wrote:
Hello, This is my first time knitting a mitten. My question is very basic -(it may sound silly to more experienced knitter) .Where do you measure the circumfrence to determine the size to knit - at the wrist or at the palm ? Thank you regards
13.09.2022 - 23:09DROPS Design answered:
Hi Anu, The circumference is around the palm/hand. Happy knitting!
14.09.2022 - 06:56
![]() Monica wrote:
Monica wrote:
Hejsan, Jag håller på att sticka tummen och har stickat 15 varv. Är det A3 jag ska följa och efter 15 varv börja avmaska? Tack för hjälpen, Monica
17.03.2022 - 16:16DROPS Design answered:
Hej Monica. Ja det stämmer att att det är A.3 du ska sticka när du gör tummen. Avmaskningen på tummen börjar på varv 15 i diagrammet. Mvh DROPS Design
18.03.2022 - 07:48
![]() Monica wrote:
Monica wrote:
Hej, Jag undrar när man ska minska av på slutet av vanten Clapping Elves? Jag har stickat 26 varv ( 7 cm ) från tummen. Tack, Monica
11.03.2022 - 15:45DROPS Design answered:
Hei Monica. Du strikker etter diagram A.1 og da vil du se når du skal begynne å felle av på toppen av votten i den str. du strikker. mvh DROPS Design
14.03.2022 - 13:47
![]() Monica wrote:
Monica wrote:
Hej, Jag vill höra med er vilka strumpstickor man ska använda till Clapping Elves mönstret. Ska man bara sticka med strumpstickor nr. 3? Tack Monica
08.03.2022 - 09:33DROPS Design answered:
Hej Monica. Ja det stämmer, de stickas med strumpstickor nr. 3. Mvh DROPS Design
09.03.2022 - 13:47
![]() Monica wrote:
Monica wrote:
Hejsan, Jag ska sticka vantarna Clapping Elves i storlek L/XL jag förstår inte hur många varv man ska sticka efter resåret upp till tummen?(när man ska börja sticka tummen)? Vänligen Monica
14.02.2022 - 17:49DROPS Design answered:
Hej Monica, du börjar på A.2 till tummen när du kommer de de grå maskor i A.1. Lycka till :)
17.02.2022 - 15:07
![]() Monica wrote:
Monica wrote:
Hej, Jag tänker sticka vantarna Clapping Elves men vill sticka utan mönster, jag undrar hur många varv ska man sticka upp till tummen om man stickar i storlek L/XL och när ska man börja avmaska för toppen av vanten. Hur många varv ska man sticka när man stickar tummen? Tack
27.01.2022 - 13:16DROPS Design answered:
Hej Monica, du finder målene til de 2 størrelser øverst i opskriften :)
27.01.2022 - 15:46
|
|||||||||||||||||||
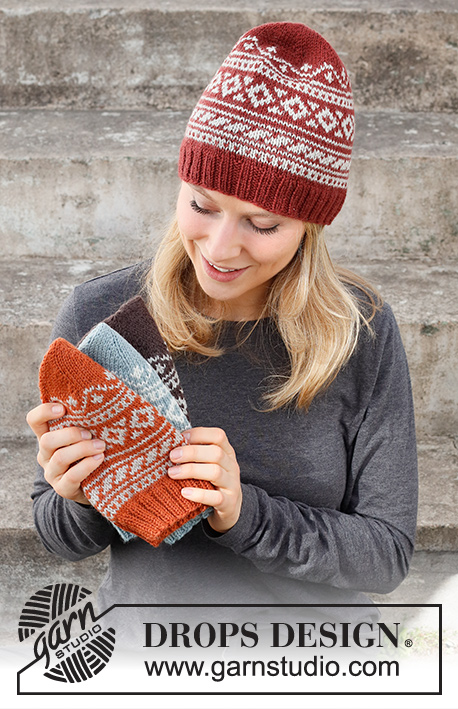
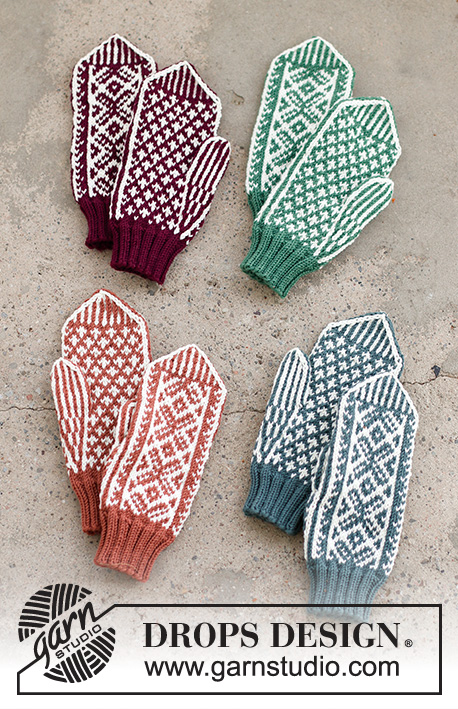
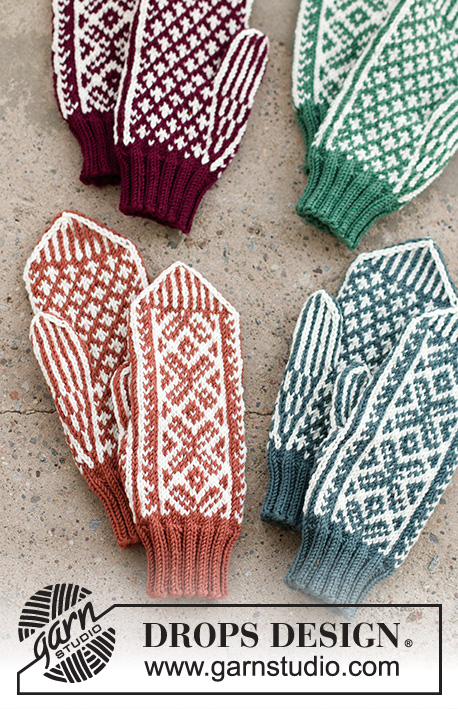
Clapping Elves#clappingelvesmittens |
|||||||||||||||||||
 |
 |
||||||||||||||||||
Knitted mittens for Christmas with Nordic pattern in DROPS Merino Extra Fine. Theme: Christmas
DROPS 214-66 |
|||||||||||||||||||
|
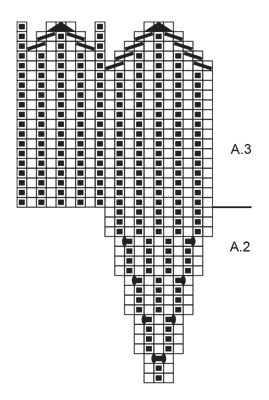
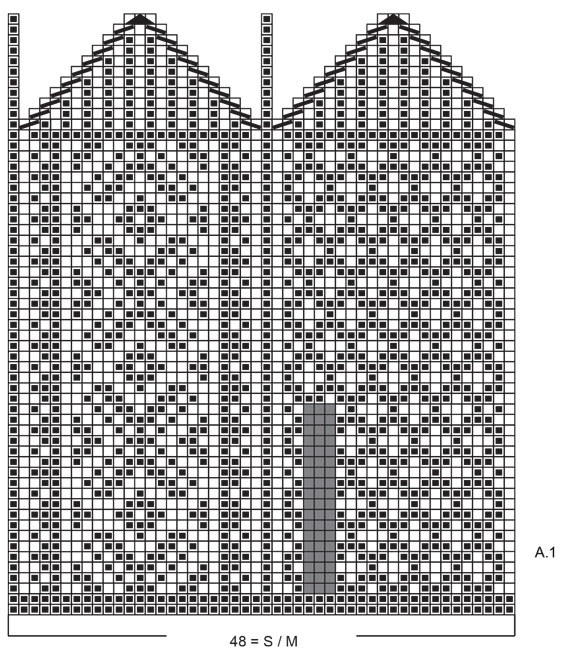
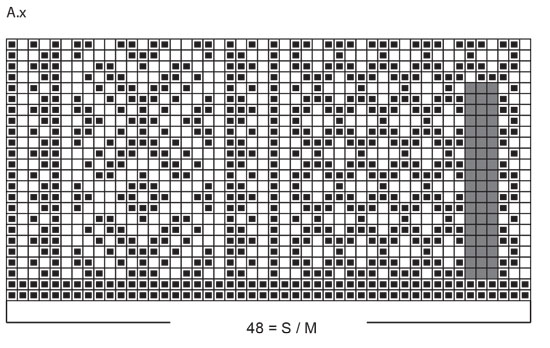
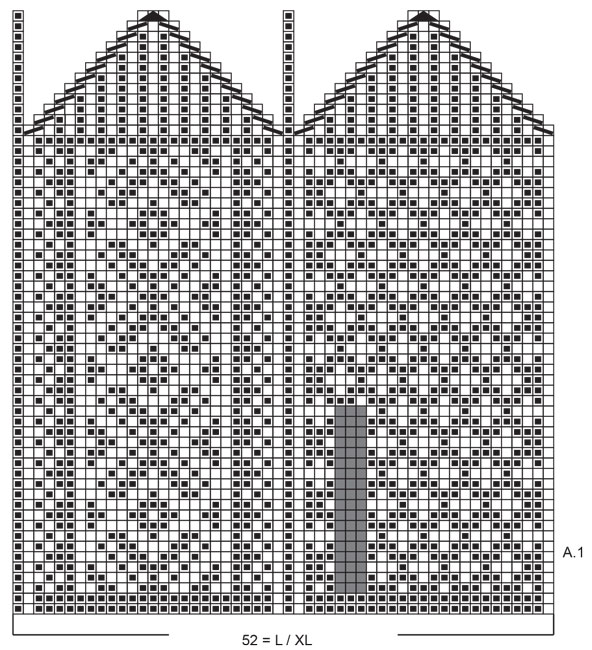
------------------------------------------------------- EXPLANATION FOR THE PATTERN: ------------------------------------------------------- PATTERN: See diagrams A.1, A.2, A.3 and A.x. Choose diagram for your size (applies to A.1 and A.x). Diagram A.x shows where thumb should be placed on right mitten. Work the entire diagram in stocking stitch. KNITTING TIP: To avoid the garment losing elasticity when working pattern, it is important not to tighten the strands on back side of piece. Switch to a higher needle number when working pattern if the pattern is tight. ------------------------------------------------------- START THE PIECE HERE: ------------------------------------------------------- MITTENS - SHORT OVERVIEW OF THE PIECE: Work from wrist and up while increasing for thumb. When increase for thumb is done, slip these stitches on a stitch holder before finishing the hand. Work thumb at the end. LEFT MITTEN: Cast on 48-48 stitches on double pointed needles size 3 mm with base colour, work rib in the round with knit 2 and purl 2 until piece measures 5 cm. Work 1 round in stocking stitch while increasing 0-4 stitches evenly = 48-52 stitches. Work diagram A.1. When it has been worked up to the grey squares in the diagram, work A.2 over these 3 stitches. Read KNITTING TIP in explanation above and REMEMBER KNITTING TENSION! Continue to work according to diagram A.1 and A.2 (increase stitches in A.2). After last round in A.2 there are 11 stitches in A.2 - slip these stitches on a stitch holder. On next round cast on 3 stitches where stitches were slipped on stitch holder = 48-52 stitches on round. Work A.1 over all stitches. When diagram has been worked vertically, 8 stitches remain on round. Cut the yarn and pull it through the remaining stitches, tighten together and fasten. THUMB: Slip the 11 thumb stitches on double pointed needles size 3 mm. Begin round by knitting up 9 stitches at the back of thumb (knit up 2 stitches in each side, 5 stitches in the 3 stitches cast on) = 20 stitches. Work diagram A.3 in the round. When diagram has been worked vertically, 4 stitches remain on round. Cut the yarn and pull it through the remaining stitches, tighten together and fasten. RIGHT MITTEN: Work as left mitten but work thumb in opposite side - see diagram A.x which shows where thumb should be worked in pattern. |
|||||||||||||||||||
Diagram explanations |
|||||||||||||||||||
|
|||||||||||||||||||
 |
|||||||||||||||||||
 |
|||||||||||||||||||
 |
|||||||||||||||||||
 |
|||||||||||||||||||
 |
|||||||||||||||||||
Have you finished this pattern?Tag your pictures with #dropspattern #clappingelvesmittens or submit them to the #dropsfan gallery. Do you need help with this pattern?You'll find 21 tutorial videos, a Comments/Questions area and more by visiting the pattern on garnstudio.com. © 1982-2026 DROPS Design A/S. We reserve all rights. This document, including all its sub-sections, has copyrights. Read more about what you can do with our patterns at the bottom of each pattern on our site. |
|||||||||||||||||||


With over 40 years in knitting and crochet design, DROPS Design offers one of the most extensive collections of free patterns on the internet - translated to 17 languages. As of today we count 324 catalogues and 12290 patterns translated into English (UK/cm). 12290
We work hard to bring you the best knitting and crochet have to offer, inspiration and advice as well as great quality yarns at incredible prices! Would you like to use our patterns for other than personal use? You can read what you are allowed to do in the Copyright text at the bottom of all our patterns. Happy crafting!
Post a comment to pattern DROPS 214-66
We would love to hear what you have to say about this pattern!
If you want to leave a question, please make sure you select the correct category in the form below, to speed up the answering process. Required fields are marked *.