


Komentáře / Otázky (13)
![]() Sara napsala:
Sara napsala:
Hei, strikker man rundt eller frem og tilbake i oppskriften?
11.12.2023 - 13:25Odpověď DROPS Design :
Hei Sara. Man strikker rundt: ) Slik står det i oppskriften: Legg opp 48-48 masker på settpinner 3 med bunnfargen, strikk vrangbord RUNDT med 2 masker rett og 2 masker vrang til arbeidet måler 5 cm. mvh DROPS Design
11.12.2023 - 13:38
![]() Mia napsala:
Mia napsala:
Hei! Voiko Drops merino extra fine langalla neulotut lapaset silittää lopuksi? Vai miten ne kannattaisi viimeistellä?
15.11.2023 - 20:21Odpověď DROPS Design :
Hei, voit silittää lapaset, mutta enintään 110 asteessa.
17.11.2023 - 14:29
![]() Agnieszka napsala:
Agnieszka napsala:
Wydaje mi się, że jest rozbieżność pomiędzy schematem i opisem. Ostatni rzad na schemacie wskazuje, że zostaje 4 oczka. W opisie jest "gdy schemat jest zakończony, zostaję 8 oczek ". Co jest poprawne?
20.10.2022 - 14:38Odpověď DROPS Design :
Witaj Agnieszko, wydaje mi się, że masz rację. Zgłoszę korektę do tego wzoru. Pozdrawiam!
22.10.2022 - 09:00
![]() Anu napsala:
Anu napsala:
Hello, This is my first time knitting a mitten. My question is very basic -(it may sound silly to more experienced knitter) .Where do you measure the circumfrence to determine the size to knit - at the wrist or at the palm ? Thank you regards
13.09.2022 - 23:09Odpověď DROPS Design :
Hi Anu, The circumference is around the palm/hand. Happy knitting!
14.09.2022 - 06:56
![]() Monica napsala:
Monica napsala:
Hejsan, Jag håller på att sticka tummen och har stickat 15 varv. Är det A3 jag ska följa och efter 15 varv börja avmaska? Tack för hjälpen, Monica
17.03.2022 - 16:16Odpověď DROPS Design :
Hej Monica. Ja det stämmer att att det är A.3 du ska sticka när du gör tummen. Avmaskningen på tummen börjar på varv 15 i diagrammet. Mvh DROPS Design
18.03.2022 - 07:48
![]() Monica napsala:
Monica napsala:
Hej, Jag undrar när man ska minska av på slutet av vanten Clapping Elves? Jag har stickat 26 varv ( 7 cm ) från tummen. Tack, Monica
11.03.2022 - 15:45Odpověď DROPS Design :
Hei Monica. Du strikker etter diagram A.1 og da vil du se når du skal begynne å felle av på toppen av votten i den str. du strikker. mvh DROPS Design
14.03.2022 - 13:47
![]() Monica napsala:
Monica napsala:
Hej, Jag vill höra med er vilka strumpstickor man ska använda till Clapping Elves mönstret. Ska man bara sticka med strumpstickor nr. 3? Tack Monica
08.03.2022 - 09:33Odpověď DROPS Design :
Hej Monica. Ja det stämmer, de stickas med strumpstickor nr. 3. Mvh DROPS Design
09.03.2022 - 13:47
![]() Monica napsala:
Monica napsala:
Hejsan, Jag ska sticka vantarna Clapping Elves i storlek L/XL jag förstår inte hur många varv man ska sticka efter resåret upp till tummen?(när man ska börja sticka tummen)? Vänligen Monica
14.02.2022 - 17:49Odpověď DROPS Design :
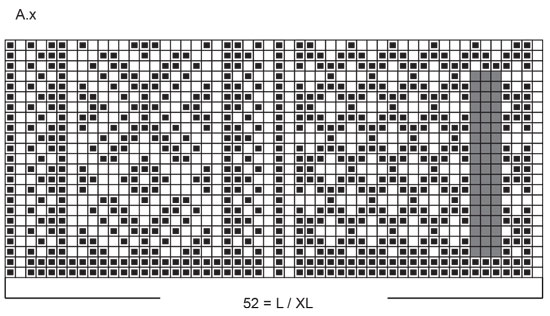
Hej Monica, du börjar på A.2 till tummen när du kommer de de grå maskor i A.1. Lycka till :)
17.02.2022 - 15:07
![]() Monica napsala:
Monica napsala:
Hej, Jag tänker sticka vantarna Clapping Elves men vill sticka utan mönster, jag undrar hur många varv ska man sticka upp till tummen om man stickar i storlek L/XL och när ska man börja avmaska för toppen av vanten. Hur många varv ska man sticka när man stickar tummen? Tack
27.01.2022 - 13:16Odpověď DROPS Design :
Hej Monica, du finder målene til de 2 størrelser øverst i opskriften :)
27.01.2022 - 15:46
![]() Alex napsala:
Alex napsala:
Hej! Jag har väldigt små händer, men vantarna är fortfarande för små i storlek L/XL. Jag har kontrollerat stickfastheten flera gånger och den är korrekt. Kan det finnas något annat jag gör fel?
14.10.2021 - 16:17Odpověď DROPS Design :
Hej Alex. Har du mätt vantarna så det stämmer med måtten i mönstret?: Längd från början till slut: ca 23-24 cm Längd från efter resåren till toppen: ca 18-19 cm Längd från tumgropen till fingertoppen: ca 11-12 cm Längd tumme (från början vid tumgropen till slut): ca 6 cm. Om din stickfasthet är rätt så ska vanten ha dessa mått. Mvh DROPS Design
15.10.2021 - 07:44
|
|||||||||||||||||||
Clapping Elves#clappingelvesmittens |
|||||||||||||||||||
 |
 |
||||||||||||||||||
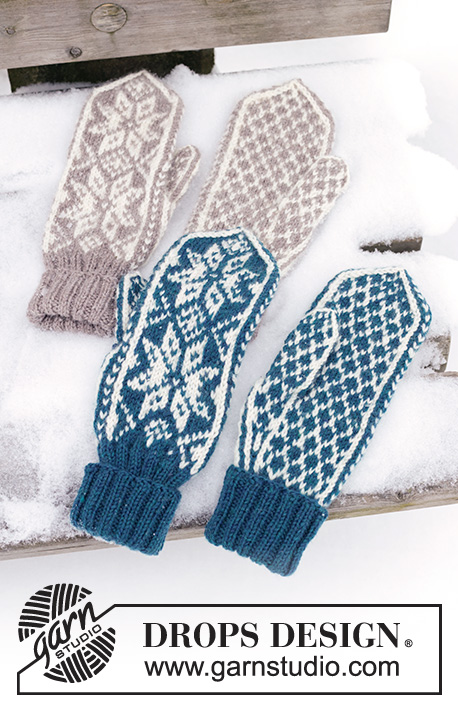
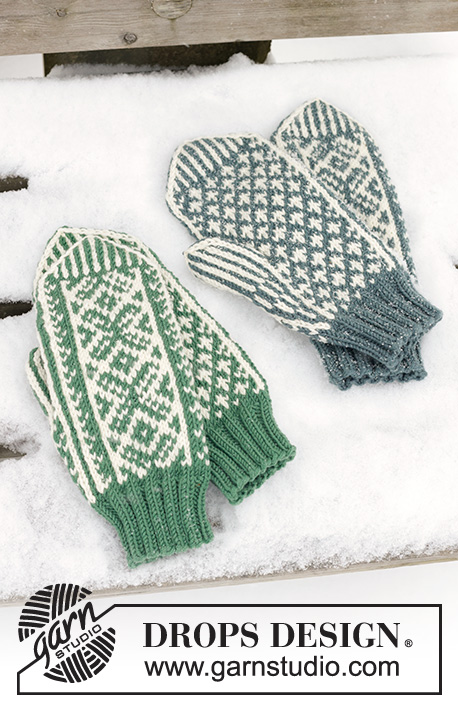
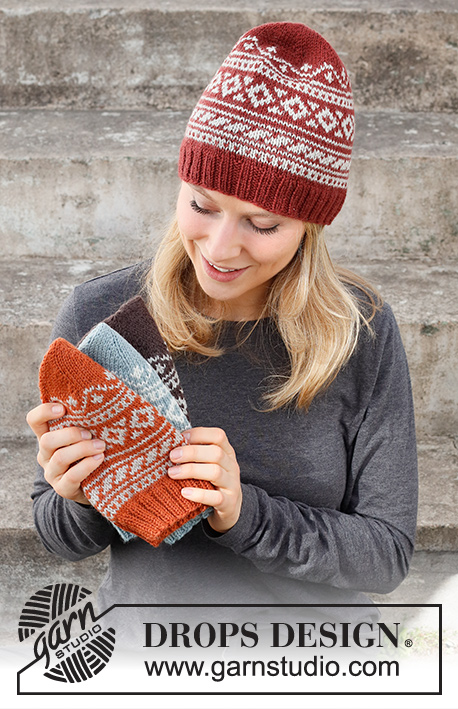
Vánoční rukavice – palčáky s norským vzorem pletené z příze DROPS Merino Extra Fine. Motiv: Vánoce.
DROPS 214-66 |
|||||||||||||||||||
|
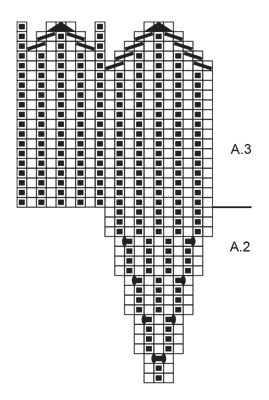
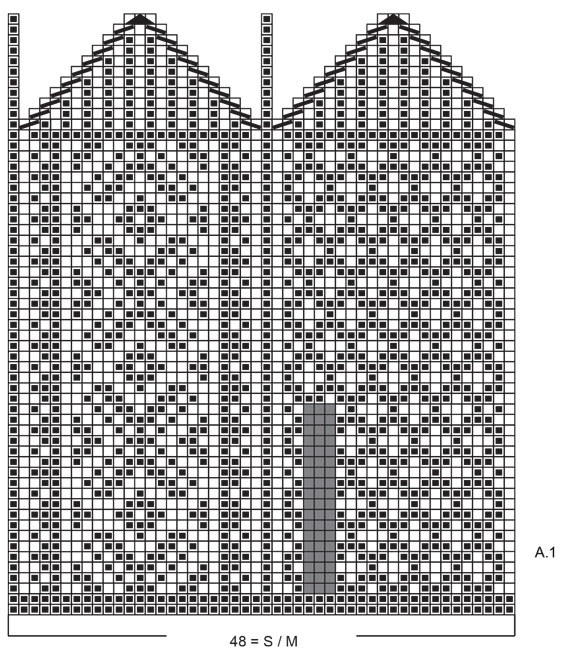
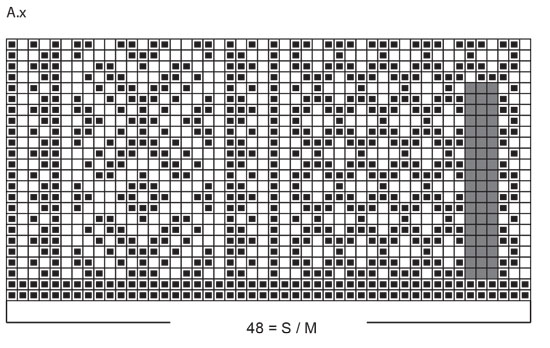
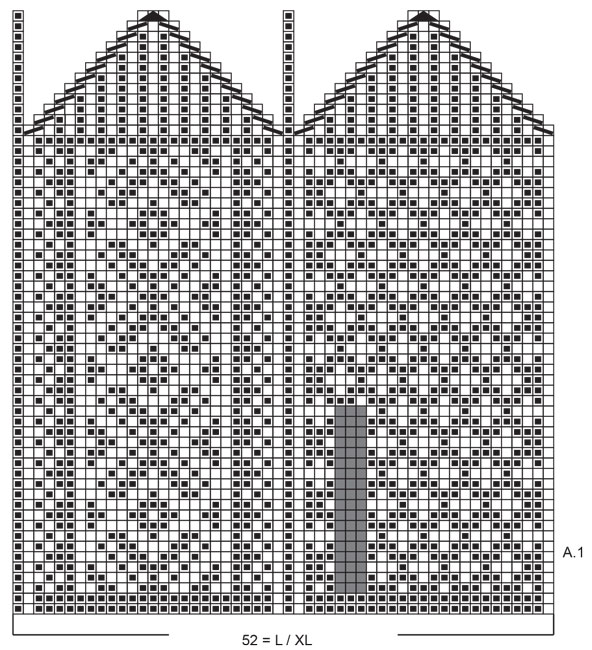
------------------------------------------------------- VYSVĚTLIVKY: ------------------------------------------------------- VZOR: Viz schémata A.1, A.2, A.3 a A.x. Zvolte si schéma pro požadovanou velikost (platí pro A.1 a A.x). Schéma A.x zobrazuje, kde bude na pravé rukavici umístěný palec. Celý vzor pleteme lícovým žerzejem. TIP: Abychom předešli deformování pleteniny v místech s vyplétaným vzorem, dbáme na to, aby vlákna příze tažená za prací nebyla příliš utažená. Pokud má vzor přece jen tendenci příliš se stahovat, použijeme na vyplétání vzoru silnější jehlice. ------------------------------------------------------- POPIS PRÁCE: ------------------------------------------------------- RUKAVICE - JAK BUDEME POSTUPOVAT: Pleteme od zápěstí ke špičkám prstů, v průběhu práce přidáme oka pro klínek palce. Jakmile dokončíme klínek, odložíme oka palce na pomocnou jehlici a dokončíme dlaň. Nakonec upleteme palec. LEVÁ RUKAVICE: Na ponožkové jehlice č.3 nahodíme barvou podkladu 48-48 ok a pleteme v kruhových řadách lem pružným vzorem 2/2 (tj. střídáme 2 oka hladce, 2 obrace). Ve výši 5 cm upleteme 1 kruhovou řadu hladce a SOUČASNĚ přidáme rovnoměrně 0-4 oka = 48-52 ok. Pleteme vzor A.1. Když dopleteme až k šedým čtverečkům ve schématu, pleteme nad těmito 3 oky vzor A.2. Viz TIP! Pokračujeme v pletení vzoru A.1 a A.2 (ve vzoru A.2 přidáváme oka). Po dokončení poslední kruhové řady vzoru A.2 máme ve vzoru A.2 11 ok – tato oka odložíme na pomocnou jehlici. V následující kruhové řadě nahodíme za odloženými oky 3 oka nová = v kruhové řadě máme 48-52 ok. Pleteme vzor A.1 (nad všemi oky). Po dokončení celé sekvence vzoru (na výšku) máme v kruhové řadě 8 ok. Přízi odstřihneme, protáhneme zbylými oky, stáhneme a zapošijeme. PALEC: Odložených 11 ok palce vrátíme z pomocné jehlice zpět na ponožkové jehlice č. 3 a navíc k nim na začátku kruhové řady nabereme 9 ok z okraje za palcem (nabereme 2 oka na každé straně a 5 ok ze 3 nahozených ok) = 20 ok. V kruhových řadách pleteme vzor A.3. Po dokončení celé sekvence vzoru A.3 (na výšku) zbývají v kruhové řadě poslední 4 oka. Přízi odstřihneme, protáhneme zbylými oky, stáhneme a zapošijeme. PRAVÁ RUKAVICE: Pleteme stejně jako levou rukavici, klínek pro palec upleteme na protilehlé straně – viz schéma A.x, které zobrazuje, kde je klínek umístěný. |
|||||||||||||||||||
Vysvětlivky ke schématu |
|||||||||||||||||||
|
|||||||||||||||||||
|
|||||||||||||||||||
|
|||||||||||||||||||
|
|||||||||||||||||||
|
|||||||||||||||||||
|
|||||||||||||||||||
Dokončili jste tento model?Pak označte své fotky tagem #dropspattern #clappingelvesmittens nebo je pošlete do galerie #dropsfan. Potřebujete s tímto návodem poradit?Otevřete-li si návod na stránce garnstudio.com, najdete tam 21 výukových video-ukázek, Komentáře/Dotazy a další užitečné informace. © 1982-2025 DROPS Design A/S. Vyhrazujeme si veškerá práva. Tento dokument, včetně všech jeho dílčích částí, podléhá autorským právům. Podrobnější komentář k možnostem užití našich návodů najdete dole pod každým návodem na našich stránkách. |
|||||||||||||||||||


V oblasti pletené a háčkované módy působí DROPS Design více než 40 let. Díky tomu vám můžeme nabídnout jednu z nejrozsáhlejších kolekcí modelů s bezplatnými návody dostupnými na internetu - navíc v 17 jazycích. K dnešnímu dni máme na 314 katalogů a 11822 návodů celkem - z nich je už 7048 dostupných v [češtině].
Přidejte komentář k návodu DROPS 214-66
Rádi bychom věděli, co si o tomto modelu myslíte!
Pokud se chcete na něco zeptat, dbejte prosím na to, abyste ve formuláři níže vybrali správnou kategorii - díky tomu se dříve dozvíte, co potřebujete vědět. Povinná pole jsou označena *.