
Popular categories
Looking for a yarn?


Comments / Questions (47)
![]() Ane wrote:
Ane wrote:
Har begynt med en vott i pinnestr 3,5 og viking sportsragg. Syns de blir veldig stramme? Sjekket strikkefasthet og den stemmer...
07.12.2020 - 15:33
![]() Sofia wrote:
Sofia wrote:
When it says 48-48 does that mean 48 on one stick and 48 on the other or am i supposed to use all four sticks?
17.11.2020 - 13:42DROPS Design answered:
Hi Sofia. 48-48 is the numer of stiches you cast on for the different sizes (S/M – L/XL). So if you do the smaller size you always follow the first number throughout the pattern. You cast on 48 stiches in total (=12 on each needle). Happy knitting!
17.11.2020 - 13:54
![]() Henny wrote:
Henny wrote:
Wat versta je onder de achtergrond kleur
04.11.2020 - 19:38DROPS Design answered:
Dag Henny,
Dat achtergrond is de basiskleur, dus geel, blauw, groen, etc. Met wit wordt het patroontje gebreid.
05.11.2020 - 09:11
![]() Wibke wrote:
Wibke wrote:
Hallo Liebes Drops Team, tolles Muster, probiere es gerade aus. Bitte auch das komplette A1 Muster für den rechten Handschuh (beide Größen) einstellen, das vereinfacht die Sache für "Norweger-Anfänger" ungemein :-). Vielen Dank und herzliche Grüße
02.11.2020 - 14:48
![]() Lise Kilganon wrote:
Lise Kilganon wrote:
Excusez moi, je ne suis pas certaine d avoir bien envoyer ma question,,,,,que veux dire faire 3 mailles au dessus pour le gousset et faire A2,,, merci
24.09.2020 - 18:24DROPS Design answered:
Bonjour Mme Kilganon, quand vous arrivez au rang avec les 3 cases noires dans A.1 , ces 3 cases noires correspondent aux mailles du pouce - tricotez ces 3 mailles en suivant le diagramme A.2 (continuez A.1 sur les autres mailles comme avant). Quand ces 3 cases noires sont terminées, mettez les mailles du pouce en attente (A.2 est terminé) et continuez A.1 comme avant sur les 3 m montées au-dessus des mailles en attente. Bon tricot!
25.09.2020 - 08:52
![]() Karen wrote:
Karen wrote:
Hallo, in der Anleitung für den Daumen steht, dass die stillgelegten Maschen zurück auf das Nadelspiel 3,5 gelegt werden sollen. Bis dahin wird aber mit Nadelstärke 3 gearbeitet. Soll also der gesamte Handschuh mit 3,5 gestrickt werden oder soll der Daumen mit 3 gestrickt werden? Oder soll die Nadelstärke an dieser Stelle absichtlich geändert werden? Die Anleitungen in den diversen Sprachen weichen an diesem Punkt voneinander ab. Wie ist das also hier gemeint? Vielen Dank für die Hilfe!
18.09.2020 - 23:41DROPS Design answered:
Liebe Karen, die ganze Arbeit (inkl. Daumen) wird mit Nadeln Nr 3 gestrickt - die deutsche Anleitung wird korrigiert, danke für den Hinweis. Viel Spaß beim stricken!
21.09.2020 - 08:22
![]() Tula Strand wrote:
Tula Strand wrote:
Hei. Jeg ser at på tommel så står det oppført pinne 3.5mm, noe som trolig ikke stemmer.
24.07.2020 - 16:04
![]() Zuzana Gerbino wrote:
Zuzana Gerbino wrote:
Aha
18.07.2020 - 19:14
![]() Englamai wrote:
Englamai wrote:
Stämmer mönstret på tummen? Den blir alldeles för lång och smal
28.02.2020 - 22:02DROPS Design answered:
Hei Englamai. Har du sjekket at strikkefastheten din med den som er oppgitt i oppskriften? Og er din strikkefasthet den samme på votten og tommelen? mvh DROPS design
02.03.2020 - 11:21
![]() Pauline wrote:
Pauline wrote:
Je n'ai jamais tricoté avec 4 aiguilles avant et je suis un peu perdue. Je voudrais savoir comment on fait le jersey avec 4 aiguilles.
25.02.2020 - 19:30DROPS Design answered:
Bonjour Pauline, cette vidéo montre comment monter les mailles et tricoter en jersey sur les aiguilles doubles pointes - vous pouvez utiliser une aiguille circulaire et la technique du magic loop si vous préférez. Bon tricot!
26.02.2020 - 09:18
|
|||||||||||||||||||
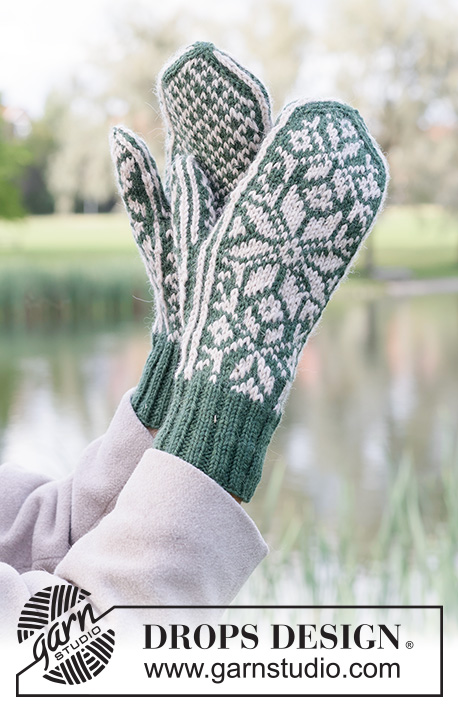
Christmas Claps#christmasclapsmittens |
|||||||||||||||||||
 |
 |
||||||||||||||||||
Knitted mittens with Nordic pattern for Christmas in DROPS Karisma. Theme: Christmas.
DROPS Extra 0-1460 |
|||||||||||||||||||
|
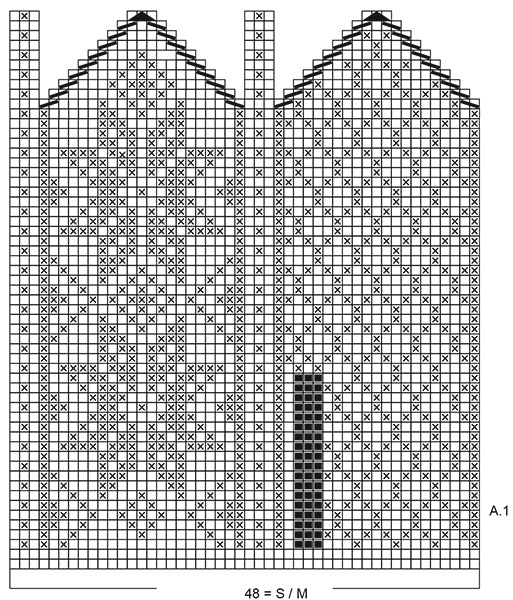
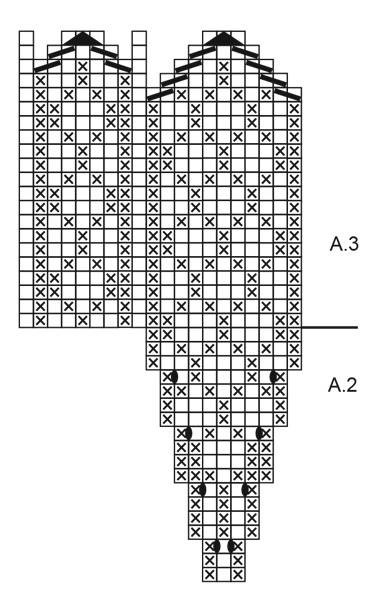
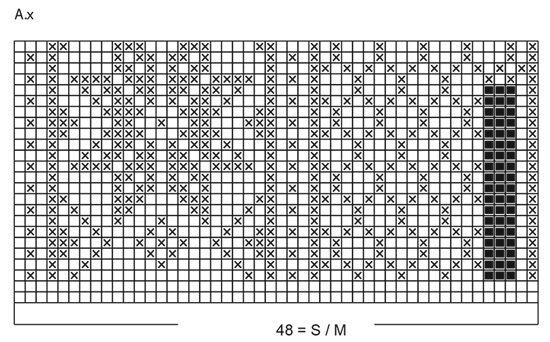
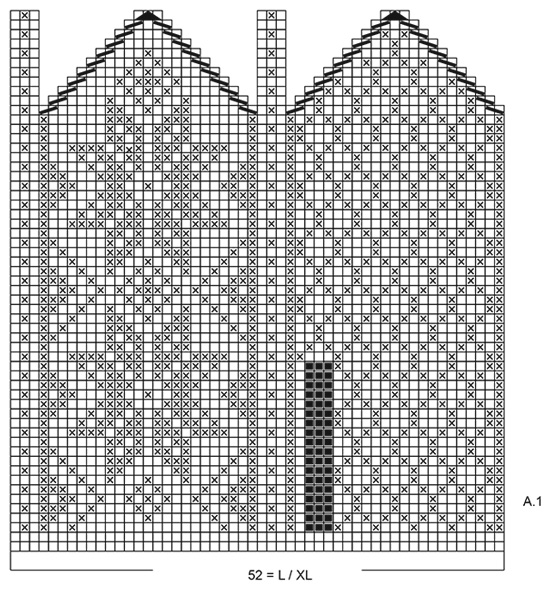
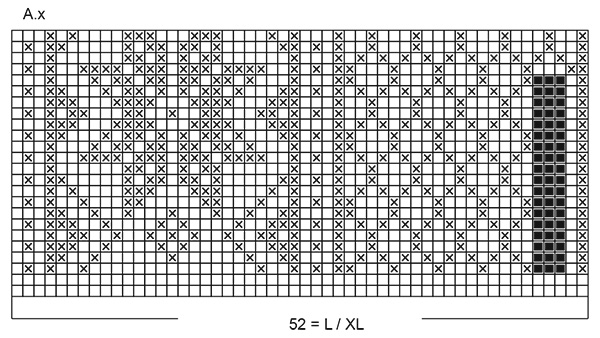
------------------------------------------------------- EXPLANATIONS FOR THE PATTERN: ------------------------------------------------------- PATTERN: See diagrams A.1, A.2, A.3 and A.x. Choose diagrams for your size. Diagram A.x shows where the thumb is positioned on the right mitten. The diagrams show all the rows in the pattern seen from the right side. ------------------------------------------------------- START THE PIECE HERE: ------------------------------------------------------- MITTENS – SHORT OVERVIEW OF THE PIECE: The piece is worked from the bottom up, increasing for the thumb. When these increases are finished, the thumb-stitches are placed on a thread before finishing the hand. The thumb is worked to finish. LEFT MITTEN: Cast on 48-48 stitches with double pointed needles size 3 mm and the background colour. Work rib in the round with knit 2, purl 2, for 12 cm. Work 1 round in stocking stitch where you increase 0-4 stitches evenly spaced = 48-52 stitches. Work diagram A.1 – when you have worked as far as the black squares in the diagram, work A.2 over these 3 stitches. Continue working according to diagrams A.1 and A.2 (you increase stitches in A.2). After the last round in A.2 there are 11 stitches in A.2 – place these stitches on a thread. On the next round cast on 3 stitches behind the stitches on the thread = 48-52 stitches on the round. Continue working A.1 over all stitches. When the diagram has been completed there are 8 stitches left on the round. Cut the strand, tack it through the stitches and fasten well. THUMB: Place the 11 stitches from the thread on double pointed needles size 3 mm and start the round by knitting up 9 stitches at the back of the thumb (pick up 2 stitches on each side and 5 stitches in the 3 cast-on stitches) = 20 stitches. Work diagram A.3. When the diagram has been completed there are 4 stitches left on the round. Cut the strand, tack it through the stitches and fasten well. RIGHT MITTEN: Work as the left, but the thumb is worked on the opposite side – see diagram A.x which shows where the thumb is positioned in the pattern. |
|||||||||||||||||||
Diagram explanations |
|||||||||||||||||||
|
|||||||||||||||||||
 |
|||||||||||||||||||
 |
|||||||||||||||||||
 |
|||||||||||||||||||
 |
|||||||||||||||||||
 |
|||||||||||||||||||
Have you finished this pattern?Tag your pictures with #dropspattern #christmasclapsmittens or submit them to the #dropsfan gallery. Do you need help with this pattern?You'll find 17 tutorial videos, a Comments/Questions area and more by visiting the pattern on garnstudio.com. © 1982-2026 DROPS Design A/S. We reserve all rights. This document, including all its sub-sections, has copyrights. Read more about what you can do with our patterns at the bottom of each pattern on our site. |
|||||||||||||||||||


With over 40 years in knitting and crochet design, DROPS Design offers one of the most extensive collections of free patterns on the internet - translated to 17 languages. As of today we count 324 catalogues and 12290 patterns translated into English (UK/cm). 12290
We work hard to bring you the best knitting and crochet have to offer, inspiration and advice as well as great quality yarns at incredible prices! Would you like to use our patterns for other than personal use? You can read what you are allowed to do in the Copyright text at the bottom of all our patterns. Happy crafting!
Post a comment to pattern DROPS Extra 0-1460
We would love to hear what you have to say about this pattern!
If you want to leave a question, please make sure you select the correct category in the form below, to speed up the answering process. Required fields are marked *.