
Popular categories
Looking for a yarn?


Comments / Questions (46)
![]() May Katrin Fylling wrote:
May Katrin Fylling wrote:
Er det samme diagram for tommelen i Str s/l som i l/xl? Syns de blir så trange
13.03.2025 - 10:07DROPS Design answered:
Hej May, ja det er samme diagram :) Hvis du holder strikkefastheden bliver de ca 9 cm i omkreds :)
14.03.2025 - 14:18
![]() Pauline Martin wrote:
Pauline Martin wrote:
I’m knitting the Christmas Claps mitts and having problems understanding the “picking up stitches” at the thumb. Pattern says place 11 sts on needles (I understand this),, then it says “knitting up 9 sts at back of the thumb”. Not sure what is meant by this??! Where are the 9 sts at back of thumb? Thank you for your response
12.02.2025 - 23:09DROPS Design answered:
Dear Pauline, the 9 sts are picked up around the 3 cast on stitches. After you put 11 stitches on a thread, you had a gap in the pattern. To keep the mitten connected you cast on 3 stitches, which connected the sides of the thumb. Now, to work the thumb, you pick up the 11 stitches, but you need to connect them to the mitten. So you also pick up these 3 stitches (as 5 stitches, you increase a little on them) and you pick up a 2 stitches on each side between the 11 stitches and 3/5 stitches (so 5+2+2=9). You can find this in this video. Happt knitting!
17.02.2025 - 00:44
![]() Tina wrote:
Tina wrote:
Hei, jeg er nå over halvveis på første votten. Jeg strikket vrangborden med pinne 3, men måtte gå opp til pinne 4 på glattstrikk for å få riktig strikkefasthet bortover. Jeg er generelt en litt stram strikker. Nå som jeg er over halvveis på mønsteret, ser jeg at votten kommer til å bli for lang. Hva kan/bør jeg gjøre i dette tilfellet? Bruker jeg mindre pinner blir votten altfor liten/stram, men nå blir den altså for høy.
12.12.2023 - 13:13DROPS Design answered:
Hej Tina, strikker du i DROPS Karisma? Hvis du har 32 pinde på 10 cm, så bliver selve mønsteret ca 18 cm i højden :)
13.12.2023 - 11:46
![]() Abbe wrote:
Abbe wrote:
Numbering the charts' rows for this pattern would be very helpful.
08.12.2023 - 18:34DROPS Design answered:
Dear Abbe, thank you for your suggestion! We will send it to the Design department as feedback. Happy knitting!
10.12.2023 - 18:35
![]() Kerstin Strömwall wrote:
Kerstin Strömwall wrote:
Kan jag få mönstret i pdf-fil? Stickar efter mönster jag lägger i Knit Companion. MVH Kerstin Strömwall
08.12.2023 - 16:25DROPS Design answered:
Hei Kerstin. Vi har dessverre ikke muligheten til å sende en PDF-fil. Men du kan kopiere oppskriften fra nettsidenog over til et Word-dokument og deretter lagre det selv som en PDF_fil. mvh DROPS Design
11.12.2023 - 08:51
![]() Cim Bergqvist wrote:
Cim Bergqvist wrote:
I mönstret i A2 står det att det ska göras omslag istället för ökningsmaska enligt diagram förklaringen. Tacksam för hjälp att förstå.
06.12.2023 - 23:26DROPS Design answered:
Hej Cim, jo du ökar med 1 omslag som stickas vridet på nästa varv, så det inte blir ett stort hål :)
07.12.2023 - 08:02
![]() Nathalie Metzelard wrote:
Nathalie Metzelard wrote:
Est ce que je peus tricoter ce modèle en aiguilles circulaires ? Par avance merci de votre reponse
03.12.2023 - 10:19DROPS Design answered:
Bonjour Mme Metzelard, tout à fait, mais à condition d'utiliser la technique dite du magic loop. Bon tricot!
04.12.2023 - 08:10
![]() Berthe wrote:
Berthe wrote:
Pour la diminution pouvez-vous m'expliquer ceci: j'ai 2 carrés blancs à droite qui comportent une ligne diagonale noire alors comment dois-je tricoter cela, quelle couleurs utiliser et de quelle façon pour que la ligne noire suive? Je suis bloquée. Merci
21.02.2023 - 15:38DROPS Design answered:
Bonjour Berthe, les diminutions se tricotent en naturel (= cf 4ème et 5ème symboles de la légende des diagrammes). continuez ensuite les diagrammes (sautez les espaces, ils sont dus aux mailles diminuées), vous allez ainsi continuer la maille avec la croix avec la couleur du jacquard pour le dessous, le dessus de la main aussi bien que pour les côtés. Bon tricot!
21.02.2023 - 18:04
![]() Berthe wrote:
Berthe wrote:
Vous dites que les diminutions en haut de la mitaine se font avec la laine naturelle que je fasse le surjet à droite ou les 2 ensemble à gauche alors comment se fait-il que ma bordure noire ne suive pas?
16.02.2023 - 00:29DROPS Design answered:
Bonjour Berthe, je ne suis pas sûre de bien comprendre votre question, comme vous diminuez (en naturel), la maille colorée au milieu des côtés va automatiquement s'incliner, si vous regardez les photos présentées, on voit bien que les diminutions sont faites en naturel, et la maille au milieu des côtés continue comme avant, comme dans le diagramme. Bon tricot!
16.02.2023 - 12:14
![]() Berthe wrote:
Berthe wrote:
Quelle couleur de laine utiliser pour faire les surjets et les 2 ensemble dans la diminution au bout de la mitaine ?
14.02.2023 - 22:33
|
|||||||||||||||||||
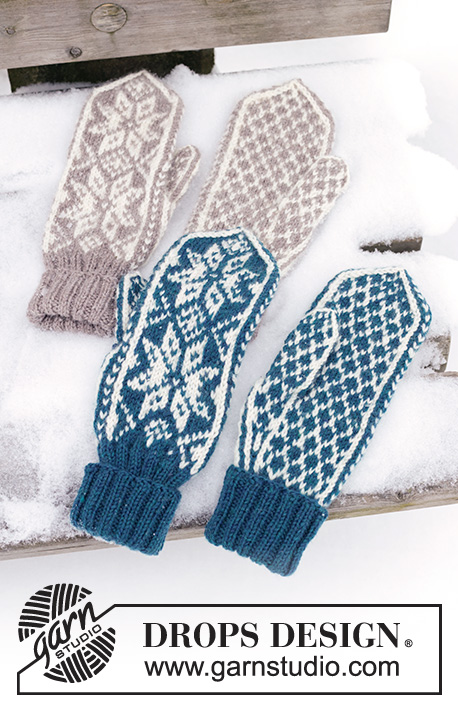
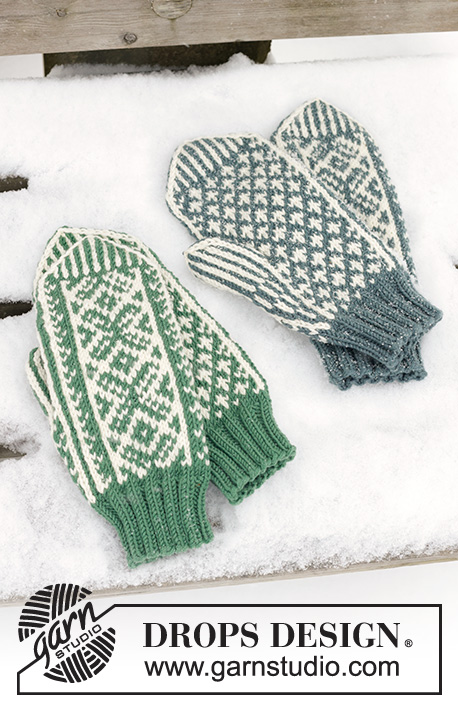
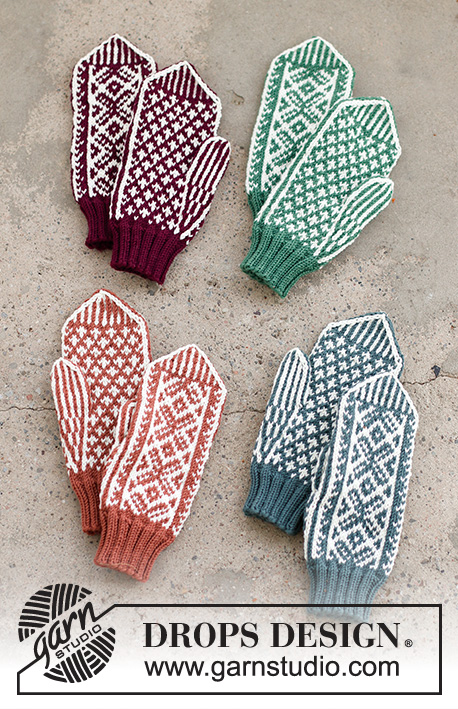
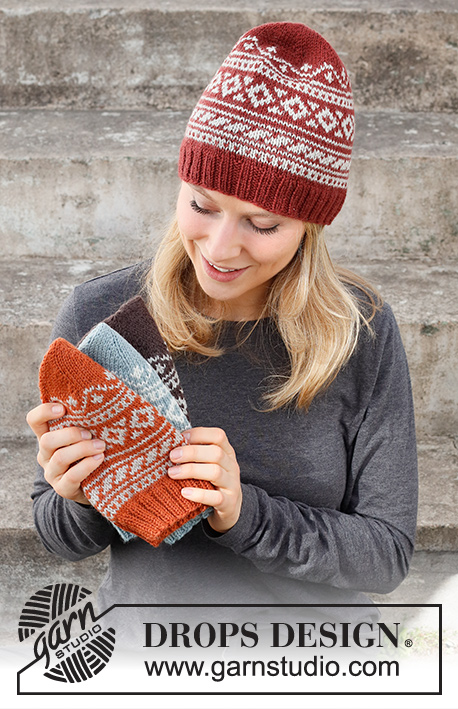
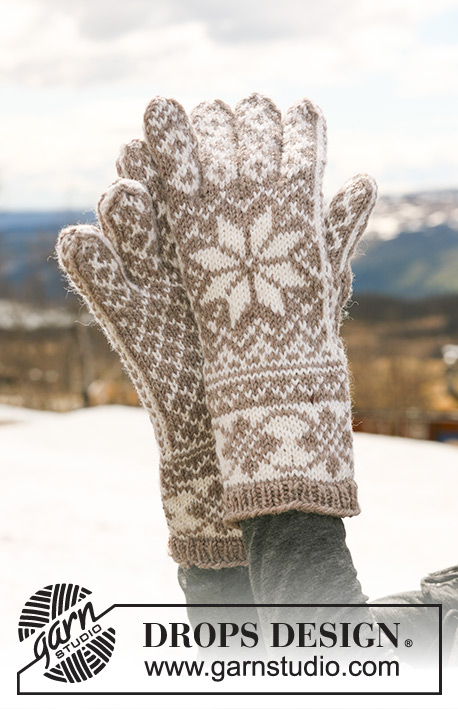
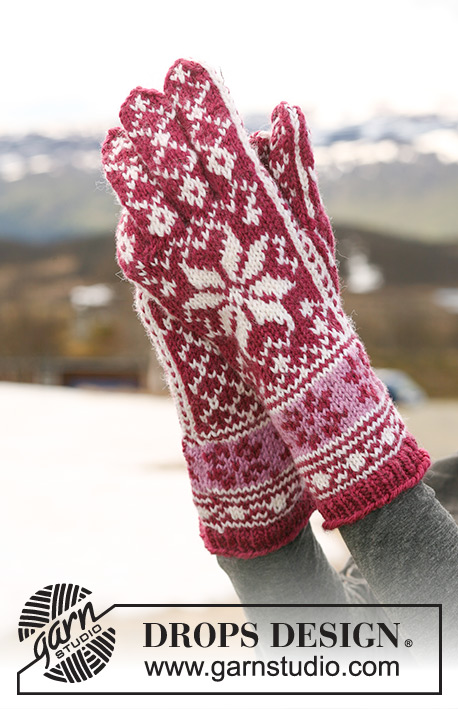
Christmas Claps#christmasclapsmittens |
|||||||||||||||||||
 |
 |
||||||||||||||||||
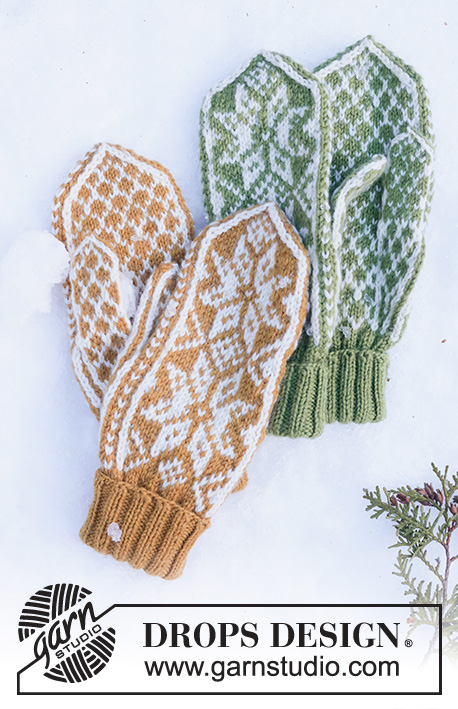
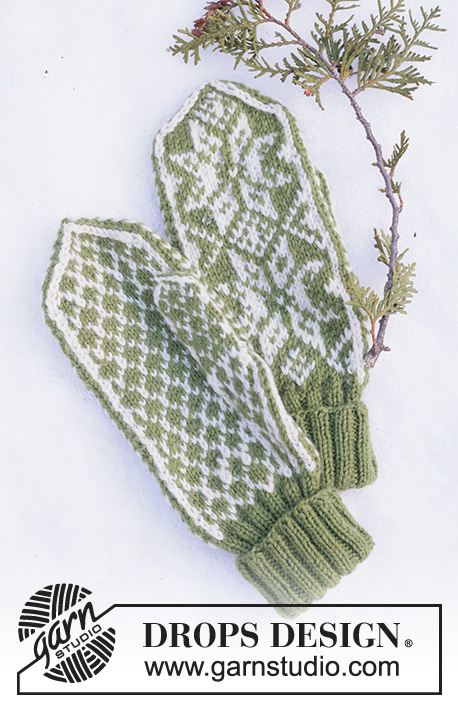
Knitted mittens with Nordic pattern for Christmas in DROPS Karisma. Theme: Christmas.
DROPS Extra 0-1460 |
|||||||||||||||||||
|
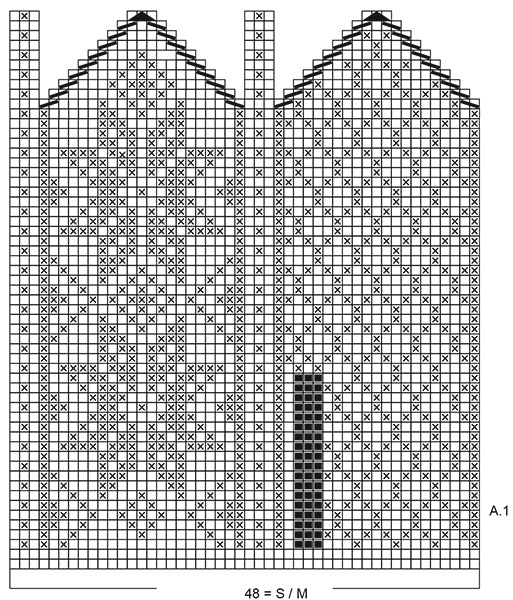
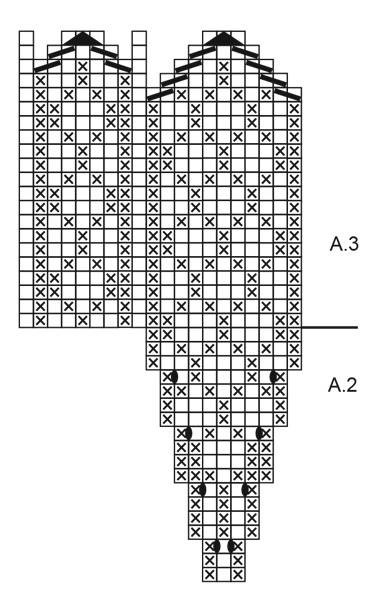
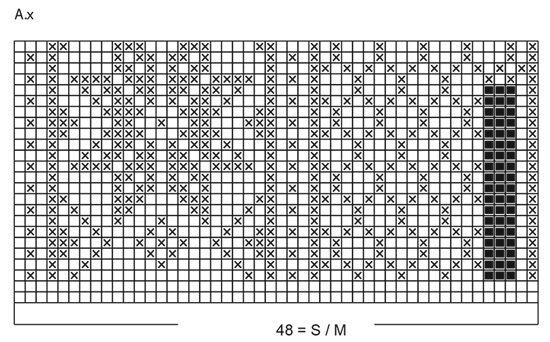
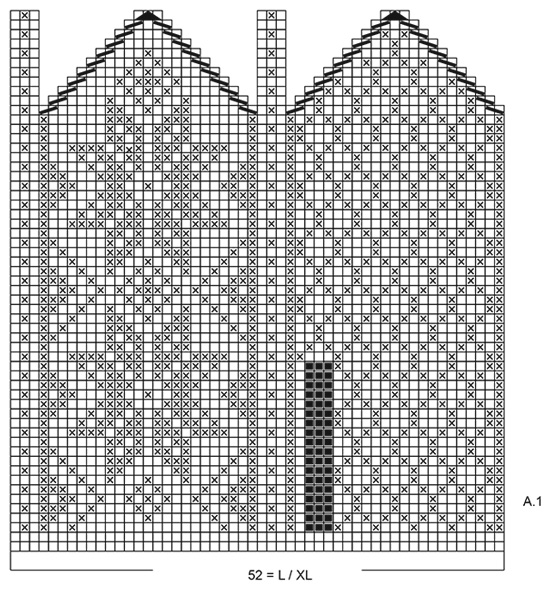
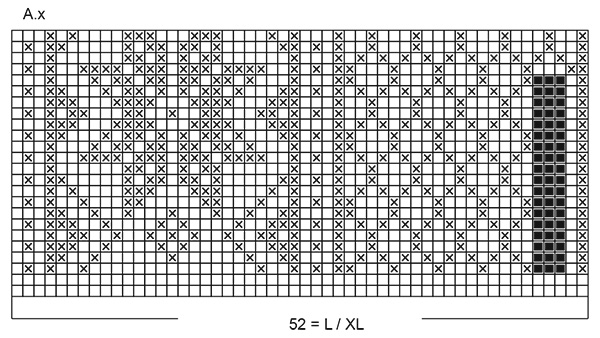
------------------------------------------------------- EXPLANATIONS FOR THE PATTERN: ------------------------------------------------------- PATTERN: See diagrams A.1, A.2, A.3 and A.x. Choose diagrams for your size. Diagram A.x shows where the thumb is positioned on the right mitten. The diagrams show all the rows in the pattern seen from the right side. ------------------------------------------------------- START THE PIECE HERE: ------------------------------------------------------- MITTENS – SHORT OVERVIEW OF THE PIECE: The piece is worked from the bottom up, increasing for the thumb. When these increases are finished, the thumb-stitches are placed on a thread before finishing the hand. The thumb is worked to finish. LEFT MITTEN: Cast on 48-48 stitches with double pointed needles size 3 mm and the background colour. Work rib in the round with knit 2, purl 2, for 12 cm. Work 1 round in stocking stitch where you increase 0-4 stitches evenly spaced = 48-52 stitches. Work diagram A.1 – when you have worked as far as the black squares in the diagram, work A.2 over these 3 stitches. Continue working according to diagrams A.1 and A.2 (you increase stitches in A.2). After the last round in A.2 there are 11 stitches in A.2 – place these stitches on a thread. On the next round cast on 3 stitches behind the stitches on the thread = 48-52 stitches on the round. Continue working A.1 over all stitches. When the diagram has been completed there are 8 stitches left on the round. Cut the strand, tack it through the stitches and fasten well. THUMB: Place the 11 stitches from the thread on double pointed needles size 3 mm and start the round by knitting up 9 stitches at the back of the thumb (pick up 2 stitches on each side and 5 stitches in the 3 cast-on stitches) = 20 stitches. Work diagram A.3. When the diagram has been completed there are 4 stitches left on the round. Cut the strand, tack it through the stitches and fasten well. RIGHT MITTEN: Work as the left, but the thumb is worked on the opposite side – see diagram A.x which shows where the thumb is positioned in the pattern. |
|||||||||||||||||||
Diagram explanations |
|||||||||||||||||||
|
|||||||||||||||||||
|
|||||||||||||||||||
|
|||||||||||||||||||
|
|||||||||||||||||||
|
|||||||||||||||||||
|
|||||||||||||||||||
Have you finished this pattern?Tag your pictures with #dropspattern #christmasclapsmittens or submit them to the #dropsfan gallery. Do you need help with this pattern?You'll find 17 tutorial videos, a Comments/Questions area and more by visiting the pattern on garnstudio.com. © 1982-2025 DROPS Design A/S. We reserve all rights. This document, including all its sub-sections, has copyrights. Read more about what you can do with our patterns at the bottom of each pattern on our site. |
|||||||||||||||||||


With over 40 years in knitting and crochet design, DROPS Design offers one of the most extensive collections of free patterns on the internet - translated to 17 languages. As of today we count 314 catalogues and 11822 patterns translated into English (UK/cm).
We work hard to bring you the best knitting and crochet have to offer, inspiration and advice as well as great quality yarns at incredible prices! Would you like to use our patterns for other than personal use? You can read what you are allowed to do in the Copyright text at the bottom of all our patterns. Happy crafting!
Post a comment to pattern DROPS Extra 0-1460
We would love to hear what you have to say about this pattern!
If you want to leave a question, please make sure you select the correct category in the form below, to speed up the answering process. Required fields are marked *.