
Popular categories
Looking for a yarn?


Comments / Questions (19)
![]() Andrea wrote:
Andrea wrote:
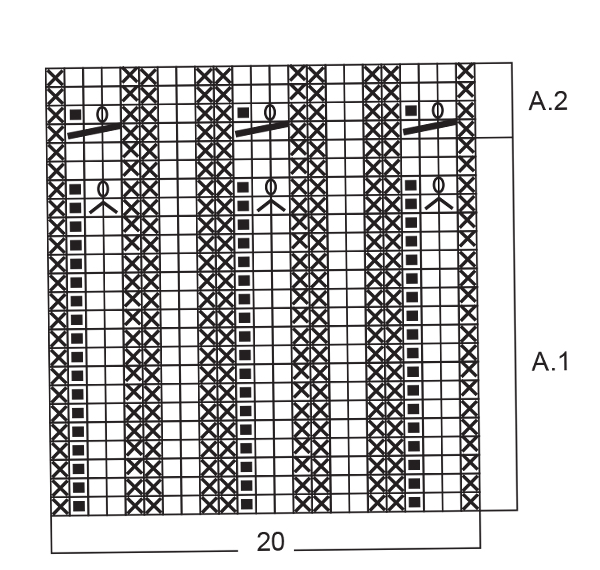
Hallo ich hab eine Frage ab wann Messe ich die Arbeit von Rand ganz unten also 2 rechts 2 links oder von "Bei einer Länge von 15-16 cm gemäß Diagramm A.5 stricken und abnehmen (= 14-15 Rapporte à 9 Maschen in" liebe Grüße Andrea
03.04.2026 - 19:39DROPS Design answered:
Liebe Andrea, messen Sie die Arbeit von Anfang an, dh inkl. A.3 und A.4. Viel Spaß beim Stricken!
08.04.2026 - 08:17
![]() Maria wrote:
Maria wrote:
I detta parti: lyft 1 maska som om den skulle stickas rät, sticka 2 maskor i nästa maska, drag den lyfta maskan över de 2 maskorna Ska man sticka en ökning i maskan efter den lyfta räta och därefter dra den lyftande över de två?
15.02.2026 - 14:12DROPS Design answered:
Hei Maria. Ja, diagramikonet går over 2 masker, så lyft 1 maska som om den skulle stickas rät, sticka 2 maskor i nästa maska (ökning). Du har nå 3 masker, men så drag den lyfta maskan över de 2 maskorna, og du har nå 2 masker igjen. mvh DROPS Design
23.02.2026 - 09:38
![]() Dorothée wrote:
Dorothée wrote:
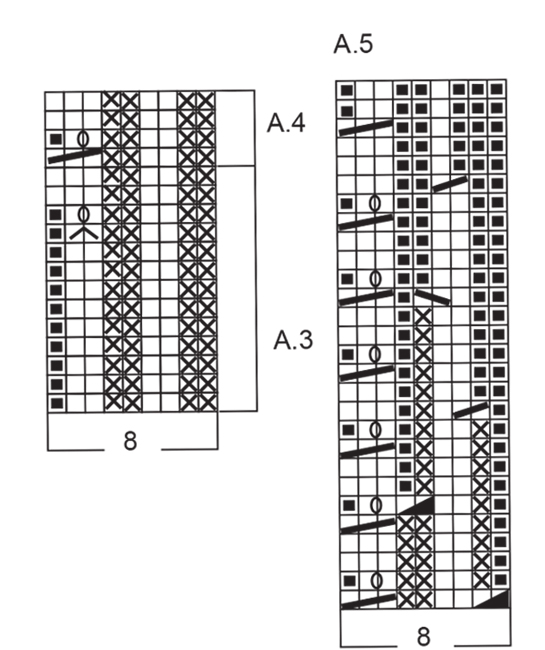
Bonjour, je ne comprends pas le point du diagramme A3 1 surjet, deux mailles ensembles sur les deux mailles endroit ?? et reprendre le diagramme sur deux mailles envers ?? Merci pour votre réponse
03.01.2026 - 19:33DROPS Design answered:
Bonjour Dorothée, au 10ème rang de A.3, tricotez: 2 m env, 2 m end, 2 m env, glissez 1 m comme pour la tricoter à l'envers, tricotez 2 fois l:a maille suivante à l'endroit (alternativement dans le brin avant et le brin arrière) et passez la maille glissée par-dessus la maille tricotée = il vous reste 2 mailles. Au tour suivant, faites 1 jeté entre ces 2 mailles endroit. Vous tricoterez ensuite une fausse petite torsade similaire à celle de cette vidéo. Bon tricot!
05.01.2026 - 10:57
![]() Tonje wrote:
Tonje wrote:
I oppskriften står det: A.1 over de neste 20 maskene, strikk 2 rett, 2 vrang. I mønster A1 begynner mønster med 1 vrang, for så å gå videre med 2 rett, 2 vrang. Hva blir rett, mønster eller tekst? Skal det være «vanlig» vrangbord fram til økning?
16.12.2025 - 13:28DROPS Design answered:
Hei Tonje. Du har 50 masker og du skal starte med * 2 rett, 2 vrang*, gjenta fra *-* over de neste 24 masker, deretter strikkes det 2 rett, 2 vrang. Du har nå strikket over 26 masker og har 24 masker igjen på pinnen. Strikk A.1 (= 20 masker). Det er nå 4 masker igjen på pinnen. Strikk 2 rett - 2 vrang = 1 omgang er nå strikket. Fortsett og strikke vrangbord (2 rett/2 vrang) og A.1 til A.1 er strikket 1 gang i høyden. mvh DROPS Design
22.12.2025 - 09:25
![]() Jenny wrote:
Jenny wrote:
När jag ska börja på mönsterdelen a1 ska det helt plötsligt vara 53 maskor från tidigare 50 vart ska övningarna vara?
04.08.2025 - 09:23DROPS Design answered:
Hej Jenny. Var i mönstret är du och stickar du mössa eller vantar? Mvh DROPS Design
26.08.2025 - 11:39
![]() Laura wrote:
Laura wrote:
Scusate, mi riferisco al cappello, il primo diagramma da lavorare é A3? Mi sembra strano
05.09.2024 - 08:08DROPS Design answered:
Buonasera Laura, è corretto, il cappello prevede il diagramma A.3. Buon lavoro!
05.09.2024 - 19:57
![]() Gloria Guerra wrote:
Gloria Guerra wrote:
Gracias, por enseñarme. Les agradezco y he seguido sus instrucciones.
03.06.2023 - 20:30
![]() Gloria Guerra wrote:
Gloria Guerra wrote:
Encontré la solución ya qué leí que una compañera hizo un aumento de1 derecho en un mismo punto y así paso el derecho sin tejer y me quedan los 2 del derecho. Gracias por compartir tu solución pues hice lo mismo y ya estoy avanzando.
27.05.2023 - 01:55
![]() Gloria Guerra wrote:
Gloria Guerra wrote:
Estoy teniendo problemas en la décima vuelta para el gorro pues pierdo el patrón del resorte al seguir el símbolo de pasar sin tejer y tejer 2 del derecho me sobra un revés y pierdo la figura de la foto del resorte
24.05.2023 - 04:20DROPS Design answered:
Hola Gloria, el símbolo del pico se trabaja como sigue: deslizar 1 punto, trabajar 2 derechos en el mismo punto, (se ha aumentado 1 punto), pasar el punto deslizado sobre los puntos trabajados (se ha disminuido un punto). Por lo tanto, deberías tener 2 derechos en esta sección. El resto se continúa como antes, y el patrón no debería interrumpirse.
28.05.2023 - 18:33
![]() Fabie wrote:
Fabie wrote:
Comment tricoter 2x une maille à l'endroit ?
08.12.2022 - 12:40DROPS Design answered:
Bonjour Fabie, cette vidéo montre comment tricoter 2 fois la même maille à l'endroit, la 1ère dans le brin avant, la 2ème fois dans le brin arrière - pour réaliser le 3ème symbole de la légende des diagrammes, passez ensuite la maille glissée par-dessus ces 2 mailles tricotées. Bon tricot!
08.12.2022 - 17:25
|
||||||||||||||||||||||||||||
Snowman Set#snowmanset |
||||||||||||||||||||||||||||
|
|
||||||||||||||||||||||||||||
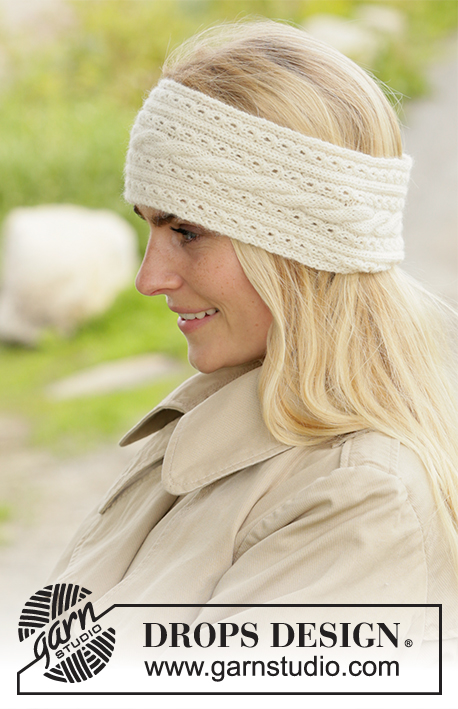
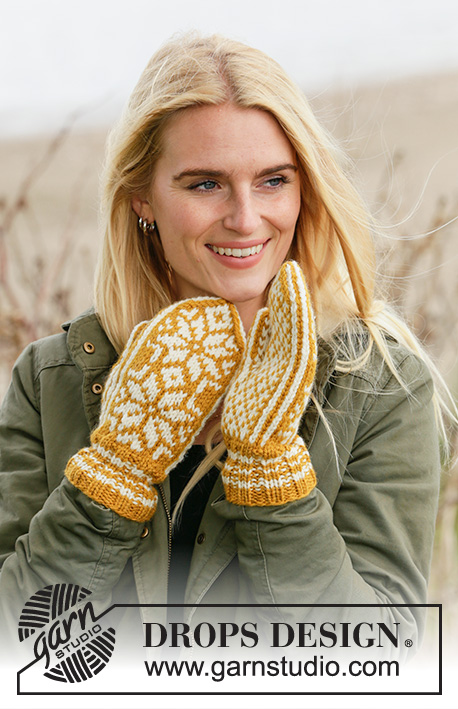
Knitted mittens and hat with small cables in DROPS Merino Extra Fine. SIZE S - L:
DROPS 204-13 |
||||||||||||||||||||||||||||
|
---------------------------------------------------------- EXPLANATION FOR THE PATTERN: ---------------------------------------------------------- PATTERN: See diagrams A.1 to A.5. A.1 to A.2 applies to mittens, A.3 to A.5 applies to hat. INCREASE TIP: Increase 1 stitch by making 1 yarn over, on next round knit yarn over twisted to avoid holes. DECREASE TIP: Decrease as follows (begin 3 stitches before marker): Knit 2 together, knit 2 (marker is in the middle of these 2 stitches), slip 1 stitch knitwise, knit 1, pass slipped stitch over stitch worked. ---------------------------------------------------------- START THE PIECE HERE: ---------------------------------------------------------- MITTENS - short overview of the piece: Worked in the round on double pointed needles. RIGHT MITTEN: Cast on 50-50 stitches on double pointed needles size 3 mm with Merino Extra Fine and knit 1 round. Work next round as follows: * Knit 2, purl 2 *, work from *-* over the next 24 stitches, knit 2, A.1 over the next 20 stitches, knit 2, purl 2. Continue until A.1 has been worked 1 time vertically. Switch to double pointed needles size 3.5 mm, work next round as follows: Knit 26-26 (= inside hand), A.2 over A.1 (= 23 stitches) and knit 4. Continue pattern like this. REMEMBER THE KNITTING TENSION! When piece measures 13-14 cm, increase 1 stitch for thumb on each side of first stitch on round - read INCREASE TIP above. Increase like this on each side of the increased stitches every other round 5-6 times in total = 60-62 stitches. Now slip the 11-13 thumb stitches on 1 stitch holder. Continue in the round as before, cast on 1 new stitch behind thumb on next round = 50-50 stitches. When mitten measures approx. 24-26 cm (try the mitten on if needed, approx. 3-3 cm until finished measurements), insert 1 marker after first stitch on round and 1 marker after 24-24 stitches. Now decrease 1 stitch on each side of both markers - read DECREASE TIP above. Decrease like every other round 3-3 times in total and then every round 2-2 times in total – on last decrease round, decrease in addition 2 stitches over each cable = 24-24 stitches. Knit all stitches together 2 by 2 = 12-12 stitches. Knit all stitches together 2 by 2 = 6 stitches. Cut the yarn and pull it through the remaining stitches, tighten together and fasten. THUMB: Slip the 11-13 thumb stitches back on double pointed needles size 3.5 mm. Pick in addition up 4-3 stitches behind thumb = 15-16 stitches. Work in stocking stitch until the thumb itself measures approx. 5-5 cm (try on the mitten, approx. ½ cm remains until finished measurements). Work all stitches together 2 by 2 on the next 2 round = 4-4 stitches remain on needles. Cut the yarn and pull it through the remaining stitches, tighten together and fasten. LEFT MITTEN: Cast on and work as right but increase for thumb on each side of the 22nd-22nd stitch on round. ---------------------------------------------------------- HAT - SHORT OVERVIEW OF THE PIECE: Worked in the round on circular needle, bottom up. Switch to double pointed needles when needed. HAT: Cast on 112-120 stitches on circular needle size 3.5 mm with Merino Extra Fine. Work A.3 over all stitches (= 14-15 repetitions of 8 stitches). When A.3 has been worked 1 time vertically, switch to circular needle size 4 mm and continue with A.4 (= 9 stitches) over all stitches. When piece measures 15-16 cm, work and decrease according to A.5 (= 14-15 repetitions of 9 stitches in width). When A.5 has been worked 1 time vertically, 42-45 stitches remain on round (switch to double pointed needles when needed). Knit all stitches together 2 by 2 = 21-23 stitches. Cut the yarn and pull it through the last stitches, tighten together and fasten. |
||||||||||||||||||||||||||||
Diagram explanations |
||||||||||||||||||||||||||||
|
||||||||||||||||||||||||||||
 |
||||||||||||||||||||||||||||
 |
||||||||||||||||||||||||||||
Have you finished this pattern?Tag your pictures with #dropspattern #snowmanset or submit them to the #dropsfan gallery. Do you need help with this pattern?You'll find 22 tutorial videos, a Comments/Questions area and more by visiting the pattern on garnstudio.com. © 1982-2026 DROPS Design A/S. We reserve all rights. This document, including all its sub-sections, has copyrights. Read more about what you can do with our patterns at the bottom of each pattern on our site. |
||||||||||||||||||||||||||||


With over 40 years in knitting and crochet design, DROPS Design offers one of the most extensive collections of free patterns on the internet - translated to 17 languages. As of today we count 324 catalogues and 12290 patterns translated into English (UK/cm). 12290
We work hard to bring you the best knitting and crochet have to offer, inspiration and advice as well as great quality yarns at incredible prices! Would you like to use our patterns for other than personal use? You can read what you are allowed to do in the Copyright text at the bottom of all our patterns. Happy crafting!
Post a comment to pattern DROPS 204-13
We would love to hear what you have to say about this pattern!
If you want to leave a question, please make sure you select the correct category in the form below, to speed up the answering process. Required fields are marked *.