
Popular categories
Looking for a yarn?


Comments / Questions (32)
![]() Zaza wrote:
Zaza wrote:
Bonjour j avoue ne pas trop saisir le debut du travail , j ai monte 36 mailles, tricote 36 mailles end, apres je bloque..je sais lire un diagramme' pourriez vous m aider pour tricoter le diagramme en entier et que j ai la premiere feuille sur mes aiguilles merci d avance zaza
22.10.2018 - 12:11DROPS Design answered:
Bonjour Zaza, bien volontiers, lisez le 1er rang du diagramme sur l'envers = 36 m endroit, puis tricotez 18 mailles end sur l'end, tournez et tricotez 16 m end sur l'env, tournez, tricotez 18 m end sur l'end, tournez, et ainsi de suite. Au 22ème rang, tricotez 16 m end, tournez et tricotez 18 m end,, tournez et tricotez 16 m end, tournez et tricotez 18 m end et ainsi de suite jusqu'à la fin du diagramme. Bon tricot!
22.10.2018 - 14:17
![]() Mobsi wrote:
Mobsi wrote:
Ein sehr schönes Tuch! Eine total kurzweilige Strickweise, da man meist nur über 16 bis 18 Maschen strickt. So können das auch meine Rheumahände noch schaffen. Ich hab meine Sockenwollreste verstrick, 6 zusammenpassende Farben (4mal uni,2mal für Mustersocken), bei jedem Blatt ein Farbwechsel. Ich hab das Tuch um eine Reihe verbreitert. Das erste Stück seit langem, mit dem ich selbst zufrieden bin. Danke für diese TOLLE Anleitung
08.10.2018 - 12:23
![]() Tina Joelsen wrote:
Tina Joelsen wrote:
Error: QueryCheckIfExists: Table 'garnstud_garnstudio.drops_oppskrift_tekst_dk' doesn't exist Jeg får denne besked når jeg forsøger at udskrive opskriften! Kunne det tænkes at der foreligger en fejl! Tak for et fantastisk site i øvrigt :) Mvh Tina Joelsen
13.09.2018 - 16:32DROPS Design answered:
Hej Tina, vi har lige prøvet at skrive den ud og det gik helt fint. Lav en restart og prøv igen. God fornøjelse!
19.09.2018 - 14:31
![]() Pam T. wrote:
Pam T. wrote:
Striking!! A real attention grabber!
08.08.2018 - 00:08
![]() Gitte Trab wrote:
Gitte Trab wrote:
Super flot men ærgeligt jeg ikke kan strikke den for kan ikke strikke efter diagram
04.08.2018 - 14:58Jessica wrote:
Hi! Are we working short rows on the end of each row, for example I knit 18 for row 2, then wrap and turn, then do I knit 16 for row 3 and wrap and turn again?
24.07.2018 - 16:02DROPS Design answered:
Dear Jessica, there is no wrap and turn, just turn without wrap in the short rows to create holes in the middle of the leaf. On row 2, you knit 18 sts from RS, turn and K 16 sts from RS (row 3), then turn and work 18 sts from RS, turn and work 16 sts from WS and so on until row 20 & 21 (= K18 sts both from RS and from WS), then work *16 sts from RS, 18 sts from WS*, repeat from *-* until you reach the marker. Happy knitting!
24.07.2018 - 16:10Pirkko Vega wrote:
Is the first cast off tail of 18 stitches used later somewhere?
22.07.2018 - 21:19DROPS Design answered:
Dear Mrs Pirkko, the 18 sts cast on under START-ROW-1 will be worked at the end of next row, ie they belog to the last leave on row, seen from RS. Happy knitting!
23.07.2018 - 08:22
![]() Hanna wrote:
Hanna wrote:
Wie kommen die Löcher in die Mitte der einzelnen Federn? Kann es sein, dass die verkürzten Reihen nicht mit einer gezogenen Doppelmasche gestrickt werden?
19.07.2018 - 23:32DROPS Design answered:
Liebe Hanna, die Löcher entstehen mit den verkürtzten Reihen in A.1, wenn Sie mit Doppelmaschen stricken, entsteht dann keine löcher. Viel Spaß beim stricken!
20.07.2018 - 14:47
![]() Gabi wrote:
Gabi wrote:
Genial. Einfach schön.
11.07.2018 - 12:58
![]() Anna wrote:
Anna wrote:
Simpelhen et meget spændende mønster i utrolig flotte farver.
09.07.2018 - 11:38
|
||||||||||
Forest Fling#forestflingshawl |
||||||||||
 |
 |
|||||||||
Knitted stole with leaves in DROPS Delight. The piece is worked in garter stitch with short rows.
DROPS 196-5 |
||||||||||
|
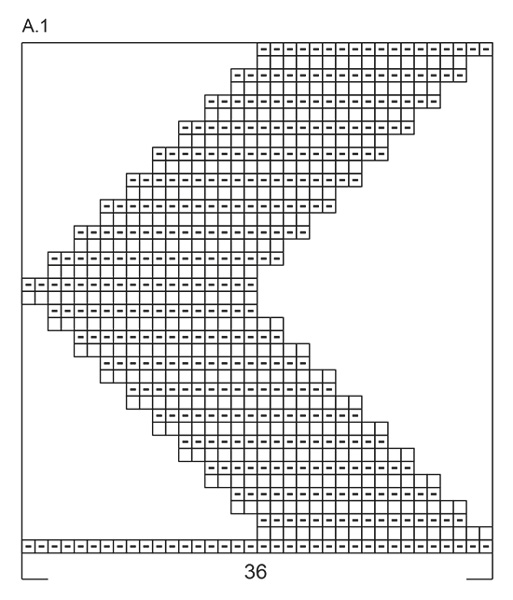
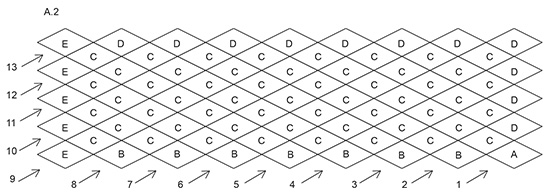
EXPLANATIONS FOR THE PATTERN: ------------------------------------------------------- RIDGE/GARTER STITCH (worked back and forth): All rows are knitted (1 ridge = knit 2 rows). PATTERN: See diagrams A.1 and A.2. Diagram A.1 shows all the rows in the pattern seen from the right side. Diagram A.1 is read from left to right on all rows from the wrong side. All rows from the right side are read from right to left. Diagram A.2 shows the leaves as well as the knitting direction and order of rows. COLOUR SUGGESTION: To mix and change the pattern of colours while you work, you can change balls or use yarn from the other end of the ball each time you start a new row of leaves. Change colour before each START-ROW 1 and START-ROW 2 are worked. ------------------------------------------------------- START THE PIECE HERE: ------------------------------------------------------- STOLE - SHORT OVERVIEW OF THE PIECE: The piece is worked back and forth with circular needle; from the one corner, diagonally upwards in rows with different numbers of leaves. Short rows are worked over one leaf at a time. The whole piece is worked in GARTER STITCH – read description above. Markers are used, inserted between and in the middle of leaves as you work. The markers are on the needle and will follow your work upwards. They make it easier to see where the leaves are to be worked. Read also COLOUR SUGGESTION in description above. STOLE: Cast on 36 stitches with circular needle size 4 mm and Delight. Then work as follows: ROW 1: Work LEAF A as follows: LEAF A: Work diagram A.1; the first row in the diagram is from the wrong side – read description above under pattern. Work the diagram 1 time in height = 1 leaf. The first row of leaves is now finished, turn the piece. In the transition between rows 1 and 2 with leaves, work START-ROW 1 as follows: START-ROW 1: From the right side: Cast off the first 18 stitches with knit, knit 18 stitches. Turn the piece, knit 18 stitches, insert 1 marker on the needle here and cast on 18 new stitches at the end of the row from the wrong side. Turn the piece and knit to end of row from the right side, insert a marker on the needle here. Cast on 36 new stitches at the end of the row. Now you are ready to work the next row of leaves. Turn the piece. ROW 2. Work LEAVES B, C and D as follows: LEAF B: Work diagram A.1 over the first 36 stitches on the needle (as far as the first marker seen from the wrong side). Work the diagram 1 time in height (you have now worked as far as the same marker again). Turn the piece, knit 36 stitches from the right side. Turn the piece, knit 18 stitches from the wrong side, insert 1 marker on the needle here, do not turn the piece; the next leaf is worked over the next 36 stitches. LEAF C: Work diagram A.1 over the next 36 stitches on the needle (past one marker and as far as the next). Work the diagram 1 time in height. Turn the piece and knit 36 stitches from the right side. Turn the piece, knit 18 stitches from the wrong side (as far as the marker in the middle of the leaf), do not turn the piece; the next leaf is worked over the next 36 stitches. LEAF D: Work diagram A.1 over the last 36 stitches on the needle (past the last marker and to end of row). Work the diagram 1 time in height. You have now worked 3 leaves and 2 rows of leaves are finished. Work START-ROW 1 – read description above, in the transition between rows 2 and 3 of leaves. ROW 3: Work LEAF B over the first 36 stitches, work LEAF C a total of 3 times in width, work LEAF D over the last 36 stitches (= 5 leaves on the row) and work START-ROW 1 in the transition between rows 3 and 4 of leaves. ROW 4: Work LEAF B over the first 36 stitches, work LEAF C a total of 5 times in width, work LEAF D over the last 36 stitches (= 7 leaves on the row) and work START-ROW 1 in the transition between rows 4 and 5 of leaves. ROW 5: Work LEAF B over the first 36 stitches, work LEAF C a total of 7 times in width and work LEAF D over the last 36 stitches (= 9 leaves on the row). NOTE! START-ROW 1 is not worked anymore from here; you work START-ROW 2 in the transition between rows 5 and 6 of leaves as follows: START-ROW 2: From the right side: Cast off the first 36 stitches with knit, knit to end of row, insert 1 marker on the row here. Cast on 36 new stitches at the end of the row and insert 1 marker on the row here. Now you are ready for the next row of leaves which are worked from here. Turn the piece. ROW 6: Work LEAF B over the first 36 stitches, work LEAF C a total of 7 times in width, work LEAF D over the last 36 stitches (= 9 leaves) and work START-ROW 2 in the transition between rows 6 and 7 of leaves. ROW 7: Work LEAF B over the first 36 stitches, work LEAF C a total of 7 times in width, work LEAF D over the last 36 stitches (= 9 leaves) and work START-ROW 2 in the transition between rows 7 and 8 of leaves. ROW 8: Work LEAF B over the first 36 stitches, work LEAF C a total of 7 times in width, work LEAF D over the last 36 stitches (= 9 leaves) and work START-ROW 2 in the transition between rows 8 and 9 of leaves. ROW 9: Work LEAF E as follows: LEAF E: Work diagram A.1 over the first 36 stitches (as far as the first marker on the needle seen from the wrong side). Work the diagram 1 time in height (you have now worked as far as the same marker again). Turn the piece. Knit 36 stitches from the right side. Turn the piece, cast off 18 stitches from the wrong side. Turn the piece, insert 1 marker on the needle here and cast on 18 new stitches from the right side. Turn the piece, knit 18 stitches from the wrong side. Do not turn the piece as the next leaf is worked over the next 36 stitches from here. Work LEAF C a total of 7 times in width and work LEAF D over the last 36 stitches (= 9 leaves on the row). Turn the piece, cast off the first 36 stitches with knit from the right side. Knit to end of row from the right side. ROW 10: Work LEAF E over the first 36 stitches, work LEAF C a total of 5 times in width and work LEAF D over the last 36 stitches (= 7 leaves on the row). Turn the piece, cast off the first 36 stitches with knit from the right side. Knit to end of row from the right side. ROW 11: Work LEAF E over the first 36 stitches, work LEAF C a total of 3 times in width and work LEAF D over the last 36 stitches (= 5 leaves on the row). Turn the piece, cast off the first 36 stitches from the right side. Knit to end of row from the right side. ROW 12: Work LEAF E over the first 36 stitches, work LEAF C 1 time in width and work LEAF D over the last 36 stitches (= 3 leaves). Turn the piece, cast off the first 36 stitches with knit from the right side. Knit to end of row from the right side. ROW 13: Work LEAF E over the last 36 stitches, but when diagram A.1 has been worked 1 time in height, cast off all stitches from the right side. Cut and fasten the strands. |
||||||||||
Diagram explanations |
||||||||||
|
||||||||||
 |
||||||||||
 |
||||||||||
Have you finished this pattern?Tag your pictures with #dropspattern #forestflingshawl or submit them to the #dropsfan gallery. Do you need help with this pattern?You'll find 11 tutorial videos, a Comments/Questions area and more by visiting the pattern on garnstudio.com. © 1982-2026 DROPS Design A/S. We reserve all rights. This document, including all its sub-sections, has copyrights. Read more about what you can do with our patterns at the bottom of each pattern on our site. |
||||||||||


With over 40 years in knitting and crochet design, DROPS Design offers one of the most extensive collections of free patterns on the internet - translated to 17 languages. As of today we count 324 catalogues and 12290 patterns translated into English (UK/cm). 12290
We work hard to bring you the best knitting and crochet have to offer, inspiration and advice as well as great quality yarns at incredible prices! Would you like to use our patterns for other than personal use? You can read what you are allowed to do in the Copyright text at the bottom of all our patterns. Happy crafting!
Post a comment to pattern DROPS 196-5
We would love to hear what you have to say about this pattern!
If you want to leave a question, please make sure you select the correct category in the form below, to speed up the answering process. Required fields are marked *.