
Popular categories
Looking for a yarn?


Comments / Questions (13)
![]() Irene Golden wrote:
Irene Golden wrote:
Sunny Day Top I didn't understand the reply. So, there are 2 knit sts at the beginning and end of each row. WHERE DO I DO THE 6 BIND OFFS for armhole without crating a hole between the edge sts and the row sts?
13.07.2022 - 16:32DROPS Design answered:
Dear Irene, you cast off the 6 stitches at the beggining of each row as normal. In the following row, you work edge stitches in garter stitch which is usually slightly looser, so the gauge may get slightly looser and you may have a hole there. To avoid having a hole, you need to tighten the yarn between the start and end of the row, and adjust it well, i.e working the first 2 edge stitches more tightly. Happy knitting!
15.07.2022 - 12:47
![]() Irene Golden wrote:
Irene Golden wrote:
Sunny day top
10.07.2022 - 21:57
![]() Irene wrote:
Irene wrote:
How do you bind off for armhole while maintaining the garter stitches without creating a hole?
10.07.2022 - 21:56DROPS Design answered:
Hi Irene, You can work the first and last stitches together with the strand between them and the next stitch. Hope this helps and happy knitting!
11.07.2022 - 06:51
![]() Adelle wrote:
Adelle wrote:
On the Back piece size L: when starting the neckline, there are 63st on the needle. the neckline will be the centre 31 st, meaning there will be 16 st. on each shoulder strap. We are told to decrease 3x each side to get to 16 st, but I already only have 16 st. Do I just ignore the decrease instruction, or will that make my top look funny?
07.05.2022 - 04:55DROPS Design answered:
Dear Adelle, the 31 sts are those worked in garter stitch, but you cast off for the neckline 25 sts (as stated in the next line). Then, you decrease 1 st 3 times on each side, so you decrease 6 sts in total (31-25 = 6 sts). Then, you will have the 16 sts for each shoulder strap. Happy knitting!
08.05.2022 - 19:30
![]() Maja Stenholm wrote:
Maja Stenholm wrote:
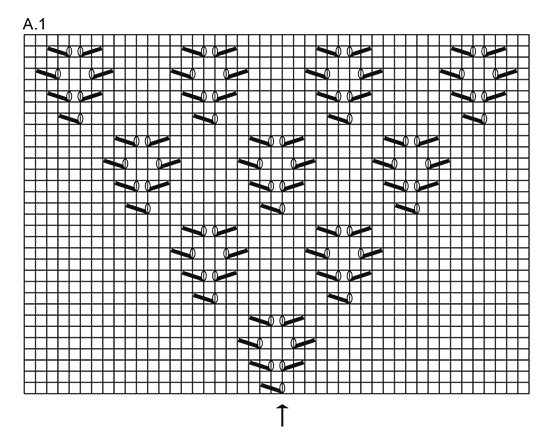
Hej. Jeg forstår ikke hvordan man fortsætter diagrammet efter A1? Skal man selv bare lægge hjerter til?
27.02.2021 - 20:40
![]() Martine RIBAULT wrote:
Martine RIBAULT wrote:
Bonjour, Je souhaite réaliser ce modèle avec le fil de coton DROPS BELLE, aiguilles No 4. Hors, le fil préconisé pour sa réalisation est DROPS PARIS, aiguilles No 5. La taille est S, mais avec le fil DROPS BELLE au lieu de DROPS PARIS. Pouvez vous me dire quel est la taille adéquate à choisir ? La responsable d'une boutique m'a recommandé de suivre la taille L pour le nombre de maille et la taille S pour les centimètres. Merci pour votre réponse. Cdlt
27.05.2020 - 13:40DROPS Design answered:
Bonjour Mme Ribault, ce modèle est pour un fil du groupe C (Paris) or Belle appartient au groupe B, l'échantillon sera par conséquent différent et les explications ne correspondront effectivement pas. Nous ne sommes malheureusement pas en mesure de pouvoir adapter chacun de nos modèles à chaque demande; Vérifiez votre échantillon et recalculez d'après les mesures du schéma comment adapter à votre taille ou bien cherchez un autre modèle à tricoter en fil du groupe B comme belle. Bon tricot!
27.05.2020 - 14:10
![]() Agata wrote:
Agata wrote:
Czemu drukuje się jedynie pierwsza strona wzoru?(wszystkie parametry drukarki ustawione są prawidłowo)
12.06.2019 - 08:34DROPS Design answered:
Witaj Agato. Musisz kliknąć na ikonkę drukarki z napisem WZÓR (tuż nad opisem wzoru). Następnie DRUKUJ WZÓR w prawym górnym rogu okna, które się pojawi i jest cały wzór do wydruku. Jeśli nie zadziała, po prostu zaznacz opis, skopiuj do worda i wtedy drukuj. Powodzenia!
12.06.2019 - 16:40
![]() Monica wrote:
Monica wrote:
Salve vorrei sapere se continuare con le 2 m. di vivagno a legaccio per tutta la lunghezza del davanti e dietro, oppure se lavorarle solo per la parte dello spacco laterale che non viene cucito. Nel caso si debba fare x tutta la lunghezza, lasciare a vista il legaccio durante la cucitura? Grazie
29.03.2018 - 07:48DROPS Design answered:
Buongiorno Monica, è tutto spiegato nel modello, si lavora dall'alto in basso con 2 o 3 maglie di vivagno a seconda delle spiegazioni. E anche per la confezione, deve seguire le indicazioni e cucire il lato nel filo più esterno delle maglie di vivagno, quindi le maglie di vivagno rimangono a vista. Buon lavoro!
29.03.2018 - 09:34
![]() Agnes wrote:
Agnes wrote:
Bonjour, je tricote le dos et je ai terminé le diagramme A1. VOUS dites de faire les diagraMmes A1a et A1b à droite et à gauche . Je ne comprends pas où les commencer et comment faire la suite des motifs au milieu Merci de me répondre
12.05.2017 - 14:01DROPS Design answered:
Bonjour Agnès, Quand A.1 est terminé 1 fois en hauteur, continuez A.1 comme avant, c'est-à-dire que vous aurez 5 motifs ajourés en largeur au prochain rang et ainsi de suite (6, 7 ... ) - en fonction de votre taille, vous devrez tricoter A.1A au début du rang et A.1B à la fin du rang (si vous n'avez pas suffisamment de mailles pour faire des motifs complets en largeur). Bon tricot!
12.05.2017 - 15:38
![]() Hilda wrote:
Hilda wrote:
Prima uitleg met fantastisch resultaat. Heel mooi ! Nu nog het zonnetje...
27.04.2016 - 12:45
|
||||||||||||||||
Sunny Day Top#sunnydaytop |
||||||||||||||||
 |
 |
|||||||||||||||
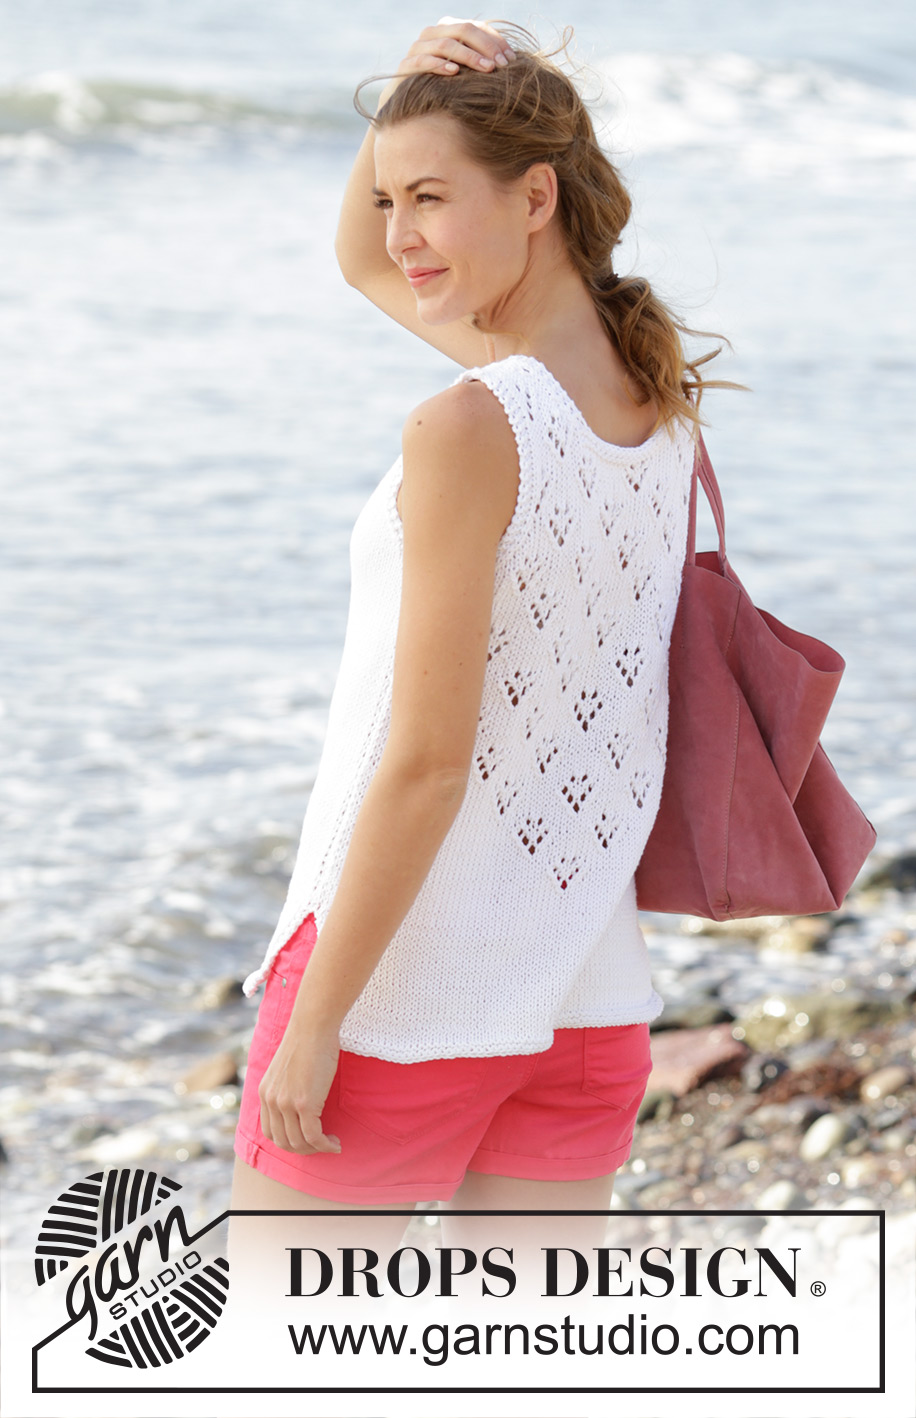
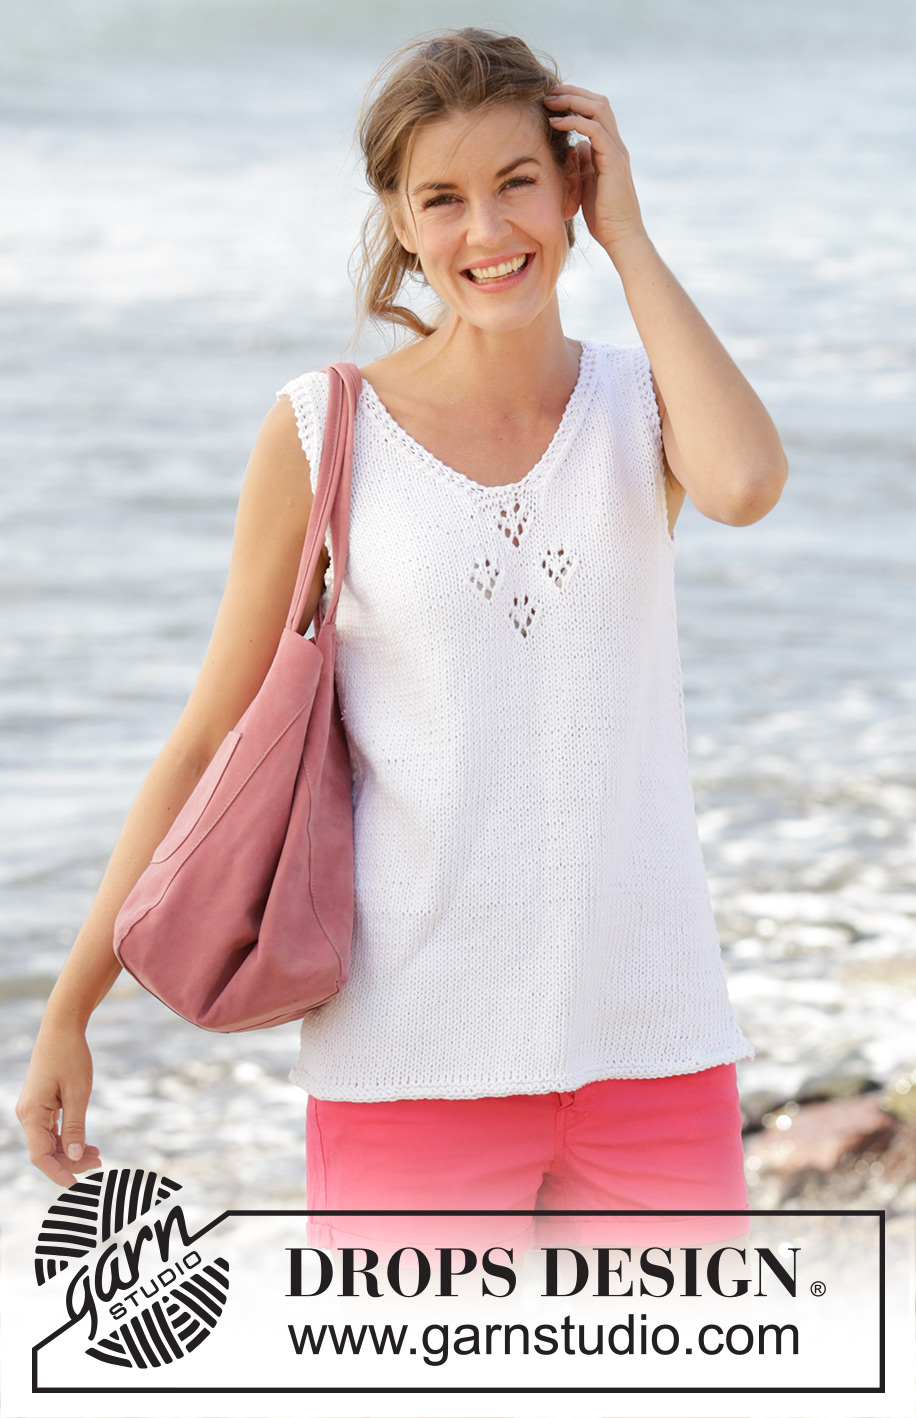
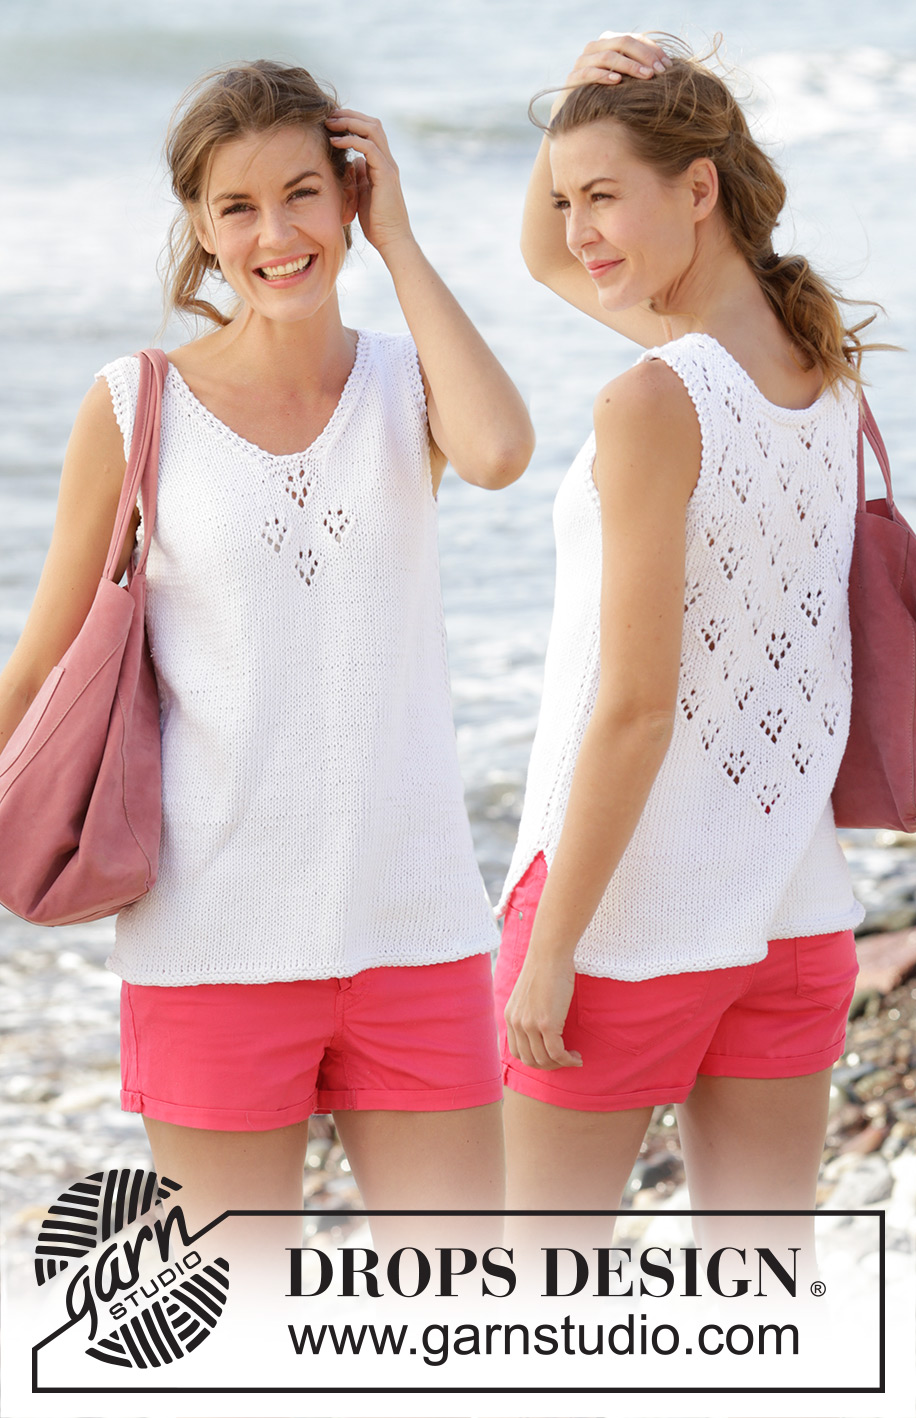
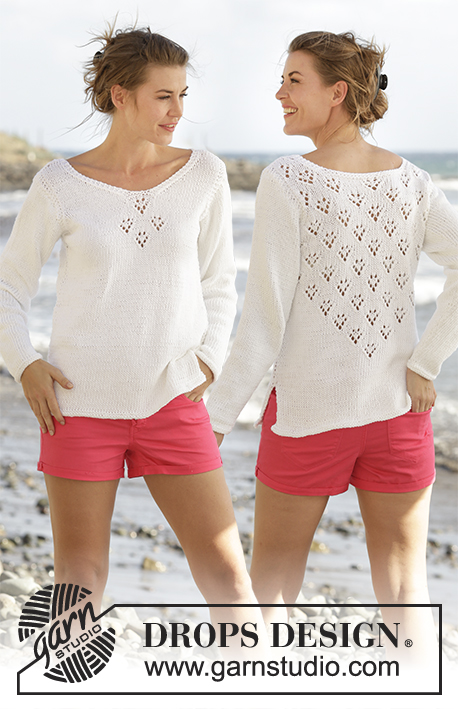
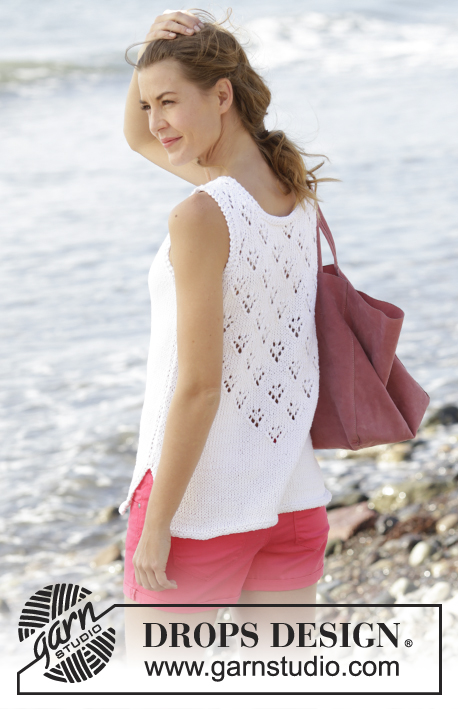
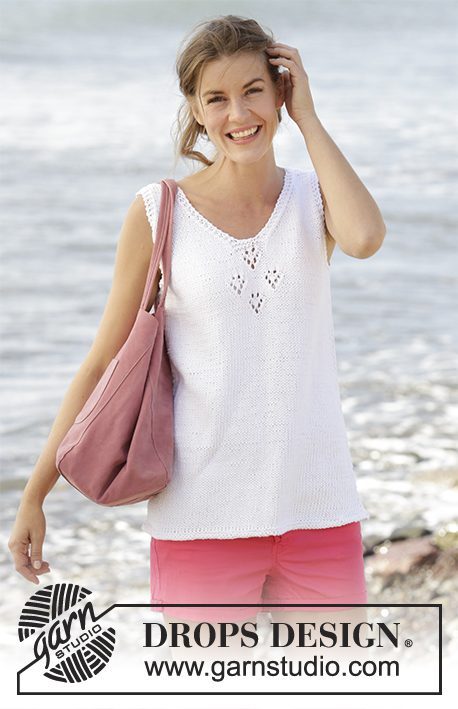
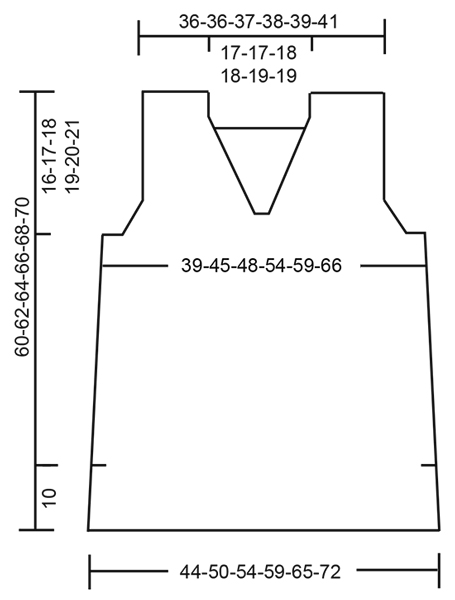
Knitted DROPS top with V-neck, lace pattern and vents in the sides in ”Paris”. Size: S - XXXL.
DROPS 170-32 |
||||||||||||||||
|
GARTER ST (back and forth): K all rows. 1 ridge = 2 rows K. PATTERN: See diagrams A.1 and A.2. The diagrams show all rows in pattern seen from RS. DECREASE TIP (applies to sides on body, at armholes and neck): Dec inside 2 edge sts in garter st on front and back piece and inside 3 edge sts in garter st along armholes and neck. All dec are done from RS! Dec as follows after 2 or 3 edge sts: Slip 1 st as if to K, K 1, psso. Dec as follows before 2 or 3 edge sts: Beg 2 sts before edge sts and K 2 tog. ---------------------------------------------------------- TOP: Piece is worked bottom up in two parts. BACK PIECE: Cast on 75-85-91-101-111-123 sts on needle size 4 mm with Paris. Work 2 ridges in GARTER ST - see explanation above. Insert 1 marker after the first 37-42-45-50-55-61 sts on needle (seen from RS) = 38-43-46-51-56-62 sts on needle after marker, move the marker upwards when working. Switch to needle size 5 mm and work in stocking st with 2 edge sts in garter st in each side. REMEMBER THE KNITTING TENSION When piece measures 12 cm, dec 1 st in each side - READ DECREASE TIP! Repeat dec every 8-8-7-7-7-7 cm a total of 4-4-5-5-5-5 times in each side = 67-77-81-91-101-113 sts. AT THE SAME TIME when piece measures 15-16-17-14-15-16 cm, work pattern according to diagram A.1 over the middle sts – pattern beg from RS after marker in the middle of piece (see arrow in diagram) – work the other sts as before. When A.1 has been worked 1 time in height continue the pattern towards the edge st in each side as before - adjust to a whole or half heart - see A.1A and A.1B, (work A.1A in the right side of work and work A.1B in the left side of work), inside edge st in each side. Work the sts that do not fit a whole or half heart out towards the sides in stocking st. When piece measures 43-44-45-46-47-48 cm, work 2 ridges over the outermost 5-7-8-9-10-11 sts in each side (work the other sts as before). Then cast off the first 2-4-5-6-7-8 sts at beg of the next 2 rows for armholes. Continue pattern with 3 edge sts in garter st in each side (where there is not enough room for a whole or half heart out towards armholes work these sts in stocking st). AT THE SAME TIME dec for armholes inside edge st on every other row (i.e. every row from RS) as follows: Dec 1 st 1-4-4-7-10-14 times in total – READ DECREASE TIP = 61-61-63-65-67-69 sts remain on needle. When piece measures 52-54-56-58-60-62 cm, work 2 ridges over the middle 29-29-31-31-33-33 sts on needle (work the other sts as before). On next row from RS, cast off the middle 23-23-25-25-27-27 sts for neck and finish each shoulder separately. Continue as before with 3 edge sts in garter st in each side. AT THE SAME TIME dec for neck on every other row as follows: Dec 1 st 3 times in total – READ DECREASE TIP = 16-16-16-17-17-18 sts remain on shoulder. Continue until piece measures 60-62-64-66-68-70 cm and cast off. Repeat on the other shoulder. FRONT PIECE: READ ALL OF THE FOLLOWING SECTION BEFORE CONTINUING! Cast on and work as on back piece until piece measures 35-37-38-39-40-42 cm - NOTE: Do not work A.1 on front piece. Now work pattern according to diagram A.2 over the middle sts – pattern beg from RS after marker in the middle of piece (see arrow in diagram) – work the other sts as before. ARMHOLE: AT THE SAME TIME when piece measures 43-44-45-46-47-48 cm, work 2 ridges over the outermost 5-7-8-9-10-11 sts in each side as on back piece (work the other sts as before). Then dec for armhole in the side as on back piece. V-NECK: AT THE SAME TIME when A.2 has been worked 1 time vertically work 2 ridges over the middle 9 sts mid front (work the other sts as before). On next row from RS after ridges, cast off the middle 3 sts for neck and finish each part separately. Continue in stocking st with dec for armhole as before and dec AT THE SAME TIME for V-neck on every other row (i.e. on every row from RS) as follows: Dec 1 st 13-13-14-14-15-15 times in total - READ DECREASE TIP. After all dec for armholes and V-neck, 16-16-16-17-17-18 sts remain on shoulder. Continue until piece measures 60-62-64-66-68-70 cm and cast off. Repeat on the other shoulder - NOTE: Work first row from mid front (= WS). Beg by picking up 1 st in first st from the other side and work this tog with first st on needle. This is done to avoid a nick at the bottom of vent. ASSEMBLY: Sew shoulder seams inside cast-off edge. Sew side seams – sew edge to edge in outer loops of edge sts - beg at the top by armhole and sew until approx. 10 cm remain in each side (= vent). |
||||||||||||||||
Diagram explanations |
||||||||||||||||
|
||||||||||||||||
 |
||||||||||||||||
 |
||||||||||||||||
 |
||||||||||||||||
Have you finished this pattern?Tag your pictures with #dropspattern #sunnydaytop or submit them to the #dropsfan gallery. Do you need help with this pattern?You'll find 19 tutorial videos, a Comments/Questions area and more by visiting the pattern on garnstudio.com. © 1982-2026 DROPS Design A/S. We reserve all rights. This document, including all its sub-sections, has copyrights. Read more about what you can do with our patterns at the bottom of each pattern on our site. |
||||||||||||||||


With over 40 years in knitting and crochet design, DROPS Design offers one of the most extensive collections of free patterns on the internet - translated to 17 languages. As of today we count 324 catalogues and 12290 patterns translated into English (UK/cm). 12290
We work hard to bring you the best knitting and crochet have to offer, inspiration and advice as well as great quality yarns at incredible prices! Would you like to use our patterns for other than personal use? You can read what you are allowed to do in the Copyright text at the bottom of all our patterns. Happy crafting!
Post a comment to pattern DROPS 170-32
We would love to hear what you have to say about this pattern!
If you want to leave a question, please make sure you select the correct category in the form below, to speed up the answering process. Required fields are marked *.