
Popular categories
Looking for a yarn?


Comments / Questions (32)
![]() Barbara wrote:
Barbara wrote:
There don't seem to be any instructions for buttonholes....am I missing something?
13.03.2026 - 12:41DROPS Design answered:
Dear Barbara, there is no buttonholes worked extra here, buttons will be buttoned through the holes in front band stitches. Happy knitting!
13.03.2026 - 15:35
![]() Grazyna Koster wrote:
Grazyna Koster wrote:
Goede dag, het truitje is gebreid van boven naar beneden. Moet ik ook telpatronen van boven naar beneden beginnen? Is de eerste naald de onderste of bovenste? Met vriendelijke groet Grazyna
17.05.2025 - 22:58DROPS Design answered:
Dag Grazyna,
Nee, de telpatronen lees je altijd van onder naar boven, onafhankelijk van welke richting het kledingstuk op wordt gebreid. Dus de eerste naald is de onderste rij.
18.05.2025 - 08:20
![]() Kerstin Marquardt wrote:
Kerstin Marquardt wrote:
Var i beskrivningen står det var man ska glra knapphål ?
07.04.2023 - 20:49DROPS Design answered:
Hej Kerstin, under montering: Knapparna sys i så att de kan knäppas i hålen på höger framkant.
13.04.2023 - 11:39
![]() Anna Sabelli wrote:
Anna Sabelli wrote:
Bonjour, Je ne suis pas claire, ci-dessous les instructions. ..... Continuer ainsi, EN MÊME TEMPS, augmenter pour le RAGLAN en commençant au rang suivant - voir ci-dessus: Augmentations devants/dos: 14-16-18-20-26-30 fois 1 m tous les rangs (c\'est-à-dire à la fois sur l\'endroit et sur l\'envers), puis 7-8-9-10-9-9 fois tous les 2 rangs. Merci de votre aide
22.08.2022 - 22:43DROPS Design answered:
Bonjour Mme Sabelli,k vous tricotez les points fantaisie/diagrammes dans l'ordre indiqué précédemment, et en même temps vous allez augmenter pour le raglan, les augmentations du raglan se font à un rythme différent pour le dos/les devants et pour les manches; autrement dit vous allez augmenter soit 8 mailles (dos/devants + manches) soit 4 mailles seulement (quand on augmente pour le dos/les devants tous les rangs mais tous les 2 rangs pour les manches par exemple). Est-ce plus clair ainsi? Bonne continuation!
23.08.2022 - 08:13
![]() Bridget Curran wrote:
Bridget Curran wrote:
Sorry, I should've been more specific. So if I have 17 stitches for the right front, then a marker, then the 19 sts for the first A.3, etc. Should I do the raglan increase as follows - (1) K 17, YO, move marker, work 19 sts A.3, etc.; - or - (2) K 16, YO, K1, move marker, work 19 sts. A.3; etc.? I hope that makes sense. Some patterns specify the YO should be x amount of stitches away from the marker, but this pattern doesn't specify. Thanks a million!
11.05.2022 - 22:19DROPS Design answered:
Dear Mrs Curran, you have to increase on each side of A.3, this means to increase on left front piece, you will work the 1st time the 17 sts, then YO, and work A.3. On the next row from WS you will increase on left front piece (on every row) after A.3 and the 18 sts (17+1 st incrased). Note that you will increase sometimes 8 sts (body + sleeves) and sometimes only 4 sts (body only when increasing on every row on body but on every other row on sleeves). Happy knitting!
12.05.2022 - 08:48
![]() Bridget Curran wrote:
Bridget Curran wrote:
Hiya, for the raglan increases on the body, should they be done right before/after the stitch marker, or one stitch away from the stitch marker? Thanks a million!
11.05.2022 - 21:18DROPS Design answered:
Dear Bridget, the increases are worked before and after the A.3 repeat (for the raglan), which consists of 19 stitches. The marker is between the stitches of the sections of the piece and the beginning or ending of a repeat of A.3. Happy knitting!
11.05.2022 - 21:49
![]() Barbara Pörschmann wrote:
Barbara Pörschmann wrote:
Vielen Dank für die prompte Antwort. VT habe ich mittlerweile verstanden, Raglanzunahme leider nicht, jetzt habe ich eine Mittelmasche mitten im Ärmel, aber das stört mich nicht. im Gegenteil! Anders bei der doppelten Zunahmen (Hin- und Rückreihe) da hatte ich riesige Löcher, das hat mir nicht gefallen. So habe ich eine Masche hochgehäkelt und diese als Zunahme berechnet. Löcher weg.
09.04.2022 - 07:06
![]() Barbara Pörschmann wrote:
Barbara Pörschmann wrote:
"Die nächste Hin-R wie folgt str: 43-47-51-55-61-66 M re (= Vorderteil), " Ist das incl. der 6 Maschen (Blende) oder werden die 6 M erst gestrickt , dann 47 M re Ferner habe ich die Zunahmen an den Ärmeln nicht richtig verstanden: 19+1+19 Grundeinteilung. 1. Zunahme 19+(1.Zun)+1+(1. Zun)+19 2. Zun.: 19+2.zun.+3+2.Zun+19 oder 20+2.Zun+1+2.Zun+20 (????) Wo kommen die Zunahmen hin?
08.04.2022 - 09:53DROPS Design answered:
Liebe Frau Pörschmann, für den Raglan nehmen Sie beidseiting von jedem A.3 zu (siehe RAGLANZUNAHMEN), dh bei den Ärmeln stricken Sie: A.3, Zunahme, glatt rechts (1 bei der 1. Reihe), Zuinahme, A.3. Die BlendeMaschen sind in den 43-47-51-55-61-66 Maschen dazugezählt. Viel Spaß beim stricken!
08.04.2022 - 11:30
![]() Gudrun Norström wrote:
Gudrun Norström wrote:
Jag förstår inte hur raglan ska ökas. Ska man öka mellan alla A3 dvs 6 ökningar eller är det 4 som menas alltså mellan framstycke och ärm, ärm och bakstycke, bakstycke och ärm, ärm och framstycke. Hur ökas maskorna på ärmarna, Är det mellan 2 A3 och hur gör jag i såfall. Det ska ökas 1 m men om jag läser ökningstips blir det 2 m.
17.02.2022 - 12:23DROPS Design answered:
Hei Gudrun. Du øker på hver side av A.3 og du strikker A.3 fire ganger pr pinne = 8 økninger. Det er 4 økninger mellom overgangene: venstre forstykke/erm, erm/bakstykket, bakstykke/erm og erm/ høyre forstykke. Det økes også 2 masker midt oppå ermet/ hver side av A.3 = 4 økte masker. Det økes ulikt på bol og ermer, se forklaringen i oppskriften til din str på hvor ofte det skal økes / på hvilken pinner, husk det økes både fra retten og vrangen på forstykket og bakstykket. Øketipse gjelder ikke for raglan, men når du skal øke i sidene = 2 økte masker i hver side = 4 økte masker på hver pinne. mvh DROPS Design
21.02.2022 - 09:58
![]() Kate wrote:
Kate wrote:
Hi! I don’t understand where I need to increase for sleeves. And for raglan increase before A3 and after A3. Is it right?
11.12.2019 - 23:12DROPS Design answered:
Dear Kate, you increase for the raglan on each side of each A.3: at the end of right front piece just before A.3, then on each sleeve: after A.3 at the beg of sleeve + before A.3 at the end of sleeve; on back piece: after A.3 at beg of back piece and before A.3 at the end of back piece and after A.3 on left front piece. You will increase sometimes 8 stitches (= sleeves and body) or sometimes 4 stitches (= only on body) - see your size. Happy knitting!
12.12.2019 - 09:31
|
||||||||||||||||||||||
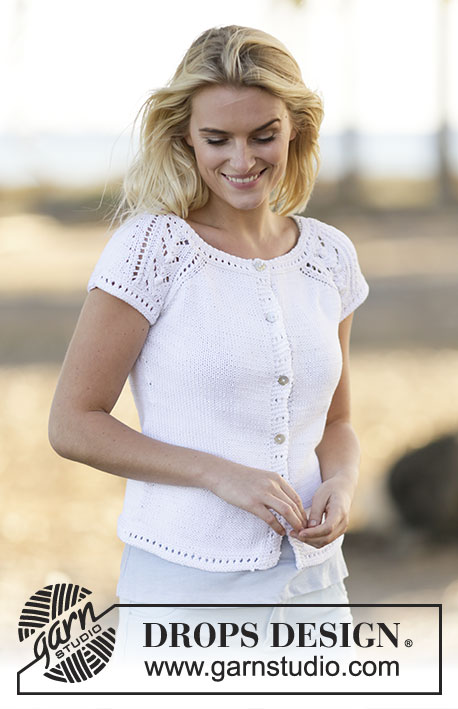
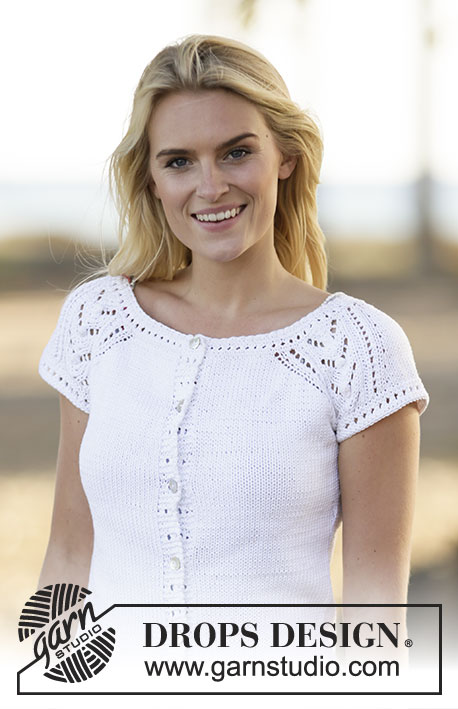
Esther Cardigan#esthercardigan |
||||||||||||||||||||||
 |
 |
|||||||||||||||||||||
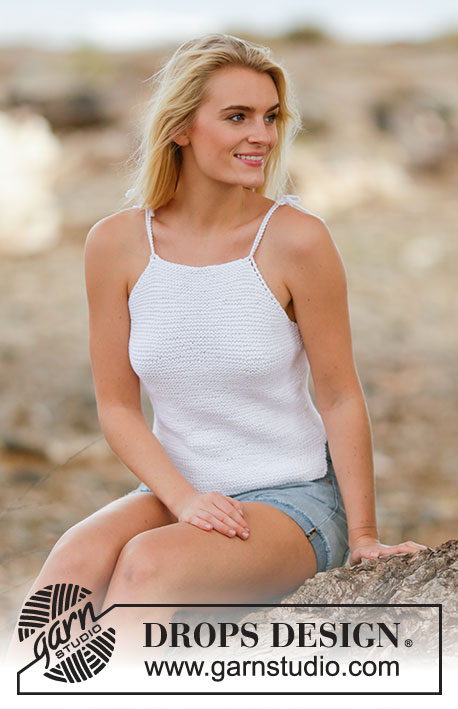
Knitted DROPS jacket with raglan and lace pattern, worked top down with short sleeves in ”Muskat”. Size: S - XXXL.
DROPS 159-32 |
||||||||||||||||||||||
|
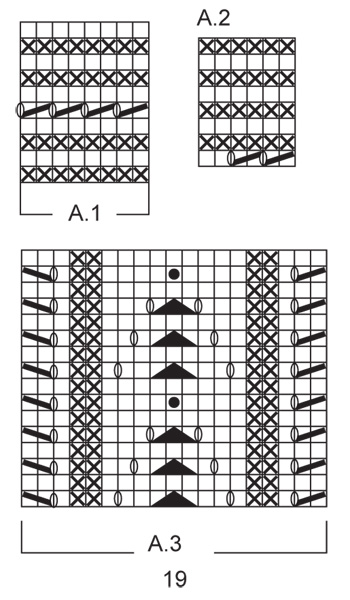
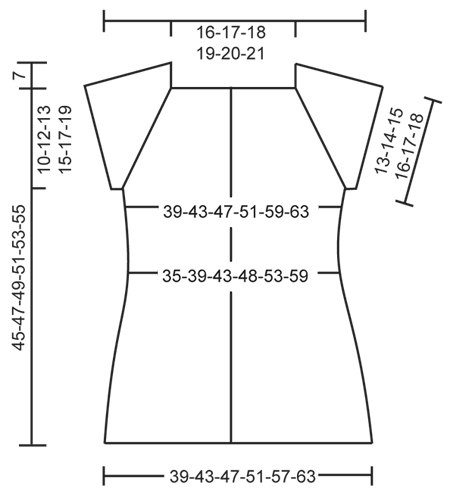
PATTERN: See diagrams A.1, A.2 and A.3. Diagram show all rows seen from RS. RAGLAN: Inc for raglan on each side of A.3. Inc with a YO, work YO twisted on next row to avoid holes. The inc on body and sleeves are uneven as explained in pattern. INCREASE TIP: Beg 1 st before marker and inc as follows: 1 YO, K 2 (marker is between these 2 sts), 1 YO. On next round K YOs twisted to avoid holes. DECREASE TIP: Dec as follows before marker: K 2 tog. Dec as follows after marker: Slip 1 st as if to K, K 1, psso. ---------------------------------------------------------- JACKET: Worked back and forth on circular needle, top down. YOKE: READ ALL OF THE FOLLOWING SECTION BEFORE CONTINUING! Cast on 156-160-164-168-172-176 sts on circular needle size 3 mm with Muskat. Work 6 sts in garter st, A.1 until 6 sts remain, 6 sts in garter st. Work 4 rows like this, then work A.2 over the 6 sts in each side (= band), continue with A.1 over the remaining sts. When A.1 has been worked, switch to circular needle size 4 mm. Work next row as follows: A.2 (= band), work 16-17-18-19-20-21 sts in stocking st (= front piece), work A.3 (= 19 sts), 1 st in stocking st, A.3 (= 19 sts) (= 39 sts on sleeve), work 34-36-38-40-42-44 sts in stocking st (= back piece), work A.3, 1 st in stocking st and A.3 (= 39 sts on sleeve) and continue with 16-17-18-19-20-21 sts in stocking st (= front piece), finish with A.2 (= band). Continue pattern like this AT THE SAME TIME inc for RAGLAN beg on next row - see explanation above. Inc on front/back piece: 1 st every row (i.e. from both RS and WS) a total of 14-16-18-20-26-30 times, then on every other row 7-8-9-10-9-9 times. Inc on sleeves: 1 st every other row a total of 2-4-6-8-10-12 times and then every 4th row a total of 6 times in all sizes. After all inc there are 272-296-320-344-376-404 sts on row and piece measures approx. 17-19-20-22-24-26 cm from shoulder and down. Work next row from RS as follows: K 43-47-51-55-61-66 (= front piece), slip the next 55-59-63-67-71-75 sts on a stitch holder for sleeve, cast on 6-6-6-8-8-10 new sts, insert 1 marker in the middle of the new sts, K 76-84-92-100-112-122 (= back piece), slip the next 55-59-63-67-71-75 sts on 1 stitch holder for sleeve, cast on 6-6-6-8-8-10 new sts, insert 1 marker in the middle of the new sts and K the remaining 43-47-51-55-61-66 ( = front piece) = 174-190-206-226-250-274 sts on row - NOW MEASURE PIECE FROM HERE. BODY: Continue in stocking st and band (in A.2). When piece measures 4 cm, dec 1 st on each side of marker in the sides - READ DECREASE TIP (= 4 sts dec). Repeat dec every 4 cm a total of 4 times = 158-174-190-210-234-258 sts. When piece measures 22 cm in all sizes, inc 1 st on each side of marker in the sides - READ INCREASE TIP (= 4 sts inc). Repeat inc every 2 1/2 cm a total of 4 times = 174-190-206-226-250-274 sts. When piece measures 33-33-34-34-34-34 cm, switch to circular needle size 3 mm. Work pattern according to diagram A.1 (continue band in A.2), then loosely cast off. Jacket measures approx. 52-54-56-58-60-62 cm from shoulder and down. SLEEVE EDGE: Worked in the round on double pointed needles. Slip the 55-59-63-67-71-75 sts from stitch holder back on double pointed needles size 3 mm and cast on 6-6-6-8-8-10 new sts under sleeve = 61-65-69-75-79-85 sts. Work pattern in the round according to diagram A.1 and then loosely cast off. Work the other sleeve edge the same way. ASSEMBLY: Sew tog under sleeves. Fasten the buttons on left front band, the top button approx. 1 cm down from neck, the bottom button approx. 12 cm from bottom edge. Distribute the remaining button every between these. Sew on buttons to button them in holes on right band. |
||||||||||||||||||||||
Diagram explanations |
||||||||||||||||||||||
|
||||||||||||||||||||||
 |
||||||||||||||||||||||
 |
||||||||||||||||||||||
Have you finished this pattern?Tag your pictures with #dropspattern #esthercardigan or submit them to the #dropsfan gallery. Do you need help with this pattern?You'll find 22 tutorial videos, a Comments/Questions area and more by visiting the pattern on garnstudio.com. © 1982-2026 DROPS Design A/S. We reserve all rights. This document, including all its sub-sections, has copyrights. Read more about what you can do with our patterns at the bottom of each pattern on our site. |
||||||||||||||||||||||


With over 40 years in knitting and crochet design, DROPS Design offers one of the most extensive collections of free patterns on the internet - translated to 17 languages. As of today we count 324 catalogues and 12290 patterns translated into English (UK/cm). 12290
We work hard to bring you the best knitting and crochet have to offer, inspiration and advice as well as great quality yarns at incredible prices! Would you like to use our patterns for other than personal use? You can read what you are allowed to do in the Copyright text at the bottom of all our patterns. Happy crafting!
Post a comment to pattern DROPS 159-32
We would love to hear what you have to say about this pattern!
If you want to leave a question, please make sure you select the correct category in the form below, to speed up the answering process. Required fields are marked *.