
Popular categories
Looking for a yarn?


Comments / Questions (81)
![]() Lynne Underkofler wrote:
Lynne Underkofler wrote:
Your quick response and clarification was amazing! Thank you so much. The differences in punctuation with commas versus semi-colons was what confused me. Now it makes total sense. Thanks again for your wonderful patterns and support.
05.06.2015 - 14:19
![]() Lynne Underkofler wrote:
Lynne Underkofler wrote:
Row 1-'skip ch 1' - does this mean skip a chain AND chain 1 in between 4 dc, or just skip a chain and continue with dc ? I have 55 dc Also confused on rows 1-6 'work A1, A2, A3 2 times in total (does that mean do all 3 and then repeat) (or each one twice) and then do A4 and A5? Doesn’t seem like the fan pattern will flow properly. Also, I’m having trouble distinguishing clearly where A2, A3 and A4 each start and end and that’s maybe the problem.
04.06.2015 - 18:07DROPS Design answered:
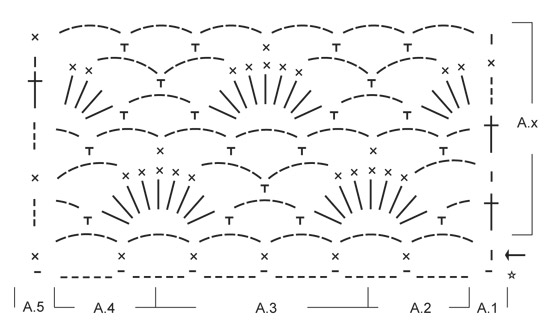
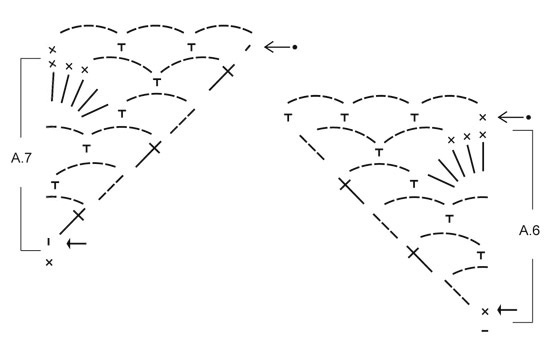
Dear Mrs Underkofler, since the fundation ch is generally tighter than the 1st row crocheted, you cast on a longer ch and skip chains evenly on 1st row. You then work A.1 1 time, A.2 1 time, repeat A.3 a total of 2 times, and finish with A.4 1 time and A.5 1 time. Arrow in diagram shows first row (ch1 in A.1 = beg of row). Happy crocheting!
05.06.2015 - 10:00
![]() Jayla wrote:
Jayla wrote:
I'm not understanding where to start adding charts A 6 and A7. thank you.
30.05.2015 - 21:42DROPS Design answered:
Dear Jayla, after you have worked the rows 1-6 in A.1, A.2, A.3, A.4, A.5 on right shoulder, work row 7 as before (= last row in A.1-A.4) but replace A.5 with A.6 - and then work A.6 1 time in height (repeat A.x over other sts). For the other shoulder, replace A.1 with A.7 on 7th row in A.1-A.4. Happy crocheting!
01.06.2015 - 09:36
![]() Anja Van Wouwe wrote:
Anja Van Wouwe wrote:
Helaas moet ik mij aansluiten bij Judith Rotter.Ook ik heb al meerdere patronen gehaakt en gebreid,maar nadat ik al 4 x opnieuw ben begonnen denk ik erover een ander patroon te zoeken,jammer want ik vond het zo'n leuk truitje.
29.05.2015 - 17:16
![]() Emily Webster wrote:
Emily Webster wrote:
Help please! I don't understand Row 7 - does "work last row in A.1-A.4 as before" mean I do Row 6 again? Only if I do that, it means my first ch.5 is sticking out, and each ch.5 sits on top of the one below instead of straddling it. It looks like I'm supposed to be repeating rows 1-6 but replacing A.5 with A.6 each time before repeating the whole of A.x again, so I think it's just Row 7 that's got me stumped!
24.05.2015 - 14:44DROPS Design answered:
Dear Mrs Webster, row 7 is the last row in A.1-A.4/A.5, work diagram as row 7 in A.1, A.2, A.3, A.4, but work A.6 at the end or row instead of A.5 - at beg of next row, work first A.6 (row 2) then repeat A.1-A.4 = A.X. Happy crocheting!
26.05.2015 - 10:06
![]() Constanze wrote:
Constanze wrote:
Beide Schultern sind fertig.... Ich verstehe das Verbinden mit den luftmaschen nicht. Sind die spitz zulaufenden Seiten außen ? Die linke Seite endet in der Zunahme von A7, dann kommen die luftmaschen und ich häkele in die 3 luftmaschen der Spitze von A6. Welche Reihe kommt als nächstes? Ich verstehe die Anleitung nicht......
20.05.2015 - 20:37DROPS Design answered:
Legen Sie die Teile beide mal so vor sich hin, dass die schräge Seite von A.6 (im Diagramm die linke Seite) und A.7 (im Diagramm die rechte Seite) die beiden Halsausschnittseiten bilden, also am Hals liegen. Die Lm-Anschlagkanten sind dabei die Schultern. Vielleicht erklärt sich damit schon, wie Sie die Teile verbinden müssen? Ansonsten gerne noch einmal fragen. Wenn Sie die Teile verbunden haben, schneiden Sie den Faden ab und häkeln wieder am dem Beginn der R, dabei wird das Muster (also die Musterabfolge A.1 bis A.5) wie zuvor fortgesetzt und über der Lm-Reihe des Halsausschnitts folgerichtig weitergeführt.
21.05.2015 - 09:13
![]() Dorthe Sonne wrote:
Dorthe Sonne wrote:
Jeg er gået igang med denne top med er desværre allerede gået i stå når de to skulderstykker skal samles. Jeg kan simpelthen ikke få mønstret til at gå op. Er det muligt at forklare hvor mange "buer" jeg skal have på luftmaskestykket i midten for at det kommer til at passe når der skal hækles stangmaske vifter. På forhånd tak
20.05.2015 - 19:09DROPS Design answered:
Hej, stemmer det ikke med at du får 6 lm buer ifølge diagrammet, i de 35 lm du har hæklet til hals...?
22.05.2015 - 15:16
![]() Judith Rotter wrote:
Judith Rotter wrote:
Ich wollte dieses Model gleich nacharbeiten;wäre nicht meine erste Arbeit und vor allem wäre es nicht die erste nach Anleitung von Garnstudio.Doch leider muss ich mir ein anderes Muster suchen, da diese Anleitung einfach unverständlich ist. Schriftliche Anleitung wirft Fragen auf, die Grafik lässt die Mustersätze mehr erahnen als ablesen und insgesamt fehlt die Angabe in Centimeter. Bsp.: Wo soll "A.6" bzw. "A.7" an der Arbeit befestigt werden? Was sind die Mustersätze "A.1-A.5"?
19.05.2015 - 21:19DROPS Design answered:
Antwort siehe unten! Es wäre schade, wenn Sie direkt aufgeben und sich ein anderes Muster suchen, es ist zu schaffen. :-)
19.05.2015 - 22:43
![]() Judith Rotter wrote:
Judith Rotter wrote:
Ich wollte dieses Model gleich nacharbeiten;wäre nicht meine erste Arbeit und vor allem wäre es nicht die erste nach Anleitung von Garnstudio.Doch leider muss ich mir ein anderes Muster suchen, da diese Anleitung einfach unverständlich ist. Schriftliche Anleitung wirft Fragen auf, die Grafik lässt die Mustersätze mehr erahnen als ablesen und insgesamt fehlt die Angabe in Centimeter. Bsp.: Wo soll "A.6" bzw. "A.7" an der Arbeit befestigt werden? Was sind die Mustersätze "A.1-A.5"?
19.05.2015 - 20:49DROPS Design answered:
Sie befestigen die linke Schulter "mit 1 Kett-M in der 3. Lm am Beginn der letzten R der rechten Schulter": Sie häkeln also bei der linken Schulter die letzte R von A.7, dann am Ende 35 Lm, dann nehmen Sie die rechte Schulter, die Sie bereits gehäkelt haben, zur Hand und häkeln 1 Kett-M in die 3. Lm des R-Beginns. A.1 bis A.5 sind die unten gezeichneten Musterabschnitte, das bezieht sich ja auf das Diagramm, wenn es nicht ganz eindeutig ist, wo die Grenze zwischen den Musterabschnitten sitzt, ergibt sich das aber eigentlich beim Häkeln. cm-Angaben sind enthalten, dort, wo sie relevant sind (z.B. Angabe, wann die Ärmel fertig sind). Wir helfen gerne weiter, stellen Sie gern konkrete Fragen.
19.05.2015 - 21:30
![]() Kiruna wrote:
Kiruna wrote:
De eerste toer met stokjes gaat erg golven als ik de losse tussen de 4 stokjes oversla. Hoort dit zo, of moet ik geen losse over gaan slaan ?
14.05.2015 - 10:52DROPS Design answered:
Hoi Kiruna. We hebben deze lossen tussen de stokjes om de opzetrand wat losser te maken. Ik verwacht dat het na een paar toeren haken veel minder gaat golven. Dus je kan gerust doorgaan.
21.05.2015 - 16:13
|
|||||||||||||||||||||||||
Shy Violet#shyviolettop |
|||||||||||||||||||||||||
 |
 |
||||||||||||||||||||||||
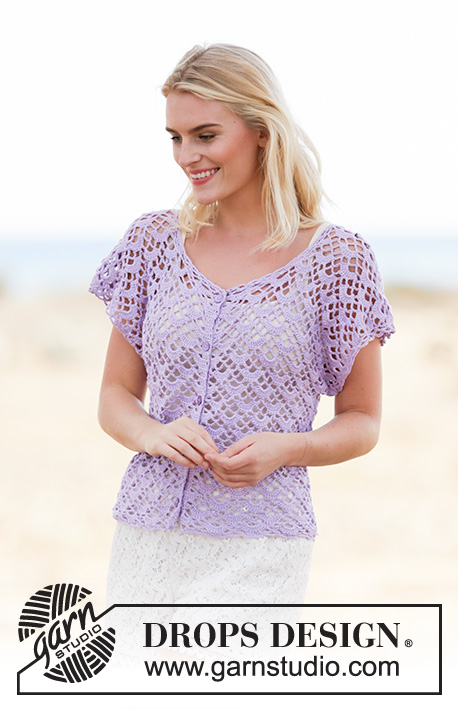
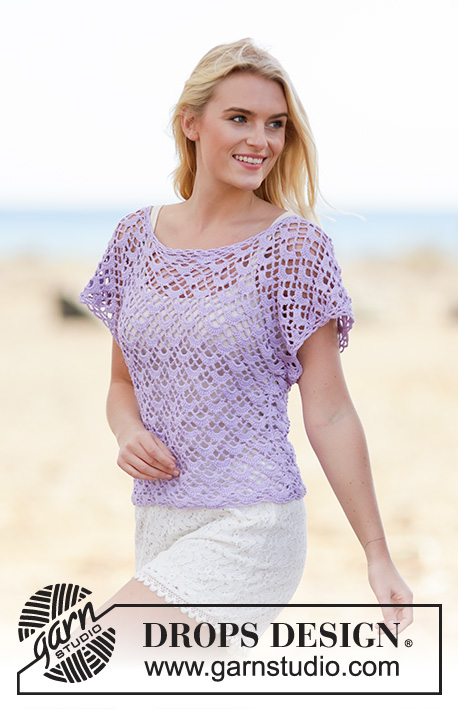
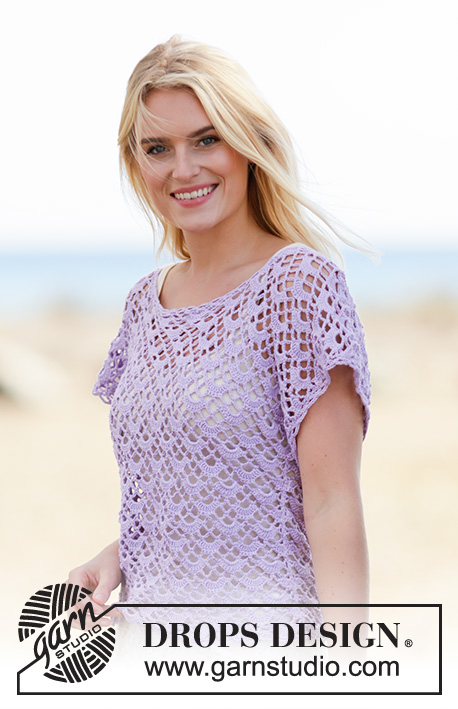
Crochet DROPS top with fan pattern, worked top down in ”Safran”. Size S- XXXL
DROPS 162-15 |
|||||||||||||||||||||||||
|
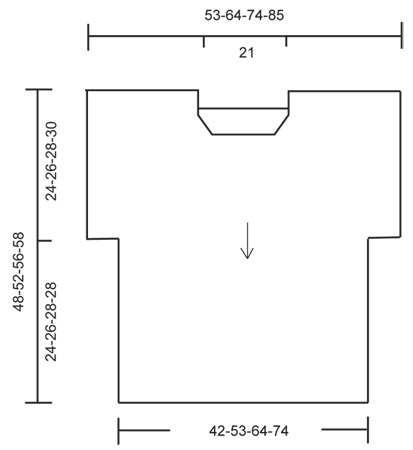
PATTERN: See diagrams A.1 to A.7. The diagrams show all rows in pattern seen from RS. ---------------------------------------------------------- FRONT PIECE: The piece is worked top down. Right shoulder: Work 69-92-114-137 ch (incl 3 ch to turn with) on hook size 3.5 mm with Safran. ROW 1 (= WS): Work 1 tr in 4th ch from hook (= 2 tr), 1 tr in each of the next 5-3-5-3 ch, * skip 1 ch, work 1 tr in each of the next 4 ch *, repeat from *-* the entire row = 55-73-91-109 tr. NOW MEASURE PIECE FROM HERE! Now work according to diagram, i.e. work as follows: ROW 1-6: (1st row = RS): Work A.1, A.2, A.3 2-3-4-5 times in total, A.4, A.5. REMEMBER THE CROCHET TENSION! ROW 7 (= RS): Work last row in A.1-A.4 as before but finish with A.6 over A.5. Continue until A.6 has been worked 1 time vertically, in A.1-A.4 repeat rows in A.x. Cut the yarn. Work left shoulder as right shoulder, work A.7 over A.1. On last row in A.7 (= from WS) work 35 ch for neck at the end of row, fasten with 1 sl st in 3rd ch at beg of last row on right shoulder. Cut the yarn. Now work over all sts, beg from RS as follows: A.1, A.2, A.3 9-10-11-12 times in total, A.4, finish with A.5. Continue like this. When piece measures approx. 24-26-28-30 cm – adjust after 7th row, sleeves are done. Then work as follows, beg from WS: Skip 3 ch-space, beg by working in next dc as follows: A.5, A.4, A.3 7-8-9-10 times in total, A.2, finish with A.1 (do not work the last 3 ch-spaces). Continue like this until piece measures approx. 48-52-56-58 cm, adjust after 5th row in diagram. Fasten off. BACK PIECE: Work left shoulder in ch-row from cast on edge (work in same ch as trebles, i.e. in the 55-73-91-109 tr) from left front piece as follows: ROW 1-6: (1st row = RS): Work A.1, A.2, A.3 2-3-4-5 times in total, A.4, A.5. Cut the yarn. Work right shoulder as left shoulder but in right front piece - NOTE! Instead of cutting the yarn work 71 ch for neck and fasten with 1 sl st in first ch at beg of last row on left shoulder. Cut the yarn. Now work over all sts the same way as on front piece. ASSEMBLY: Sew side and underarm seams in one. EDGES: Work an edge around the neck, beg from one shoulder as follows: ROUND 1: Work * 1 dc, 5 ch *, repeat from *-* along the neck with approx. 2 cm between every dc, finish with 1 sl st in first dc. ROUND 2: 3 ch, 1 dc in next ch-space, * 5 ch, 1 dc in next ch-space *, repeat from *-* the entire round and finish with 3 ch and 1 sl st in first dc from beg of 1st round. Fasten off. Work an edge at the bottom along front and back piece the same way, beg from the side. Work an edge around the sleeve the same way, beg from mid under sleeve. |
|||||||||||||||||||||||||
Diagram explanations |
|||||||||||||||||||||||||
|
|||||||||||||||||||||||||
 |
|||||||||||||||||||||||||
 |
|||||||||||||||||||||||||
 |
|||||||||||||||||||||||||
Have you finished this pattern?Tag your pictures with #dropspattern #shyviolettop or submit them to the #dropsfan gallery. Do you need help with this pattern?You'll find 5 tutorial videos, a Comments/Questions area and more by visiting the pattern on garnstudio.com. © 1982-2026 DROPS Design A/S. We reserve all rights. This document, including all its sub-sections, has copyrights. Read more about what you can do with our patterns at the bottom of each pattern on our site. |
|||||||||||||||||||||||||


With over 40 years in knitting and crochet design, DROPS Design offers one of the most extensive collections of free patterns on the internet - translated to 17 languages. As of today we count 324 catalogues and 12290 patterns translated into English (UK/cm). 12290
We work hard to bring you the best knitting and crochet have to offer, inspiration and advice as well as great quality yarns at incredible prices! Would you like to use our patterns for other than personal use? You can read what you are allowed to do in the Copyright text at the bottom of all our patterns. Happy crafting!
Post a comment to pattern DROPS 162-15
We would love to hear what you have to say about this pattern!
If you want to leave a question, please make sure you select the correct category in the form below, to speed up the answering process. Required fields are marked *.