
Popular categories
Looking for a yarn?


Comments / Questions (317)
![]() Anke wrote:
Anke wrote:
Lt Reihe 6 soll man die Mustergruppe ins erste Stäbchen machen, dann lt. Mustergruppe aber gleich eine Luftmasche und die zusammengehäkelten Stäbchen, und wenn man dann diese Anleitung liest, soll man den Umschlag schon um den Luftmaschenbogen machen... Könnte man da nicht evtl ein Tutorial machen? Ich finde maximal eine Anleitung hier, wie man zwei Stäbchen zusammen abmascht und die Weste soll doch größer nicht kleiner werden... Bin verwirrt!
12.12.2016 - 10:08DROPS Design answered:
Liebe Anke, 1 Mustergruppe = in 1 Stb so häkeln: (1 Lm, 2 zusammengehäkelte Stb, 2 Lm, 2 zusammengehäkelte Stb, 1 Lm) - es wird dann keine Abnahme geben. Viel Spaß beim häkeln!
12.12.2016 - 10:44
![]() Victoria Mayor wrote:
Victoria Mayor wrote:
Hola. Estoy tejiendo la chaqueta, he acabado la vuelta numero 52, y pide cortar el hilo,pero luego no explica donde debo comenzar. Me pueden ayudar por favor. Gracias.
07.11.2016 - 17:32DROPS Design answered:
Hola Victoria. A partir de la fila 7 trabajamos de ida y vta en ag. Asi que después de la fila 52 continuamos trabajando de la misma manera. Después de cortar el hilo volvemos al principio de la fila.
09.11.2016 - 09:05
![]() Sonia wrote:
Sonia wrote:
Rebonjour,merci j'ai fait comme vous dites mais maintenant c'est au rang26 que ça ne colle pas. Donc j'ai fini mon rang 25 et j'ai tourné on est d'accord ? Je tricotte un groupe de motif et un groupe de b et puis j'arrive à mon rang chaînette,le modèle dit que je dois commencer par un groupe de b or moi j'ai (au rang en dessous de la chaînette) un groupe de motif. Et pour la chaînette d'après c'est l'inverse. N'y a t'il pas une erreur d'ordre dans les explications ? merci encore
01.11.2016 - 18:39DROPS Design answered:
Bonjour Sonia, au rang 26 (= sur l'endroit), continuez le motif comme avant, en sautant (1groupe de motif, 1 groupe de B) x 2, on commence au tour suivant par (1 groupe de motif, 1 groupe de B) x 2, vous aurez le même résultat. Bon crochet!
02.11.2016 - 08:59
![]() Sonia wrote:
Sonia wrote:
Bonjour j'ai un souci au rang25 et 26 de la taille xs ,j'ai vu pas mal de personnes qui ont le même problème que moi.....au rang25 c'est pas très clair j'ai déjà tricoté 20 bien,1 groupe de motif,20 b,50 ml,puis sauté les 2 groupes de motifs et 2 groupe de b,ensuite je tricotte normalement les 6 prochains groupe de b qui correspondent au 114b et c'est la que je ne sais pas si je dois faire les ml après 1 groupe de brides ou après un groupe de motif.......?merci d'avance !
01.11.2016 - 00:11DROPS Design answered:
Bonjour Sonia, quand vous sautez les 114 B, terminez par 1 motif (pour la symétrie des 2 emmanchures), crochetez 50 ml, et sautez 1 groupe de B, 1 motif, 1 groupe de B, 1 motif, puis continuez comme avant. Bon crochet!
01.11.2016 - 12:25
![]() Hanneke wrote:
Hanneke wrote:
Ik heb op 23-09 een vraag gesteld, maar helaas nog geen antwoord gekregen. Is het mogelijk dat ik alsnog een antwoord krijg op mijn vraag? vr. groet, Hanneke
26.09.2016 - 18:18DROPS Design answered:
Hoi Hanneke. Je had je vraag als "opmerking" geplaatst - dan zie ik het niet... Je vraag wordt zsm beantwoord.
27.09.2016 - 10:30
![]() Rita wrote:
Rita wrote:
Grazie. Ora è chiaro
26.09.2016 - 17:55
![]() Rita wrote:
Rita wrote:
Salve, non riesco a fare il bordo inferiore della manica poichè sembra. largo nonostante le 54 m.a. da cui iniziare (taglia S/M). Potrei sapere quanti gruppi di motivi dovrei avere per eseguire esattamente il modello. Grazie
26.09.2016 - 15:32DROPS Design answered:
Buongiorno Rita. Dopo la riga1 del bordo dovrebbe avere: 2 m.a, 1 cat, per 25 volte: 1 m.a e 1 cat, 2 m.a. Alla riga2, lavora un gruppo in una cat sì e in una no: le cat in tutto sono 26, diviso 2 = 13 gruppi. Buon lavoro!
26.09.2016 - 15:56
![]() Hanneke wrote:
Hanneke wrote:
DROPS design: Model nr. z-684 In het patroon staat het volgende: "Herhaal 8e en 9e toer tot er 6 toeren in de rondte en 18-20-22 toeren heen en weer zijn gehaakt ..." Wat wordt er daar bedoeld met 6 toeren in de rondte en waar moet ik deze haken?
23.09.2016 - 22:49
![]() Ann Priddy wrote:
Ann Priddy wrote:
On rows 27 to 50 for the S/M size, it says to continue the pattern as before. On the arm holes do you continue the arm hole pattern or the original pattern? Also do you increase on the arm holes? Thank you!!
25.05.2016 - 18:05DROPS Design answered:
Dear Mrs Priddy, the armholes are a "hole" worked on round 25 - now continue in the round in pattern all the round and inc to keep the circle be growing, ie you should have 33 tr in each tr-group at the end of round 50. Happy crocheting!
26.05.2016 - 08:21Kadi wrote:
Hi there! I am working the armholes, and for the S/M pattern this is rows 27-50; it says to increase on even rows only. I have continued to increase on one specific side, as I did previously. Is it correct to do this? Or for each even row, should I be alternating which side I increase on, to keep it evenly round? At the moment it is making a slight spiral as all the increases fall on one side.
22.05.2016 - 18:25DROPS Design answered:
Dear Kadi, continue to inc alternately at the beg and at the end of tr (UK-English) group but now inc every other round. Happy crocheting!
23.05.2016 - 10:08
|
|
Winter Solstice#wintersolsticecardigan |
|
 |
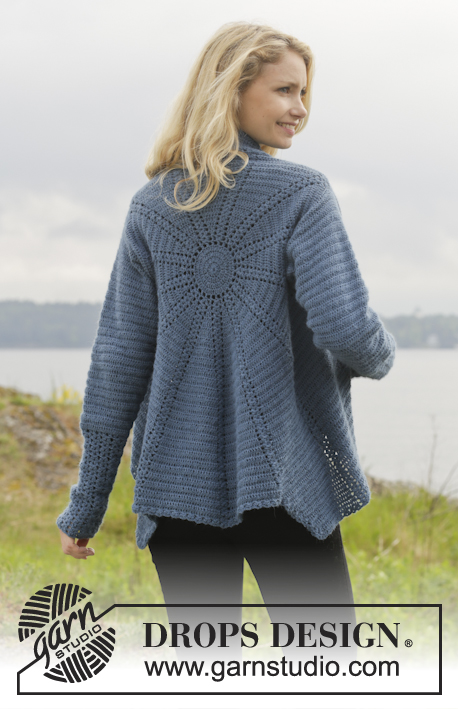 |
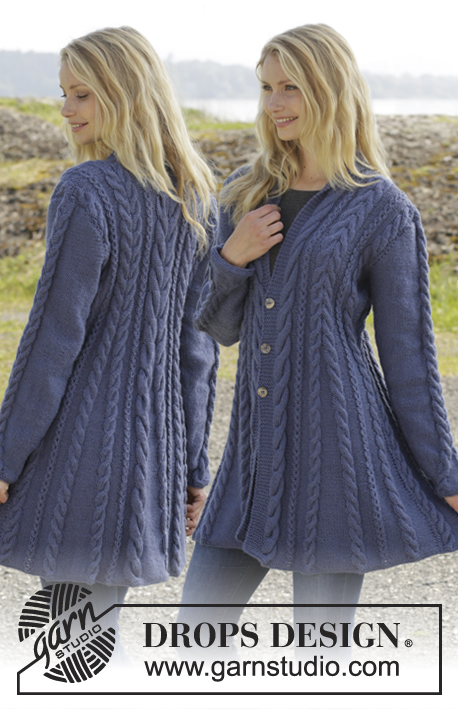
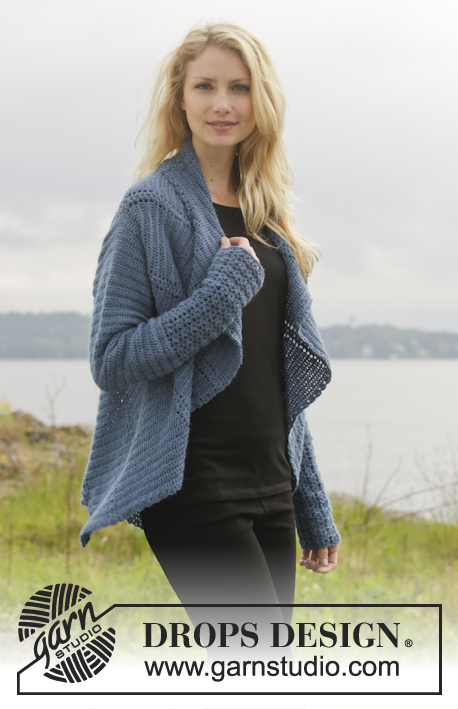
Crochet DROPS jacket worked in a circle in "Alpaca". Size: S - XXXL.
DROPS 158-10 |
|
|
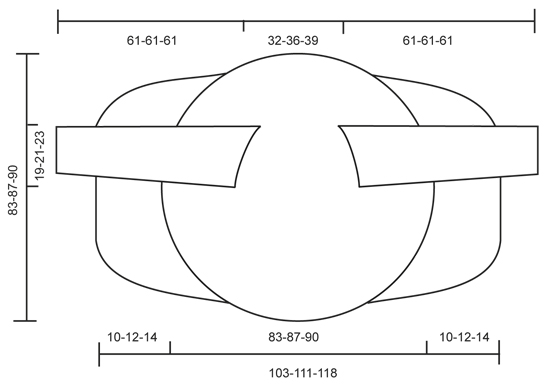
CROCHET INFO: Beg every round/row with 3 ch that replace 1st tr and finish every round/row with 1 sl st in 3rd ch from beg of round/row. PATTERN GROUP: Each pattern group consists of: 1 ch, 2 TR WORKED TOG - see explanation below, 2 ch, 2 tr worked tog and 1 ch. TR WORKED TOG: * Make 1 YO, insert hook in ch-space, get yarn, make a YO, pull through 2 of the sts on hook *, repeat from *-* one more time, make 1 YO and pull yarn through all 3 sts on hook. CROCHET 3 TR TOG: Work 3 tr into 1 tr at beg of row as follows: Work 2 ch (= replace 1 tr), work 1 tr, but wait with last pull through (= 2 strands on hook), then work next tr but on last pull through, pull yarn through all sts on hook. DECREASE TIP (applies to sleeves): Dec at beg of row by working 1 sl st over the tr to be dec. Dec at end of row by working until 1 tr to be dec remains, turn piece. -------------------------------------------------------- CIRCLE: Work 5 ch on hook size 3.5 mm with Alpaca and form a ring with 1 sl st in first ch. READ CROCHET INFO. ROUND 1: Work 13 tr in ch-ring. ROUND 2: Work * 2 tr in every tr*, repeat from *-* the entire round = 26 tr. ROUND 3: Work * 2 tr in first tr, then 1 tr in next tr *, repeat from *-* the entire round = 39 tr. ROUND 4: Work * 2 tr in first tr, then 1 tr in each of the next 2 tr *, repeat from *-* the entire round = 52 tr. ROUND 5: Work * 1 tr in next tr, then 2 ch, skip 1 tr *, repeat from *-* the entire round = 26 ch-spaces and 26 tr. REMEMBER THE CROCHET TENSION! ROUND 6: In first tr work PATTERN GROUP - see explanation above, * 1 tr in next tr, 1 pattern group in next tr *, repeat from *-* until 1 tr remains, 1 tr in last tr = 13 pattern groups with 1 tr between each. Then work piece back and forth. Work every row tog at the end of row with 1 sl st in first st on row. Turn piece. ROW 7 (= from WS): 2 tr in first tr, * 1 pattern group in next pattern group, 2 tr in next tr (= tr-group) *, repeat from *-* until 1 pattern group from previous row remains, 1 pattern group = 13 pattern groups with 13 tr-groups between each. Turn piece. ROW 8: 1 pattern groups in first pattern group, * 2 tr in first tr, 1 tr in each of the next tr in tr-group, 1 pattern group in next pattern group *, repeat from *-* until 1 tr-group remains, 2 tr in first tr, 1 tr in each of the next tr in tr-group = 13 groups with 3 tr between each. Turn piece. ROW 9: 2 tr in first tr, 1 tr in each of the next tr in tr-group, * 1 pattern group in pattern group, 2 tr in first tr of tr-group, 1 tr in each of the next tr *, repeat from *-* until 1 pattern group from previous row remains, 1 pattern group = 13 groups with 4 tr between each. Turn piece. Then repeat 8th and 9th row until 6 rounds + 18-20-22 rows have been worked (= 19-21-23 tr between every pattern group) = 247-273-299 tr and 13 pattern group. Piece measures approx. 20-22-23 cm from centre and outwards. Now work armholes as follows in the different sizes: SIZE S/M: ROW 25 (= from WS): Inc in every group with tr as before. Work 20 tr, 1 pattern group, 20 tr, work 50 loose ch (= right armhole), skip 2 tr-groups and 2 pattern groups. Then work tr-groups and pattern groups as before over the next 114 tr, work 50 loose ch (= left armhole), skip 2 tr-groups and 2 pattern groups, work as before the rest of row, finish with 1 sl st in first tr on row = 180 tr and 100 ch. Turn piece. ROW 26: Continue with pattern and inc as before but work first ch-row (= left armhole) as follows: 10 tr, skip 1 ch, 11 tr, skip 1 ch, 1 pattern group, skip 1 ch, 11 tr, skip 1 ch, 10 tr, skip 1 ch, 1 pattern group and skip 1 ch. I next ch-row (= right armhole) work the same way but in opposite order, i.e. beg by skipping 1 ch, 1 pattern group and finish with tr = 273 tr. ROW 27-50: Work pattern as before but now inc only on even numbered rows until 50 rows have been worked in total = 429 tr (33 tr in every tr-group). Piece measures approx. 42 cm from centre and outwards. SIZE L/XL: ROW 27 (= from WS): Inc in every group with tr as before. Work 22 tr, 1 pattern group, 22 tr, work 54 loose ch (= right armhole), skip 2 tr-groups and 2 pattern groups. Then work pattern as before over the next 126 tr, work 54 loose ch (= left armhole), skip 2 tr-groups and 2 pattern groups, work as before the rest of row, finish with 1 sl st in first tr on row = 198 tr and 108 ch. Turn piece. ROW 28: Continue with pattern and inc as before but work first ch-row (= left armhole) as follows: 11 tr, skip 1 ch, 12 tr, skip 1 ch, 1 pattern group, skip 1 ch, 12 tr, skip 1 ch, 11 tr, skip 1 ch, 1 pattern group and skip 1 ch. I second ch-row (= right armhole) work the same way but in opposite order, i.e. beg by skipping 1 ch, 1 pattern group and finish with tr = 299 tr. ROW 29-52: Work pattern as before but now inc only on even numbered rows until 52 rows have been worked in total = 455 tr (35 tr in every tr-group). Piece measures approx. 43 cm from centre and outwards. SIZE XXL/XXXL: ROW 29 (= from WS): Inc in every group with tr as before. Work 24 tr, 1 pattern group, 24 tr, work 58 loose ch (= right armhole), skip 2 tr-groups and 2 pattern groups. Then work pattern as before over the next 138 tr, work 58 loose ch (= left armhole), skip 2 tr-groups and 2 pattern groups, work as before the rest of row, finish with 1 sl st in first pattern group on row = 216 tr and 116 ch. Turn piece. ROW 30: Continue with pattern and inc as before but work first ch-row (= left armhole) as follows: 12 tr, skip 1 ch, 13 tr, skip 1 ch, 1 pattern group, skip 1 ch, 13 tr, skip 1 ch, 12 tr, skip 1 ch, 1 pattern group and skip 1 ch. I second ch-row (= right armhole) work the same way but in opposite order, i.e. beg by skipping 1 ch, 1 pattern group and finish with tr = 325 tr. ROW 31-54: Work pattern as before but now inc only on even numbered rows until 54 rows have been worked in total = 481 tr and 37 tr in every tr-group. Piece measures approx. 45 cm from centre and outwards. ALL SIZES: Insert 4 markers in the piece as follows from WS: Work 16-17-18 tr, insert 1st marker here, work 17-18-19 tr, * 1 pattern group, 33-35-37 tr *, repeat from *-* 3 more times, insert 2nd marker here (1st-2nd marker = right front piece). Work 1 pattern group, 33-35-37 tr, 1 pattern group, 33-35-37 tr and 1 pattern group, insert 3rd marker here. * Work 33-35-37 tr, 1 pattern group *, repeat from *-* 3 more times, 17-18-19 tr, insert 4th marker. (3rd-4th marker = left front piece). Work the rest of row. Sts between 1st and 4th marker are up towards neck. Cut the yarn and fasten. RIGHT FRONT PIECE: Now work right front piece between 1st and 2nd marker, beg from 2nd marker (i.e. from RS) = 149-158-167 tr and 4 pattern groups. Continue inc on every row in tr-groups as before BUT do not inc in tr-groups in each side of front piece - AT THE SAME TIME dec 2 tr at beg of every row by CROCHET 3 TR TOG - see explanation above. Continue to work until 12-14-16 rows have been worked over front piece. Cut the yarn and fasten. LEFT FRONT PIECE: Work left front piece between 3rd and 4th marker the same way as right front piece, beg from 4th marker (i.e. from RS). SLEEVES: Work back and forth from armhole and down, work every row tog with 1 sl st at the end of row. Use hook size 3.5 mm and Alpaca. Beg by working 86-94-102 tr around the opening for sleeve, beg of row should be under sleeve. Then work 3 rows with 1 tr in every tr. Continue with 1 tr in every tr - AT THE SAME TIME dec in the different sizes as follows: READ DECREASE TIP! SIZE S/M: Dec 1 st in each side of piece every other row 4 times and then every 3rd row 12 times (= 16 times in total) = 54 tr. SIZE L/XL: Dec 1 st in each side of piece alternately every 3rd and 2nd row 18 times in total = 58 tr. SIZE XXL/XXXL: Dec 1 st in each side of piece every other row 17 times and then every 3rd row 4 times (= 21 times in total) = 60 tr. Then work pattern groups as follows: ROW 1: 2 tr, 1 ch * work the next 2 tr tog, 1 ch *, repeat from *-* and finish with 2 tr. ROW 2: Work 2 tr, * in next ch work 1 pattern group, skip 1 ch *, repeat from *-*, and finish with 1 tr in each of the last 2 tr. Turn piece. ROW 3: Work 2 tr, 1 pattern group in each of the next pattern groups until 2 tr remain, work 1 tr in each of these. Turn piece. Repeat 3rd row until piece measures approx. 61 cm in all sizes. Cut the yarn and fasten. CROCHET EDGE: Work 1 round with around the entire jacket as follows: * 1 pattern group, skip 2 tr/1 row *, repeat from *-* the entire round. |
|
 |
|
Have you finished this pattern?Tag your pictures with #dropspattern #wintersolsticecardigan or submit them to the #dropsfan gallery. Do you need help with this pattern?You'll find 8 tutorial videos, a Comments/Questions area and more by visiting the pattern on garnstudio.com. © 1982-2026 DROPS Design A/S. We reserve all rights. This document, including all its sub-sections, has copyrights. Read more about what you can do with our patterns at the bottom of each pattern on our site. |
|


With over 40 years in knitting and crochet design, DROPS Design offers one of the most extensive collections of free patterns on the internet - translated to 17 languages. As of today we count 324 catalogues and 12290 patterns translated into English (UK/cm). 12290
We work hard to bring you the best knitting and crochet have to offer, inspiration and advice as well as great quality yarns at incredible prices! Would you like to use our patterns for other than personal use? You can read what you are allowed to do in the Copyright text at the bottom of all our patterns. Happy crafting!
Post a comment to pattern DROPS 158-10
We would love to hear what you have to say about this pattern!
If you want to leave a question, please make sure you select the correct category in the form below, to speed up the answering process. Required fields are marked *.