
Popular categories
Looking for a yarn?


Comments / Questions (97)
![]() Miriam Hasson wrote:
Miriam Hasson wrote:
In the Pattern Lady like 151-8, Desig:noks-080. After completing chart 1 18 times,and reaching the middle of the shawl, is that triangle in the middle supposed to have YOs. The instructions are confusing at this point to me. Thank you.
13.04.2026 - 21:16DROPS Design answered:
Hi Miriam, After working Short rows 1, 18 times, you then work Short rows 2 and 3 without yarn overs. Regards, Drops Team.
14.04.2026 - 07:46
![]() Micheline wrote:
Micheline wrote:
Bonjour merci pour votre réponse alors le marqueur avance avec les augmentations et n est plus après les 3 mailles du début c'est ça ? Merci beaucoup
18.03.2026 - 12:26DROPS Design answered:
Bonjour Micheline, le marqueur doit rester en place mais vous devez augmenter avant le marqueur sur l'endroit, cf Rang 3 par ex: vous tricotez jusqu'au marqueur, vous faites 1 jeté, vous glissez votre marqueur sur l'aiguille droite et vous tricotez A.1 = le nombre de mailles avant le marqueur va augmenter (à la fin du rang 3, vous avez 4 m avant le marqueur et les mailles de A.1 après le marqueur). Bon tricot!
18.03.2026 - 16:28
![]() Micheline wrote:
Micheline wrote:
Bonjour, a mon tour de pauser ma question : est ce que le marqueur reste après les 3 mailles du début , comment faire avec ce marqueur ,j'arrive à la moitié et plus rien ne va merci de m'aider
18.03.2026 - 07:20DROPS Design answered:
Bonjour Micheline, le marqueur doit rester en place mais vous allez augmenter avant le marqueur = autrement dit, le marqueur doit servir de repère aux augmentations mais aussi au début/à la fin des mailles à tricoter en suivant le diagramme A.1 (on augmente en même temps 1 maille dans A.1, tous les rangs sur l'endroit) . Bon tricot!
18.03.2026 - 07:54
![]() Marleen wrote:
Marleen wrote:
Naald 4 laat je de omslag na de markeerder gedraaid recht breien. Bij naald 7 en verder staat dit niet meer apart aangegeven. Klopt het dat dit eenmalig is of moet je de omslag gedraaid recht blijven breien?
13.02.2026 - 16:12DROPS Design answered:
Dag Marleen,
De omslagen die in het telpatroon brei je recht zodat er een gaatje ontstaat, de andere omslagen brei je gedraaid recht (zoals ook aangegeven bij tip voor het meerderen.
15.02.2026 - 14:09
![]() Chantal wrote:
Chantal wrote:
Quel est votre méthode utilisée pour augmenter les 6 mailles sur l’envers dans la section 2 du travail
03.02.2026 - 22:35DROPS Design answered:
Bonjour Chantal, pensez-vous à la partie avec le diagramme A.1? C'est dans ce diagramme que l'on augmente 1 m tous les rangs sur l'endroit (= on a 4 jetés mais seulement 1 diminution = on augmente 1 m tous les rangs sur l'endroit). Bon tricot!
04.02.2026 - 17:26
![]() Åsa Lännerholm wrote:
Åsa Lännerholm wrote:
Är det 05 Ljung eller 04 gammelrosa?I beskrivningen står det 05 gammelrosa?!
27.01.2026 - 19:31DROPS Design answered:
Hej Åsa, farven er blevet ændret, vælg den farve du synes bedst om :)
29.01.2026 - 10:04
![]() Chantal wrote:
Chantal wrote:
J’aimerais savoir en regardant votre schéma je commence a1 à droite en allant à gauche et faire point mousse aiguille circulaire je fais un rg endroit est ce que je transfère mailles sur aiguille gauche avez vous un vidéo pour aiguille circulaire point mousse merci
15.01.2026 - 15:07DROPS Design answered:
Bonjour Chantal, quand on tricote en allers et retours sur aiguille circulaire comme ici, on va tricoter alternativement sur l'endroit et sur l'envers, comme avec des aiguilles droites; dans cette vidéo, nous montrons comment tricoter en jersey en allers et retours sur aiguille circulaire, pour le point mousse, vous procéderez de la même façon, mais vous tricotez alors les mailles à l'endroit sur l'endroit et à l'endroit sur l'envers. Bon tricot!
16.01.2026 - 08:14
![]() Nahát!Petra wrote:
Nahát!Petra wrote:
A kendőt nem 11 hanem 14 szemmel kezdjük.
13.01.2026 - 20:18
![]() Lucia wrote:
Lucia wrote:
Nel modello ladylike i ferri accorciati su lavorano solo sul diagramma A1? Grazie
02.01.2026 - 10:22DROPS Design answered:
Buongiorno Lucia, i ferri accorciati si lavorano su A.1 sulle maglie indicate. Buon lavoro!
03.01.2026 - 11:44
![]() Christine wrote:
Christine wrote:
Bonjour lorsque on finit les 18 répétitions de A1 er rangs raccourcis 1, si on continue en rang ra courcis 2 et 3 est-ce que on le fait côté bordure ajourée ?. Ça va créer une j terruption dans la bordure ajourée ? Merci
04.11.2025 - 18:29DROPS Design answered:
Bonjour Christine, les rangs raccourcis -2 commencent sur l'envers: après vos 18 répétions de A.1, tricotez toutes les mailles sur l'endroit (comme avant), puis tricotez les rangs raccourcis -2: 2 rangs sur 11 m, 2 rangs sur 8 m, etc.. Tricotez ensuite 4 rangs sur les 68 m et tricotez 2 rang sur 2 m (en commençant sur l'envers de nouveau), puis 2 rangs sur 5 m etc... terminez par 1 rang sur l'envers pour continuer le châle sur l'endroit avec A.2. Bon tricot!
05.11.2025 - 07:36
|
|||||||||||||
Ladylike#ladylikeset |
|||||||||||||
 |
 |
||||||||||||
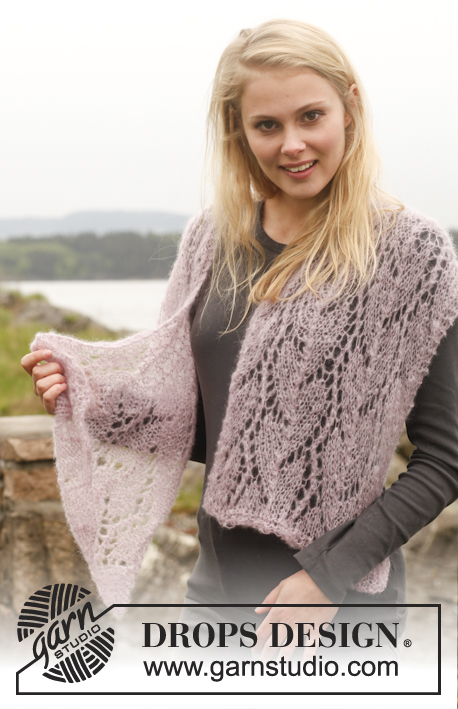
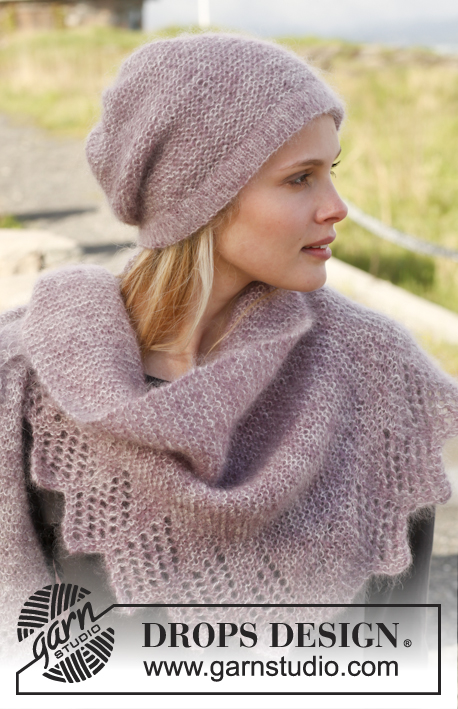
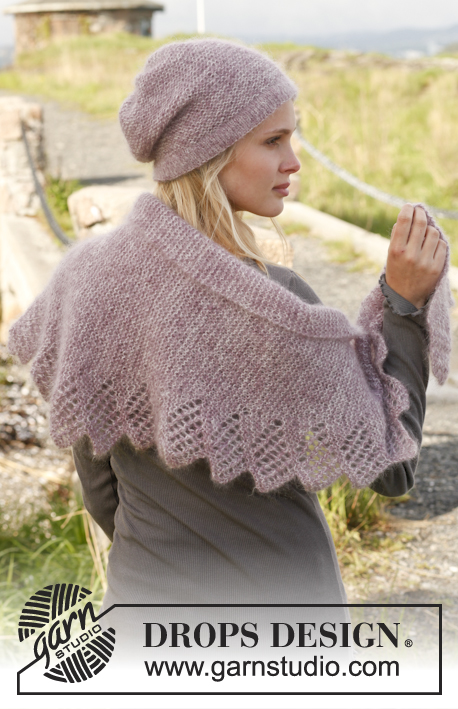
Set consists of: Knitted DROPS hat and shawl in garter st with lace pattern in 2 strands ”Kid-Silk”.
DROPS 151-8 |
|||||||||||||
|
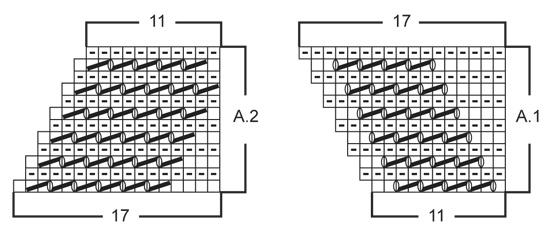
GARTER ST (back and forth on circular needle): K all rows. 1 ridge = 2 rows K. INCREASE TIP: Inc 1 st by making 1 YO, K YO twisted on next row to avoid holes. PATTERN: See diagrams A.1 and A.2. The diagrams show all rows in pattern seen from RS. SHORT ROWS 1: Work short rows to get a nice shape on lace edge as follows: Beg from RS and K over all sts, turn piece and K 17 from WS (i.e. until marker), turn piece and K 17 from RS, turn piece, cast off the first 6 sts and K over all sts on row = 1 repetition with short rows. SHORT ROWS 2: Beg from RS and K over all sts, turn piece and K 11 from WS (i.e. until marker), turn piece and K 11 from RS, turn piece and K 8 from WS, turn piece and K 8 from RS, turn piece and K 5 from WS, turn piece and K 5 from RS, turn piece and K 2 from WS, turn piece and K 2 from RS. Work 2 ridges in garter st back and forth over all 68 sts, the shawl has been worked to the middle. Then work as follows, beg from WS: K 2, turn piece and K 2 from RS, turn piece and K 5 from WS, turn piece and K 5 from RS, turn piece and K 8 from WS, turn piece and K 8 from RS, turn piece and K 11 from WS, turn piece and K 11 from RS, turn piece and K back over all sts = 1 repetition with short rows. SHORT ROWS 3: Beg from RS, K over all sts and cast on 6 new sts at end of row, turn piece and K 17 from WS (i.e. until marker), turn piece and K 17 from RS, turn piece and K back over all sts on row = 1 repetition with short rows. DECREASE TIP: Dec 1 st by K 2 sts tog. ---------------------------------------------------------- HAT: Worked back and forth on circular needle. Cast on 100 sts with 1 strand of each colour (= 2 strands) on circular needle size 3.5 mm. Work in stocking st for 3 cm with 1 edge st in GARTER ST in each side - see explanation above. K 1 row from WS (= folding edge) and continue in stocking st with 1 edge st in garter st in each side for 3 cm – adjust so that next row is from RS. Switch to circular needle size 5 mm and work 1 ridge in garter st AT THE SAME TIME dec 16 sts evenly on 1st row = 84 sts. NOW MEASURE THE PIECE FROM HERE. Continue in garter st back and forth until piece measures 20 cm. On next row from RS K all sts tog 2 by 2 = 42 sts remain on needle. K 3 rows. On next row (= RS) K all sts tog 2 by 2 = 21 sts remain on needle. K 3 rows. On next row (= RS) K all sts tog 2 by 2 = 11 sts remain on needle. Cut the yarn and pull it through the remaining sts, tighten tog and fasten. ASSEMBLY: Fold the bottom edge on hat double towards WS in folding edge and fasten with small stitches - make sure to avoid a tight seam. Then sew hat tog mid back, sew in front loop of outermost st to avoid a chunky seam. Hat measures approx. 26 cm vertically (incl 3 cm edge at the bottom). ---------------------------------------------------------- SHAWL: Shawl is worked in garter st with an edge in lace pattern and worked back and forth on circular needle. Cast on 14 sts on circular needle size 5 mm with 1 strand of each colour (= 2 strands). Work 1 ridge in GARTER ST - see explanation above (1st row = RS). Then work as follows: Row 1 (= RS): K 3, insert 1 marker, work pattern according to diagram A.1 (= 11 sts) = 15 sts on needle, turn piece. Row 2 (= WS): Work A.1 over the first 12 sts, marker, K the rest of row, turn piece. Row 3 (= RS): K until marker, 1 YO – READ INCREASE TIP, marker, A.1 over the last 12 sts = 17 sts on row, turn piece. Row 4 (= WS): Work A.1 over the first 13 sts, marker, K YO twisted and K the rest of row, turn piece. Row 5 (= RS): K until marker and work A.1 over the last 13 sts = 18 sts on row, turn piece. Row 6 (= WS): Work A.1 over the first 14 sts, marker, K the rest of row, turn piece. Row 7 (= RS): K until marker, 1 YO (READ INCREASE TIP), marker, A.1 over the last 14 sts = 20 sts on row, turn piece. Row 8 (= WS): Work A.1 over the first 15 sts, marker, K the rest of row, turn piece. Row 9 (= RS): K until marker, A.1 over the last 15 sts = 21 sts on row, turn piece. Row 10 (= WS): Work A.1 over the first 16 sts, marker, K the rest of row, turn piece. Row 11 (= RS): K until marker, 1 YO, marker, A.1 over the last 16 sts = 23 sts on row, turn piece. Row 12 (= WS): Work A.1 over the first 17 sts, marker, K the rest of row. 1 repetition with A.1 has now been worked and 3 sts have been inc in garter st before marker (seen from RS). Work 1 repetition with SHORT ROWS 1 - see explanation above, over sts in lace edge (do not work the other sts on row). Then work alternately 1 repetition A.1 vertically and 1 repetition SHORT ROWS 1 (NOTE: Every time 1st row in A.1 is worked, there will be 3 sts more before marker). REMEMBER THE KNITTING TENSION! When A.1 and SHORT ROWS 1 have been worked 18 times vertically in total, there are 57 sts in garter st before marker and 11 sts in lace edge after marker = 68 sts on needle. Work 1 repetition SHORT ROWS 2 - see explanation above. After short rows 2 work 1 repetition with SHORT ROWS 3 - see explanation above = 74 sts on needle. Then work back and forth over all sts as follows: Row 1 (= RS): K until marker, work pattern according to diagram A.2 (= 17 sts) = 73 sts on row, turn piece. Row 2 (= WS): Work A.2 over the first 16 sts, marker, K the rest of row, turn piece. Row 3 (= RS): K until 2 sts remain before marker, K 2 tog, marker, A.2 over the last 16 sts = 71 sts on row, turn piece. Row 4 (= WS): Work A.2 over the first 15 sts, marker, K the rest of row, turn piece. Row 5 (= RS): K until marker and work A.2 over the last 15 sts = 70 sts on row, turn piece. Row 6 (= WS): Work A.2 over the first 14 sts, marker, K the rest of row, turn piece. Row 7 (= RS): K until 2 sts remain before marker, K 2 tog, marker, A.2 over the last 14 sts = 68 sts on row, turn piece. Row 8 (= WS): Work A.2 over the first 13 sts, marker, K the rest of row, turn piece. Row 9 (= RS): K until marker and work A.2 over the last 13 sts = 67 sts on row, turn piece. Row 10 (= WS): Work A.2 over the first 12 sts, marker, K the rest of row, turn piece. Row 11 (= RS): K until 2 sts remain before marker, K 2 tog, marker, A.2 over the last 12 sts = 65 sts on row, turn piece. Row 12 (= WS): Work A.2 over the first 11 sts, marker, K the rest of row, turn piece. 1 repetition with A.2 has now been worked and 3 sts have been dec in garter st before marker (seen from RS). Work 1 repetition with SHORT ROWS 3 - see explanation above, over sts in lace edge (do not work the other sts on row). Then work alternately 1 repetition A.2 vertically and 1 repetition SHORT ROWS 3 (NOTE: Every time 1st row in A.2 is worked, there will be 3 sts less before marker). When A.2 and SHORT ROWS 3 have been worked 18 times vertically in total there are 14 sts on needle. Work 1 ridge in garter st over all sts and loosely cast off. Shawl measures approx. 145 cm in width and approx. 40 cm in the middle. |
|||||||||||||
Diagram explanations |
|||||||||||||
|
|||||||||||||
 |
|||||||||||||
Have you finished this pattern?Tag your pictures with #dropspattern #ladylikeset or submit them to the #dropsfan gallery. Do you need help with this pattern?You'll find 17 tutorial videos, a Comments/Questions area and more by visiting the pattern on garnstudio.com. © 1982-2026 DROPS Design A/S. We reserve all rights. This document, including all its sub-sections, has copyrights. Read more about what you can do with our patterns at the bottom of each pattern on our site. |
|||||||||||||


With over 40 years in knitting and crochet design, DROPS Design offers one of the most extensive collections of free patterns on the internet - translated to 17 languages. As of today we count 324 catalogues and 12290 patterns translated into English (UK/cm). 12290
We work hard to bring you the best knitting and crochet have to offer, inspiration and advice as well as great quality yarns at incredible prices! Would you like to use our patterns for other than personal use? You can read what you are allowed to do in the Copyright text at the bottom of all our patterns. Happy crafting!
Post a comment to pattern DROPS 151-8
We would love to hear what you have to say about this pattern!
If you want to leave a question, please make sure you select the correct category in the form below, to speed up the answering process. Required fields are marked *.