
Popular categories
Looking for a yarn?


Comments / Questions (102)
![]() Cecilie wrote:
Cecilie wrote:
Jeg skal nå begynne og hekle A2. Det jeg lurer på da er at når første omgang begynner og avslutter med fire staver, med fastmasker mellom, så vil det jo bli høydeforskjell på maskene. Skal det være sånn?
19.09.2014 - 09:29
![]() Lynne wrote:
Lynne wrote:
Hello, I am trying to make the size3/4. when the a.2 pattern starts I am getting 5 tr one end and only 4 the other end for the bands. Please help I don't know where I am going wrong.
13.09.2014 - 14:11
![]() Lynne wrote:
Lynne wrote:
Hello, I have completed the first increase row on size 3/4, however I am not sure where the markers should be to increase on the next increase row??
11.09.2014 - 16:37DROPS Design answered:
Dear Lynne, you inc first 1 st at each marker, ie on first inc row you inc before each marker, on next inc row you will inc after, and repeat this 2 inc rows. If you have worked 1 st before each marker, you should get 1 st more than before before each marker. Happy crocheting!
15.09.2014 - 10:16
![]() Cecilie wrote:
Cecilie wrote:
Jeg har ikke heklet etter diagram før, og forstår ikke diagram A1. Etter rad 1, hva skal jeg begynne med da? Blir veldig takknemlig for svar.
08.09.2014 - 11:22DROPS Design answered:
Hei Cecilie. Förste rad var fastmasker (x). Anden rad skal du hekle st masker. Du hekler frem og tilbage, saa du leser förste rad fra höjre mod venstre, anden fra venstre mod höjre osv. Husk at förste fm erstattes af 1 lm og förste st erstattes med 3 lm. Les ogsaa her
08.09.2014 - 14:21
![]() Andrea wrote:
Andrea wrote:
Diese Aufnahmen in jeder 2. Runde 5x wiederholen. (Muster A1 Grösse 110/116) Wie muss ich genau Vorgehen?
02.09.2014 - 09:54DROPS Design answered:
Liebe Andrea, Sie häkeln eine Reihe mit Zunahmen und eine Reihe ohne Zunahmen (= in jeder 2. R), dann wieder eine Reihe mit Zunahmen etc. „Noch 5 x“ bedeutet insgesamt 6 x.
04.09.2014 - 09:48Hema wrote:
Hi! I have understood this part of increasing the stitches. The marker position will change with the increase of stitches so wanted to know the marker positions on the row where there are 92 stitches and on the rows after the increase. Appreciate your response.
23.08.2014 - 06:53DROPS Design answered:
Dear Hema, in size 9/10 years you start with 92 ch and first row is 81 sts, then put your markers as follows: First marker after 5 sts, then insert 16 markers 4 sts apart, after last marker there are 6 sts. After first inc (done eg before each marker), you will have 6 sts, marker, *5 sts, marker* a total of 16 times, 6 sts= 92 sts. Happy crocheting!
25.08.2014 - 10:09Hema wrote:
Hi! I haven't been able to gather how to increase the stitches for size 9/10 years. After the first increase I had required number of stitches (75+17=92). Could you please tell me the marker positions for the increase in the following rows. Greatly appreciate your response.
22.08.2014 - 13:14DROPS Design answered:
Dear Hema, on first inc row, all inc are made before markers, on next inc row, all inc will be made after markers, continue like this working alternately inc before and after markers. Happy crocheting!
22.08.2014 - 14:10
![]() Mareike wrote:
Mareike wrote:
In der Anleitung steht, ich soll bei der kleinsten Grösse 0x in der 4. R. zunehmen. Was ist richtig?
15.08.2014 - 16:08DROPS Design answered:
Das gilt für A.1 und ist bei A.1 richtig. Sie kommen ja damit auf die 147 M. In der 4. Rd von A.2 nehmen Sie einmalig bei allen Markierern je 1 M zu, das gilt für alle Größen, unabhängig von der Anweisung bei A.1.
15.08.2014 - 16:27
![]() Mareike wrote:
Mareike wrote:
Für die kleinste Grösse nehme ich in jeder 2. R. 5x bei allen Markierungen zu, keinmal in der 4. Reihe. So komme ich auf 147 M. Wenn ich weiter im Diagramm A2 häkele, ist keine weitere Zunahme angegeben,dann sind es nach der 6. Reihe immer noch 147 M. In der 7.Reihe des Diagramms soll ich 16 M. aufnehmen, das ergibt 163 M. In der Anleitung sind es 177 M., die gesamte weitere Anleitung baut auf dieser Zahl auf. Ist irgendwo vorher eine Zunahme vergessen worden oder sind die 163 M. richtig?
14.08.2014 - 17:50DROPS Design answered:
Liebe Mareike, Sie nehmen ja in der 4. R von A.2 noch mal an den Markierungen zu (= 14 M zugenommen), dann kommen Sie auf die 177 M. Hier ist der Satz in der Anleitung: "BEMERKUNG: In den 2 ersten R werden über die 4 äußeren M auf jeder Seite Stb gehäkelt, dann weiter im Muster wie gehabt - und in der 4. R des Diagramms an den Markierungen wie beschrieben aufnehmen."
15.08.2014 - 13:29
![]() Mareike wrote:
Mareike wrote:
Für die kleinste Grösse nehme ich in jeder 2. R. 5x bei allen Markierungen zu, keinmal in der 4. Reihe. So komme ich auf 147 M. Wenn ich weiter im Diagramm A2 häkele, ist keine weitere Zunahme angegeben,dann sind es nach der 6. Reihe immer noch 147 M. In der 7.Reihe des Diagramms soll ich 16 M. aufnehmen, das ergibt 163 M. In der Anleitung sind es 177 M., die gesamte weitere Anleitung baut auf dieser Zahl auf. Ist irgendwo vorher eine Zunahme vergessen worden oder sind die 163 M. richtig?
14.08.2014 - 17:40DROPS Design answered:
Antwort siehe oben! :-)
15.08.2014 - 13:29
|
||||||||||
Amelie Smiles#ameliesmilescardigan |
||||||||||
|
|
||||||||||
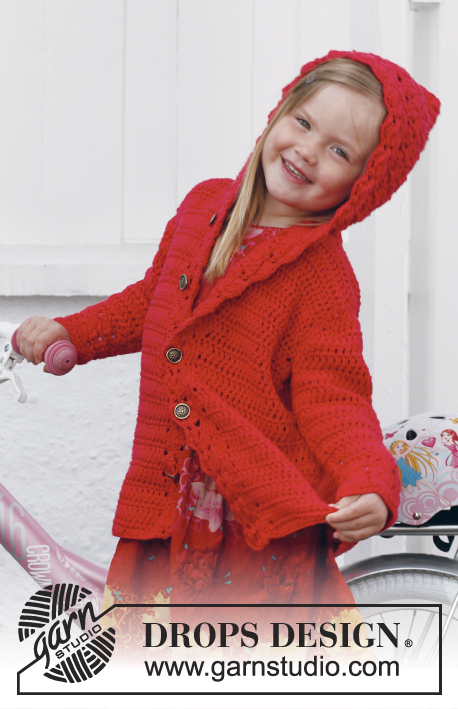
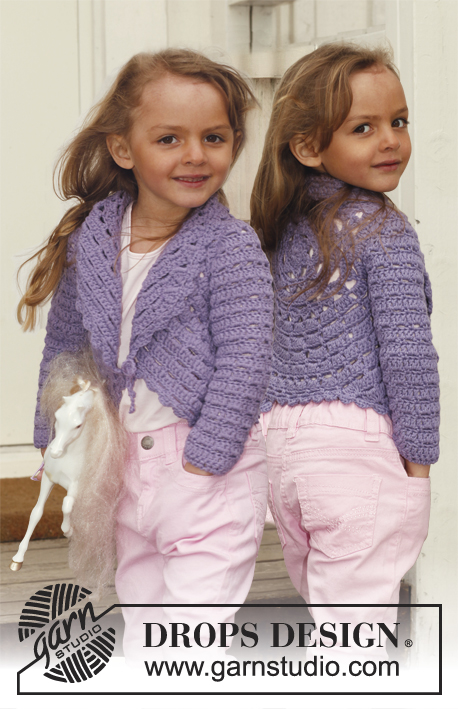
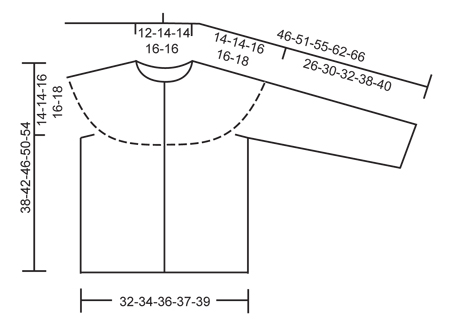
Crochet jacket with lace pattern and round yoke, worked top down in DROPS Karisma. Size children 3 - 12 years.
DROPS Children 24-38 |
||||||||||
|
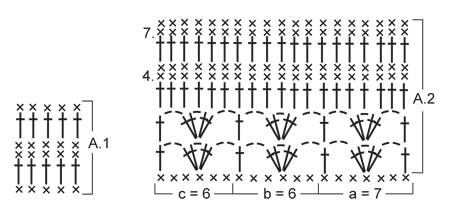
CROCHET INFO: Replace first dc on every dc row with 1 ch. Replace first tr on every tr row with 3 ch. PATTERN: See diagrams A.1 and A.2. INCREASE TIP: Inc by working 2 sts in 1 st, first on the one side of all markers on row, next time on the other side of all markers on row, continue inc like this alternately before and after markers. DECREASE TIP: Dec 1 st by working 2 sts tog. Work 2 dc tog as follows: Insert hook in first st and pull thread through, insert hook in next st and pull thread through, make 1 YO and pull thread through all 3 loops on hook. Work 2 tr tog as follows: Work 1 tr in first st but wait with last pull through, work 1 tr in next st but on last pull through, pull thread through all 3 loops on hook. ---------------------------------------------------------- BODY: The piece is worked top down. Worked back and forth from mid front. Work 77-85-85-92-100 ch (incl 1 ch to turn with) on hook size 4 mm with Karisma. Work next row as follows: 1 dc in 2nd ch, 1 dc in each of the next 5-3-3-5-3 ch, * skip 1 ch, 1 dc in each of the next 4 ch *, repeat from *-* the entire row = 63-69-69-75-81 dc (ch at beg of row = 1 dc) – READ CROCHET INFO! Insert 14-15-16-17-18 markers in the piece as follows: First marker after 5-6-4-5-6 sts, then insert 13-14-15-16-17 markers 4 sts apart, after last marker there are 6-7-5-6-7 sts. Work back and forth according to diagram A.1 - AT THE SAME TIME on next row inc 1 st at all markers – READ INCREASE TIP! Repeat inc every other row 5-5-3-3-2 more times and then every 4th row 0-0-2-2-3 times = 147-159-165-177-189 sts. REMEMBER THE CROCHET TENSION! Continue to work A.2 as follows: 1 tr in each of the first 4 dc (= band), a over the next 7 dc, then b until 10 dc remain, c over the next 6 dc and 1 tr in each of the last 4 dc (= band). Work diagram 1 time vertically – NOTE: On the first 2 rows work the four first and the last 4 sts in each side in tr, then work the pattern as before - inc at the markers as before on 4th row in diagram. On 7th row in diagram inc 16-13-16-15-12 sts evenly (do not inc over the first and last 4 band sts) = 177-187-197-209-219 sts. Work last row in A.2 as follows: 28-30-31-33-34 dc (= front piece), 6 ch (= under sleeve), skip 36-38-40-43-45 dc (to be used for sleeve later), work 49-51-55-57-61 dc (= back piece), 6 ch (= under sleeve), skip 36-38-40-43-45 dc (to be used for sleeve later) and work 28-30-31-33-34 dc (= front piece). There are now 117-123-129-135-141 sts on body. Remove all markers on yoke and insert a new marker in the middle of the 6 ch under each sleeve. Beg on 1st row in A.2 again and work a, b and c the same way as last time (every ch under sleeve = 1 dc) - the first and last 4 sts in each side = bands, only work these in tr on the first 2 rows. Continue A.2 until repetition has been worked 4-4-4-5-5 times in total after yoke, piece measures now approx. 24-24-24-30-30 cm from armhole and down. The smallest size is now done. Continue with diagram A.1 for 0-4-6-4-6 cm, i.e. piece measures 24-28-30-34-36 cm from armhole and down. Fasten off. SLEEVE: To get the same texture as on body, work back and forth. There are now 42-44-46-49-51 sts in total on sleeve. Beg to work mid under sleeve in 3rd ch worked for armhole on body – work first row from WS. Work 1 row with 1 dc in every ch/dc, AT THE SAME TIME dec 6 dc evenly = 36-38-40-43-45 dc. Work next row as follows – from RS: Work 1 tr in each of the first 3-1-2-0-1 dc, then work diagram A.2 as follows: a over 7 sts, then b until 8-6-7-6-7 sts remain, c over 6 sts and finish with 1 tr in each of the last 2-0-1-0-1 dc. Turn and work as follows: On 4th row first time diagram is worked, dec 5-1-3-0-2 sts evenly – SEE DECREASE TIP = 31-37-37-43-43 sts. No of sts will now fit the repetition so next time you start A.2, no tr are worked mid under sleeve in any size. Continue with A.2 downwards 3-4-4-5-5 more times – AT THE SAME TIME, third time repetition is worked, dec 0-6-6-6-6 sts evenly = 31-31-31-37-37 sts. When A.2 are worked a total of 4-5-5-6-6 times on sleeve (piece measures approx. 24-30-30-36-36 cm), continue with diagram A.1 until sleeve measures 26-30-32-38-40 cm. Cut the yarn – make it long and use it to sew tog sleeve mid under. Work the other sleeve the same way. ASSEMBLY: Sew sleeve seams edge to edge to avoid a chunky seam. Sew on buttons evenly down on left band – top button should be 1 cm from the top. Button through sts on right band. |
||||||||||
Diagram explanations |
||||||||||
|
||||||||||
 |
||||||||||
 |
||||||||||
Have you finished this pattern?Tag your pictures with #dropspattern #ameliesmilescardigan or submit them to the #dropsfan gallery. Do you need help with this pattern?You'll find 6 tutorial videos, a Comments/Questions area and more by visiting the pattern on garnstudio.com. © 1982-2026 DROPS Design A/S. We reserve all rights. This document, including all its sub-sections, has copyrights. Read more about what you can do with our patterns at the bottom of each pattern on our site. |
||||||||||


With over 40 years in knitting and crochet design, DROPS Design offers one of the most extensive collections of free patterns on the internet - translated to 17 languages. As of today we count 324 catalogues and 12291 patterns translated into English (UK/cm). 12291
We work hard to bring you the best knitting and crochet have to offer, inspiration and advice as well as great quality yarns at incredible prices! Would you like to use our patterns for other than personal use? You can read what you are allowed to do in the Copyright text at the bottom of all our patterns. Happy crafting!
Post a comment to pattern DROPS Children 24-38
We would love to hear what you have to say about this pattern!
If you want to leave a question, please make sure you select the correct category in the form below, to speed up the answering process. Required fields are marked *.