
Looking for a yarn?


Comments / Questions (99)
![]() Heidi wrote:
Heidi wrote:
Hej, Jeg hækler Amelia Smiles cardigan i str 3/4 år. Det går fint indtil jeg har 147 masker og hækler i diagram a2, hvor jeg skal hækle stg, 2xlm, 2xstg, 1 lm, 2 stg, 2 lm, 1,xstg osv. Når jeg har færdiggjort denne rk. har jeg mere end 200 masker og jeg forstår ikke hvad det er jeg gør forkert. Håber I kan hjælpe mig med at komme videre. Mange hilsner Heidi
24.06.2025 - 21:40DROPS Design answered:
Hej Heidi, du hækler skiftevis i hver 3. fm: 1 stangmaske, 2 luftmasker og skiftevis 1 stangmaskegruppe, 2 luftmasker hele rækken ud :)
26.06.2025 - 14:53
![]() Lucie wrote:
Lucie wrote:
Bonjour, Cela fait 2 fois que je recommence l'ouvrage. Je suis arrivée jusqu'à la phase du premier motif. j'ai relu 3 fois comment faire les augmentations , et à quel moment les faire. Je n'obtient pas le nombre indiqué. Je fais le modele 5-6 ans, et j'obtiens 237 mailles après le premier motif, juste avant la création des emmanchures. Que faire ? Je n'y arrive pas. Merci pour votre aide.
14.04.2025 - 22:18DROPS Design answered:
Bonjour Lucie, vous commencez avec 69 mailles et vous allez augmenter 15 mailles (soit 1 à chaque marqueur) 6 fois au total, soit 15x6= 90+69= 159 mailles. Pour augmenter la 1ère fois, augmentez avant chaque marqueur, la fois suivante, augmentez après chaque marqueur et continuez ainsi alternativement avant et après chacun des marqueurs. Bon crochet!
22.04.2025 - 09:21
![]() Marion wrote:
Marion wrote:
Bij het begin van het werk klopt het niet met het aantal markeerders klopt niet, nu zelf gaan meerderen tot ik aan de 159 steken kwam Tip voor jullie Hoop dat de rest wel klopt
12.03.2025 - 13:05
![]() Sylvia wrote:
Sylvia wrote:
Goedemorgen, ik ben met vest Amelie smiles bezig. Mijn vraag is bij de lossen onder de arm moet je daar vasten blijven haken. Alvast bedankt. Sylvia
23.01.2025 - 10:26
![]() Rami wrote:
Rami wrote:
On the sleeve, you say to work the first row on the wrong side (WS). Nowhere else in the pattern are the sides mentioned. How do I determine which side is RS and which is WS? Thank you. I do like your patterns.
01.10.2024 - 19:39DROPS Design answered:
Dear Rami, the division row on yoke was supposed to be a row from WS (last row in A.2), so work the first row on sleeve from the wrong side, ie on the same side as you worked the division row (when skipping the stitches for sleeves replaced with chains stitches). Happy crocheting!
02.10.2024 - 08:25
![]() Josanna wrote:
Josanna wrote:
How many skeins of yarn do I need to purchase to complete this project? Thank you!
19.10.2023 - 00:55DROPS Design answered:
Dear Johanna, you will find the total weight required for each size under header, this means in first size for example you need 300 g DROPS Karisma/50 g a ball =6 balls Karisma. If you like to use another yarn, please use the yarn converter to get the new amount. Happy crocheting!
19.10.2023 - 08:29
![]() Hanneke wrote:
Hanneke wrote:
Het gaat over model nr u-061-bn Er staat ga verder in A2 tot het patroon in mijn geval 5 keer is gehaakt , maar ik hoef nu toch niet meer in de 4e en 7e toer te meerderen ?
25.08.2023 - 20:17DROPS Design answered:
Dag Hanneke,
Dat klopt inderdaad, je hoeft dan niet meer te meerderen.
28.08.2023 - 07:05
![]() Mireille PETRUCCI wrote:
Mireille PETRUCCI wrote:
Bonsoir je vient de reprendre le modele du cardigan pourriez-vous me dire d apres le diagrame est-ce que les explictions a2 pour commencer faut-il que je fasse apres les 4 brides du devant faire une 5eme avant de continuer le rg pour avoir les 129 m le modele est U 061 bn merci bonne soiree
23.09.2022 - 18:58DROPS Design answered:
Bonjour Mme Petrucci, effectivement, A.2 va se crocheter entre les 4 mailles de bordure devant de chaque côté, vu sur l'endroit, ainsi: 4 mailles pour la bordure devant (bride ou maille serrée en fonction du rang de A.2), puis crochetez les 7 mailles de A.2a, puis répétez les 6 mailles de A.2b jusqu'à ce qu'il reste 10 mailles, et terminez par les 6 mailles de A.2c et 4 brides/mailles serrées pour la bordure devant (sur l'envers, crochetez A.2c, A.2b, A.2a). Bon crochet!
26.09.2022 - 08:52
![]() Mireille PETRUCCI wrote:
Mireille PETRUCCI wrote:
Bonjour merci pour la reponse mais je fais les auguementations a chaque marqueur de chaques cotée tt les 2rg je dois tricher pour avoir le nbrs de mailles haut mesure 11 cm merci
18.08.2022 - 10:22DROPS Design answered:
Bonjour Mme Petrucci, si votre échantillon n'est pas juste en largeur et en hauteur, il vous faudra adapter la taille du crochet, sinon les mesures finales risquent d'être différentes. Si votre hauteur ne correspond pas, vous devrez recalculer sur la base des explications (ex tous les 4 rangs dans A.1 dans les explications = tous les 3 rangs environ - et ainsi de suite en fonction de votre propre tension. Retrouvez d'autres explications ici. Bon crochet!
18.08.2022 - 14:59
![]() Mireille PETRUCCI wrote:
Mireille PETRUCCI wrote:
Bonsoir ma question na pas ete e enregistré pour le modele cardigan les explications ne correspondent pas apres le haut je n ai pas du tout les 16 cm que je devais obtenir qui sur la photo est plus large merci pour votre aide
17.08.2022 - 19:18DROPS Design answered:
Bonjour Mme Petrucci, vous parlez de la largeur de l'encolure dans une des 2 grandes tailles indiquée dans le schéma? Cette mesure correspond à la largeur de l'encolure quand le gilet est posé à plat, si vous avez bien le bon échantillon (17 m x 15 rangs en A.1 = 10 x 10 cm) et que vous conservez bien la même tension que pour votre échantillon, vous devriez avoir ces mêmes mesures. Bon crochet!
18.08.2022 - 08:57
|
||||||||||
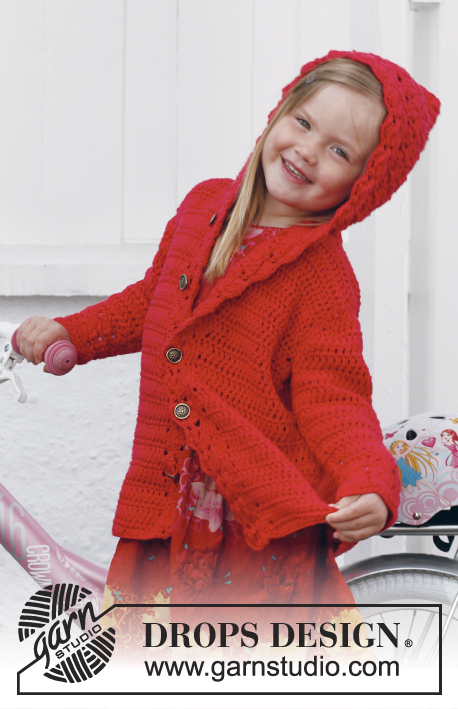
Amelie Smiles#ameliesmilescardigan |
||||||||||
|
|
||||||||||
Crochet jacket with lace pattern and round yoke, worked top down in DROPS Karisma. Size children 3 - 12 years.
DROPS Children 24-38 |
||||||||||
|
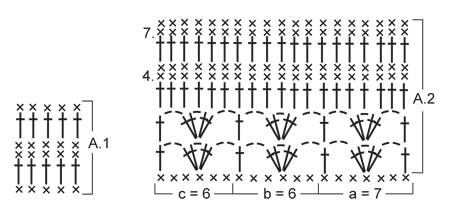
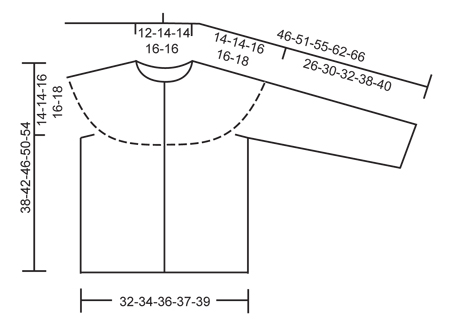
CROCHET INFO: Replace first sc on every sc row with 1 ch. Replace first dc on every dc row with 3 ch. PATTERN: See diagrams A.1 and A.2. INCREASE TIP: Inc by working 2 sts in 1 st, first on the one side of all markers on row, next time on the other side of all markers on row, continue inc like this alternately before and after markers. DECREASE TIP: Dec 1 st by working 2 sts tog. Work 2 sc tog as follows: Insert hook in first st and pull thread through, insert hook in next st and pull thread through, make 1 YO and pull yarn through all 3 loops on hook. Work 2 dc tog as follows: Work 1 dc in first st but wait with last pull through, work 1 dc in next st but on last pull through, pull yarn through all 3 loops on hook. ---------------------------------------------------------- BODY: The piece is worked top down. Worked back and forth from mid front. Ch 77-85-85-92-100 (includes 1 ch to turn with) on hook size 4 mm / G/6 with Karisma. Work next row as follows: 1 sc in 2nd ch, 1 sc in each of the next 5-3-3-5-3 ch, * skip ch 1, 1 sc in each of the next 4 ch *, repeat from *-* the entire row = 63-69-69-75-81 sc (ch at beg of row = 1 sc) – READ CROCHET INFO! Insert 14-15-16-17-18 markers in the piece as follows: First marker after 5-6-4-5-6 sts, then insert 13-14-15-16-17 markers 4 sts apart, after last marker there are 6-7-5-6-7 sts. Work back and forth according to diagram A.1 - AT THE SAME TIME on next row inc 1 st at all markers – READ INCREASE TIP! Repeat inc every other row 5-5-3-3-2 more times and then every 4th row 0-0-2-2-3 times = 147-159-165-177-189 sts. REMEMBER THE CROCHET GAUGE! Continue to work A.2 as follows: 1 dc in each of the first 4 sc (= band), a over the next 7 sc, then b until 10 sc remain, c over the next 6 sc and 1 dc in each of the last 4 sc (= band). Work diagram 1 time vertically – NOTE: On the first 2 rows work the four first and the last 4 sts in each side in dc, then work the pattern as before - inc at the markers as before on 4th row in diagram. On 7th row in diagram inc 16-13-16-15-12 sts evenly (do not inc over the first and last 4 band sts) = 177-187-197-209-219 sts. Work last row in A.2 as follows: 28-30-31-33-34 sc (= front piece), 6 ch (= under sleeve), skip 36-38-40-43-45 sc (to be used for sleeve later), work 49-51-55-57-61 sc (= back piece), 6 ch (= under sleeve), skip 36-38-40-43-45 sc (to be used for sleeve later) and work 28-30-31-33-34 sc (= front piece). There are now 117-123-129-135-141 sts on body. Remove all markers on yoke and insert a new marker in the middle of the 6 ch under each sleeve. Beg on 1st row in A.2 again and work a, b and c the same way as last time (every ch under sleeve = 1 sc) - the first and last 4 sts in each side = bands, only work these in dc on the first 2 rows. Continue A.2 until repetition has been worked 4-4-4-5-5 times in total after yoke, piece measures now approx. 24-24-24-30-30 cm / 9½"-9½"-9½"-11¾"-11¾" from armhole and down. The smallest size is now done. Continue with diagram A.1 for 0-4-6-4-6 cm / 0-1½"-2½"-1½"-2½", i.e. piece measures 24-28-30-34-36 cm / 9½"-11"-11¾"-13½"-14¼" from armhole and down. Fasten off. SLEEVE: To get the same texture as on body, work back and forth. There are now 42-44-46-49-51 sts in total on sleeve. Beg to work mid under sleeve in 3rd ch worked for armhole on body – work first row from WS. Work 1 row with 1 sc in every ch/sc, AT THE SAME TIME dec 6 sc evenly = 36-38-40-43-45 sc. Work next row as follows – from RS: Work 1 dc in each of the first 3-1-2-0-1 sc, then work diagram A.2 as follows: a over 7 sts, then b until 8-6-7-6-7 sts remain, c over 6 sts and finish with 1 dc in each of the last 2-0-1-0-1 sc. Turn and work as follows: On 4th row first time diagram is worked, dec 5-1-3-0-2 sts evenly – SEE DECREASE TIP = 31-37-37-43-43 sts. No of sts will now fit the repetition so next time you start A.2, no dc are worked mid under sleeve in any size. Continue with A.2 downwards 3-4-4-5-5 more times – AT THE SAME TIME, third time repetition is worked, dec 0-6-6-6-6 sts evenly = 31-31-31-37-37 sts. When A.2 are worked a total of 4-5-5-6-6 times on sleeve (piece measures approx. 24-30-30-36-36 cm / 9½"-11¾"-11¾"-14¼"-14¼"), continue with diagram A.1 until sleeve measures 26-30-32-38-40 cm / 10¼"-11¾"-12½"15"-15¾". Cut the yarn – make it long and use it to sew tog sleeve mid under. Work the other sleeve the same way. ASSEMBLY: Sew sleeve seams edge to edge to avoid a chunky seam. Sew on buttons evenly down on left band – top button should be 1 cm / ½" from the top. Button through sts on right band. |
||||||||||
Diagram explanations |
||||||||||
|
||||||||||
|
||||||||||
|
||||||||||
Have you finished this pattern?Tag your pictures with #dropspattern #ameliesmilescardigan or submit them to the #dropsfan gallery. Do you need help with this pattern?You'll find 5 tutorial videos, a Comments/Questions area and more by visiting the pattern on garnstudio.com. © 1982-2025 DROPS Design A/S. We reserve all rights. This document, including all its sub-sections, has copyrights. Read more about what you can do with our patterns at the bottom of each pattern on our site. |
||||||||||


With over 40 years in knitting and crochet design, DROPS Design offers one of the most extensive collections of free patterns on the internet - translated to 17 languages. As of today we count 314 catalogs and 11821 patterns - 11811 of which are translated into English (US/in).
We work hard to bring you the best knitting and crochet have to offer, inspiration and advice as well as great quality yarns at incredible prices! Would you like to use our patterns for other than personal use? You can read what you are allowed to do in the Copyright text at the bottom of all our patterns. Happy crafting!
Post a comment to pattern DROPS Children 24-38
We would love to hear what you have to say about this pattern!
If you want to leave a question, please make sure you select the correct category in the form below, to speed up the answering process. Required fields are marked *.