
Popular categories
Looking for a yarn?


Comments / Questions (102)
![]() Kristin wrote:
Kristin wrote:
Thanks ^^ I already made short sleeve cardigan based on this pattern and doing another one for long sleeve. I have question in the sleeve part pattern. Would you explain the meaning of these lines "No of sts will now fit the repetition so next time you atart A.2, no dc are worked mid under sleeve in any size"? To make sure.. that i need to continue whole part of A.2 on the sleeve, right? Thanks
10.06.2015 - 21:12DROPS Design answered:
Dear Kristin, when you first work A.2 row starts and ends with some extra dc (3-1-2-0-1 dc worked over the sc from previous row). After you have dec 5-1-3-0-2 sts evenly, you can work A.2 around, there will be no dc any more mid under sleeve, ie row will start with A.2a and end with A.2c. Happy crocheting!
11.06.2015 - 09:42
![]() Kristin wrote:
Kristin wrote:
Hi, thanks for help. I am doing A-2 diagram and stuck at last row for skipping 40sc for the part to be used as sleeve.. How can I skip 40 sc after 6 chain..?
23.05.2015 - 04:02DROPS Design answered:
Dear Kristin, on last row in A.2 you will create opening for sleeves, ie skip 40 sc from previous row (= worked later for sleeve) and ch 6 for underarm - repeat twice for both armholes. Happy crocheting!
23.05.2015 - 13:53
![]() Annette Offenberg wrote:
Annette Offenberg wrote:
Syntes i har så mange skønne opskrifter,men er svære at følge kunne godt bruge opskrift række for række virker meget forvirrende soM det er skrevet nu.mvh.annette
13.05.2015 - 07:51
![]() Lisa wrote:
Lisa wrote:
Kristin, sc means single crochet (and of course here stiches)
09.05.2015 - 10:05
![]() Kristin wrote:
Kristin wrote:
Thank you so much for reply! Now i understand it and one more question about " 1 Dc in each of next first 4 SC ". The 4sc means same as 4 stitches? Waiting and Thanks again
09.05.2015 - 01:37
![]() Geneviève wrote:
Geneviève wrote:
Bonjour, Comme quelques uns j'ai eu des problèmes à placer mes marqueurs après la première augmentation et voici que je me pose cette question... Lorsque vous dites d'augmenter aux deux rangs, pour la taille 3/4 les rangs qui sont augmentés sont-ils rang 1-3-5-1-3-5 du diagramme a.1 ou les rangs 1-4-1-4-1-4? Je vous remercie d'avance pour la précision!
08.05.2015 - 02:56DROPS Design answered:
Bonjour Geneviève, pour l'empiècement, on augmente tous les 2 rangs, soit *1 rang avec augmentations, 1 rang sans augmentations*, et on répète 6 fois ces 2 rangs au total (= on a crocheté 10 rangs et augmenté 84 m (6 fois 14 augm) en taille 3/4 ans: soit 63 + 84 = 147 m. Bon crochet!
08.05.2015 - 09:52
![]() Kristin wrote:
Kristin wrote:
I am almost new at chrochet and having little hard time to read pattern. But i have been through this pattern so far up to work A.1part. My question is how to understand work A.2 part. From first part of it, "1 dc in eachof the first 4 sc(=band), a over the next..." I am not getting those a. b, c, ... I will be so appreciate if you let me know. Thanks
07.05.2015 - 22:27DROPS Design answered:
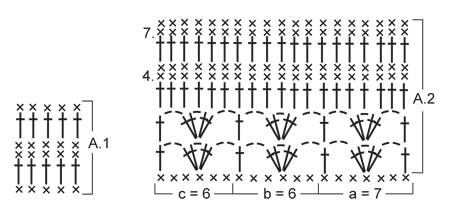
Dear Kristin, start reading A.2 from the bottom corner on the right side towards the left from RS, and work every row from WS reading from the left towards the right. Then work as follows: diag. a on the first 7 sts, then repeat the 6 sts in b until 10 sts remain at the end of row, work then the 6 sts in c and finish with front bands. In other words, a shows how to start diagram from RS and how to finish from WS, b how to repeat pattern accross the row and c how to finish the row from RS, how to start the row from WS. Happy crocheting!
08.05.2015 - 09:42
![]() Katleen Couvreur wrote:
Katleen Couvreur wrote:
Help, ik ben beginnende haakster en ik heb problemen met het lezen van het telpatroon A2 ik begrijp lijn 2 niet, uitleg symbolenstokjes denk ik maar waarom in groepjes van 2????? aub wat hulp......want ik vind het patroon héél leuk om doen!!!!! thanks
03.02.2015 - 19:43DROPS Design answered:
Hoi Katleen. Heb je problemen bij het begrijpen van de delen van A.2 (a, b en c gedeelte) of is het de steken zelf die je niet snapt? En welke maat haak je? Dan kan ik meekijken en uitleggen.
04.02.2015 - 16:07
![]() Bitten Kaas wrote:
Bitten Kaas wrote:
Hvordan får jeg mønsteret til at ligge over hinanden, når jeg skal lave ærmerne? Jeg kan ikke få mønsteret til at passe. efter jeg har taget ind ligger det forskudt i forhold til første diagram
30.09.2014 - 23:22DROPS Design answered:
Hej Bitten, Jo men mønsteret vil blive forskudt i og med du tager ud, det er det også på de ærmer i modellen. God fornøjelse!
16.10.2014 - 12:22
![]() Annamaria wrote:
Annamaria wrote:
Buongiorno, non mi è chiaro per realizzare questo giacchino quanti gomitoli in totale dover ordinare... la mia bimba ha 4 anni ma è alta 105 cm circa quindi penso di riferirmi alla taglia 3-4 oppure no? grazie
26.09.2014 - 17:51DROPS Design answered:
Buongiorno Annamaria. Provi a misurare un indumento simile di sua figlia e confrontare le misure con quelle riportate nel grafico in basso, alla fine delle spiegazioni del modello. Potrebbe valutare di scegliere la taglia leggermente più grande, così sua figlia potrà indossare il cardigan anche quando sarà crescita un po' . Buon lavoro!
26.09.2014 - 20:12
|
||||||||||
Amelie Smiles#ameliesmilescardigan |
||||||||||
|
|
||||||||||
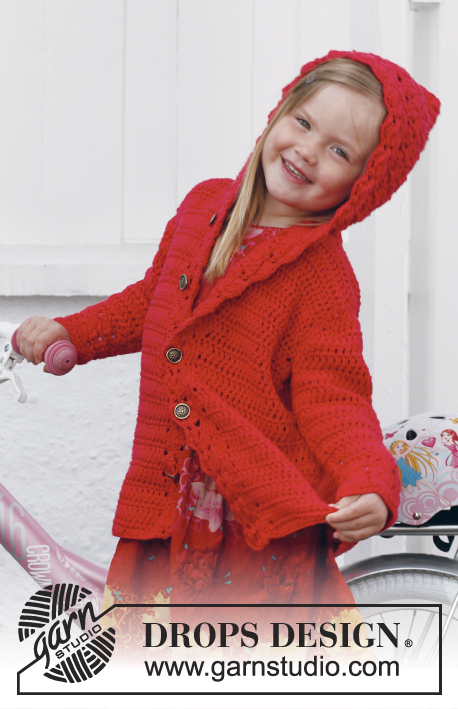
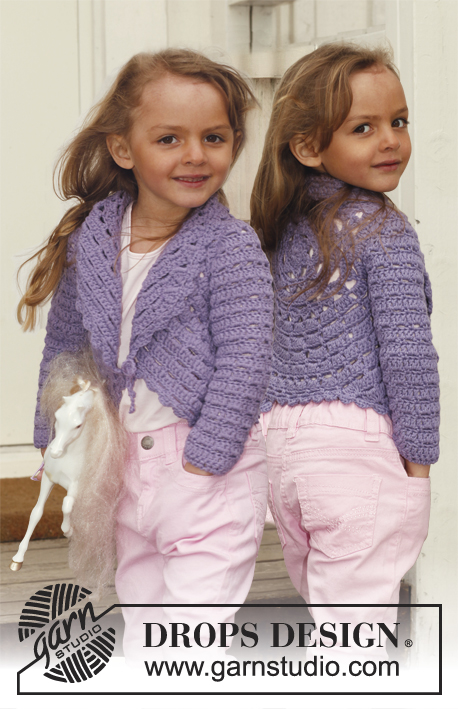
Crochet jacket with lace pattern and round yoke, worked top down in DROPS Karisma. Size children 3 - 12 years.
DROPS Children 24-38 |
||||||||||
|
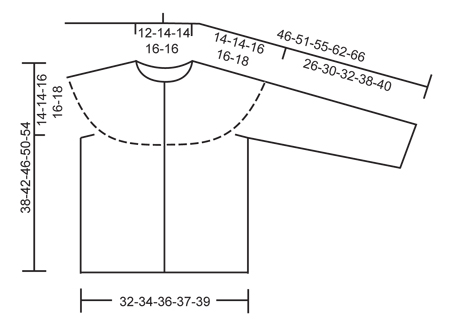
CROCHET INFO: Replace first dc on every dc row with 1 ch. Replace first tr on every tr row with 3 ch. PATTERN: See diagrams A.1 and A.2. INCREASE TIP: Inc by working 2 sts in 1 st, first on the one side of all markers on row, next time on the other side of all markers on row, continue inc like this alternately before and after markers. DECREASE TIP: Dec 1 st by working 2 sts tog. Work 2 dc tog as follows: Insert hook in first st and pull thread through, insert hook in next st and pull thread through, make 1 YO and pull thread through all 3 loops on hook. Work 2 tr tog as follows: Work 1 tr in first st but wait with last pull through, work 1 tr in next st but on last pull through, pull thread through all 3 loops on hook. ---------------------------------------------------------- BODY: The piece is worked top down. Worked back and forth from mid front. Work 77-85-85-92-100 ch (incl 1 ch to turn with) on hook size 4 mm with Karisma. Work next row as follows: 1 dc in 2nd ch, 1 dc in each of the next 5-3-3-5-3 ch, * skip 1 ch, 1 dc in each of the next 4 ch *, repeat from *-* the entire row = 63-69-69-75-81 dc (ch at beg of row = 1 dc) – READ CROCHET INFO! Insert 14-15-16-17-18 markers in the piece as follows: First marker after 5-6-4-5-6 sts, then insert 13-14-15-16-17 markers 4 sts apart, after last marker there are 6-7-5-6-7 sts. Work back and forth according to diagram A.1 - AT THE SAME TIME on next row inc 1 st at all markers – READ INCREASE TIP! Repeat inc every other row 5-5-3-3-2 more times and then every 4th row 0-0-2-2-3 times = 147-159-165-177-189 sts. REMEMBER THE CROCHET TENSION! Continue to work A.2 as follows: 1 tr in each of the first 4 dc (= band), a over the next 7 dc, then b until 10 dc remain, c over the next 6 dc and 1 tr in each of the last 4 dc (= band). Work diagram 1 time vertically – NOTE: On the first 2 rows work the four first and the last 4 sts in each side in tr, then work the pattern as before - inc at the markers as before on 4th row in diagram. On 7th row in diagram inc 16-13-16-15-12 sts evenly (do not inc over the first and last 4 band sts) = 177-187-197-209-219 sts. Work last row in A.2 as follows: 28-30-31-33-34 dc (= front piece), 6 ch (= under sleeve), skip 36-38-40-43-45 dc (to be used for sleeve later), work 49-51-55-57-61 dc (= back piece), 6 ch (= under sleeve), skip 36-38-40-43-45 dc (to be used for sleeve later) and work 28-30-31-33-34 dc (= front piece). There are now 117-123-129-135-141 sts on body. Remove all markers on yoke and insert a new marker in the middle of the 6 ch under each sleeve. Beg on 1st row in A.2 again and work a, b and c the same way as last time (every ch under sleeve = 1 dc) - the first and last 4 sts in each side = bands, only work these in tr on the first 2 rows. Continue A.2 until repetition has been worked 4-4-4-5-5 times in total after yoke, piece measures now approx. 24-24-24-30-30 cm from armhole and down. The smallest size is now done. Continue with diagram A.1 for 0-4-6-4-6 cm, i.e. piece measures 24-28-30-34-36 cm from armhole and down. Fasten off. SLEEVE: To get the same texture as on body, work back and forth. There are now 42-44-46-49-51 sts in total on sleeve. Beg to work mid under sleeve in 3rd ch worked for armhole on body – work first row from WS. Work 1 row with 1 dc in every ch/dc, AT THE SAME TIME dec 6 dc evenly = 36-38-40-43-45 dc. Work next row as follows – from RS: Work 1 tr in each of the first 3-1-2-0-1 dc, then work diagram A.2 as follows: a over 7 sts, then b until 8-6-7-6-7 sts remain, c over 6 sts and finish with 1 tr in each of the last 2-0-1-0-1 dc. Turn and work as follows: On 4th row first time diagram is worked, dec 5-1-3-0-2 sts evenly – SEE DECREASE TIP = 31-37-37-43-43 sts. No of sts will now fit the repetition so next time you start A.2, no tr are worked mid under sleeve in any size. Continue with A.2 downwards 3-4-4-5-5 more times – AT THE SAME TIME, third time repetition is worked, dec 0-6-6-6-6 sts evenly = 31-31-31-37-37 sts. When A.2 are worked a total of 4-5-5-6-6 times on sleeve (piece measures approx. 24-30-30-36-36 cm), continue with diagram A.1 until sleeve measures 26-30-32-38-40 cm. Cut the yarn – make it long and use it to sew tog sleeve mid under. Work the other sleeve the same way. ASSEMBLY: Sew sleeve seams edge to edge to avoid a chunky seam. Sew on buttons evenly down on left band – top button should be 1 cm from the top. Button through sts on right band. |
||||||||||
Diagram explanations |
||||||||||
|
||||||||||
 |
||||||||||
 |
||||||||||
Have you finished this pattern?Tag your pictures with #dropspattern #ameliesmilescardigan or submit them to the #dropsfan gallery. Do you need help with this pattern?You'll find 6 tutorial videos, a Comments/Questions area and more by visiting the pattern on garnstudio.com. © 1982-2026 DROPS Design A/S. We reserve all rights. This document, including all its sub-sections, has copyrights. Read more about what you can do with our patterns at the bottom of each pattern on our site. |
||||||||||


With over 40 years in knitting and crochet design, DROPS Design offers one of the most extensive collections of free patterns on the internet - translated to 17 languages. As of today we count 324 catalogues and 12291 patterns translated into English (UK/cm). 12291
We work hard to bring you the best knitting and crochet have to offer, inspiration and advice as well as great quality yarns at incredible prices! Would you like to use our patterns for other than personal use? You can read what you are allowed to do in the Copyright text at the bottom of all our patterns. Happy crafting!
Post a comment to pattern DROPS Children 24-38
We would love to hear what you have to say about this pattern!
If you want to leave a question, please make sure you select the correct category in the form below, to speed up the answering process. Required fields are marked *.