
Popular categories
Looking for a yarn?


Comments / Questions (102)
![]() Inke wrote:
Inke wrote:
Ich möchte die Jacke gerne in Größe 158 häkeln. Können Sie die Anleitung auch in dieser Größe liefern, oder beschreiben, wo und wie ich umrechnen / mehr Maschen zunehmen kann?
29.01.2021 - 14:13DROPS Design answered:
Liebe Inke, leider können wir nicht jede Anleitung nach jeder Anfrage anpassen & umrechnen, gerne können Sie sich an Ihrem Laden oder einem Forum wenden. Danke im voraus für Ihr Verständnis. Viel Spaß beim häkeln!
29.01.2021 - 14:58
![]() Pia Hansen wrote:
Pia Hansen wrote:
Jeg hækler str. 11 - 12 år. Hæklefastheden passer.
26.09.2020 - 18:35DROPS Design answered:
Hei Pia. Det er meget lett å hekle for løst med MerinoExtraFine, slik at det går for mye garn. DROPS MerinoExtraFine har en litt lengre løpelende enn DROPS Karisma som modellen er heklet opp i, slik at det skulle ha vært mer enn nok garn. Men takk for ditt innspill og vi vil følge med om det kommer flere kommentarer på garnmengden. mvg DROPS design
28.09.2020 - 17:01
![]() Pia Hansen wrote:
Pia Hansen wrote:
Jeg hækler i Drops Merino extra fine, som har en løbelængde på 105 meter, nål 4 Det ser ud til at jeg kommer til at mangle omkring 3 nøgler garn. Er der andre som ikke har garn nok, den passer med de mål der står i opskriften. Med venlig hilsen Pia
24.09.2020 - 17:17DROPS Design answered:
Hej Pia, nej det har vi faktisk ikke hørt tidligere og der er mange som har hæklet den... Hvilken størrelse hækler du? Har du 15 rækker af A.1 i højden på 10 cm?
25.09.2020 - 11:47
![]() Donna Eastwood wrote:
Donna Eastwood wrote:
I have made two of these sweaters. There are a couple places at first that sounded confusing but after crocheting through and reading it a few times it made perfect sense. Thank you for producing these patterns and keeping them free.
16.05.2020 - 15:59
![]() Patricia Londre wrote:
Patricia Londre wrote:
I find this pattern very hard to follow.
15.01.2020 - 04:30
![]() Charlotte wrote:
Charlotte wrote:
I’m working the pattern with 30, ch 6, skip 38, st 51
11.11.2019 - 15:33DROPS Design answered:
Dear Charlotte, it looks like you are working size 5/6 years: you start with 69 sts, increase 1 st at each marker (= 15 sts) a total of 6 times = 90 sts inc +69= 159 sts. You work then A.2 and inc 1 st at each marker (= 15 sts inc) + 13 sts evenly= you should have now 187 sts. You then work 30 sts front piece, skip the next 38 sts for sleeve replaced with 6 ch under sleeve, work 51 sts for back piece, skip the next 38 sts for sleeve replaced with 6 ch and work 30 sts for front piece = 30+6+51+6+30= 123 sts. Happy crocheting!
11.11.2019 - 16:18
![]() Charlotte wrote:
Charlotte wrote:
I’m not sure where I’ve gone wrong or why, maybe I’m not understanding the pattern very well. I have 388 sts and I’m just about to start the bit with ch 6 for the sleeves.
11.11.2019 - 08:22DROPS Design answered:
Dear Charlotte, it looks like you have increased too many stitches, which size are you working?
11.11.2019 - 11:46
![]() Charlotte wrote:
Charlotte wrote:
I don’t understand this bit? Work diagram 1 time vertically – NOTE: On the first 2 rows work the four first and the last 4 sts in each side in dc, then work the pattern as before - inc at the markers as before on 4th row in diagram.
24.10.2019 - 10:29DROPS Design answered:
Dear Charlotte, the first and the last 4 sts are the front band sts, when working A.2, work these first and 4 last sts in dc, then as shown in A.2: on row 3 work these with dc, on row 4 and 5 with sc, and so on, so that the front band stitches are worked the same way/height as the stitches in A.2. Happy crocheting!
24.10.2019 - 11:00
![]() Soledad wrote:
Soledad wrote:
La explicación de cómo poner los marcadores de puntos es bastante confusa, ya que dice que el primero va DESPUES de 5 pb y no EN el punto número 5, y también dice que hay que dejar 4 puntos ENTRE los marcadores, y en realidad los puntos que quedan en el medio son 3. Esto lo deduje después de leer los comentarios de alguna gente con el mismo problema, voy a tener que deshacer el trabajo por tercera vez...
09.10.2019 - 09:52
![]() Frances wrote:
Frances wrote:
Hi On the sleeves for size 5/6 it says sleeves should measure 11 3/4 I just wanted to check and make sure this final measurement was correct for that size. As all other sizes this measurement changes from the row before. (piece measures approx. 24-30-30-36-36 cm / 9½"-11 3/4"-11 3/4"-14 1/4"-14 1/4"), continue with diagram A.1 until sleeve measures 26-30-32-38-40 cm / 10 1/4"-11 3/4"-12½"15"-15 3/4". 24-30-30-36-36 / 26-30??-32-38-40 Thank you
04.09.2019 - 20:32DROPS Design answered:
Dear Frances, in size 5/6 you won't have to crochet A.1, sleeve is finished after you have worked A.2 a total of 5 times. Happy crocheting!
05.09.2019 - 09:16
|
||||||||||
Amelie Smiles#ameliesmilescardigan |
||||||||||
|
|
||||||||||
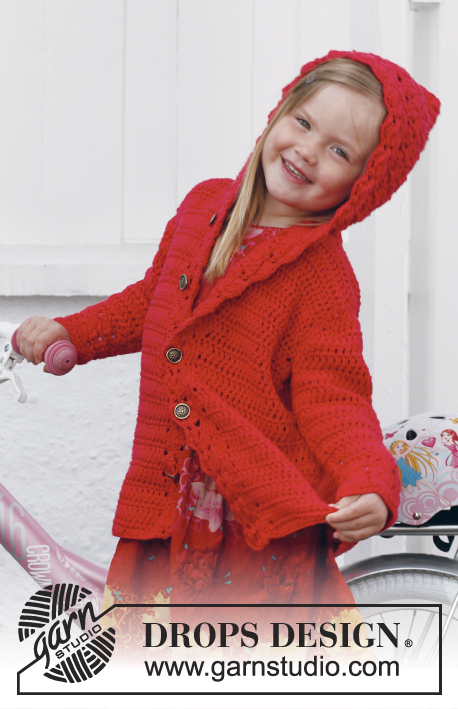
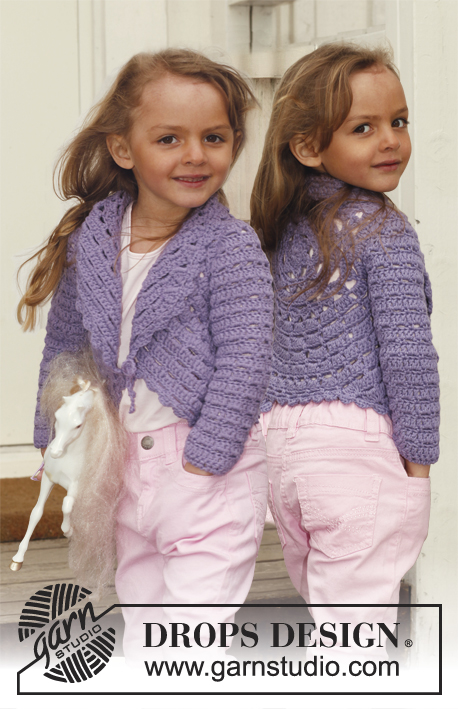
Crochet jacket with lace pattern and round yoke, worked top down in DROPS Karisma. Size children 3 - 12 years.
DROPS Children 24-38 |
||||||||||
|
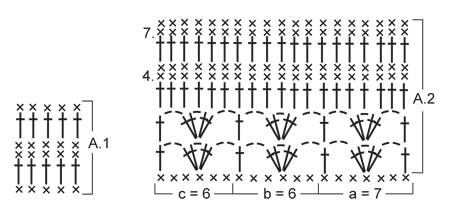
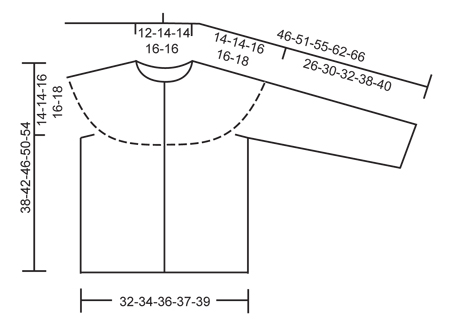
CROCHET INFO: Replace first dc on every dc row with 1 ch. Replace first tr on every tr row with 3 ch. PATTERN: See diagrams A.1 and A.2. INCREASE TIP: Inc by working 2 sts in 1 st, first on the one side of all markers on row, next time on the other side of all markers on row, continue inc like this alternately before and after markers. DECREASE TIP: Dec 1 st by working 2 sts tog. Work 2 dc tog as follows: Insert hook in first st and pull thread through, insert hook in next st and pull thread through, make 1 YO and pull thread through all 3 loops on hook. Work 2 tr tog as follows: Work 1 tr in first st but wait with last pull through, work 1 tr in next st but on last pull through, pull thread through all 3 loops on hook. ---------------------------------------------------------- BODY: The piece is worked top down. Worked back and forth from mid front. Work 77-85-85-92-100 ch (incl 1 ch to turn with) on hook size 4 mm with Karisma. Work next row as follows: 1 dc in 2nd ch, 1 dc in each of the next 5-3-3-5-3 ch, * skip 1 ch, 1 dc in each of the next 4 ch *, repeat from *-* the entire row = 63-69-69-75-81 dc (ch at beg of row = 1 dc) – READ CROCHET INFO! Insert 14-15-16-17-18 markers in the piece as follows: First marker after 5-6-4-5-6 sts, then insert 13-14-15-16-17 markers 4 sts apart, after last marker there are 6-7-5-6-7 sts. Work back and forth according to diagram A.1 - AT THE SAME TIME on next row inc 1 st at all markers – READ INCREASE TIP! Repeat inc every other row 5-5-3-3-2 more times and then every 4th row 0-0-2-2-3 times = 147-159-165-177-189 sts. REMEMBER THE CROCHET TENSION! Continue to work A.2 as follows: 1 tr in each of the first 4 dc (= band), a over the next 7 dc, then b until 10 dc remain, c over the next 6 dc and 1 tr in each of the last 4 dc (= band). Work diagram 1 time vertically – NOTE: On the first 2 rows work the four first and the last 4 sts in each side in tr, then work the pattern as before - inc at the markers as before on 4th row in diagram. On 7th row in diagram inc 16-13-16-15-12 sts evenly (do not inc over the first and last 4 band sts) = 177-187-197-209-219 sts. Work last row in A.2 as follows: 28-30-31-33-34 dc (= front piece), 6 ch (= under sleeve), skip 36-38-40-43-45 dc (to be used for sleeve later), work 49-51-55-57-61 dc (= back piece), 6 ch (= under sleeve), skip 36-38-40-43-45 dc (to be used for sleeve later) and work 28-30-31-33-34 dc (= front piece). There are now 117-123-129-135-141 sts on body. Remove all markers on yoke and insert a new marker in the middle of the 6 ch under each sleeve. Beg on 1st row in A.2 again and work a, b and c the same way as last time (every ch under sleeve = 1 dc) - the first and last 4 sts in each side = bands, only work these in tr on the first 2 rows. Continue A.2 until repetition has been worked 4-4-4-5-5 times in total after yoke, piece measures now approx. 24-24-24-30-30 cm from armhole and down. The smallest size is now done. Continue with diagram A.1 for 0-4-6-4-6 cm, i.e. piece measures 24-28-30-34-36 cm from armhole and down. Fasten off. SLEEVE: To get the same texture as on body, work back and forth. There are now 42-44-46-49-51 sts in total on sleeve. Beg to work mid under sleeve in 3rd ch worked for armhole on body – work first row from WS. Work 1 row with 1 dc in every ch/dc, AT THE SAME TIME dec 6 dc evenly = 36-38-40-43-45 dc. Work next row as follows – from RS: Work 1 tr in each of the first 3-1-2-0-1 dc, then work diagram A.2 as follows: a over 7 sts, then b until 8-6-7-6-7 sts remain, c over 6 sts and finish with 1 tr in each of the last 2-0-1-0-1 dc. Turn and work as follows: On 4th row first time diagram is worked, dec 5-1-3-0-2 sts evenly – SEE DECREASE TIP = 31-37-37-43-43 sts. No of sts will now fit the repetition so next time you start A.2, no tr are worked mid under sleeve in any size. Continue with A.2 downwards 3-4-4-5-5 more times – AT THE SAME TIME, third time repetition is worked, dec 0-6-6-6-6 sts evenly = 31-31-31-37-37 sts. When A.2 are worked a total of 4-5-5-6-6 times on sleeve (piece measures approx. 24-30-30-36-36 cm), continue with diagram A.1 until sleeve measures 26-30-32-38-40 cm. Cut the yarn – make it long and use it to sew tog sleeve mid under. Work the other sleeve the same way. ASSEMBLY: Sew sleeve seams edge to edge to avoid a chunky seam. Sew on buttons evenly down on left band – top button should be 1 cm from the top. Button through sts on right band. |
||||||||||
Diagram explanations |
||||||||||
|
||||||||||
 |
||||||||||
 |
||||||||||
Have you finished this pattern?Tag your pictures with #dropspattern #ameliesmilescardigan or submit them to the #dropsfan gallery. Do you need help with this pattern?You'll find 6 tutorial videos, a Comments/Questions area and more by visiting the pattern on garnstudio.com. © 1982-2026 DROPS Design A/S. We reserve all rights. This document, including all its sub-sections, has copyrights. Read more about what you can do with our patterns at the bottom of each pattern on our site. |
||||||||||


With over 40 years in knitting and crochet design, DROPS Design offers one of the most extensive collections of free patterns on the internet - translated to 17 languages. As of today we count 324 catalogues and 12291 patterns translated into English (UK/cm). 12291
We work hard to bring you the best knitting and crochet have to offer, inspiration and advice as well as great quality yarns at incredible prices! Would you like to use our patterns for other than personal use? You can read what you are allowed to do in the Copyright text at the bottom of all our patterns. Happy crafting!
Post a comment to pattern DROPS Children 24-38
We would love to hear what you have to say about this pattern!
If you want to leave a question, please make sure you select the correct category in the form below, to speed up the answering process. Required fields are marked *.