
Popular categories
Looking for a yarn?


Comments / Questions (52)
![]() Cristina wrote:
Cristina wrote:
Seconda domanda. Premessa: seguendo le istruzioni del CORPO taglia S/M al 13° giro ho lavorato 30 catenelle e ho saltato per gli scalfi 27 maglie per cui il giro manica dovrebbe essere di 57 maglie? Come mai per le maniche si chiede di avviare solo 28 catenelle che corrisponderanno a 25 maglie alte doppie? Non capisco. Grazie.
23.03.2026 - 13:32DROPS Design answered:
Buonasera Cristina, non sono previsti errori, le maniche non si lavorano in tondo, ma verranno cucite al capo. Buon lavoro!
23.03.2026 - 22:07
![]() Cristina wrote:
Cristina wrote:
Ho letto come si fanno le diminuzioni sul davanti sinistro. Ma non capisco se le diminuzioni vanno fatte solo alla fine di ogni riga. Se devo farle sia all'inizio che alla fine di ogni riga la spiegazione non è completa.
23.03.2026 - 03:12DROPS Design answered:
Buonasera Cristina, le diminuzioni si lavorano all'inizio e alla fine di ogni riga. Buon lavoro!
23.03.2026 - 22:03
![]() Begoña Martorell wrote:
Begoña Martorell wrote:
Buenas tardes, he acabado todo el círculo completo, y no sé cómo continuar para hacer los delanteros, gracias. Un saludo desde España!
01.09.2024 - 15:45DROPS Design answered:
Hola Begoña, desde el centro del lado del escote (en la parte superior del círculo) cuentas el punto central + 19 puntos a cada lado. Estos son puntos para el cuello y no se trabajarán en los delanteros. Cuenta los siguientes 87 puntos desde cada lado; estos serán los puntos para cada delantero y tienen que incluir las sisas. Finalmente, te quedan 39 puntos en la parte inferior del círculo, para la parte inferior de la espalda. Insertas los marcapuntos como se indica y se trabaja de ida y vuelta con 1 p.a.d en cada punto y aumentando antes o después de los marcapuntos, alternadamente y disminuyendo 3 pts al final de cada fila, en ambos extremos del delantero.
08.09.2024 - 20:02
![]() Kati wrote:
Kati wrote:
Hallo, werden die Fäden nach jedem Streifen abgeschnitten und vernäht oder mitgeführt? LG
27.05.2024 - 12:53DROPS Design answered:
Liebe Kati, Sie können die Fäden mitführen wenn die Streifen nicht zu hoch sind, beachten Sie nur, daß sie nicht zu eng sind. Viel Spaß beim Häkeln!
27.05.2024 - 13:05
![]() Pia Sesterhenn wrote:
Pia Sesterhenn wrote:
Hallo liebes Drops Team, mmit den Vorderteilen komme ich leider gar nicht klar: die Zunahmen und Abnahmen werden gleichzeitig gemacht ??? Über eine Hilfestellung freue ich mich sehr, da ich die Jacke sehr originell finde. Herzlichen Dank.Viele Grüße Pia Sesterhenn
04.03.2019 - 21:38DROPS Design answered:
Liebe Frau Sesterhenn, ja genau, es wird am Anfang und am Ende jeder Reihe abgenommen - siehe ABNAHMETIPP 1- und gleichzeitg an jede Markierung zugenommen. Viel Spaß beim häkeln!
05.03.2019 - 12:02
![]() Engnath wrote:
Engnath wrote:
Ist die Maschenprobe zweifädig analog dem Garnvorschlag zu erstellen? Ich möchte die Jacke mit einem einfädig mit einem Farbverkaufsgarn probieren.
03.06.2018 - 11:18DROPS Design answered:
Liebe Frau Engnath, wenn Sie 2 Fäden Garngruppe A durch 1 Faden Garngruppe C ersetzen, dann sollen Sie die gleiche Maschenprobe haben - hier lesen Sie mehr über Garnalternativen. Viel Spaß beim häkeln!
04.06.2018 - 09:18Jess wrote:
Can you please clarify how many pieces are needed for the sleeves? If I crochet 1 piece for each sleeve and join that piece together with one side seam, that sleeve is too small to fit into the armhole. So should I be crocheting two sleeve pieces together to make one sleeve,(so 4 sleeve pieces in total?) The armhole is way too big to crochet if only one sleeve piece done.
20.06.2016 - 10:13DROPS Design answered:
Dear Jess, you have to crochet 2 sleeves - sleeve are worked back and forth, from cap of sleeves down to armhole then to wrist edge, then sewn tog around. You first inc for sleeve cap, then dec along "arm" it self. Happy crocheting!
20.06.2016 - 12:03
![]() Karin wrote:
Karin wrote:
Hallo, Ik heb het vest nu bijna af. Echter het lijf is wel heel anders uitgevallen alsop de foto, bij mijvalt het achter in twee wijde plooien over mijn rug. Ik heb de kleinste maat genomen, en toch valt het veel te wijd. Verandert dit zodra ik de mouwen aan zai misschien? Ook lijkt het alsof ik met het garen vooral de lichtpaarse kleur waar ik een rand van wil maken niet uitkom. Heel erg mooi patroon verder, maar zou jammer zijn als het niet goed zou vallen.
12.02.2016 - 13:45DROPS Design answered:
Hoi Karin. Het is helaas moeilijk voor mij om in te schatten op afstand. Maar kloppen de afmetingen wel zoals op de maattekening en de stekenverhouding?
10.03.2016 - 14:20
![]() Maritza wrote:
Maritza wrote:
Hello,i love your patterns,i am crocheting calypso drops 140-22,but I am confused how to start the left side,the large pattern said to count 27 sts from the side ,I marked the 41 sts top and bottom,but I do not understand from witch point I start to count the 27sts,thanks a lot
11.11.2015 - 01:48DROPS Design answered:
Dear Maritza, the left front piece is worked over 87 sts - insert 2 markers as follows: 27 sts, insert 1 marker, 33 sts, insert 1 marker, 27 sts = 87 sts. Happy crocheting!
11.11.2015 - 09:28
![]() Annie wrote:
Annie wrote:
Hallo Ook ik ben met dit vest bezig en ik moet nu de mouw innaaien maar de mouwkop in het vest is veeeel breder dan de mouwkop van de mouw . Dit past echt niet . De mouwkop van get vest is 36 cm ongeveer en due van de mouw 18
05.08.2015 - 08:08DROPS Design answered:
Hoi Annie. Nu weet ik niet welke maat je maakt, maar een mouwkop zal nooit precies dezelfde afmetingen hebben als het armsgat ivm de schuine randen. Het is wel - zoals altijd - heel belangrijk dat de stekenverhouding correct is, of dan kan de afmetingen verkeerd uitkomen.
05.08.2015 - 14:14
|
|
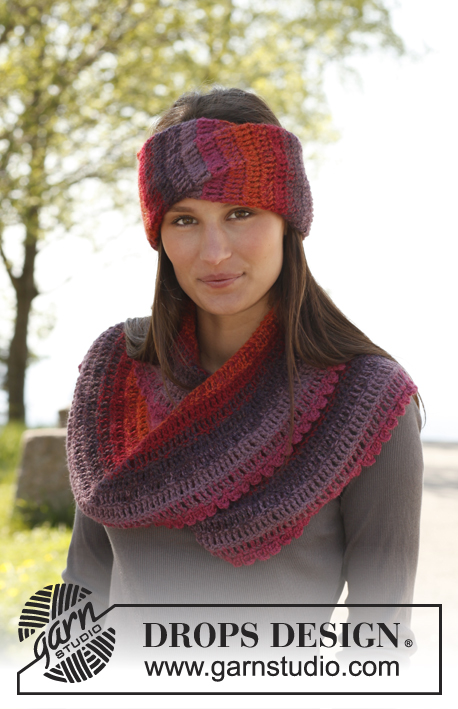
Calypso#calypsojacket |
|
 |
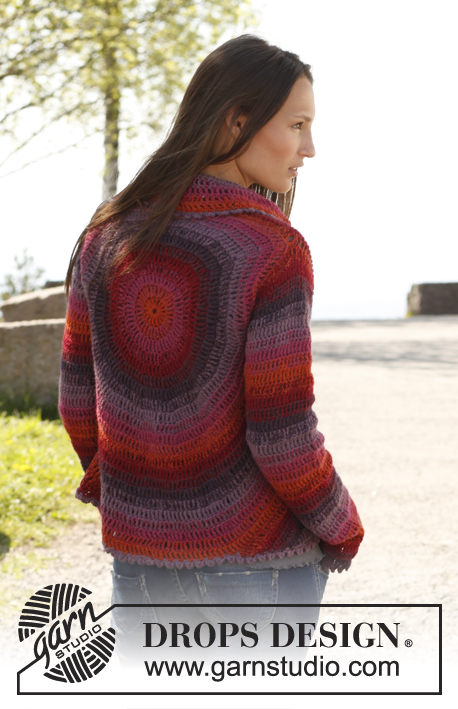 |
Crochet DROPS jacket worked in a circle in 2 threads "Alpaca". Size: S - XXXL.
DROPS 140-22 |
|
|
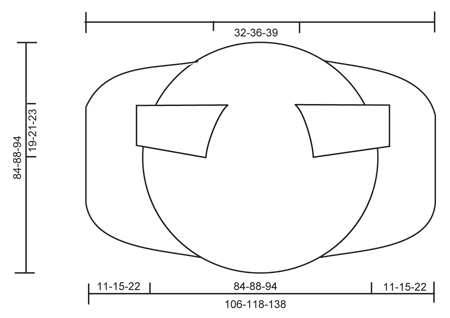
STRIPES: Work 1 round with every colour combination as follows: 2 threads 2925 1 thread 3770 + 1 thread 2925 2 threads 3770 1 thread 3770 + 1 thread 3900 2 threads 3900 1 thread 3900 + 1 thread 6736 2 threads 6736 1 thread 6736 + 1 thread 3800 2 threads 3800 1 thread 3800 + 1 thread 3770 Then work 1 round with every colour combination and repeat upwards as follows: 2 threads 3770 1 thread 3770 + 1 thread 2925 2 threads 2925 1 thread 2925 + 1 thread 3900 2 threads 3900 1 thread 3900 + 1 thread 6736 2 threads 6736 1 thread 6736 + 1 thread 3800 2 threads 3800 1 thread 3800 + 1 thread 3770 CROCHET TIP: Replace first dtr on every round/row with 4 ch. DECREASE TIP 1 (applies to body): Dec as follows: Work dtr until 3 dtr remain, * in the first of these work 1 tr, in the next 1 htr and in the last 1 dc, turn with 1 ch, skip dc, work 1 sl st in htr and 1 sl st in tr, then 1 dc in first dtr, 1 htr in next dtr and 1 tr in next dtr, work dtr until 3 dtr remain at end of row *, repeat from *-* until a total of 6-8-12 rows have been worked. DECREASE TIP 2 (applies to sleeve): Dec at beg of row by working sl sts over the no of dtr to be dec. Dec at end of row by working until same no of dtr to be dec remains, turn piece. -------------------------------------------------------- BODY: Worked in the round in a circle from mid back with 2 threads Alpaca and STRIPES – see explanation above. Crochet 8 ch on hook size 5 mm and form a ring with 1 sl st in first ch. ROUND 1: Work 16 dtr in ch-ring. READ CROCHET TIP! ROUND 2: 2 dtr in every dtr = 32 dtr. ROUND 3: * 1 dtr in next dtr, 2 dtr in next dtr *, repeat from *-* the entire round = 48 dtr. ROUND 4: * 1 dtr in each of next 2 dtr, 2 dtr in next dtr *, repeat from *-* the entire round = 64 dtr. ROUND 5: * 1 dtr in each of next 3 dtr, 2 dtr in next dtr *, repeat from *-* the entire round = 80 dtr. ROUND 6: * 1 dtr in each of next 4 dtr, 2 dtr in next dtr *, repeat from *-* the entire round = 96 dtr. ROUND 7: * 1 dtr in each of next 5 dtr, 2 dtr in next dtr *, repeat from *-* the entire round = 112 dtr. ROUND 8: * 1 dtr in each of next 6 dtr, 2 dtr in next dtr *, repeat from *-* the entire round = 128 dtr. ROUND 9: * 1 dtr in each of next 7 dtr, 2 dtr in next dtr *, repeat from *-* the entire round = 144 dtr. ROUND 10: * 1 dtr in each of next 8 dtr, 2 dtr in next dtr *, repeat from *-* the entire round = 160 dtr. ROUND 11: * 1 dtr in each of next 9 dtr, 2 dtr in next dtr *, repeat from *-* the entire round = 176 dtr. ROUND 12: Work 1 dtr in every dtr but work 2 dtr in every 16th dtr = 187 dtr. Piece now measures approx. 20 cm from centre and outwards. SIZE S/M: ROUND 13: 1 ch, then work 1 dc in each of the first 45 dtr (= up towards neck), work 30 loose ch, skip the next 27 dtr (= armhole), then work 1 dc in each of the next 88 dtr (= down towards back), work 30 loose ch, skip the next 27 dtr (= armhole) and fasten with 1 sl st in first dc on round. ROUND 14: Work 1 dtr in every dc - but inc 2 dtr evenly over the first 45 dc (= 47 dtr), then work 30 dtr in ch-row over armhole, work 1 dtr in every dc – but inc 3 dtr evenly over the bottom 88 dc (= 91 dtr), work 30 dtr in ch-row over armhole and fasten with 1 sl st in 4th ch = 198 dtr. ROUND 15 to 23: Continue with dtr – while at the same time inc 6 dtr evenly on every round. After 23rd round there are 252 dtr on the round and piece now measures approx. 42 cm from centre and outwards. Continue working only over 87 dtr in each side – i.e. do not work over 39 dtr at top by neck and 39 dtr at bottom of back. Cut the thread. Continue with explanation under left front piece. SIZE L/XL: ROUND 13: Work 1 dtr in every dtr but work 2 dtr in every 17th dtr = 198 dtr. ROUND 14: 1 ch, then work 1 dc in each of the first 50 dtr (= up towards neck), work 32 loose ch, skip the next 29 dtr (= armhole), then work 1 dc in each of the next 90 dtr (= down towards back), work 32 loose ch, skip the next 29 dtr (= armhole) and fasten with 1 sl st in first dc on round. ROUND 15: Work 1 dtr in every dc - but inc 3 dtr evenly over the first 50 dc (= 53 dtr), then work 32 dtr in ch-row over armhole, work 1 dtr in every dc – but inc 3 dtr evenly over the bottom 90 dc (= 93 dtr), work 32 dtr in ch-row over armhole and fasten with 1 sl st in 4th ch = 210 dtr. ROUND 16 to 24: Continue with dtr – while at the same time inc 6 dtr evenly on every round. After 24th round there are 264 dtr on the round and piece now measures approx. 44 cm from centre and outwards. Continue working only over 91 dtr in each side – i.e. do not work over 41 dtr at top by neck and 41 dtr at bottom of back. Cut the thread. Continue with explanation under left front piece. SIZE XXL/XXXL: ROUND 13: Work 1 dtr in every dtr but work 2 dtr in every 17th dtr = 198 dtr. ROUND 14: Work 1 dtr in every dtr but work 2 dtr in every 18th dtr = 209 dtr. ROUND 15: 1 ch, then work 1 dc in each of the first 54 dtr (= up towards neck), work 36 loose ch, skip the next 32 dtr (= armhole), then work 1 dc in each of the next 91 dtr (= down towards back), work 36 loose ch, skip the next 32 dtr (= armhole) and fasten with 1 sl st in first dc on round. ROUND 16: Work 1 dtr in every dc - but inc 2 dtr evenly over the first 54 dc (= 56 dtr), then work 36 dtr in ch-row over armhole, work 1 dtr in every dc – but inc 3 dtr evenly over the bottom 91 dc (= 94 dtr), and work 36 dtr in ch-row over armhole = 222 dtr. ROUND 17 to 26: Continue with dtr – while at the same time inc 6 dtr evenly on every round. After 26th round there are 282 dtr on the round and piece now measures approx. 47 cm from centre and outwards. Continue working only over 95 dtr in each side – i.e. do not work over 46 dtr at top by neck and 46 dtr at bottom of back. Continue with explanation under left front piece. LEFT FRONT PIECE - ALL SIZES: = 87-91-95 dtr. Insert a marker after 27-29-33 sts in from each side (= 33-33-29 sts between markers). Then work dtr back and forth over these sts while at the same time inc 1 st at every marker on every row (i.e. inc 2 sts on row, inc alternately before and after every marker) and dec 3 sts at beg and end of every row in each side - SEE DECREASE TIP 1 - until a total of 6-8-12 rows have been worked back and forth = 63-59-47 dtr. RIGHT FRONT PIECE: Work the same way as on left front piece over the 87-91-95 dtr in the right side. SLEEVE: Worked back and forth from sleeve cap and down with 2 threads Alpaca and STRIPES – see explanation above. Beg in the same colour as round 13-14-15 on body, continue with stripes as on body. Work 28-34-38 ch. Turn and work 1 dtr in 5th ch from hook ( = 2 dtr), then work 1 dtr in every ch = 25-31-35 dtr. ROW 2: Work 4 ch, 3 dtr in first dtr, 1 dtr in each of the next 23-29-33 dtr, 4 dtr in the last dtr = 31-37-41 dtr. Turn. ROW 3, 4 and 5: Work 4 ch, 2 dtr in first dtr, 1 dtr in every dtr until 1 dtr remains, 3 dtr in the last dtr = 43-49-53 dtr. Turn. ROW 6: Work 4 ch, 3 dtr in first dtr, 1 dtr in each of the next 41-47-51 dtr, 4 dtr in the last dtr = 49-55-59 dtr. Turn. Then work 1 dtr in every dtr, AT THE SAME TIME when piece measures 14 cm, dec 1 dtr in each side – SEE DECREASE TIP! Repeat dec every 7-5-5 cm 5-7-7 more times = 37-39-43 dtr. Continue with 1 dtr in every dtr until sleeve measures approx. 61-61-61 cm (same in all sizes because of broader shoulder width on body). Cut and fasten the thread. ASSEMBLY: Sew sleeve seams tog edge to edge to avoid a chunky seam. Work 1 picot edge around the entire body and at the bottom around the sleeves with 2 threads in the last colour used as follows: 1 sl st, * 5 ch, 1 tr in first ch, skip 1 st, fasten with 1 dc in next st *, repeat from *-* the entire round and finish with 1 sl st in first ch. Sew in the sleeves. |
|
 |
|
Have you finished this pattern?Tag your pictures with #dropspattern #calypsojacket or submit them to the #dropsfan gallery. Do you need help with this pattern?You'll find 8 tutorial videos, a Comments/Questions area and more by visiting the pattern on garnstudio.com. © 1982-2026 DROPS Design A/S. We reserve all rights. This document, including all its sub-sections, has copyrights. Read more about what you can do with our patterns at the bottom of each pattern on our site. |
|


With over 40 years in knitting and crochet design, DROPS Design offers one of the most extensive collections of free patterns on the internet - translated to 17 languages. As of today we count 324 catalogues and 12290 patterns translated into English (UK/cm). 12290
We work hard to bring you the best knitting and crochet have to offer, inspiration and advice as well as great quality yarns at incredible prices! Would you like to use our patterns for other than personal use? You can read what you are allowed to do in the Copyright text at the bottom of all our patterns. Happy crafting!
Post a comment to pattern DROPS 140-22
We would love to hear what you have to say about this pattern!
If you want to leave a question, please make sure you select the correct category in the form below, to speed up the answering process. Required fields are marked *.