
Popular categories
Looking for a yarn?


Comments / Questions (34)
![]() Mieke Schuller wrote:
Mieke Schuller wrote:
Sorrie, dit was een vraag:Nu ik de kantgebreide bovenkant af heb, zie ik dat het pand scheef loopt. Wat er aan een kant af gegaan is, is er aan de andere kant bijgekomen . Het helt nu naar links. Ik heb vanaf de boord en vanaf de goede kant als volgt begonnen A1 dus: Naald 1: 1 kantst.,2r sam., 1 omslag etc. Naald 2: hele naald recht . Naald 3: 1 kantst., 1 omslag, 1 st. recht afhalen, 1 st. recht, afgehaalde st. overhalen, etc. Naald 4: alles recht. Ik was al op 50 cm, wat ging mis?
18.02.2017 - 16:31DROPS Design answered:
Hoi Mieke. Het lijkt dat je hebt gemeerderd aan de ene kant, het is belangrijk dat je steeds de minderingen/omslagen op dezelfde manier doet - en dat je hetzelfde aantal st aanhoudt.
22.02.2017 - 12:25
![]() Mieke Schuller wrote:
Mieke Schuller wrote:
Nu ik de kantgebreide bovenkant af heb, zie ik dat het pand scheef loopt. Wat er aan een kant af gegaan is, is er aan de andere kant bijgekomen . Het helt nu naar links. Ik heb vanaf de boord en vanaf de goede kant als volgt begonnen A1 dus: Naald 1: 1 kantst.,2r sam., 1 omslag etc. Naald 2: hele naald recht . Naald 3: 1 kantst., 1 omslag, 1 st. recht afhalen, 1 st. recht, afgehaalde st. overhalen, etc. Naald 4: alles recht. Ik was al op 50 cm, wat ging mis?
16.02.2017 - 18:08
![]() Mieke Schuller wrote:
Mieke Schuller wrote:
Het lijkt of de omvang van maat S 127cm is. Met mijn omvang van 125 cm heb ik maat 48 en dus zeker geen S. Ik snap het dus niet.
23.01.2017 - 14:39Mieke Schuller wrote:
Dank voor uw reactie, maar dat is juist waar ik niet uitkom. De lengte is aan te passen, maar ik kom niet uit de omvang.
23.01.2017 - 14:28DROPS Design answered:
Hoi Mieke. Ik kan je helaas niet verder helpen met individuele aanpassingen op de gratis patronen. Je kan hiervoor vragen bij jouw DROPS verkooppunt
23.01.2017 - 14:31
![]() Marietta wrote:
Marietta wrote:
Es ist ganz toll geworden, ein richtiger "Seelenwärmer", perfekt für den Übergang oder an lauen Sommerabenden, einfach schnell über werfen.☺
12.06.2016 - 11:15
![]() Marietta wrote:
Marietta wrote:
Danach habe ich es nochmal mit der Air gestrickt. Dabei konnte ich die Maschenangaben so übernehmen. Es ist ganz weich, locker, leicht und luftig geworden. Ich habe für die größte Größe 250g gebraucht.
12.06.2016 - 11:13
![]() Marietta wrote:
Marietta wrote:
Hallo Drops Team, ich habe dieses Model mit der vorgeschlagenen Wolle Eskimo bereits gestrickt, da ich den Schnitt so interessant fand und ich war von dem Ergebnis total begeistert.
12.06.2016 - 11:10Dan wrote:
141-27 = 141-28
16.12.2013 - 20:53
![]() FERET wrote:
FERET wrote:
Je ne trouve pas le diagramme du modèle 141-28 pourriez vous m'aider SVP Merci
16.12.2013 - 17:57DROPS Design answered:
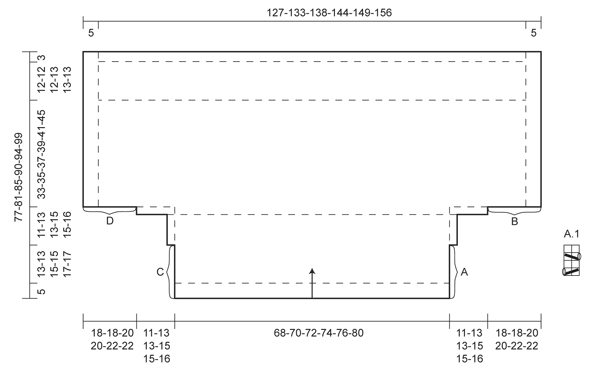
Bonjour Mme Feret, vous trouverez le diagramme A.1 à la fin des explications, en bas à droite du schéma des mesures. C'est un petit diagramme qui se tricote sur 2 m et 4 rangs. Bon tricot!
17.12.2013 - 08:51
![]() Beth O'Neill wrote:
Beth O'Neill wrote:
I don't understand the diagram for the pattern. Is it for 2 rows? Can someone write out the instructions for the pattern? I can't discern what the diagram means. does the following repeat each row: k2 tog, s1st as if to k, k1, psso* til end of row. OR is the pattern 2 rows: Row 1: k2 tog.* til end of row. Row 2: s1st as if to k, k1, psso* til end of row??? THere is a diagram for 1 yo between 2 sts, but I don't see where that goes in the pattern.
12.09.2013 - 07:38DROPS Design answered:
Dear Mrs O'Neill, in the diagram A.1, 1 square = 1 st x 1 row. Row1= *K2 tog,YO*, repeat from *-* on all sts. Row2: P all sts. Row3= *YO, Sl 1, K1, psso*, repeat from *-* on all sts. Row4= P all sts. Repeat these 4 rows upwards. Happy knitting!
12.09.2013 - 08:59
|
||||||||||||||||
Betsy#betsycardigan |
||||||||||||||||
 |
 |
|||||||||||||||
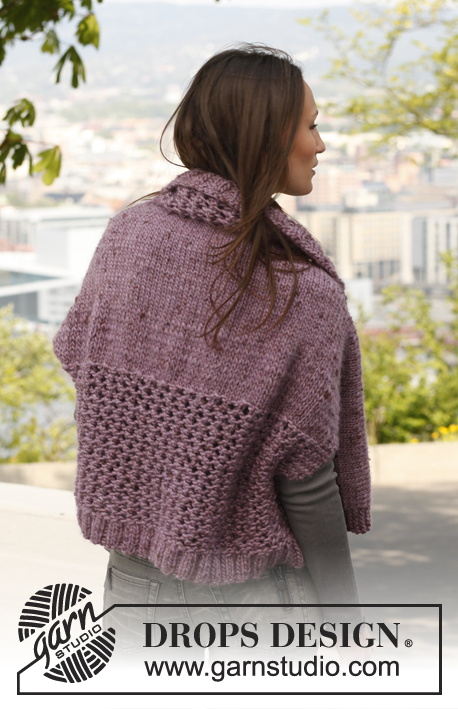
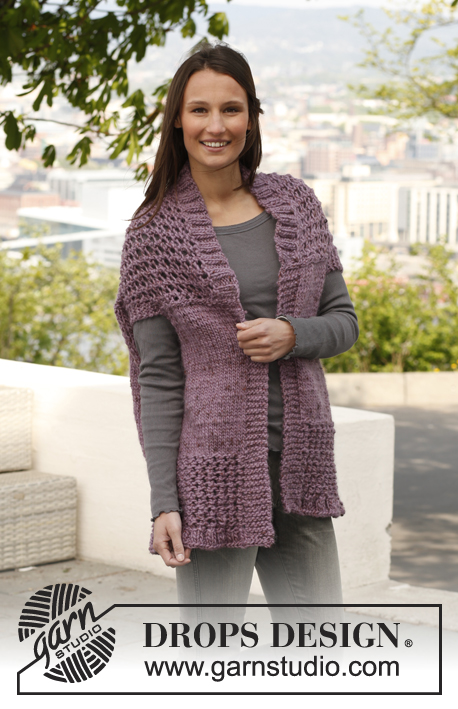
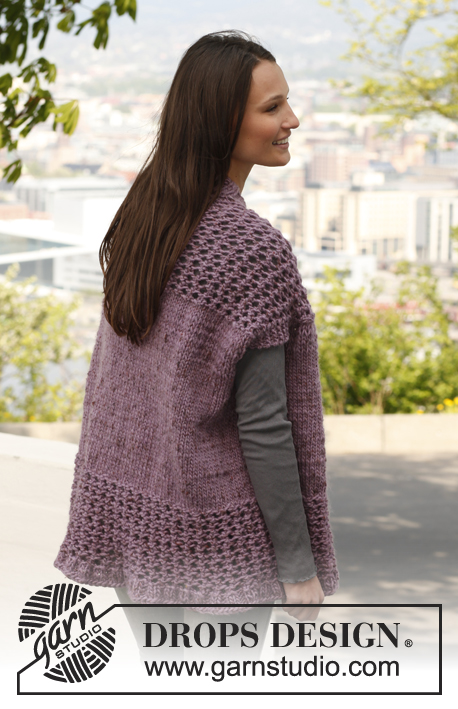
Knitted DROPS jacket with lace pattern in ”Snow”. Size: S - XXXL.
DROPS 141-28 |
||||||||||||||||
|
GARTER ST (back and forth on needle): K all rows. 1 ridge = 2 rows K. PATTERN: See diagram A.1, diagram shows 1 pattern repetition seen from RS. INCREASE TIP: Inc 1 st by making 1 YO. On next row work YO twisted (i.e. work in back loop of st instead of front) to avoid holes. -------------------------------------------------------- JACKET: Worked back and forth on needle in one. Start at the top of front piece and cast on for back piece afterwards. FRONT PIECE: Cast on 84-84-88-88-92-96 sts on circular needle size 8 mm with Snow. On 1st row (= RS) work rib as follows: 1 edge st in GARTER ST - see explanation above, * K 2, P 2 *, repeat from *-*, finish with K 2 and 1 edge st in garter st. Continue rib with 1 edge st in garter st in each side for 5 cm. On last row from WS, K while AT THE SAME TIME dec 16-14-16-14-16-16 sts evenly on row = 68-70-72-74-76-80 sts. On next row from RS work as follows: 1 edge st in garter st, work A.1 and finish with 1 edge st in garter st. REMEMBER THE KNITTING TENSION! Continue with pattern with 1 edge st in garter st in each side until piece measures 18-18-20-20-22-22 cm (last row = WS). At the end of the next 2 rows cast on 3 sts in each side = 74-76-78-80-82-86 sts - while AT THE SAME TIME continuing pattern over the middle 66-68-70-72-74-78 sts and work the outermost 4 sts (3 new sts + 1 edge st from earlier = sleeve edges) each side in garter st. When piece measures 26-28-30-32-33-35 cm, work last row from WS as follows: K over all sts - while AT THE SAME TIME inc 8 sts in all sizes - READ INCREASE TIP - evenly over the middle sts, (not over the outermost 4 sts in garter st) = 82-84-86-88-90-94 sts. At the end of the next 2 rows, cast on 9-11-11-13-13-15 sts in each side = 100-106-108-114-116-124 sts - AT THE SAME TIME work in stocking st over the middle sts. Continue in stocking st over the middle sts - but work the outermost 13-15-15-17-17-19 sts (= sleeve edge) in each side in garter st. Continue to work like this until piece measures 29-31-33-35-37-38 cm (last row = WS). At the end of the next 2 rows, cast on 20-20-22-22-24-24 sts in each side = 140-146-152-158-164-172 sts - AT THE SAME TIME work in stocking st over the middle sts. BACK PIECE: = 140-146-152-158-164-172 sts. Continue in stocking st over the middle sts but work the 6 sts in each side in garter st until finished measurements. When piece measures 62-66-70-74-78-83 cm, K over all sts on last row from WS - AT THE SAME TIME dec 20-20-20-20-20-22 sts evenly over the middle sts (not over the 6 sts in garter st in each side) = 120-126-132-138-144-150 sts remain. Then work A.1 - but continue the outermost 6 sts in garter st until finished measurements - until piece measures 74-78-82-87-91-96 cm. On last row from WS, K over all sts - while AT THE SAME TIME inc 22-24-26-28-30-32 sts evenly over the middle sts (not over the 6 sts in garter st in each side) = 142-150-158-166-174-182 sts. Then work rib on next row from RS as follows: 6 sts in garter st, * K 2, P 2 *, repeat from *-* until 8 sts remain, finish with K 2 and 6 sts in garter st. Continue rib with 6 sts in garter st in each side until piece measures 77-81-85-90-94-99 cm, loosely cast off all sts with K over K and P over P. ASSEMBLY: Sew edge A against edge B - see chart - in front loop of outermost st = side seam, the remaining opening is left armhole. Sew tog short sides on sleeve edge. Repeat the same way with edge C and edge D in the other side (= right side seam and armhole). |
||||||||||||||||
Diagram explanations |
||||||||||||||||
|
||||||||||||||||
 |
||||||||||||||||
Have you finished this pattern?Tag your pictures with #dropspattern #betsycardigan or submit them to the #dropsfan gallery. Do you need help with this pattern?You'll find 6 tutorial videos, a Comments/Questions area and more by visiting the pattern on garnstudio.com. © 1982-2026 DROPS Design A/S. We reserve all rights. This document, including all its sub-sections, has copyrights. Read more about what you can do with our patterns at the bottom of each pattern on our site. |
||||||||||||||||


With over 40 years in knitting and crochet design, DROPS Design offers one of the most extensive collections of free patterns on the internet - translated to 17 languages. As of today we count 325 catalogues and 12298 patterns translated into English (UK/cm). 12298
We work hard to bring you the best knitting and crochet have to offer, inspiration and advice as well as great quality yarns at incredible prices! Would you like to use our patterns for other than personal use? You can read what you are allowed to do in the Copyright text at the bottom of all our patterns. Happy crafting!
Post a comment to pattern DROPS 141-28
We would love to hear what you have to say about this pattern!
If you want to leave a question, please make sure you select the correct category in the form below, to speed up the answering process. Required fields are marked *.