
Popular categories
Looking for a yarn?


Comments / Questions (39)
![]() Susanne wrote:
Susanne wrote:
Hallo, ich habe diese Decke nach Anleitung gehäkelt und bin super happy, wie toll sie geworden ist. Sie sieht genau so aus wie auf dem angezeigten Bild. Ich fand die grannys sehr leicht zu häkeln. Eine große Herausforderung war definitv die richtige Anordnung der Farben beim Zusammenhäkeln. Aber auch das ist zu bewältigen. Ich habe viele Komplimente und neue Anfragen für die Decke bekommen. ;-) Vielen Dank für diese tolle Anleitung. Liebe Grüße, Susanne
14.12.2017 - 16:43
![]() Caro wrote:
Caro wrote:
Hallo! Ich habe die Quadrate gehäkelt und verstehe nicht,wie sie zusammengehäkelt werden sollen.Immer nur 2 Quadrate und dann die Fäden abschneiden oder eine Reihe hintereinander? Danke für eine Antwort.
21.11.2017 - 14:47DROPS Design answered:
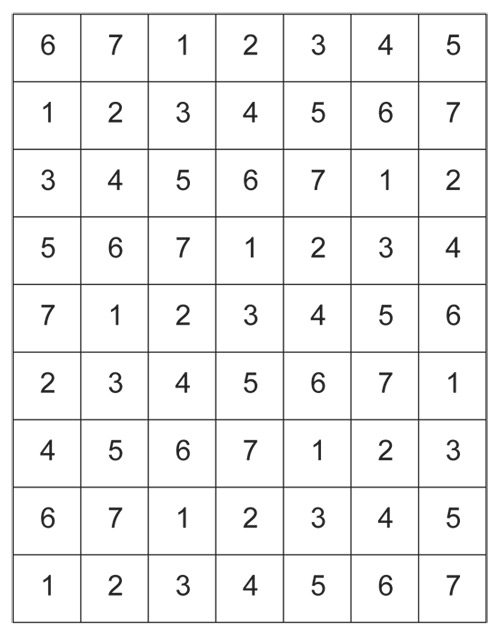
Liebe Caro, die Quadraten werden zuerst waagrecht zusammengehäkelt, dh Quadrate 1 (untere Reihe in der Skizze) mit Quadrate 6, dann Quadrate 2 mit Quadrate 7 usw bis letzte (= 7 und 5). Dann die 3. Reihe mit den 2. zshäkeln (Quadrate 6 und 4, dann 7 und 5...) usw bis alle Reihe zsgehäkelt sind. Dann senkrecht zshäkeln: Quadrate 1und2 (unten links) zshäkeln, dann 7 und 6 usw bis oben 7 und 6 und dann die 3. Reihe mit den 2. Reihe genauso zshäkeln. Ein Video dafür finden Sie hier. Viel Spaß beim zusammenhäkeln!
21.11.2017 - 16:26
![]() Birgit wrote:
Birgit wrote:
Bonjour, une petite question concernant l'assemblage des carrés, faut-il couper la laine à chaque fois, monter les carrés deux par deux pour faire une bande verticale, puis faire la même chose pour obtenir une bande horizontale et ensuite comment procéder pour assembler le tout ? Merci de votre réponse :)
23.02.2015 - 14:19DROPS Design answered:
Bonjour Birgit, on assemble les carrés 2 par 2 en bandes d'abord dans un sens (horizontal par ex soit les carrés 5 et 7 puis continuez avec les carrés 4 et puis les carrés 3 et 5 et ainsi de suite), puis assemblez les bandes en hauteur de la même façon (de droite à gauche: les carrés 7 et 6 puis 5 et 4, 3 et 2 etc). Bon crochet!
23.02.2015 - 17:16
![]() Leona wrote:
Leona wrote:
Hej! Jag ska snart virka ihop rutorna. Då de ska virkas ihop på längden först så innebär det att man fäster trådar efter varje två rutor som virkas ihop? Blir bättre sen då man virkar ihop längderna, då blir det bara efter varje remsa. Tänker jag rätt? (har varit underbart rolig att virka)
06.02.2015 - 10:04DROPS Design answered:
Hej Leona, det kanske går att virka hela längden ihop 2 och 2, men blir det för svårt så måste du fästa trådar efter varje. Lycka till!
09.02.2015 - 10:51
![]() Elke wrote:
Elke wrote:
Ein Diagramm wäre wirklich sehr hilfreich.
21.09.2014 - 21:17
![]() Penny wrote:
Penny wrote:
Were you telling the French person that the majority didn't like diagrams? I have decided against downloading this pattern because there is no diagram. Beginners tend to be scared of diagrams, but then they realise their mistake. Please give us a diagram. It enables an overview of the project.
07.09.2014 - 22:27
![]() Jomi wrote:
Jomi wrote:
Please, peut-on avoir un diagramme, bien plus simple que ces loooongues explications? beaucoup de crocheteuses ne travaillent qu'avec les diagrammes! merci d'en tenir compte ,bien amicalement..jomi
21.10.2013 - 19:11DROPS Design answered:
Bonjour Jomi, nous avons opté pour des explications écrites car l'expérience montre qu'au niveau international, c'est ce type d'explications qui convient à la majorité. De plus en plus de diagrammes sont, dans la mesure du possible, ajoutés, en plus des explications écrites. Bon crochet!
22.10.2013 - 11:27
![]() Marlene wrote:
Marlene wrote:
Virkade klart pläden för en vecka sedan och jag är så nöjd, vilken härlig färgkombination!!! :-)
15.12.2012 - 23:49
![]() Margreet wrote:
Margreet wrote:
Haaknaald 4,5 zoals aangegeven in het patroon blijkt (in mijn geval) wel heel erg dun om deze wol mee te verwerken. Ik kom uiteindelijk uit op naald nummer 6 en daarmee is één vierkantje krap 15 x 15 cm.
23.06.2012 - 11:05DROPS Design answered:
Iedereen haakt verschillend, dus kom je uit op 15x15 met een nld 6 - dan moet u dat gebruiken. Maar was ook het proeflapje - dan bent u zeker van de correcte stekenverhouding.
25.06.2012 - 13:28
![]() Carmen wrote:
Carmen wrote:
Unos tonos preciosos, muy acertados.
18.02.2012 - 13:40
|
||||||||||||||||||||||
Romantic Memories#romanticmemoriesblanket |
||||||||||||||||||||||
 |
 |
|||||||||||||||||||||
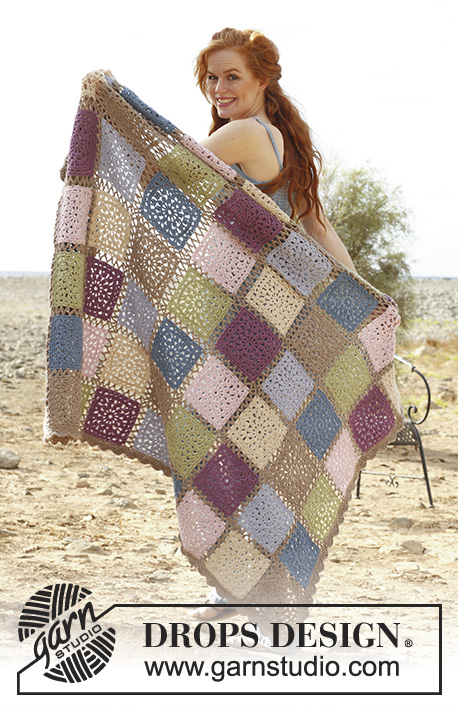
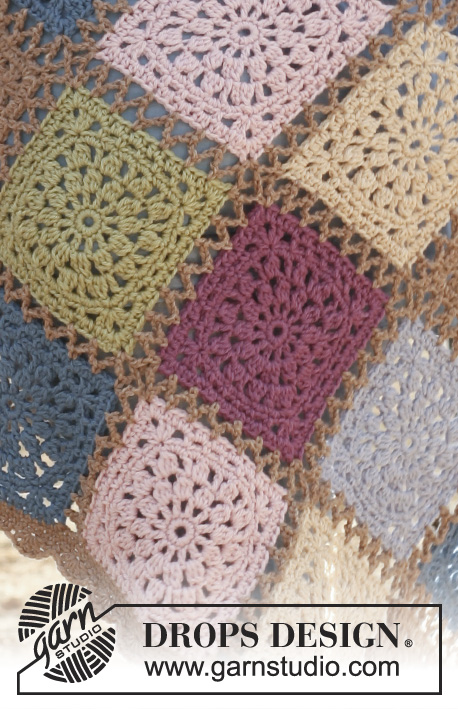
Crochet DROPS blanket with squares in ”Lima”.
DROPS 138-32 |
||||||||||||||||||||||
|
CROCHET INFO: Replace first tr with 3 ch and finish round with 1 sl st in 3rd ch from beg of round. BOBBLE START: Work 3 ch, work 1 tr – but wait with last pull through (= 2 sts on hook), work 1 tr the same way in the same st, pull thread through all 3 sts on hook = 1st bobble on round. BOBBLE: Work 1 tr – but wait with last pull through (= 2 sts on hook), work 2 tr the same way in the same st, pull thread through all 4 sts on hook. ATTERN: SQUARE 1 = beige SQUARE 2 = grey blue SQUARE 3 = pistachio SQUARE 4 = powder pink SQUARE 5 = heather SQUARE 6 = light beige SQUARE 7 = ice blue Place squares as shown on fig. 1 (squares are displaced 2 squares to the right on every row). ---------------------------------------------------------- BLANKET: Work 9 squares with every colour = 63 squares in total. SQUARE: Worked in the round. Work 6 ch on hook size 4.5 mm with Lima and form a ring with 1 sl st in first ch. ROUND 1: 1 ch, 12 dc in ch-ring, finish with 1 sl st in first dc. ROUND 2: 4 ch (= 1st tr + 1 ch), * 1 tr in next dc, 1 ch *, repeat from *-* the entire round - Read CROCHET INFO above, finish with 1 sl st in 3rd ch from beg of round = 12 tr and 12 ch-loops. ROUND 3: Sl st until 1st ch-loop and work BOBBLE START - Read explanation above, * 3 ch, 1 BOBBLE - Read explanation above - in next ch-loop *, repeat from *-* 11 times, finish with 3 ch, 1 sl st at the top of 1st bobble from beg of round = 12 bobbles and 12 ch-loops. ROUND 4: Sl st until 1st ch-loop and work BOBBLE START, * 2 ch, 1 tr in next BOBBLE, 2 ch, 1 BOBBLE in next ch-loop *, repeat from *-* 11 times, finish with 2 ch, 1 tr in next bobble, 2 ch, 1 sl st in 1st bobble from beg of round = 12 bobbles, 12 tr and 24 ch-loops. ROUND 5: Sl st until 1st ch-loop and work 1 ch, 3 dc in same ch-loop, then work 3 dc in every ch-loop, finish with 1 sl st in first dc = 72 dc. ROUND 6: Work as follows in 1st dc: 3 ch, 1 tr, 2 ch, 2 tr = 1st corner, * work [2 ch, skip 2 dc, 1 dc in next dc] a total of 5 times, 2 ch, skip 2 dc, in next dc work as follows: 2 tr, 2 ch, 2 tr = next corner *, repeat from *-* the entire round. When repeating from *-* the last time, do not work 2 tr, 2 ch and 2 tr but work 1 sl st in 3rd ch from beg of round = 20 dc and 28 ch-loops. ROUND 7: Sl st until 1st ch-loop, work [1 ch, 1 htr, 2 ch, 2 htr] in same ch-loop (= 1st corner), * 1 htr in the next 2 tr, work 2 htr in each of the next 6 ch-loops, 1 htr in the next 2 tr, [2 htr, 2 ch, 2 htr] in ch-loop in next corner *. Repeat from *-* the entire round. When repeating from *-* the last time, do not work [2 tr, 2 ch, 2 tr] but work 1 sl st in the first of the ch sts in the middle of first corner at beg of round, cut and fasten the thread. Work 9 squares with every colour = 63 squares in total. ASSEMBLY: Work squares tog alongside and then across. Place the squares with 7 squares in breadth and 9 rows in height - see fig. 1 and read PATTERN above. Place 2 and 2 squares on top of each other WS against WS, and crochet them tog with beige as follows: Work 1 dc in ch-loop in the corner on 1st square, 3 ch, 1 dc in ch-loop in the corner on 2nd square, * 3 ch, skip 2 htr on 1st square, 1 dc in next htr on 1st square, 3 ch, skip 2 htr on 2nd square, 1 dc in next htr on 2nd square *, repeat from *-*, finish with 3 ch, 1 dc in ch-loop in the corner on 1st square, 3 ch, 1 dc in ch-loop in the corner on 2nd square. NOTE: Make sure that the transitions between every square are pretty when the squares are worked tog alongside. CROCHET EDGE: Work an edge around the entire blanket as follows: Work with beige 1 dc in every htr and 2 dc in every transition between every square. NOTE: In ch-loop in each corner work as follows: 1 dc, 2 ch, 1 dc. On next round work 1 dc in every dc, in every ch-loop in the corner work 1 dc, 2 ch and 1 dc. Work 1 more round the same way = 3 rounds with dc. Work next round as follows: 1 dc in 1st dc, * skip 2 dc, in next dc work 5 tr with 1 ch between each tr, skip 2 dc, 1 dc in next dc *, repeat from *-* the entire round, cut and fasten the thread. |
||||||||||||||||||||||
Diagram explanations |
||||||||||||||||||||||
|
||||||||||||||||||||||
 |
||||||||||||||||||||||
Have you finished this pattern?Tag your pictures with #dropspattern #romanticmemoriesblanket or submit them to the #dropsfan gallery. Do you need help with this pattern?You'll find 9 tutorial videos, a Comments/Questions area and more by visiting the pattern on garnstudio.com. © 1982-2026 DROPS Design A/S. We reserve all rights. This document, including all its sub-sections, has copyrights. Read more about what you can do with our patterns at the bottom of each pattern on our site. |
||||||||||||||||||||||


With over 40 years in knitting and crochet design, DROPS Design offers one of the most extensive collections of free patterns on the internet - translated to 17 languages. As of today we count 324 catalogues and 12290 patterns translated into English (UK/cm). 12290
We work hard to bring you the best knitting and crochet have to offer, inspiration and advice as well as great quality yarns at incredible prices! Would you like to use our patterns for other than personal use? You can read what you are allowed to do in the Copyright text at the bottom of all our patterns. Happy crafting!
Post a comment to pattern DROPS 138-32
We would love to hear what you have to say about this pattern!
If you want to leave a question, please make sure you select the correct category in the form below, to speed up the answering process. Required fields are marked *.