
Popular categories
Looking for a yarn?


Comments / Questions (53)
![]() Brigitte wrote:
Brigitte wrote:
Bei dem Modell Montecarlo verstehe ich in der Anleitung nicht, wie ich die Passe beginnen soll. Muss ich z. B. mit einer 2. Nadel fortsetzen? Außer den abgeketteten Armausschnitten sind doch noch alle Maschen auf der Nadel? Würde mich sehr über eine Antwort freuen! Mit freundlichen Grüßen Brigitte G.
14.10.2025 - 14:47DROPS Design answered:
Liebe Brigitte, ja, es sind noch alle Maschen auf der Nadel. Sie schneiden nach dem Abketten für die Armausschnitte den Faden ab und setzen wie in der Anleitung beschrieben neu an, Sie heben also so viele Maschen ab, bis Sie zu der in der Anleitung genannten Stelle gelangen. Dann stricken Sie über alle Maschen und schlagen dazwischen noch neue Maschen für die Ärmel an. Gutes Gelingen!
21.10.2025 - 22:48
![]() Irmgard Dürer wrote:
Irmgard Dürer wrote:
Hallo liebes Drops Team Ich stricke den pulli Montecarlo. Ich bin jetzt im letzten Abschnitt bei der HALSKANTE ,und zwar ab DANACH KRAUSRIPPEN VON DER HINTEREN MITTE HER hin und zurück stricken. Wie ist das gemeint und wieviele maschen ? Lg.Irmgard
29.07.2022 - 20:15DROPS Design answered:
Liebe Irmgard, In der hinteren Mitte befindet sich eine Markierung. Jetzt müssen Sie je nach Größe die vordere Mitte markieren (ohne vorher die Maschen zu arbeiten). Ab der hinteren Mitte arbeiten und gleichzeitig je nach Größe Maschen abnehmen. Ab der hinteren Mitte kraus rechts hin und zurück weiterstricken.
31.07.2022 - 19:37
![]() Irmgard Dürer wrote:
Irmgard Dürer wrote:
Liebes drops Team Ich stricke grad an dem pulli Montecarlo Modell Nr. W-405 /drops 128-27 . Beim Oberteil wird beschrieben das man nach 41 cm wieder maschen aufnehmen soll.Nun meine frage sollen es 41 cm ab Muster 1 oder ab Muster 2 ? MfG I.Dürer
04.07.2022 - 21:53DROPS Design answered:
Liebe Frau Dürer, die 17 cm (für die Abnahmen) sowie die 41 cm (für die Zunahmen) werden beide von der Anschlagskante gemessen. Viel Spaß beim stricken!
05.07.2022 - 09:05
![]() Carmen wrote:
Carmen wrote:
Guten tag beim muster M.2 geht mir das zopfmuster nicht auf, 3 m zopfmuster 1 m. zopfmuster 2 m. und 3 m. zopfmuster und den rapport wiederholen, aber am schluss bleiben nicht 2 maschen übrig was mache ich falsch
08.07.2019 - 15:31DROPS Design answered:
Liebe Carmen, seien Sie sicher, Ihre Maschenanzahl stimmt, M.2 wird über 10 Maschen wiederholt, setzen Sie Markierungen zwischen jedem M.2, so können Sie am besten die Maschenanzahl prüfen. Viel Spaß beim stricken!
08.07.2019 - 16:25
![]() Carmen wrote:
Carmen wrote:
Guten tag ich verstehe m. 2 diagramm nicht wo ist der rapport und wie weiter, und das mit den zopfnadeln 1m. Auf einer zopfnadel vor/hinder 1re., 1 re. / 2 re., 1 re von der zopfnadel usw.
21.06.2019 - 06:55DROPS Design answered:
Liebe Carmen, M.2 besteht aus die 10 Maschen gezeigt im Diagram, diese 10 Maschen wiederholen Sie in der Breite = Diagram zeigt 2 Rapporte. Das 7. und 8. Symbol sind kleine Zöpfe, die über 2 Maschen gestrickt sind, dieses Video zeigt, wie mann diese Zöpfe auch ohne Zopfnadel stricken kann. Viel Spaß beim stricken!
21.06.2019 - 07:06
![]() Laura wrote:
Laura wrote:
Hi there, I am getting really confused by the neckline elevation instructions. Where the pattern says "Work until 16-17-18-19-20-21 sts remain before marker mid front, turn piece, tighten thread and work back until 16-17-18-19-20-21 sts remain before marker in the other side." There are 2 markers in the piece now. Does that mean that I should do this between the markers, on one side of the piece, then knit around and repeat on the other side of the piece? Many thanks.
28.07.2018 - 12:05DROPS Design answered:
Dear Laura, yes correct, you first work from mid back until 16-17-18-19-20-21sts remain before mid front, turn and work next row until 16-17-18-19-20-21 sts remain before mid front (= on the other side), then turn and work until 32-34-36-38-40-42 sts remain before mid front, turn and work until32-34-36-38-40-42 sts remain before mid front. Work 2 more short rows (until 48-51-54-57-60-63 sts remain before mid front at the end of these both row), then work one more row to mid back (= beg of round). Happy knitting!
31.07.2018 - 08:57
![]() Ermanna Piras wrote:
Ermanna Piras wrote:
SCOLLATURA : inserire segnapunti dopo 60 m. SIGNIFICA CHE LE PRIME 60 MAGLIE LE FACCIO A DIRITTO E DOPO METTO SEGNAPUNTI? Lavorare a diritto un giro: QUALE È L\'INIZIO DEL GIRO? IL SEGNAPUNTI? Cosa si intende nelle righe successive con \"lavorare avanti e indietro\"? German short rows?queste righe di istruzioni non sono per nulla chiare Grazie
05.07.2018 - 13:06DROPS Design answered:
Buongiorno Ermanna. Sulla scollatura, l'inizio del giro rimane sempre al centro sul dietro. Quando trova l'indicazione di lavorare avanti e indietro, deve lavorare un'alzata sul dietro come spiegato nelle righe successive, nel testo. Buon lavoro!
05.07.2018 - 13:37
![]() Carolyne Wernet wrote:
Carolyne Wernet wrote:
Und nach den Kraus rechts wo werden die 6 Maschen auf beiden Seiten abgenommen
07.05.2018 - 09:57DROPS Design answered:
Liebe Frau Wernet, es sind 6 M vor jedem Markierer + 6 M nach jedem Markierer = 12 M auf beiden Seiten. Viel Spaß beim stricken!
07.05.2018 - 10:49
![]() Carolyne Wernet wrote:
Carolyne Wernet wrote:
Wo beginnen die 8maschen jeweils auf beiden Seiten \\\\\\\\r\\\\\\\\nÜber den Maschenmakierer hinaus oder vorne dran
06.05.2018 - 22:49DROPS Design answered:
Liebe Frau Wernet, nach 44 cm stricken Sie die 16 M (= 8 M vor jedem Markierer + 8 M nach jedem Markierer) kraus rechts (= 1 Rd li, 1 Rd re, 1 Rd li). Viel Spaß beim stricken!
07.05.2018 - 09:39
![]() Ermanna Piras wrote:
Ermanna Piras wrote:
Per favore cosa significa "fare attenzione alla tensione del lavoro" quando si cambia il numero di ferri,da 4 a 5? Ha qualche significato particolare? Grazie
16.04.2018 - 14:14DROPS Design answered:
Buongiorno Ermanna. E' un'indicazione che viene data in tutti i modelli e che invita a verificare che la tensione rimanga la stessa per tutto il lavoro, così da essere sicuri di ottenere il capo della misura necessaria. Buon lavoro!
16.04.2018 - 14:21
|
||||||||||||||||||||||||||||
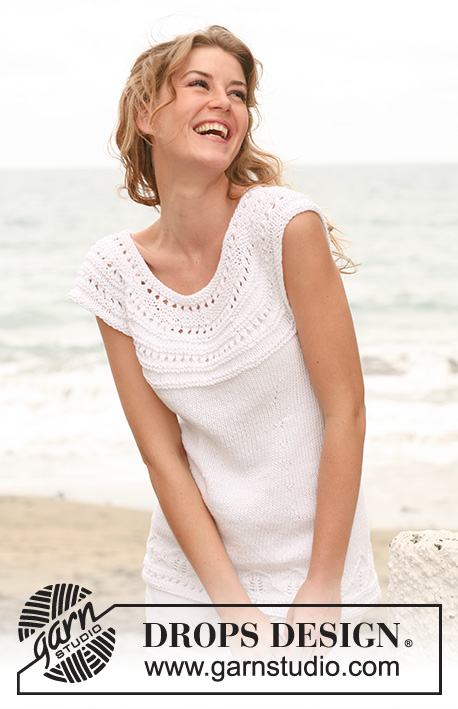
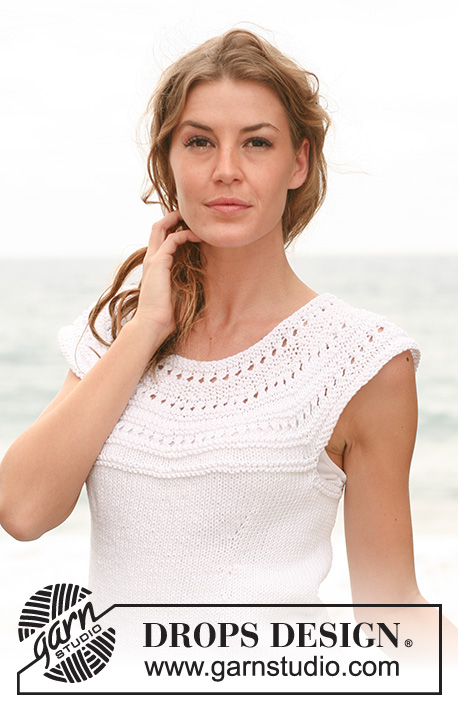
Montecarlo#montecarlotop |
||||||||||||||||||||||||||||
 |
 |
|||||||||||||||||||||||||||
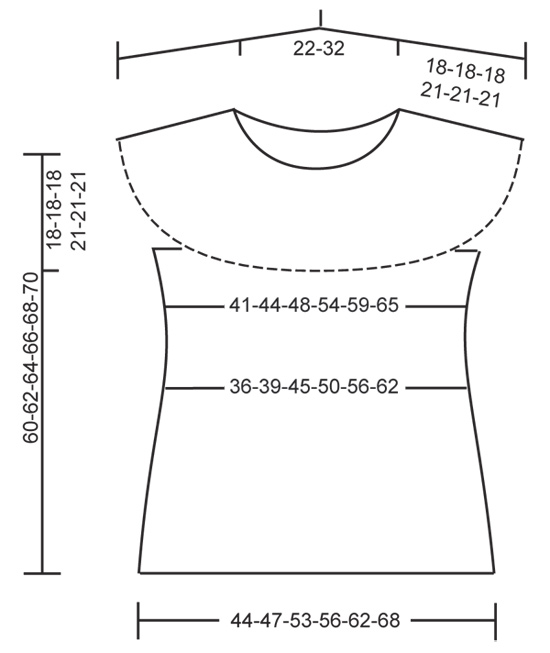
Knitted DROPS top with lace pattern and round yoke in "Paris". Size: S - XXXL.
DROPS 128-27 |
||||||||||||||||||||||||||||
|
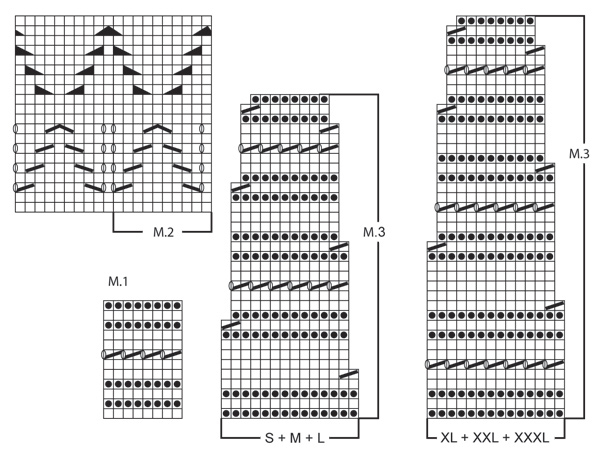
GARTER ST (back and forth on needle): K all rows. PATTERN: See diagram M.1 to M.3. The diagram shows the pattern from RS. DECREASE TIP (applies to waist on body): Dec as follows 2 sts before marker: K 2 tog. Dec as follows after marker: Slip 1 st as if to K, K 1, psso. INCREASE TIP: Inc 1 st by picking up a st from previous row, K this st. -------------------------------------------------------- TOP: Worked in the round on circular needle. Cast on 150-160-180-190-210-230 sts on circular needle size 4 mm with Paris. Work M.1. After M.1, work M.2 (1 repetition = 10 sts). After M.2 switch to circular needle size 5 mm and continue in stocking st and on 1st round insert 4 markers in the piece as follows: Work 17-19-23-25-30-34 sts, insert marker 1, work 41-42-44-45-45-47 sts, insert marker 2, work 34-38-46-50-60-68 sts, insert marker 3, work 41-42-44-45-45-47 sts, insert marker 4 and work the remaining sts = 17-19-23-25-30-34 sts. Move the markers upwards when working. REMEMBER THE KNITTING TENSION! When piece measures 15-16-16-17-17-17 cm, dec 1 st after marker 1 and 3 and before marker 2 and 4 - READ DECREASE TIP- (= 4 sts dec). Repeat dec every 3-3-3½-5-5½-6 cm a total of 7-7-7-5-5-5 times = 122-132-152-170-190-210 sts. When piece measures 36-37-40-41-43-45 cm, inc 1 st after marker 1 and 3 and before marker 2 and 4 - READ INCREASE TIP - (= 4 sts inc). Repeat inc every other round a total of 4-4-3-3-3-3 times = 138-148-164-182-202-222 sts. Now remove the 4 markers and insert 2 new markers as follows: Insert a marker at beg of round and a marker after 69-74-82-91-101-111 sts (= mid of each side). When piece measures 40-42-44-43-45-47 cm, P 1 round, K 1 round and P 1 round over the middle 14-14-16-18-22-22 sts in each side (i.e. over 7-7-8-9-11-11 sts on each side of both markers). NOTE! Work the remaining sts in stocking st as before. Then cast off the middle 10-10-12-14-18-18 sts in each side for armholes (i.e. 5-5-6-7-9-9 sts on each side of both markers) = 59-64-70-77-83-93 sts remain on front and back piece. Cut the thread. YOKE: Beg mid back of body (in Sizes S + XL + XXL + XXXL beg with the middle st and in sizes M + L beg with the 2nd of the 2 middle sts). Work on circular needle size 5 mm as follows: K 30-32-35-39-42-47 sts, cast on 46-48-56-56-57-61 new sts (= over one sleeve), K the 59-64-70-77-83-93 sts on front piece, cast on 46-48-56-56-57-61 new sts (= over the other sleeve) and work the remaining 29-32-35-38-41-46 sts = 210-224-252-266-280-308 sts. Continue to work M.3 (1 repetition = 14 sts). NOTE! See diagram for size! When M.3 has been worked vertically, 120-128-144-152-160-176 sts remain on needle. NECKLINE: Switch to circular needle size 4 mm. Insert a marker after 60-64-72-76-80-88 sts (= mid front). K 1 round while AT THE SAME TIME dec 18-18-26-26-26-34 sts evenly = 102-110-118-126-134-142 sts (NOTE! Dec the same no of sts on each side of marker and mid back). P 1 round. Continue in GARTER ST - see explanation above - back and forth on needle from mid back while AT THE SAME TIME working an elevation in the back of neck as follows (start from RS): Work until 16-17-18-19-20-21 sts remain before marker mid front, turn piece, tighten thread and work back until 16-17-18-19-20-21 sts remain before marker in the other side. Turn piece, tighten thread and work until 32-34-36-38-40-42 sts remain before marker, turn piece, tighten thread and work back until 32-34-36-38-40-42 sts remain before marker in the other side. Turn piece, tighten thread and work until 48-51-54-57-60-63 sts remain before marker, turn piece, tighten thread and work back until 48-51-54-57-60-63 sts remain before marker in the other side. Turn piece, tighten thread and K until beg of round (= mid back). Now work M.1 in the round but start on 3rd round in the diagram. When M.1 has been worked vertically, loosely cast off with K over all sts. |
||||||||||||||||||||||||||||
Diagram explanations |
||||||||||||||||||||||||||||
|
||||||||||||||||||||||||||||
 |
||||||||||||||||||||||||||||
 |
||||||||||||||||||||||||||||
Have you finished this pattern?Tag your pictures with #dropspattern #montecarlotop or submit them to the #dropsfan gallery. Do you need help with this pattern?You'll find 19 tutorial videos, a Comments/Questions area and more by visiting the pattern on garnstudio.com. © 1982-2026 DROPS Design A/S. We reserve all rights. This document, including all its sub-sections, has copyrights. Read more about what you can do with our patterns at the bottom of each pattern on our site. |
||||||||||||||||||||||||||||


With over 40 years in knitting and crochet design, DROPS Design offers one of the most extensive collections of free patterns on the internet - translated to 17 languages. As of today we count 324 catalogues and 12290 patterns translated into English (UK/cm). 12290
We work hard to bring you the best knitting and crochet have to offer, inspiration and advice as well as great quality yarns at incredible prices! Would you like to use our patterns for other than personal use? You can read what you are allowed to do in the Copyright text at the bottom of all our patterns. Happy crafting!
Post a comment to pattern DROPS 128-27
We would love to hear what you have to say about this pattern!
If you want to leave a question, please make sure you select the correct category in the form below, to speed up the answering process. Required fields are marked *.