
Popular categories
Looking for a yarn?


Comments / Questions (40)
![]() Annette wrote:
Annette wrote:
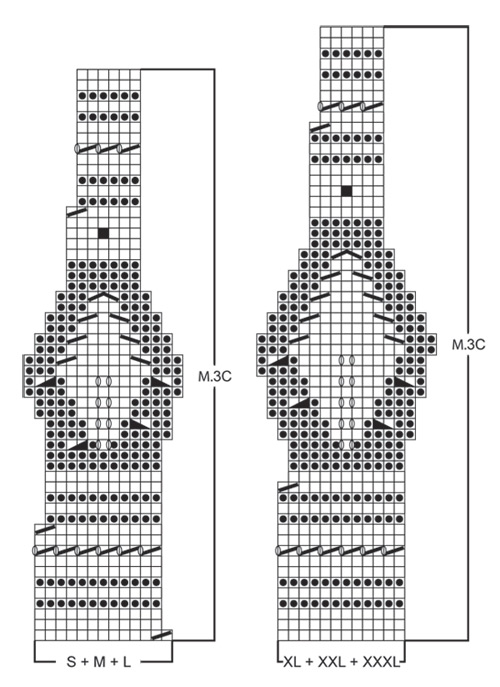
Synes ikke mønster 3C er særlig godt beskrevet om hvor mange masker, der skal strikkes mellem mønstrene og om det skal være glatstr. eller omvendt glatstr. Jeg tror jeg har regnet mig frem til det ved at se på forstørrelsen af billedet. Er der mulighed for at få nærmere oplysninger om dette?
07.01.2013 - 16:46DROPS Design answered:
Efter M.3B har du f.eks 299 m paa pinden (str S). Du skal da strikke 6 forkantm, M.3C til der 7 m tilbage paa p, 1 rapport af M.3C (förste raekke) er 13 m dvs 22 gentagelser af M.3C. Du slutter af med at strikke den förste (=1 m) af M.3C igen og 6 forkantm. Strik videre paa denne maade. Du skal IKKE strikke nogle masker i mellem mönstret.
17.01.2013 - 11:59
![]() Lena Maria wrote:
Lena Maria wrote:
Forferdelig irriterende å oppdage at mønsteret jeg kjøpte ikke stemmer med bildet. Nå er jeg halvveis med jakken og orker ikke rekke opp for å strikke etter korrigert mønster! Neste gang studerer jeg mønsteret bedre før jeg kjøper garn og går igang. Skulle nesten fått tilbud om å bytte inn garnet i noe annet, en jakke med 4-hulls mønster blir mye løsere i fasong enn en med 1-hulls!
30.08.2012 - 16:28
![]() CREVEL wrote:
CREVEL wrote:
Bonjour, Dans le modèle 127 13, je ne comprends pas ou positionner le marqueur (au début du tour = milieu sous la manche)et faire augmentations des manches.celà veut -il dire que toutes mes augmentations se feront uniquement à droite du travail?Pouvez-vous,SVP,me venir en aide? Mille merci à vous.
19.08.2012 - 17:25DROPS Design answered:
Bonjour Crevel, quand on tricote en rond, on place un marqueur pour repérer le début du tour, entre la dernière maille montée et la 1ère maille, juste à la jointure. On va ensuite augmenter 1 m de chaque côté de ce marqueur = 1 m avant et 1 m après le marqueur = 2 augmentations au milieu sous la manche. Bon tricot !
21.08.2012 - 10:11
![]() Lene wrote:
Lene wrote:
Det drejer sig om bære stykket, hvor jeg har alt for mange masker - 301- i stf. 196.Har kigget på "rettelser" men der står kun en ændring i hulmønstret.
28.02.2012 - 14:21DROPS Design answered:
Hej Lene, Jo du tager ind hver gang du strikker M3.A+B+C ifølge diagrammet (du har 31 rapporter i XXL) God fornøjelse!
28.02.2012 - 14:31
![]() DROPS Design wrote:
DROPS Design wrote:
Diagrammet er nå rettet på.
28.04.2011 - 14:14
![]() Signe wrote:
Signe wrote:
Det ser ikke ut til å være samsvar mellom mønsteret på nederste del av jakken og det som er angitt i mønster. Mønster 2 a og b. På bildet har den enkle hull, men når det strikkes etter mønsteret blir det grupper på 4 hull.
01.04.2011 - 08:10
![]() Tove Lindfjord wrote:
Tove Lindfjord wrote:
Veldig pen
31.01.2011 - 12:30
![]() Carole wrote:
Carole wrote:
This is a beautiful sweater with wonderful details. I love alpaca
31.01.2011 - 03:37
![]() Natalie wrote:
Natalie wrote:
So interesting and beautiful!
29.01.2011 - 03:31
![]() Lucy wrote:
Lucy wrote:
Z-544 is the best model!!! can't waite to make this one! Thanks a lot!!!
24.01.2011 - 11:32
|
||||||||||||||||||||||||||||
Prairie Song#prairiesongcardigan |
||||||||||||||||||||||||||||
 |
 |
|||||||||||||||||||||||||||
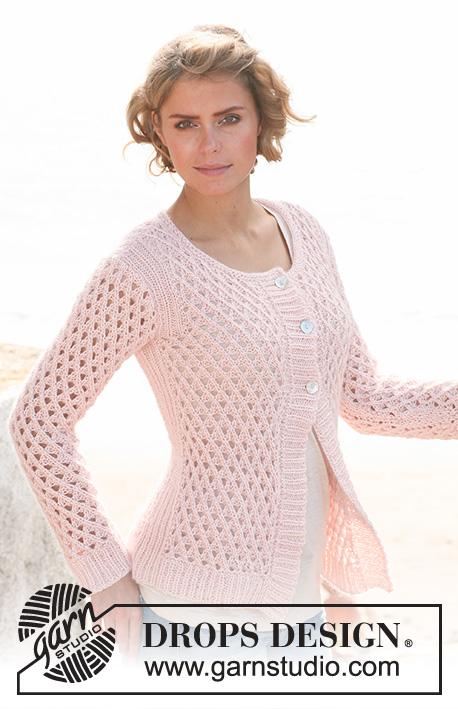
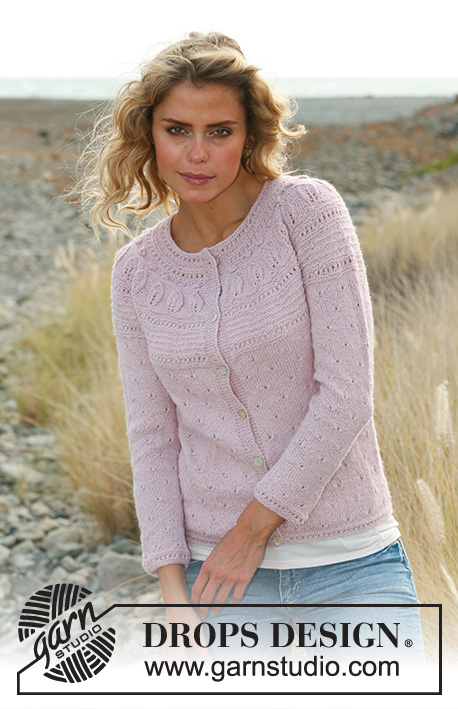
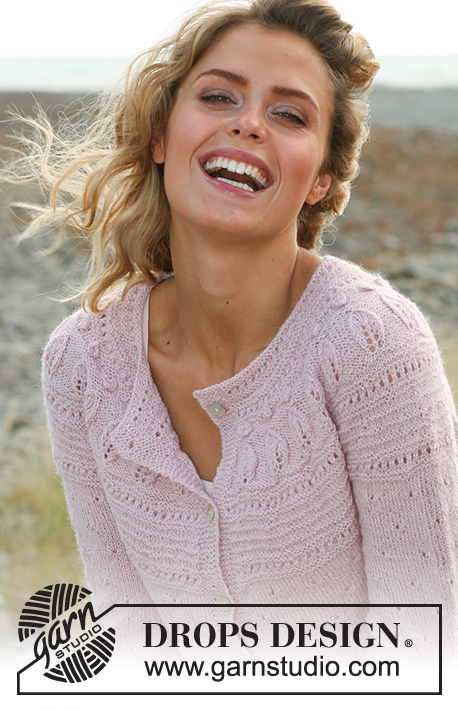
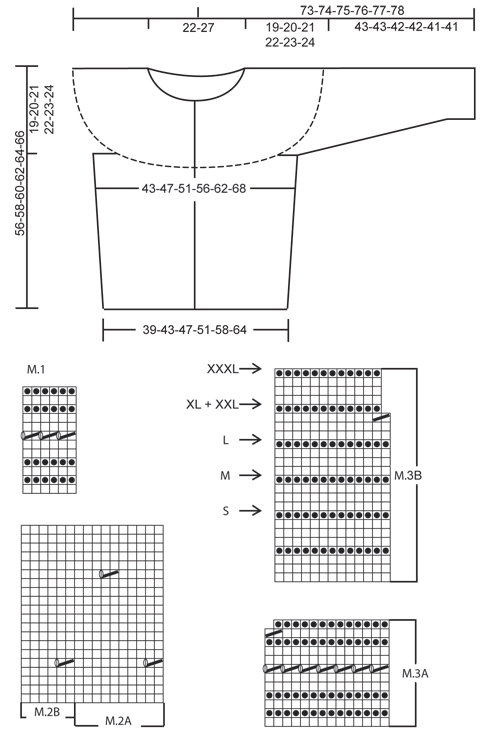
Knitted DROPS jacket with lace pattern and round yoke in "Alpaca". Size: S - XXXL.
DROPS 127-13 |
||||||||||||||||||||||||||||
|
GARTER ST (back and forth on needle): K all rows. PATTERN: See diagram M.1 to M.3. The diagram shows the pattern from RS. NOTE! See diagram M.3C for size! BUTTON HOLES: Cast off for button holes on right front band. 1 BUTTON HOLE = cast off 4th st from edge. On next row cast on 1 new st over the cast off st. Cast off for button holes when piece measures: SIZE S: 2, 11, 19, 28, 36, 45 and 54 cm SIZE M: 2, 11, 20, 29, 38, 47 and 56 cm SIZE L: 2, 10, 18, 26, 34, 42, 50 and 58 cm SIZE XL: 2, 10, 18, 27, 35, 43, 51 and 60 cm SIZE XXL: 2, 11, 19, 28, 36, 45, 53 and 62 cm SIZE XXXL:2, 11, 20, 29, 38, 47, 56 and 64 cm I.e. approx. 2 cm remain until finished measurements after last button hole. -------------------------------------------------------- JACKET: Worked back and forth on circular needle from mid front. Cast on 199-219-239-259-289-319 sts (incl 6 band sts each side towards mid front) on circular needle 2.5 mm with Alpaca. Work first row from RS as follows: 6 band sts in GARTER ST - see explanation above, repeat M.1 and finish with 6 band sts in GARTER ST. Continue the pattern like this - NOTE: On 7th row in M.1 K last st before band. REMEMBER BUTTON HOLES ON BAND - see explanation above. After M.1 switch to circular needle size 3 mm and work next row from RS as follows: 6 band sts as before, 1 st in stocking st, M.2A until 12 sts remain, finish with M.2B (= 6 sts) and 6 band sts as before. Continue the pattern like this. REMEMBER THE KNITTING TENSION! Insert 2 markers in the piece after 53-58-63-68-75-83 sts each side = 93-103-113-123-139-153 sts between markers on back piece. When piece measures 8-8-9-9-10-10 cm, inc 1 st each side of both markers (= 4 sts inc). Repeat the inc every 6 cm a total of 5 times = 219-239-259-279-309-339 sts - NOTE: Work inc sts in stocking st until they can be worked in pattern each side. When piece measures approx. 37-38-39-40-41-42 cm - adjust so that next row is worked from RS and so that 3 or 5 rows in stocking st are worked after 1 row with lace pattern - cast off 10-10-10-12-12-12 sts each side for armholes (i.e. 5-5-5-6-6-6 sts both sides of markers) = 93-103-113-121-137-151 sts on back piece and 53-58-63-67-74-82 sts on each front piece. Put piece aside and knit the sleeves. SLEEVE: Cast on 56-56-58-60-62-64 sts on double pointed needles size 2.5 mm with Alpaca. Work M.1. Insert a marker at beg of round (= mid under sleeve). After M.1 switch to double pointed needles size 3 mm and work next round as follows: 0-0-1-2-3-4 sts in stocking st, M.2A until 6-6-7-8-9-10 sts remain, finish with M.2B (= 6 sts) and 0-0-1-2-3-4 sts in stocking st. Continue like this. When piece measures 8-9-8-9-7-12 cm, inc 2 sts mid under sleeve. Repeat inc every 3½-2½-2½-2-2-1½ cm a total of 10-13-14-16-17-18 times = 76-82-86-92-96-100 sts - NOTE: Work inc sts in stocking st until they can be worked in pattern. When piece measures approx. 43-43-42-42-41-41 cm (NOTE! Shorter measurements in the larger sizes because of longer sleeve cap and broader shoulder width) - adjust so that same no of rounds in stocking st have been worked after 1 round with lace pattern as on body - cast off 10-10-10-12-12-12 sts mid under sleeve (i.e. 5-5-5-6-6-6 sts each side of marker) = 66-72-76-80-84-88 sts. Slip sts on a stitch holder and knit another sleeve. YOKE: Slip sleeves on to same circular needle as body where armholes were cast off = 331-363-391-415-453-491 sts. Work 1-1-1-1-1-3 rows in stocking st (1st row = P from WS and work bands in garter st as before until finished measurements) while AT THE SAME TIME dec 10-14-14-10-6-2 sts evenly (do not dec over bands) = 321-349-377-405-447-489 sts. Work next row from RS as follows: 6 band sts, M.3A over the next 308-336-364-392-434-476 sts (1 repetition = 14 sts), finish with first st in M.3A and 6 band sts. Continue the pattern like this. NOTE: On 7th row in M.3A K last st before band. After M.3A, 299-325-351-377-416-455 sts remain on needle. Now work M.3B with 6 band sts each side - finish with row before arrow in your size (i.e. finish after K 1 row from WS). After M.3B, 299-325-351-349-385-421 sts remain on needle. Work next row from RS as follows - see diagram for correct size: 6 band sts, M.3C until 7 sts remain (1 repetition = 13-13-13-12-12-12 sts), finish with first st in M.3C and 6 band sts - NOTE: On the rows that start with K 2 tog at beg of 1 repetition, K last st before band. Continue the pattern like this. After M.3C, 145-157-169-181-199-217 sts remain on needle. NECKLINE: Switch to circular needle 2.5 and work M.1 with 6 band sts each side (on 7th row K last st before band) - AT THE SAME TIME on 1st row dec 26-34-42-50-64-76 sts evenly (do not dec over bands) = 119-123-127-131-135-141 sts. After M.1 loosely cast off with K from RS. ASSEMBLY: Sew the openings under the sleeves. Sew on buttons. |
||||||||||||||||||||||||||||
Diagram explanations |
||||||||||||||||||||||||||||
|
||||||||||||||||||||||||||||
 |
||||||||||||||||||||||||||||
 |
||||||||||||||||||||||||||||
Have you finished this pattern?Tag your pictures with #dropspattern #prairiesongcardigan or submit them to the #dropsfan gallery. Do you need help with this pattern?You'll find 22 tutorial videos, a Comments/Questions area and more by visiting the pattern on garnstudio.com. © 1982-2026 DROPS Design A/S. We reserve all rights. This document, including all its sub-sections, has copyrights. Read more about what you can do with our patterns at the bottom of each pattern on our site. |
||||||||||||||||||||||||||||


With over 40 years in knitting and crochet design, DROPS Design offers one of the most extensive collections of free patterns on the internet - translated to 17 languages. As of today we count 324 catalogues and 12290 patterns translated into English (UK/cm). 12290
We work hard to bring you the best knitting and crochet have to offer, inspiration and advice as well as great quality yarns at incredible prices! Would you like to use our patterns for other than personal use? You can read what you are allowed to do in the Copyright text at the bottom of all our patterns. Happy crafting!
Post a comment to pattern DROPS 127-13
We would love to hear what you have to say about this pattern!
If you want to leave a question, please make sure you select the correct category in the form below, to speed up the answering process. Required fields are marked *.