
Popular categories
Looking for a yarn?


Comments / Questions (84)
![]() Jacqueline Noordzij wrote:
Jacqueline Noordzij wrote:
Hallo, Een geweldig patroon! Kan ik van dit patroon een trui maken? Zo ja, hoe moet ik dat dan doen?
13.01.2022 - 21:58DROPS Design answered:
Dag Jacqueline,
Je zou dan de bies weg moeten laten en het bovenste deel van het voorpand kun je dan in zijn geheel heen en weer breien. Naderhand neem je steken op rondom de hals met een rondbreinaald om de hals te breien. Helaas is het voor ons niet mogelijk om patronen aan te passen naar persoonlijke wensen, maar misschien heb je wat aan deze tips.
16.01.2022 - 14:51
![]() RD wrote:
RD wrote:
Hallo, könnte man die Jacke auch ohne „Keile“ stricken? und diese dann möglicherweise weglassen? Worauf müsste ich dann achten?
07.01.2020 - 00:52DROPS Design answered:
Liebe Frau RD, ich misverstehe leider was Sie mit "Keile" meinen, können Sie bitte erklären?
07.01.2020 - 09:08
![]() Sabine Simma wrote:
Sabine Simma wrote:
Hallo liebes Drops-Team,\\\\\\\\r\\\\\\\\nIch stricke diese Jacke in Größe M. Figur 1 und 2 habe ich fertig gestellt. Nun meine Frage: wird die Jacke mit gesamt 5 oder 7 Keilen gestrickt? Kommt direkt nach Figur 1 der zweite Keil oder erst nach 11 cm
19.10.2018 - 21:31DROPS Design answered:
Liebe Frau Simma, Für den Rückenteil stricken Sie 11 cm (Größe M) Krausrippen über die Maschen vom li. Vorderteil, dann 1 Keil stricken, wieder über alle Maschen stricken, und nach 22 cm noch einen Keil stricken, und endlich noch 22 cm über alle Maschen stricken = beim Rückenteil stricken Sie 2 Zeilen - bei jedes Vorderteil stricken Sie auch je 2 Zeilen. Viel Spaß beim stricken!
22.10.2018 - 08:04
![]() Andrea wrote:
Andrea wrote:
Hallo, beim Stricken der Quadrate steht in der Mitte ein Boppel hoch, es liegt nicht glatt. Liegt es evtl. daran, dass ich glatt rechts gestrickt habe? Ich mg nicht so gerne krause Rippe. Oder was ist sonst falsch? LG und vielen Dank Andrea
04.04.2018 - 18:57DROPS Design answered:
Liebe Andrea, es kann schon sein, dieses Video zeigt, wie man das Quadrat strickt, und wie es am Ende aussieht. Viel spaß beim stricken!
05.04.2018 - 08:31
![]() Monica wrote:
Monica wrote:
Buongiorno, chiedo conferma che la parte superiore delle maniche (quella con gli aumenti) si lavori a m.rasata rovescia e non a legaccio. Nella prima parte delle istruzioni è indicato solo il p. legaccio. Grazie saluti
07.05.2017 - 07:43DROPS Design answered:
Buongiorno Monica. Sì è corretto, la parte superiore della manica viene lavorata a maglia rasata rovescia. Quindi sul diritto del lavoro, lavora a rovescio e sul rovescio del lavoro, lavora a diritto. Buon lavoro!
07.05.2017 - 08:38
![]() Monica wrote:
Monica wrote:
Buongiorno, sono un po' in difficoltà con la lavorazione del filato, infatti con i ferri 3 il risultato della lavorazione è bellissimo, ma 24 maglie mi corrispondono a 9 cm; con i ferri 3,5 ottengo 10 cm per 24 maglie ma la lavorazione risulta molto leggera e non rende l'effetto dei colori sfumati. Potrei risolvere con una taglia più grande del capo lavorata con i ferri nr.3 ? grazie
21.03.2017 - 09:57DROPS Design answered:
Buongiorno Monica, per un risultato ottimale dovrebbe raggiungere le misure del campione indicato; se non le piace il risultato finale, può provare a lavorare una taglia più grande, misurando sempre il lavoro in corso d'opera. Buon lavoro!
21.03.2017 - 10:10
![]() Esther Meijburg wrote:
Esther Meijburg wrote:
Inmiddels ben ik met het breien van dit leuke vest begonnen. Het valt mij op dat bij de beschrijving van de spie bij de maten S en M er tussen de korte naalden (de naalden waarbij je niet alle steken breit) geen hele naalden gebreid moeten worden, terwijl dat bij alle andere maten wel het geval is. Dit betekent dat er aan de bovenkant maar 6 naalden gebreid zijn (dus minder ribbels) dan bij de andere maten (bij maat L en XL wel 14 naalden). Klopt dit wel?
11.03.2014 - 14:17DROPS Design answered:
Hoi Esther. Ja, dat klopt.
11.03.2014 - 16:42
![]() Janne wrote:
Janne wrote:
Vdr. vendestrik så har jeg læst et og andet sted, at hvis man på vende pinden slår om inden den strikkes tilbage så undgår man hullet. Omslaget strikkes sammen med den næste maske, når alle masker skal stikkes.
25.02.2014 - 11:46
![]() Esther Meijburg wrote:
Esther Meijburg wrote:
Ik wil dit patroon graag breien, maar weet nog niet of ik M of L moet breien. Waarom wordt bij maat L boven de vierkantjes en in het rugpand gemeerderd en bij maat (S en) M niet? Ik zou maat M kunnen breien, maar ik ben bang dat het qua bovenwijdte te krap wordt, terwijl maat L over het geheel genomen waarschijnlijk wat te groot (en lomp) wordt. Wat adviseert u mij? Ik wil graag beginnen, want het is een geweldig leuk patroon!!!
23.02.2014 - 21:08DROPS Design answered:
Hoi Esther. Ik kan je helaas niet helpen met de maat. De afmetingen onderaan kan je vergelijken met je eigen afmetingen en dan beslissen welke maat je denkt het beste zal passen. Er wordt gemeerderd in L en niet S/M omdat deze maat groter moet worden...
06.03.2014 - 17:10
![]() Beate wrote:
Beate wrote:
Warum ist hat der Keil in Größe L+XL weniger Reihen als in Größe S+M? Das kommt mir komisch vor. Fehlt da irgendetwas in der Anleitung?
01.11.2012 - 23:35DROPS Design answered:
Liebe Beate, Sie haben völlig Recht: es ist beim Übersetzen ein Fehler passiert. Wir haben das jetzt korrigiert.
04.11.2012 - 10:16
|
|
Forest Emeralds#forestemeraldscardigan |
|
 |
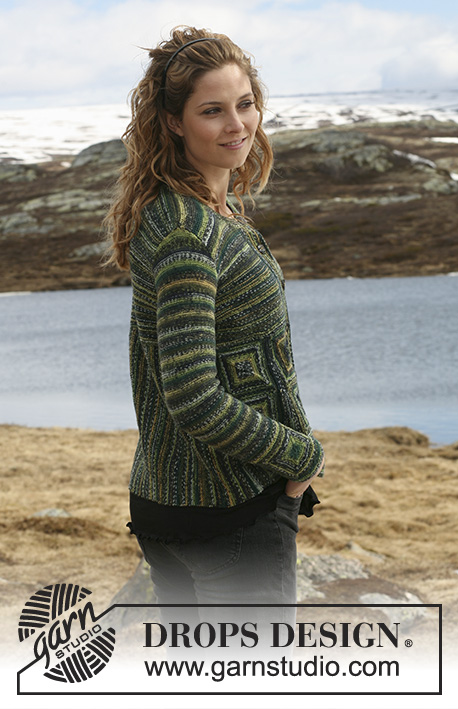 |
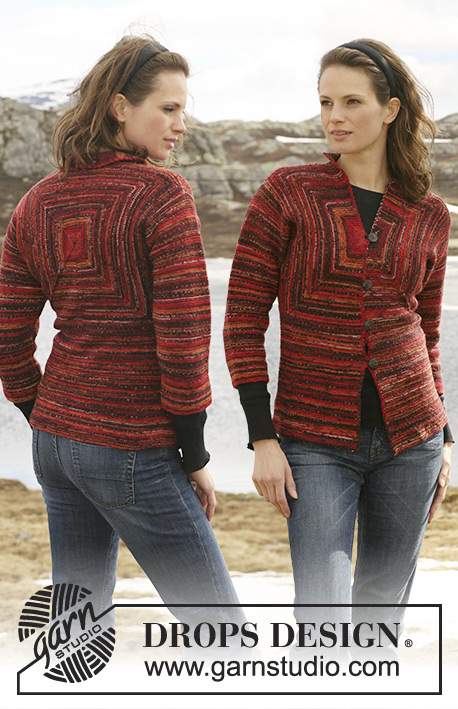
DROPS jacket with squares in ”Fabel”. Size S – XXXL.
DROPS 114-1 |
|
|
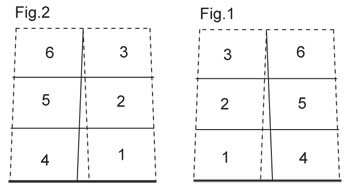
GARTER ST (in the round): K 1 round, P 1 round. GARTER ST (back and forth on needle): K all rows. SQUARE: Cast on 8 sts on double pointed needles size 3 mm with Fabel. Distribute sts on 4 needles with 2 sts per needle. Insert a marker in the first, 3rd, 5th and 7th st. K st with marker on every round and work remaining sts in GARTER ST – see above. Continue in the round, AT THE SAME TIME inc 1 st on each side of each st with marker (= 8 inc per round) on every other round. Inc by making 1 YO and work YO into back of loop on next round to avoid a hole. Continue like this until there are 96-104-104-112-112-120 sts on round = 24-26-26-28-28-30 sts per needle. 1 square measures approx 10-11-11-12-12-13 x 10-11-11-12-12-13 cm. KNITTING TIP: When turning mid piece, tighten thread before working return row to ensure a smooth transition. -------------------------------------------------------- LEFT FRONT PIECE: See Fig.1. Square 1: Work SQUARE – see above. REMEMBER THE KNITTING TENSION! Cast off the first 24-26-26-28-28-30 sts (= from first to 2nd marker), slip the next 24-26-26-28-28-30 sts (= from 2nd to 3rd marker) on a stitch holder, cast off the next 24-26-26-28-28-30 sts (= from 3rd to 4th marker) and slip the last 24-26-26-28-28-30 sts (= from 4th to first marker) on another stitch holder. Square 2: Like Square 1. Square 3: Work SQUARE. Cast off the first 24-26-26-28-28-30 sts, slip the next 24-26-26-28-28-30 sts on a stitch holder, slip the next 24-26-26-28-28-30 sts on another stitch holder and the last 24-26-26-28-28-30 sts on yet another stitch holder. Square 4: Work SQUARE. Cast off the first 24-26-26-28-28-30 sts, slip the next 24-26-26-28-28-30 sts on a stitch holder, cast off the next 24-26-26-28-28-30 sts and cast off the last 24-26-26-28-28-30 sts Square 5: Like SQUARE 4. Square 6: Work SQUARE. Cast off the first 24-26-26-28-28-30 sts, slip the next 24-26-26-28-28-30 sts on a stitch holder, slip the next 24-26-26-28-28-30 sts on another stitch holder and cast off the last 24-26-26-28-28-30 sts. Place the first 3 squares as shown in Fig.1. The dotted lines mark sts on stitch holders, the solid lines mark cast off sts. Sew tog Square 1 and 2, edge to edge with neat sts. Sew tog Square 2 and 3 in the same way. Slip sts from stitch holders on the one side of squares (= sts towards square 4, 5 and 6 and the side of jacket) on the same needle = 72-78-78-84-84-90 sts. Now work gusset as follows – see KNITTING TIP!: Row 1 = RS, from bottom edge and up. Work gusset in garter st. SIZE S + M: Work all sts, turn piece and work return row. Work 60-64 sts, turn piece and work return row. Work 48-50 sts, turn piece and work return row. Work 36 sts, turn piece and work return row. Work 22 sts, turn piece and work return row. Work all sts, turn piece and work return row. Work 36 sts, turn piece and work return row. Work 48-50 sts, turn piece and work return row. Work 60-64 sts, turn piece and work return row. Work all sts, turn piece and work return row. Cast off. SIZE L + XL: Work all sts, turn piece and work return row. Work 60-64 sts, turn piece and work return row. Work all sts, turn piece and work return row. Work 42-44 sts, turn piece and work return row. Work all sts, turn piece and work return row. Work 24 sts, turn piece and work return row. Work all sts, turn piece and work return row. Work 24 sts, turn piece and work return row. Work all sts, turn piece and work return row. Work 42-44 sts, turn piece and work return row. Work all sts, turn piece and work return row. Work 60-64 sts, turn piece and work return row. Work all sts, turn piece and work return row. Cast off. SIZE XXL + XXXL: Work all sts, turn piece and work return row. Work 70-74 sts, turn piece and work return row. Work all sts, turn piece and work return row. Work 56-58 sts, turn piece and work return row. Work all sts, turn piece and work return row. Work 42 sts, turn piece and work return row. Work all sts, turn piece and work return row. Work all sts, turn piece and work return row. Work 28 sts, turn piece and work return row. Work all sts, turn piece and work return row. Work all sts, turn piece and work return row. Work 42 sts, turn piece and work return row. Work all sts, turn piece and work return row. Work 56-58 sts, turn piece and work return row. Work all sts, turn piece and work return row. Work 70-74 sts, turn piece and work return row. Work all sts, turn piece and work return row. Cast off. Sew tog Square 4 and 5, edge to edge with neat sts. Sew tog Square 5 and 6 in the same way = 1 row with 3 squares. See Fig.1. The one long side has sts on stitch holders (= towards the side) and the other side cast off sts (= towards square 1, 2 and 3). Sew the side with cast off sts to gusset, edge to edge with neat sts. Slip sts from stitch holders along the other side of the 3 squares on the same needle = 72-78-78-84-84-90 sts. Now work Gusset as described above. Slip all sts on a stitch holder. RIGHT FRONT PIECE: See Fig.2 and work like left front piece. Cast off all sts after the last gusset. BACK PIECE, bottom part: Slip sts from stitch holder at the side of left front piece back on needle. Insert a marker in piece, and now measure piece from here. Work garter st back and forth on needle on all sts until piece measures 10-11-11-12-12-13 cm from marker. Now work Gusset as described above. After gusset insert a new marker, and continue back and forth on all sts in garter st. When piece measures 20-22-22-24-24-26 cm from the new marker work Gusset as described above. After gusset insert a new marker, and back and forth on all sts in garter st. When piece measures 10-11-11-12-12-13 cm from the last marker cast off. Sew cast off row to cast off row on gusset on right front piece, edge to edge with neat sts. FRONT AND BACK PIECE, upper part: Worked back and forth from mid front in garter st. Beg on right front piece towards mid front (i.e. at the top right hand corner of Square 3 – see Fig.2). Row 1 = RS. SIZE S + M: Slip the 24-26 sts from stitch holder back on needle, pick up 3 sts over gusset, then slip the next 24-26 sts (from square 6 in Fig.2) back on needle, pick up 3 sts over gusset and insert a marker in the middle of these 3 sts (= the side). Pick up 102-110 sts along back piece, then pick up 3 sts over gusset at the other side and insert a marker in the middle of these 3 sts (= the side). Now slip the 24-26 sts from stitch holder on square 6 on left front piece (see Fig.1) back on needle, then pick up 3 sts over gusset and slip the last 24-26 sts from stitch holder towards mid front on left front piece (square 3 in Fig.1) back on needle = 210-226 sts. Insert a marker, and measure piece from here. Continue back and forth on all sts in garter st. When piece measures 11 cm from marker cast off 7 sts each side for armhole (i.e. 3 sts each side of st with marker + st with marker) = 196-212 sts. Now complete each piece separately. SIZE L + XL + XXL + XXXL: Slip the 26-28-28-30 sts from stitch holder back on needle, pick up 6-6-10-10 sts over gusset, then slip the next 26-28-28-30 (from square 6 in Fig.2) back on needle, pick up 6-6-10-10 sts over gusset and insert a marker in the middle of these 6-6-10-10 sts (= the side). Pick up 116-124-132-140 sts along back piece, then pick up 6-6-10-10 sts over gusset at the other side and insert a marker in the middle of these 6-6-10-10 sts (= the side). Now slip the 26-28-28-30 sts from stitch holder on square 6 on left front piece (see Fig.1) back on needle, then pick up 6-6-10-10 sts over gusset and slip the last 26-28-28-30 sts from stitch holder towards mid front on left front piece (square 3 in Fig.1) back on needle = 244-260-284-300 sts. Insert a marker, and measure piece from here. Continue back and forth on all sts in garter st, AT THE SAME TIME on first row inc 4-8-4-8 sts as follows: 1-2-1-2 sts evenly on each front piece and 2-4-2-4 evenly on back piece = 248-268-288-308 sts. When piece measures 11 cm from marker cast off 6 sts each side for armhole (i.e. 3 sts each side of marker) = 236-256-276-296 sts. Now complete each piece separately. LEFT FRONT PIECE: = 49-53-59-64-69-74 sts. Continue back and forth on needle in garter st AT THE SAME TIME cast off for armhole at the side on every other row: 2 sts 2-3-5-7-9-11 times and 1 st 1-2-2-2-2-2 times = 44-45-47-48-49-50 sts. When piece measures 18-19-18-19-18-19 cm from marker cast off 4 sts towards mid front for neck and cast off to shape the neckline at the beg of every row from mid front: 2 sts 1 time and 1 st 5-5-5-6-7-7 times, then on every other row from mid front: 1 st 5-6-7-7-7-8 times = 28-28-29-29-29-29 sts left on shoulder. Continue until piece measures 30-31-32-33-34-35 cm from marker. Cast off loosely. BACK PIECE: = 98-106-118-128-138-148 sts. Continue in garter st and cast off for armhole each side as described for front piece = 88-90-94-96-98-100 sts. When piece measures 28-29-30-31-32-33 cm from marker cast off the middle 28-30-32-34-36-38 sts for neck and complete each side separately. Cast off 1 st on every other row 2 times on neckline = 28-28-29-29-29-29 sts left on shoulder. Cast off loosely when piece measures 30-31-32-33-34-35 cm from marker. RIGHT FRONT PIECE: = 49-53-59-64-69-74 sts. Like left front piece. SLEEVE: Work SQUARE (in your size) – see above. Slip 24-26-26-28-28-30 sts from 3 of the sides on separate stitch holders and keep 24-26-26-28-28-30 sts from the last side on needle. Work garter st back and forth on these 24-26-26-28-28-30 sts for 7 cm. Cast off. Slip the 24-26-26-28-28-30 sts from stitch holder on the opposite side (i.e. the parallel side) back on needle. Work garter st back and forth on needle for 7 cm. Cast off. Turn square so that you have 7 cm garter st on the right side and on the left side of square. Now pick up (from RS) 17 sts in the garter st on the left side of square, work the 24-26-26-28-28-30 sts from stitch holder back on needle and then pick up 17 sts in the garter st on the other side of square = 58-60-60-62-62-64 sts. Work garter st back and forth on all sts for 2 cm. Cast off. This is the cuff of the sleeve, the last 2 cm garter st is the bottom edge of sleeve. Now pick up 17 sts in the 7 cm garter st on one side of square, work the last 24-26-26-28-28-30 sts from stitch holder back on needle and pick up 17 sts along the garter st on the other side of square = 58-60-60-62-62-64 sts. Work 2 cm garter st back and forth on these sts. Insert a marker and now measure piece from here. Now continue in reverse stocking st on all sts. AT THE SAME TIME when piece measures approx 1-1-2-1-2-2 cm from marker inc 1 st each side, and repeat the inc on every 2.5-2-1.5-1.5-1-1 cm a total of 12-14-17-18-22-24 times = 82-88-94-98-106-112 sts. When piece measures 34-32-32-30-31-28 cm from marker (less for the larger sizes because of longer sleeve cap and wider shoulder) cast off 3 sts each side for armhole and cast off for sleeve cap each side at the beg of every row: 2 sts 5-6-6-6-6-6 times and 1 st 1-1-3-5-3-7 times, then 2 sts each side until piece measures 41-40-41-40-41-40 cm from marker. Now cast off 3 sts 1 time each side and cast off remaining sts. Sleeve measures approx 56-56-57-57-58-58 cm. ASSEMBLY: Sew shoulder seams. Set in sleeves and sew sleeve seam inside 1 edge st. FRONT BANDS: Left front band: Beg by neckline at the top of left front piece. Pick up approx 1 st in every garter st row down to the squares, slip the 24-26-26-28-28-30 sts (x 3) from stitch holders towards mid front on the 3 squares back on needle. K 1 row from WS, AT THE SAME TIME adjust no of sts to 116-122-122-132-132-140. Work 26 rows garter st back and forth on all sts and cast off loosely. Right front band: Like left front band, but beg at the bottom of front piece (sts already cast off on squares), AT THE SAME TIME after 14 rows make 6 buttonholes as follows from RS (beg from bottom edge): Work 14 sts, K2 tog, 1 YO, * work 15-16-16-18-18-19 sts, K2 tog, 1 YO *, repeat from *-* a total of 5 times and finish with 15-16-16-16-16-19 sts. K all sts, incl YO, on next row. NECKLINE: Pick up 120 to 160 sts (from RS) round neck (includes sts on front bands each side). Work garter st back and forth over all sts, AT THE SAME TIME after 4 rows make 1 buttonhole on the right side of piece as follows: work 4 sts, K2 tog and make 1 YO, work remaining sts on row. Continue as before and cast off loosely after 10 rows. |
|
 |
|
 |
|
Have you finished this pattern?Tag your pictures with #dropspattern #forestemeraldscardigan or submit them to the #dropsfan gallery. Do you need help with this pattern?You'll find 20 tutorial videos, a Comments/Questions area and more by visiting the pattern on garnstudio.com. © 1982-2026 DROPS Design A/S. We reserve all rights. This document, including all its sub-sections, has copyrights. Read more about what you can do with our patterns at the bottom of each pattern on our site. |
|


With over 40 years in knitting and crochet design, DROPS Design offers one of the most extensive collections of free patterns on the internet - translated to 17 languages. As of today we count 324 catalogues and 12290 patterns translated into English (UK/cm). 12290
We work hard to bring you the best knitting and crochet have to offer, inspiration and advice as well as great quality yarns at incredible prices! Would you like to use our patterns for other than personal use? You can read what you are allowed to do in the Copyright text at the bottom of all our patterns. Happy crafting!
Post a comment to pattern DROPS 114-1
We would love to hear what you have to say about this pattern!
If you want to leave a question, please make sure you select the correct category in the form below, to speed up the answering process. Required fields are marked *.