
Popular categories
Looking for a yarn?


Comments / Questions (83)
![]() Morjanne wrote:
Morjanne wrote:
Eine sehr hübsche Anleitung, als Anfänger nicht ganz einfach zu verstehen, aber mit etwas Mitdenken klappt's auch ;-) Meine größten Arbeiten waren bisher Mützen und Schals, und ich habe trotzdem gerade erfolgreich das linke Vorderteil beendet - es sieht genauso aus wie auf dem Bild (in Orangetönen, allerdings) und ich bin jetzt schon gespannt auf das Endprodukt!
29.11.2012 - 15:46
![]() Heike wrote:
Heike wrote:
Was bedeutet gegen die Mitte oder gegen die Seiten (bei der Aufnahme d. Maschen
21.09.2012 - 18:10
![]() Stefanie wrote:
Stefanie wrote:
Die Zunahmen sind in den Reihen 2, 5,7, 10 usw., richtig? Und 10 Reihen stricken ist auch richtig? Auf dem Bild sieht es nach Spitze aus... Danke, danke!!
15.07.2012 - 14:06DROPS Design answered:
Ja, die Zunahmen und die 10 R sind richtig so.
01.08.2012 - 09:33
![]() Lolochamp wrote:
Lolochamp wrote:
Bonjour, Je ne comprends pas bien l'augmentation "alternativement tous les 2 et 3 rangs"? Ensuite je ne comprends pas qu'il faille tricoter 10 rangs après la dernière augmentation, on voit bien que sur le modèle il n'y a pas de bord "droit" côté milieu? pouvez vous m'aider. 9a fait déjà 3 fois que je recommence...merci !
14.06.2012 - 17:33DROPS Design answered:
Bonjour Lolochamp, il faut vraiment tricoter 10 rangs "droit" après la dernière augmentation. Bon tricot !
15.06.2012 - 08:42
![]() Lolochamp wrote:
Lolochamp wrote:
J'ai reçu la laine ce matin, je commence la semaine prochaine. j'espère qu'il ne sera pas trop difficile ! Si quleq'un a des conseils...
09.06.2012 - 15:27
![]() Maja wrote:
Maja wrote:
Venstre forstykke: der står: tag 1 m. ud skiftevis hv.2og hv. 3.p . Men da der skal tages ud i 1 side, kan det jo ikke lade sig gøre. Hvordan skal det forståes???
23.02.2012 - 16:41DROPS Design answered:
Jo du kan tage ud både på retsiden og på vrangen, bare du gør det i samme side af arbejdet. Når du tager ud på skiftevis hver 2.og hver 3.p gør du således (udtagning med STORT)r V r v R v R v r V osv. God fornøjelse!
28.02.2012 - 15:04
![]() DROPS Deutsch wrote:
DROPS Deutsch wrote:
Beachten Sie dass man am Schuss der 2. Reihe und danach gleich am Anfang der 3. Reihe aufnimmt (linkes Vorderteil).
13.02.2012 - 12:42
![]() Veronika wrote:
Veronika wrote:
Die Anleitung ist total schlecht.ich habe wie beschrieben in jeder 2. und 3. Reihe jeweis Maschen angeschlagen, wenn man das aber so macht wird das Jäckchen auf beiden Seiten länger, soll ja aber nur auf einer Seite sein... und dann 10 Reihen Stricken ...?! Auf dem Bild ist es eine Spietze, sieht nicht aus als wären da 10 Reihen gestrickt worden. Leider kann ich mit der Anleitung nichts anfangen, wobei mir das Modell sehr gut gefallen würde.
12.02.2012 - 20:19
![]() Karine wrote:
Karine wrote:
Jeg må få opplyse dere om at str 62/68 IKKE er 6-9mnd! det er faktisk 2-4mnd! det er veldig dumt at dere har feile størrelser i flere av oppskriftene deres!
05.09.2011 - 21:12
![]() Karine wrote:
Karine wrote:
Jeg må få opplyse dere om at str 62/68 IKKE er 6-9mnd! det er faktisk 2-4mnd! det er veldig dumt at dere har feile størrelser i flere av oppskriftene deres!
05.09.2011 - 21:12
|
|
Tender Dreams#tenderdreamsjacket |
|
|
|
|
Wrap around jacket in garther stitch for baby and children in DROPS Fabel
DROPS Baby 18-3 |
|
|
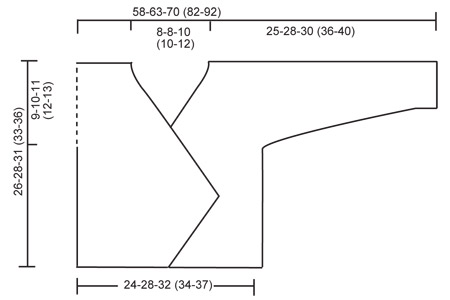
GARTER ST (back and forth on needle): K all rows. ---------------------------------------------------------- ---------------------------------------------------------- JACKET: Worked back and forth on circular needle in garter st. Beg with one front piece, cast on for sleeves, work the other front piece, put the 2 front pieces tog on the same needle and work back piece from neck down. LEFT FRONT PIECE: LOOSELY cast on 29-34-38 (41-44) sts on circular needle size 3 mm with Fabel. Work garter st, AT THE SAME TIME on row 2 cast on 1 st towards mid front and repeat the inc on * every other and 3rd row * alternately a total of 18-20-24 (28-30) times = 47-54-62 (69-74) sts. After the last inc work 10 rows. Piece now measures approx 11-12-15 (17-18) cm. NOW READ ALL OF THE FOLLOWING SECTION BEFORE CONTINUING! On next row dec 1 st towards mid front (K2 tog) and repeat the dec on every row (i.e. dec from RS and WS) a total of 0-0-7 (19-12) times and then on every other row (i.e. dec from RS) a total of 28-31-29 (21-32) times (= 28-31-36 (40-44) dec sts). AT THE SAME TIME when piece measures 17-18-20 (21-23) cm cast on new sts for sleeve at the end of every row towards the side: 6 sts 2-2-3 (3-3) times, 8 sts 1-1-1 (2-3) times and 21-22-20 (23-24) sts 1 time. After all inc and dec are complete there are 60-65-72 (86-96) sts on shoulder/sleeve. When piece measures 26-28-31 (33-36) cm insert a marker in piece = mid shoulder. AT THE SAME TIME cast on 2 new sts towards neckline and cast on another 2 sts on next row towards neckline = 64-69-76 (90-100) sts. Slip all sts on a stitch holder. RIGHT FRONT PIECE: Cast on and work like left front piece, but mirrored. BACK PIECE: Work left front piece onto circular needle size 3 mm, cast on 12-12-16 (16-20) new sts (= neckline on back piece) and work right front piece onto needle = 140-150-168 (196-220) sts. NOW MEASURE PIECE FROM MARKERS ON SHOULDERS. Continue in garter st. When piece measures 6½-7½-8 (8½-9) cm cast off sleeve sts at beg of every row each side as follows: 21-22-20 (23-24) sts 1 time, 8 sts 1-1-1 (2-3) times and 6 sts 2-2-3 (3-3) times = 58-66-76 (82-88) sts on row. Continue until piece measures approx 26-28-31 (33-36) cm – fold piece double at shoulder and measure back piece to front piece – and cast off. ASSEMBLY: Sew side and sleeve seams, edge to edge in outer loops of sts. CROCHET BORDER: Crochet a border round the whole jacket with crochet hook size 2.5 mm and Alpaca as follows: 1 dc in first st * 2 ch, skip 2 sts/ 4 rows, 1 dc in next st *, repeat from *-*. When you reach the point at front pieces, crochet tie strings as follows: 1 dc in point, crochet approx 25 cm ch, turn and work 1 sl st in each ch back to point, then 1 dc in point and continue the crochet border. Crochet a similar border (without the tie strings) round sleeve edges. Crochet 1 tie string as described for crochet border on the inside of seam on the right side and 1 tie string on the outside of seam on the left side – make sure to place the tie strings in line with tie strings on front pieces. |
|
 |
|
Have you finished this pattern?Tag your pictures with #dropspattern #tenderdreamsjacket or submit them to the #dropsfan gallery. Do you need help with this pattern?You'll find 14 tutorial videos, a Comments/Questions area and more by visiting the pattern on garnstudio.com. © 1982-2026 DROPS Design A/S. We reserve all rights. This document, including all its sub-sections, has copyrights. Read more about what you can do with our patterns at the bottom of each pattern on our site. |


With over 40 years in knitting and crochet design, DROPS Design offers one of the most extensive collections of free patterns on the internet - translated to 17 languages. As of today we count 324 catalogues and 12290 patterns translated into English (UK/cm). 12290
We work hard to bring you the best knitting and crochet have to offer, inspiration and advice as well as great quality yarns at incredible prices! Would you like to use our patterns for other than personal use? You can read what you are allowed to do in the Copyright text at the bottom of all our patterns. Happy crafting!
Post a comment to pattern DROPS Baby 18-3
We would love to hear what you have to say about this pattern!
If you want to leave a question, please make sure you select the correct category in the form below, to speed up the answering process. Required fields are marked *.