
Popular categories
Looking for a yarn?


Comments / Questions (83)
![]() Alicia wrote:
Alicia wrote:
Hola. No entiendo bien los aumentos del principio. ¿Se ha de montar un punto extra en el medio en la 2ª y 3ª fila sucesivamente o cada dos filas, luego cada tres, luego cada dos? Gracias.
19.10.2017 - 18:29DROPS Design answered:
Hola Alicia. Los aumentos se trabajan como sigue: aumentamos 1 punto y trabajamos 2 filas, aumentamos 1 punto, trabajamos 3 filas, aumentamos 1 punto, trabajamos 2 filas y etc.
30.10.2017 - 08:35
![]() Mamieflo wrote:
Mamieflo wrote:
Aiguille circulaire n°3 , OK, mais quelle longueur SVP, ce n'est pas indiqué, merci.
15.08.2017 - 18:18DROPS Design answered:
Bonjour, l'aiguille circulaire 80 cm suffit. Bon tricot!
15.08.2017 - 20:33
![]() Cocora wrote:
Cocora wrote:
Nachtrag: Ich habe das Jäckchen jetzt gestrickt und die Maschen einfach nicht "gegen die Mitte" (wie in der Anleitung beschrieben), sondern jeweils gegen die Kante ab- bzw. zugenommen. So ist es ja auch logisch. Dann klappt alles wunderbar.
09.08.2016 - 11:02
![]() Cocora wrote:
Cocora wrote:
Stimmt es wirklich, dass man die Aufnahmen beim linken Vorderteil "gegen die Mitte" machen soll? Die Frage ist schon öfters gestellt worden, wurde aber immer ignoriert. Ich habe es genau so wie in der Anleitung beschrieben versucht, aber es formt sich keine Spitze. Man soll die Aufnahmen ja in R2, R5, R7, R10 usw. mittig machen. Aber dann wölbt sich doch das Strickstück zu beiden Seiten?! Die Abnahmen macht man doch auch jeweils zum Ende der Hin- bzw. Anfang der Rückreihe.
31.07.2016 - 15:40
![]() Beate wrote:
Beate wrote:
Hei. Hvordan knytter dere denne jakken? Klarer ikke å finne ut i oppskriften om det skal være et hull i siden for å putte tråden gjennom eller om det er et annet triks.
26.09.2015 - 17:51DROPS Design answered:
Hej Beate, Her ser du: Deretter hekles det 1 knytebånd tilsvarende det i hver spiss på innsiden av sømmene i høyre side og på utsiden av sømmen i venstre side – pass på at båndene kommer i samme høyde som spissene på forstk.
01.10.2015 - 16:13
![]() Åse Johansson wrote:
Åse Johansson wrote:
Hej! så här står det i beskrivningen Upprepa ökningen med växelvis 2 v och 3 v mellanrum Betyder det att jag ibland ökar i början på varvet och ibland i slutet på varvet?
10.08.2015 - 15:39DROPS Design answered:
Hej Åse, Ja du ökar i samma sida såhär: Du ökar på varv 1,3,6,8,11,13. Lycka till!
11.08.2015 - 08:41
![]() Katie wrote:
Katie wrote:
I'm stuck. When casting on for the sleeves it says to cast on toward the sides of every row so, I end up with 6+8 st added to one side and 6+22 added to the other? Or, does 'row' mean back and forth so all the cast on stitches are on the same side?
30.07.2015 - 21:54DROPS Design answered:
Dear Katie, you cast on sts for sleeve at the end of every row towards the side, ie every row that start from mid front and finish on the side (= every other round). Happy knitting!
31.07.2015 - 11:01
![]() Ulla Nielsen wrote:
Ulla Nielsen wrote:
Hvor kan jeg læse hvornår jeg skal bruge hvilken slags garn ?
10.06.2015 - 13:06DROPS Design answered:
Hej Ulla. Du bruger kun Fabel her (og Alpaca til kanterne). Fabel er et print garn = flere farver, saa der er ikke noget farveskift. Se garnkortet her.
10.06.2015 - 14:53
![]() Andrea wrote:
Andrea wrote:
Ich versteh das nicht ganz mit den Zunahmen. Nimmt man in der 2.,3.,5.,6.,8.,9. usw. zu oder in der 2., 5., 7., 10. usw. ?
20.04.2015 - 19:57DROPS Design answered:
Liebe Andrea, Letzteres ist richtig - in der 2. R, dann in der darauffolgenden 3. R (also in der 5. R), dann in der darauffolgenden 2. R (also in der 7. R), dann wieder in der darauffolgenden 3. R (10. R) usw.
23.04.2015 - 23:09
![]() Monica Gertsson. wrote:
Monica Gertsson. wrote:
Till minsta storl. Ska jag lägga upp 29 maskor, därefter ökar jag med 18 m = 47 m, därefter lägger jag ut till ärmen2+2+21 m.detta blir 52m men enl. Mönstret ska det bli 60 ???
12.08.2013 - 18:26
|
|
Tender Dreams#tenderdreamsjacket |
|
|
|
|
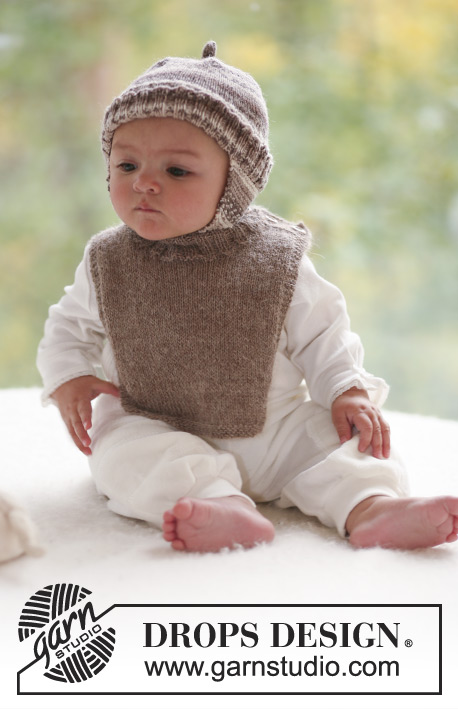
Wrap around jacket in garther stitch for baby and children in DROPS Fabel
DROPS Baby 18-3 |
|
|
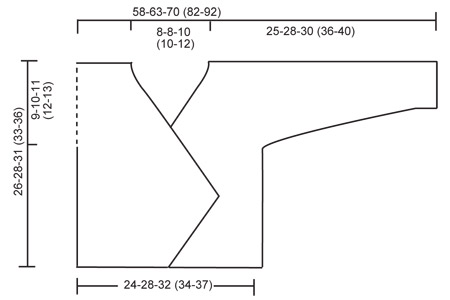
GARTER ST (back and forth on needle): K all rows. ---------------------------------------------------------- ---------------------------------------------------------- JACKET: Worked back and forth on circular needle in garter st. Beg with one front piece, cast on for sleeves, work the other front piece, put the 2 front pieces tog on the same needle and work back piece from neck down. LEFT FRONT PIECE: LOOSELY cast on 29-34-38 (41-44) sts on circular needle size 3 mm with Fabel. Work garter st, AT THE SAME TIME on row 2 cast on 1 st towards mid front and repeat the inc on * every other and 3rd row * alternately a total of 18-20-24 (28-30) times = 47-54-62 (69-74) sts. After the last inc work 10 rows. Piece now measures approx 11-12-15 (17-18) cm. NOW READ ALL OF THE FOLLOWING SECTION BEFORE CONTINUING! On next row dec 1 st towards mid front (K2 tog) and repeat the dec on every row (i.e. dec from RS and WS) a total of 0-0-7 (19-12) times and then on every other row (i.e. dec from RS) a total of 28-31-29 (21-32) times (= 28-31-36 (40-44) dec sts). AT THE SAME TIME when piece measures 17-18-20 (21-23) cm cast on new sts for sleeve at the end of every row towards the side: 6 sts 2-2-3 (3-3) times, 8 sts 1-1-1 (2-3) times and 21-22-20 (23-24) sts 1 time. After all inc and dec are complete there are 60-65-72 (86-96) sts on shoulder/sleeve. When piece measures 26-28-31 (33-36) cm insert a marker in piece = mid shoulder. AT THE SAME TIME cast on 2 new sts towards neckline and cast on another 2 sts on next row towards neckline = 64-69-76 (90-100) sts. Slip all sts on a stitch holder. RIGHT FRONT PIECE: Cast on and work like left front piece, but mirrored. BACK PIECE: Work left front piece onto circular needle size 3 mm, cast on 12-12-16 (16-20) new sts (= neckline on back piece) and work right front piece onto needle = 140-150-168 (196-220) sts. NOW MEASURE PIECE FROM MARKERS ON SHOULDERS. Continue in garter st. When piece measures 6½-7½-8 (8½-9) cm cast off sleeve sts at beg of every row each side as follows: 21-22-20 (23-24) sts 1 time, 8 sts 1-1-1 (2-3) times and 6 sts 2-2-3 (3-3) times = 58-66-76 (82-88) sts on row. Continue until piece measures approx 26-28-31 (33-36) cm – fold piece double at shoulder and measure back piece to front piece – and cast off. ASSEMBLY: Sew side and sleeve seams, edge to edge in outer loops of sts. CROCHET BORDER: Crochet a border round the whole jacket with crochet hook size 2.5 mm and Alpaca as follows: 1 dc in first st * 2 ch, skip 2 sts/ 4 rows, 1 dc in next st *, repeat from *-*. When you reach the point at front pieces, crochet tie strings as follows: 1 dc in point, crochet approx 25 cm ch, turn and work 1 sl st in each ch back to point, then 1 dc in point and continue the crochet border. Crochet a similar border (without the tie strings) round sleeve edges. Crochet 1 tie string as described for crochet border on the inside of seam on the right side and 1 tie string on the outside of seam on the left side – make sure to place the tie strings in line with tie strings on front pieces. |
|
 |
|
Have you finished this pattern?Tag your pictures with #dropspattern #tenderdreamsjacket or submit them to the #dropsfan gallery. Do you need help with this pattern?You'll find 14 tutorial videos, a Comments/Questions area and more by visiting the pattern on garnstudio.com. © 1982-2026 DROPS Design A/S. We reserve all rights. This document, including all its sub-sections, has copyrights. Read more about what you can do with our patterns at the bottom of each pattern on our site. |


With over 40 years in knitting and crochet design, DROPS Design offers one of the most extensive collections of free patterns on the internet - translated to 17 languages. As of today we count 324 catalogues and 12290 patterns translated into English (UK/cm). 12290
We work hard to bring you the best knitting and crochet have to offer, inspiration and advice as well as great quality yarns at incredible prices! Would you like to use our patterns for other than personal use? You can read what you are allowed to do in the Copyright text at the bottom of all our patterns. Happy crafting!
Post a comment to pattern DROPS Baby 18-3
We would love to hear what you have to say about this pattern!
If you want to leave a question, please make sure you select the correct category in the form below, to speed up the answering process. Required fields are marked *.