
Popular categories
Looking for a yarn?


Comments / Questions (238)
![]() Elena wrote:
Elena wrote:
Buongiorno, ho bisogno di spiegazioni. Dunque riguardo al 1 e 2 ferro credo di aver capito di lasciare 2 maglie prima di voltare il lavoro quindi per la taglia M 112, 110, 108 ecc. fino ad arrivare alle 16 maglie di inizio ferro. Per quanto riguarda, invece, il 3 e 4 ferro: devo sempre lavorare sulle 16 maglie iniziali? per es. 16 maglie (3 ferro), giro il lavoro 16 maglie (4 ferro)???? e' difficilissimo da capire... lo ho già disfatto diverse volte... grazie mille!!!
20.01.2015 - 11:57DROPS Design answered:
Buonasera Elena. Sì è corretto, al 3° e 4° ferro dei ferri accorciati lavora sempre su 16 m. Ci riscriva se incontra altre difficoltà. Buon lavoro!
20.01.2015 - 18:55
![]() Claudia Grimm wrote:
Claudia Grimm wrote:
Beim stricken des Kreises bleiben immer Löcher. Was mache ich falsch? Kann auch mit dem Stricktipp nichts anfangen, da ich ja nicht einfach links stricken kann.
15.01.2015 - 07:59DROPS Design answered:
Die Linksmaschen beziehen sich auf die M ganz innen im Kreis in der R, in der Sie über alle M stricken. Auf dem Foto können Sie ja erkennen, dass der innerste Kreis etwas anders aussieht als der "Ring" drumrum, das sind die Linksmaschen. Wenn Sie sich das Video "Verkürzte R" unter Videos im Kopf neben dem Foto anschauen, finden Sie Hilfe, wie Sie Löcher an den Wendestellen vermeiden können.
15.01.2015 - 10:25
![]() Elisabeth P wrote:
Elisabeth P wrote:
Bonjour, Merci de me confirmer l'emplacement du marqueur (taille M/L) : après la 69ème maille en partant du côté extérieur du cercle. Car je l'ai placé en montant mes mailles ce qui le positionne après la 69ème maille à partir du côté de l'intérieur du cercle, et placé ainsi cela modifie la prise des mesures pour placer l'emmanchure
14.01.2015 - 18:18DROPS Design answered:
Bonjour Elisabeth, le marqueur se met effectivement après la 69e m, vu sur l'endroit. Bon tricot!
15.01.2015 - 09:54
![]() Monika Henke wrote:
Monika Henke wrote:
Guten Tag, in der deutschen Übersetzung hat sich ganz am Ende des Ärmels ein Zahlenfehler eingeschlichen hier heißt es nach 62-65-65-68cm das hat mich ein wenig verwirrt, es muss aber wohl heißen 62-63-63-64 cm. Viele Grüße Monika Henke
01.01.2015 - 12:45DROPS Design answered:
Liebe Frau Henke, ja das stimmt, das wird gleich korrigiert. Vielen Dank für den Hinweis!
02.01.2015 - 22:35
![]() Judith Doherty wrote:
Judith Doherty wrote:
Can't tell from photo if pearl or knit side is outside for stockingknit on sleeve. Thanks
31.10.2014 - 03:29DROPS Design answered:
Dear Mrs Doherty, sleeve is worked in reverse stockinette, ie P from RS and K from WS. Happy knitting!
31.10.2014 - 10:03
![]() Judith Doheryy wrote:
Judith Doheryy wrote:
Have finished circle portion. Is the k2 p1 for sleeve reversed to p2 k1 on wrong side for ribbing? Thanks
31.10.2014 - 00:51DROPS Design answered:
Dear Mrs Doheryy, you are correct, the ribbing for sleeve is K2, P1 seen from RS (= K1, P2 seen from WS). Happy knitting!
31.10.2014 - 10:01
![]() Florence wrote:
Florence wrote:
Bonjour Dans les 1er et 2eme rang des rangs raccourcis que voulez vous dire quand vous xpliquez qu'il faut tricoter 2 mailles en moins avant de tourner?dois je faire 2diminutions en fin de rang?merci.
19.09.2014 - 22:09DROPS Design answered:
Bonjour Florence, dans les rangs raccourcis, on tricote moins de mailles à chaque nouveau rang sur l'endroit (en laissant les mailles de la fin de rang non travaillées) pour avoir plus de rangs sur les mailles de l'extérieur du cercle (débuts de rangs sur l'end) et moins sur les mailles de l'intérieur (fin de rang). Ainsi, la 2ème fois que vous répétez les rangs 1 et 2, vous les tricoterez sur 100 m (en taille S), la 3ème fois, sur 98 m et ainsi de suite. Bon tricot!
20.09.2014 - 09:53
![]() Renee Van Wyck wrote:
Renee Van Wyck wrote:
I am looking for the sizing on the circular jacket. Would be making it for someone with a bust size of40DDD and 40CC.There is nothing in wardrobe to compare to. Thank you. Pattern #102-6
18.09.2014 - 14:18
![]() Judith wrote:
Judith wrote:
Am doing fine now, but how do I measure for beginning of armhole. Is it a diagonal from the marker?
16.09.2014 - 23:55DROPS Design answered:
Dear Judith, measurements on circle are done with piece lying flat, they follow the curve to 63rd - 69th -73rd - 81st st where you placed your marker. Happy knitting!
17.09.2014 - 09:52
![]() Renee Van Wyck wrote:
Renee Van Wyck wrote:
How do you figure out sizing when your patterns only list s-m/lg-xl/xxxl??
16.09.2014 - 19:27DROPS Design answered:
Dear Mrs Van Wyck, you will find at the end of a pattern a measurement chart with all measurements from side to side (in cm). Compare these to a similar garment you like the shape to find out the matching size. Happy knitting!
17.09.2014 - 08:54
|
||||||||||||||||
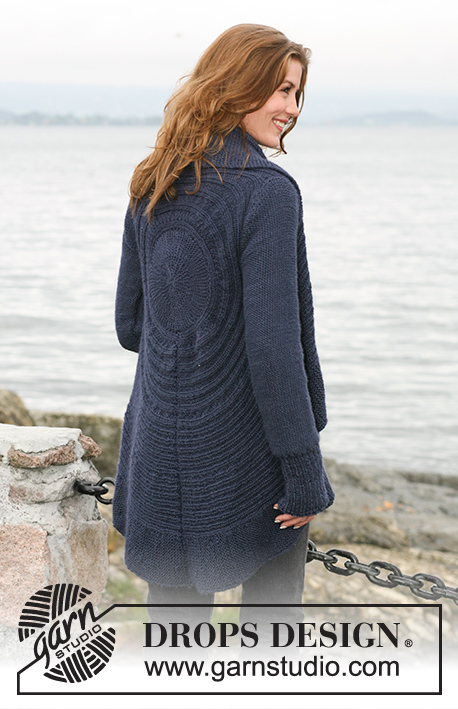
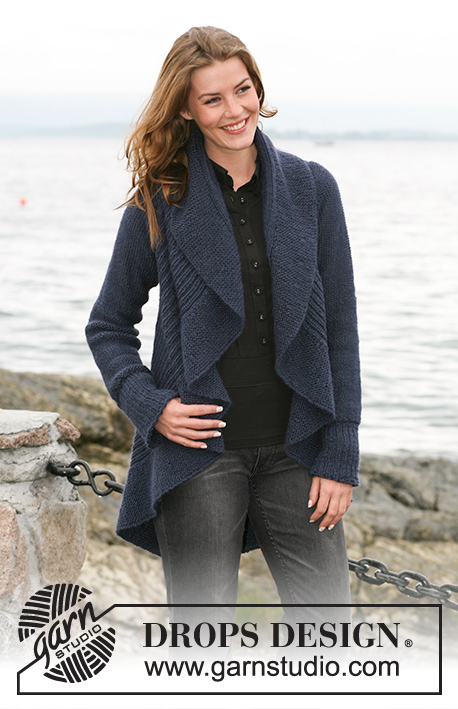
Blue Moon |
||||||||||||||||
 |
 |
|||||||||||||||
Knitted circular jacket in DROPS Silke Alpaca or DROPS Air, with texture pattern Size: S – XXXL
DROPS 102-6 |
||||||||||||||||
|
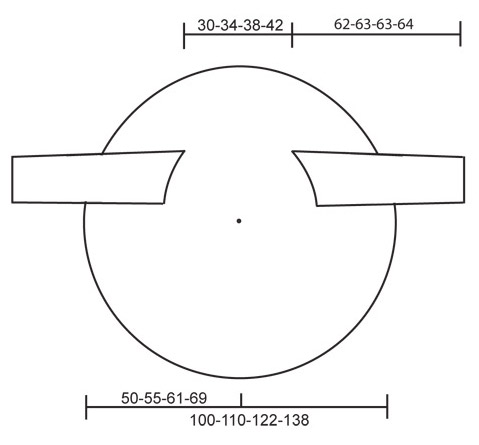
Knitting tension: 17 sts x 22 rows stocking sts = 10 x 10 cm Pattern: See diagram M.1. Diagrams are seen from RS. NOTE: Each size has own diagram. Short rows: Work short rows to ensure circular shape of piece, as follows: 1st / 2nd row: Knit 102-112-124-140 sts, turn piece and knit back. 3rd / 4th row: Knit back and forth over 18-16-20-20 first sts on row (these sts = outermost on circle) – read knitting tip 1 below. Repeat 1st to 4th rows, but reduce stitch number by 2 sts on every 1st/2nd row before turning piece – repeat this 10-10-12-12 times in total, then reduce sts number knitted by 4 sts before piece is turned – repeat this 6-9-8-12 times in total and from this point reduce sts number by 8 sts before piece is turned – repeat 5-5-6-6 times in total. Remaining are 18-16-20-20 outermost sts of circle. Start again from beginning over all sts. – read Knitting tip 2 below. Knitting tip 1: When turning piece slip the first st as if to knit and tighten yarn before continuing knitting. This is done to avoid holes when turning. This does not applies to innermost 20-20-24-24 sts of circle – when piece is turned knit all sts as normal. Knitting tip 2: On row where all sts are knit, P 20-20-24-24 innermost sts in circle (seen from RS). Then continue as before with chart M.1. Measuring tip: All measurements on circle are done with piece lying flat. Do not measure across! Measurements follow curve to 63rd - 69th -73rd - 81st sts. Circle: Knit piece back and forth on needle to make room for all sts. Cast on 102-112-124-140 sts on circular needle size 4.5 mm with Silke Alpaca or Air. Insert 1 marking thread or stitch marker after 63-69-73-81 sts, make all measurements from this point. Knit chart M.1 (see diagram for your size) from right to left (i.e. from outside towards inside on circle) 1st row = RS. At the same time as chart M.1 knit Short rows – see explanation above – to make circular shape. When piece measures 37-40-49-57 cm from marking thread or stitch marker – read measuring tip – knit armholes. Armhole: Slip outermost 63-69-73-81 sts onto an extra needle size 4.5 mm (circular needle to make room for all sts). Continuing, cast off next 2 sts (= armhole). Insert 1 marking thread or stitch marker between 2 cast off sts. Leave remaining sts on needle. Continuing, knit 2 parts (sts before and after armhole) separately, but knit them at the same time on separate needles with separate balls of yarn. This is done so the short rows are correct on both sides of armhole. Continue with pattern and short rows as earlier. When armhole measures 18-21-23-25 cm cast on 2 new sts over armhole(i.e. between the 2 parts). Continuing, slip all sts onto one needle again = 102-112-124-140 sts. Insert 1 marking thread or stitch marker after 63-69-73-81 sts. Continuing, measure piece from this point. Now knit chart M.1 and short rows on all sts. Continue like this until piece measures approx 15-17-19-21 cm, this should be a ½ circle. Continue until piece measures approx 30-34-38-42 cm from marking thread – read measuring tip. Now make armholes in same way. When all sts are back on one needle again insert 1 marking thread or stitch marker after 63-69-73-81 sts. Continue measuring from here. Continue with M.1 and short rows until piece measures approx 37-40-49-57 cm from marking thread or stitch markers (adjust to 1 whole pattern repeat with short rows). Cast off loosely. Sleeve: Knit piece back and forth on circular needles. Cast on 56-59-65-68 sts (incl 1 front edge sts on each side) on needles size 4.5 mm with Silke Alpaca or Air. P1 row from WS. Continue with Rib K2/P1 and 1 edge sts on each side. When Rib measures 13-13-14-14 cm K 1 row from WS at the same time dec 10-11-13-14 sts evenly = 46-48-52-54 sts. Continue in stocking sts with WS out until complete measurement. When piece measures 16 cm inc 1 sts on each side on every 9 -4.5 -3.5 -3 cm 5-9-11-13 times in total = 56-66-74-80 sts. When piece measures 56 cm cast off top shape sleeve top on each side on every other row: 4 sts 1-2-2-2 times. Continuing, cast off 2 sts on each side until piece measures approx 61-62-62-63 cm. Then cast off 4 sts 1 time on each side. Piece measures approx 62-63-63-64 cm. Cast off remaining sts. Assembly: Sew circle tog in outermost edge of cast on sts and cast off edge. Sew in sleeves so seams under sleeve meet at middle of marking thread or stitch marker placed at bottom of armhole and middle of sleeve top meet marking thread or stitch marker placed on top of armhole. Sew sleeve seams. |
||||||||||||||||
Diagram explanations |
||||||||||||||||
|
||||||||||||||||
 |
||||||||||||||||
 |
||||||||||||||||
Have you finished this pattern?Tag your pictures with #dropspattern or submit them to the #dropsfan gallery. Do you need help with this pattern?You'll find 15 tutorial videos, a Comments/Questions area and more by visiting the pattern on garnstudio.com. © 1982-2026 DROPS Design A/S. We reserve all rights. This document, including all its sub-sections, has copyrights. Read more about what you can do with our patterns at the bottom of each pattern on our site. |
||||||||||||||||


With over 40 years in knitting and crochet design, DROPS Design offers one of the most extensive collections of free patterns on the internet - translated to 17 languages. As of today we count 324 catalogues and 12290 patterns translated into English (UK/cm). 12290
We work hard to bring you the best knitting and crochet have to offer, inspiration and advice as well as great quality yarns at incredible prices! Would you like to use our patterns for other than personal use? You can read what you are allowed to do in the Copyright text at the bottom of all our patterns. Happy crafting!
Post a comment to pattern DROPS 102-6
We would love to hear what you have to say about this pattern!
If you want to leave a question, please make sure you select the correct category in the form below, to speed up the answering process. Required fields are marked *.