
Popular categories
Looking for a yarn?


Comments / Questions (72)
![]() Jeanny wrote:
Jeanny wrote:
Nadat ik het eerste pand af had bleek het veel te kort. De vierkantjes zaten ter hoogte van mijn borst en op de foto zitten die ter hoogte van de heupen. Ook nadat ik het had veranderd en 8 ipv 6 toeren met boogjes had gehaakt, (XXL)paste het niet. Ik heb toen de eerste drie toeren met dubbele stokjes over de gehele breedte gehaakt, toen pas het werk gesplitst en gaan tellen voor het minderen en meerderen van de boogjes van M!. Nu lijkt het wel te passen. De maten kloppen in ieder geval.
24.05.2015 - 15:39
![]() Jeanny wrote:
Jeanny wrote:
Voor maat XXL moet je M1 en M2 haken, heb ik het dan goed begrepen dat je dan dus 8 toeren met bogen krijgt?
21.05.2015 - 17:34DROPS Design answered:
Hoi Jeanny. Ja, 1 herhaling voor maat XXL is M.1 + M.2, dus je haakt na 1 volle herhaling van M.1, M.2 (= nog twee toeren boogjes = 8 in totaal).
27.05.2015 - 15:41
![]() Somers Tania wrote:
Somers Tania wrote:
Beste, Nadat de vierkantjes zijn gehaakt moet je deze aan elkaar zetten door 1vaste in het buitenste L-boogje te haken, *5Losse en 1 vaste in het volgende boogje tot al de vierkantjes aan elkaar hangen. Is het de bedoeling dat ik na deze handeling telkens afzet om tot een lange strook vierkantjes te geraken? of hoe moet ik dit precies doen? Mvg tania
07.05.2015 - 11:20DROPS Design answered:
Hoi Tania. Je haakt ze samen door 1 v door het buitenste l-boogje van beide vierkantjes te haken, vervolgens 5 l, en dan nog 1 v om het volgende l-boogje van beide vierkantjes. Je maakt 1 lange strook van vierkantjes
27.05.2015 - 15:52
![]() Esther Vajas wrote:
Esther Vajas wrote:
Welche Häkelnadel nimmt man, 4 oder 5? Oben steht Nr. 5 dann fängt die Anleitung mit Nadel nr. 4 an.
06.05.2015 - 21:22DROPS Design answered:
Nr. 4 ist richtig, die obere Angabe wird gleich korrigiert. Viel Spaß beim Häkeln und danke für den Hinweis!
07.05.2015 - 00:04
![]() Somers Tania wrote:
Somers Tania wrote:
Beste, Bij het 'gehaakt vierkantje' staat er bij de eerste toer 16 stokjes in de ring haken. hoeveel stokjes moeten er dan per losse gehaakt worden om een mooie ring te bekomen? mvg
05.05.2015 - 21:09DROPS Design answered:
Hoi Tania. Je haakt gewoon om de ring, niet in de lossen. Dan komen de stokjes netjes om de ring.
06.05.2015 - 11:30Liesbeth wrote:
Als je bij de bovenkant begint, start je dan gelijk bij de 6e toer(en de rij vasten zijn dan 1e toer?) met meerderen en afkanten? Of pas bij de herhaling? Ook snap ik niet hoe dat meerderen er uit moet komen te zien. wie helpt mij verder? alvast bedankt!
03.05.2015 - 12:37DROPS Design answered:
Hoi Liesbeth. Je meerdert voor de schouder aan het eind van de 6e, 8e en 10e toer van M.1 en je kant af voor de hals op elke 2½ cm
06.05.2015 - 17:47
![]() Hanneke wrote:
Hanneke wrote:
Ik ben bezig met dit mooie vest maar kom er niet uit bij het rechterdeel. Ik moet afkanten, maar wordt daar minderen mee bedoeld? Ik neem aan dat ik dit alleen aan de buitenkant moet doen? Zoals ik het lees, is het de bedoeling dat het 'schuin' afloopt bij de hals, maar wanneer begin ik dan met afkanten? Alvast bedankt!!
09.01.2015 - 08:14DROPS Design answered:
Hoi Hanneke. Ja, het is minderen langs da halslijn. Je kan zien hoe onder "TIPS VOOR HET AFKANTEN" bovenaan het patroon. Je mindert tegelijkertijd met het meerderen voor de schouder zoals beschreven in het patroon.
09.01.2015 - 16:16
![]() Satu wrote:
Satu wrote:
Ilmoitettu lankamäärä riitti vain puoleen väliin työtä! Samaa värierää ei ole enää saatavilla. Onpa hupno juttu!
01.09.2014 - 19:51
![]() Patricia wrote:
Patricia wrote:
Merci beaucoup pour votre réponse rapide :-))
19.05.2014 - 14:17
![]() Linda Lenhard wrote:
Linda Lenhard wrote:
What does rad mean and m1A m1B m1C mean in the pattern. Very confusing!
18.05.2014 - 02:29DROPS Design answered:
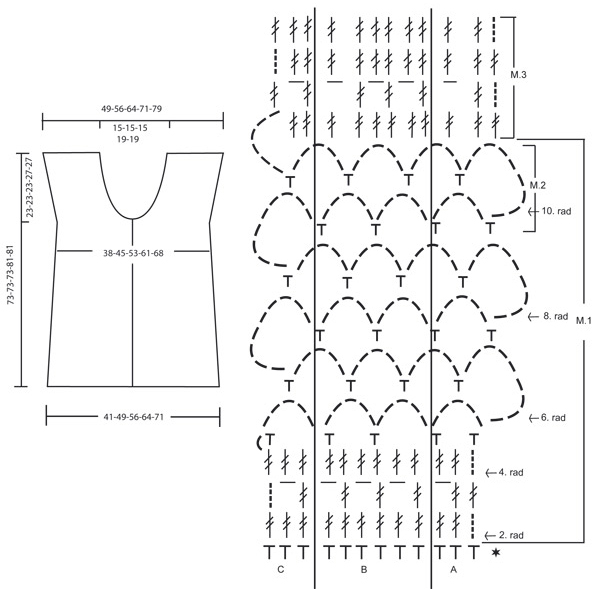
Dear Mrs Lenhard, M.1A shows how to start the pattern from RS + how to end the WS rows, M.1B shows the repetition of the pattern, M.1C shows how to end RS rows and how to start WS rows. Happy crocheting!
19.05.2014 - 08:54
|
|||||||||||||
Enjoy#enjoycardigan |
|||||||||||||
|
|
|||||||||||||
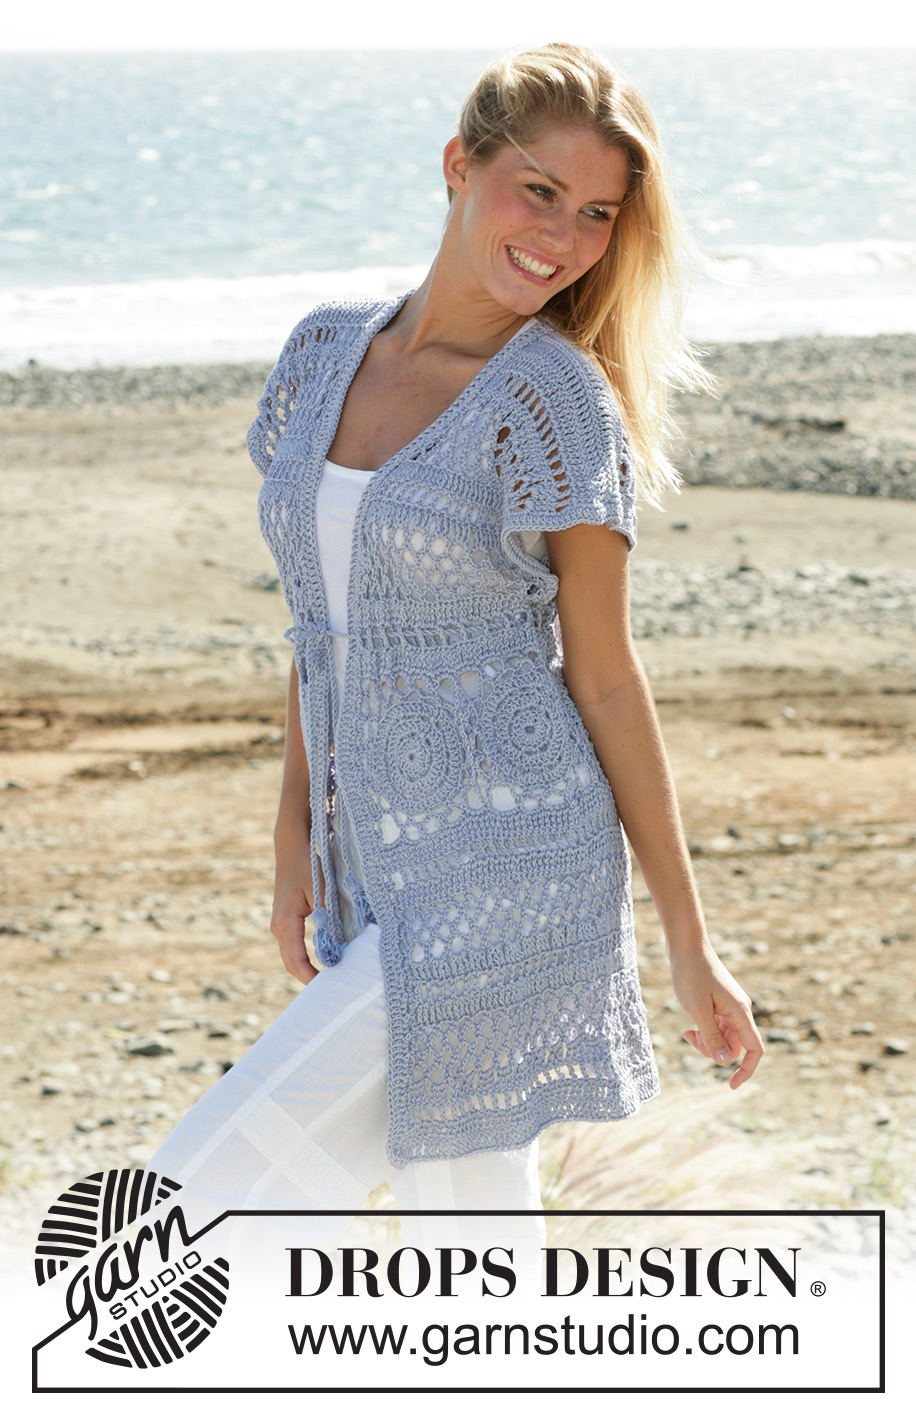
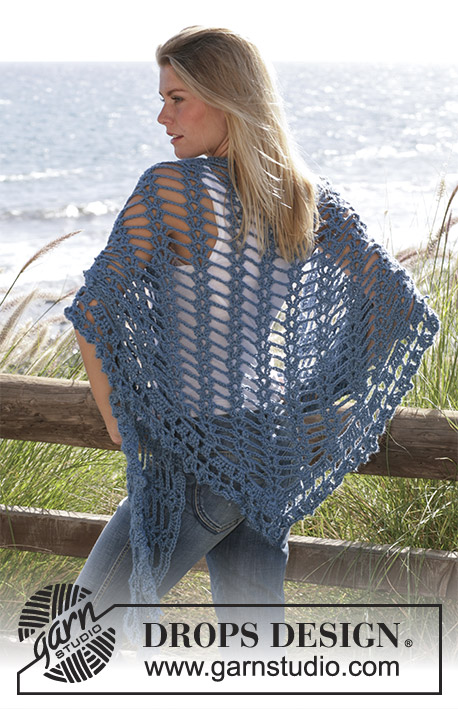
DROPS long sleeves less cardigan with wide shoulders crochet in “Muskat”. Sizes XS - XXL
DROPS 99-2 |
|||||||||||||
|
Crochet tension: 16 tr x 10 rows using hook size 4 mm and Muskat =10 x 10 cm. Crochet info: At the beg. of row substitute the tr with 3 ch. Pattern info: See diagram M.1, M.2 and M.3. M.2 is crochet only in size XL and XXL - one time after M.1 Size XS/S–M-L: 1 repeat = M.1 Size XL-XXL: 1 repeat = M.1 + M.2 The diagrams are seen from the RS. English Translations for the wording in the diagrams are given at the bottom of this pattern, and they are given in the vertical order in which they appear in the diagram. Increasing tips: For inc. crochet 1 extra ch-loop at the end of a row with ch-loops. Crochet until finish, then crochet 8 ch, 1 dc in the last dc. Turn and crochet the first dc in the new ch-loop. Cast off tips: For rows with dtr: Cast off as follows at beg. of row: Substitute 3 dtr with 3 sl sts. Cast off as follows at the end of row: Turn when there are 3 dtr left to cast off. For rows with ch-loops: Cast off as follows from beg. of row: Crochet sl sts over the the last ch-loop from previous row. Cast off as follows at the end of row: Turn when 1 ch-loop is left. Crochet squares: 1 crochet square measures approx. 13 x 13 cm. Crochet squares: Crochet 5 ch and make a ring with a sl st. Read crochet info! 1st round: crochet 16 tr in the ring. 2nd round: 1 dc in the first tr, *3 ch, skip 1 tr, 1 dc in the next tr*, repeat from *-* and finish with 3 ch and a sl st in the first dc = 8 ch-loops. 3rd round: *1 tr in each dc, 3 tr in each ch-loop*, repeat from *-* and finish with a sl st in the first tr = 32 tr 4th round: 1 dc in the first tr, *3 ch, skip 1 tr, 1 dc in the next tr*, repeat from *-* and finish with 3 ch and a sl st in the first dc = 16 ch-loops 5th round: *1 tr in each dc and 2 tr in each ch-loop*, repeat from *-* until finish round and finish with a sl st in the first tr = 48 tr 6th round: *1 dc in the first tr, 5 ch, skip 2 tr, 1 dc in the next tr*, repeat from *-* and finish with 5 ch and a sl st in the first dc = 16 ch-loops 7th round: Crochet sl sts until the middle of the first ch-loop *(7 ch, 1 dc in the next ch-loop), repeat from (-)a total of 3 times, 10 ch (=corner), 1 dc in the next ch-loop*, repeat from *-* until finish round. Cut and sew the thread. Crochet a total of 6-7-8-9-10 squares. Put the squares on top of each other 2 by 2 and crochet as follows: 1 dc in the outer most ch-loop of both squares, * 5 ch, 1 dc in the next ch-loop of both squares*, repeat from *-* until the squares are crochet tog. as a long string. Continue to crochet the sleeves less cardigan from the squares and down in one piece, and then the top part. Bottom piece: Crochet the first row from the WS. Crochet 120-144-168-192-216 dc in the bottom edge of the string of crochet squares (crochet approx. 20-20-21-21-22 dc in each square) Turn and crochet according to M.1A over the first 3 dc, repeat M.1B over the next 114-138-162-186-210 dc and finish with M.1C. Work M.1 (M.1 + M.2 for size XL and XXL) – read pattern info, 2 times in total. AT THE SAME TIME when M.1 is worked for the 2nd time, on 1st row inc 6 dtr evenly distributed = 126-150-174-198-222 dtr. Them work according to M.3, AT THE SAME TIME on 1st row inc 6 dtr evenly distributed = 132-156-180-204-228 dtr. Cut and sew the thread tight. The piece measures approx. 30-30-30-34-34 cm. Top piece: Crochet the first row from the WS. Crochet 120-144-168-192-216 dc in the top edge of the string of squares. Split the work and finish front and back pieces separately. All measures are done from the top edge of the string of squares. Right front: 1st row = RS. Crochet M.1 (M.1 + M.2 for size XL and XXL) – read pattern info over 30-36-42-48-54 dc at the right side of the piece. (crochet M.1A over the first 3 dc then repeat M.1B over the next 24-30-36-42-48 dc and finish with M.1C). At the same time at the end of the 6th, 8th and 10th row of M.1 inc. for wide shoulder – read increasing tips above. At the same time cast off 3 dtr/ 1 ch-loop for the neck shaping on every 2.5 cm a total of 4-4-4-5-5 times – read casting off tips. After a total of 2 vertical repeats of M.1 (M.1 + M.2 for size XL and XXL) are completed crochet M.3. After all dec. and inc. are completed there are 27-33-39-42-48 dtr left for each shoulder. Cut and sew the thread tight when the piece measures approx. 30-30-30-34-34 cm. The total length of the cardigan is approx. 73-73-73-81-81 cm Left from piece: Crochet as right front but reverse. NB: To get the cast off edges look the same each side, beg. the left front piece at the mid front. 1st row is the WS. Back piece: 1st row =RS. Crochet M.1 (M.1 + M.2 for size XL and XXL) – read pattern info over the mid 60-72-84-96-108 dc. (Crochet M.1A over the first 3 dc, repeat M.1B over the next 54-66-78-90-102 dc and finish with M.1C). At the same time at the end of the 6th to 11th row inc. for wide shoulder as done for the front pieces. Crochet a total of 2 repeats of M.1 (M.1 + M.2 for size XL and XXL) then crochet M.3 (after all inc. for the wide shoulder there are 78-90-102-114-126 dtr) At the same time on the 3rd row of M.3 crochet 1 row but only over the outer most 27-33-39-42-48 dtr/ch each side (do not crochet over the mid 24-24-24-30-30 dtr/ch= neck line). Crochet the last row of M.3, cut and sew the thread, the piece measures approx. 330-30-30-34-34 cm. Assembly: Sew the shoulder seams with small neat stitches. Sew approx. 4 cm tog. under neath the armhole, i.e. up to where the inc. for the shoulder beg. Crochet edge: Crochet and edge around the armholes and up along the opening of the sleeve less cardigan as follows: Crochet up along one side of the front piece around the neck opening and down along the other front piece: 1st row: Crochet 1 dc, *3 ch, skip over approx. 1-1.5 cm, 1 dc*, repeat from *-* until finish. 2nd row: 1 dc in each dc and 2 dc in each ch-loop (in the transitions between the neck and front pieces crochet 4 dc in each ch-loop). 3rd row: 1 tr in each dc. Twisted string: Cut 4 threads Muskat of approx 3 meters. Twist them tog until they resist, double thread and let it twist tog. Tie knot approx 5 cm from each end of the string. Pull thread up and down through the 2nd round of dtr above the crochet squares. Make a tassel for each end: cut 25 threads Muskat of approx. 25 cm each. Split the string above the knot and pull the threads through the split. Knot the threads tog. and twist 1 of them around the top of the tassel to keep it tog. Cut and sew the thread. |
|||||||||||||
Diagram explanations |
|||||||||||||
|
|||||||||||||
 |
|||||||||||||
Have you finished this pattern?Tag your pictures with #dropspattern #enjoycardigan or submit them to the #dropsfan gallery. Do you need help with this pattern?You'll find 10 tutorial videos, a Comments/Questions area and more by visiting the pattern on garnstudio.com. © 1982-2026 DROPS Design A/S. We reserve all rights. This document, including all its sub-sections, has copyrights. Read more about what you can do with our patterns at the bottom of each pattern on our site. |
|||||||||||||


With over 40 years in knitting and crochet design, DROPS Design offers one of the most extensive collections of free patterns on the internet - translated to 17 languages. As of today we count 324 catalogues and 12290 patterns translated into English (UK/cm). 12290
We work hard to bring you the best knitting and crochet have to offer, inspiration and advice as well as great quality yarns at incredible prices! Would you like to use our patterns for other than personal use? You can read what you are allowed to do in the Copyright text at the bottom of all our patterns. Happy crafting!
Post a comment to pattern DROPS 99-2
We would love to hear what you have to say about this pattern!
If you want to leave a question, please make sure you select the correct category in the form below, to speed up the answering process. Required fields are marked *.