
Popular categories
Looking for a yarn?


Comments / Questions (55)
![]() Nadine L. wrote:
Nadine L. wrote:
Pour le devant, lorsqu'on commence les aug. au côté 2, est-ce qu'on doit les faire au bord du tricot ou à quelques mailles du bord? Si c'est à quelques mailles, pourriez-vous svp préciser le nombre de mailles. Merci.
02.02.2015 - 02:45DROPS Design answered:
Bonjour Nadine L, les augmentations sur le côté 2 au début de l'ouvrage se font au bord directement (on monte d'abord plusieurs mailles sur plusieurs rangs), celles qui se font côté 2 à partir de 36-48 cm (cf taille) se font avec 1 jeté à 3 m des bords (voir "Augmentations pour les devants"). Bon tricot!
02.02.2015 - 13:17
![]() Rebecca wrote:
Rebecca wrote:
Sie schreiben: Weiter wird auf Seite-1 von der Kante so abgekettet: 1 M 20-20-20-20-21 Mal auf alle 3.Ndl und danach 1 Ndl ohne zu abketten, stricken ; jedoch ist unklar was gemeint ist. Heißt das: alle 3 Reihen eine abketten und das 20 Mal (während eine ohne abketten gestrickt wird), oder heißt das anstatt 2 Maschen zu einer zusammenzuziehen, ziehen wir 3 zusammen... Und: Ndl. = Reihe? Vielen Dank :)
21.01.2015 - 21:42DROPS Design answered:
Die Anleitung ist schon sehr alt und wird noch sprachlich überarbeitet. Es soll heißen, dass Sie an der Seite-1 in 3 R nacheinander 1 M abnehmen, in der 4. R dann keine Abnahme arbeiten. Also 3 R stricken und in jeder R an Seite-1 1 M abnehmen, dann 1 R ohne Abnahme stricken. Dann wieder 3 R mit Abnahme, 1 R ohne. Das machen Sie so lange, bis Sie 20 M abgenommen haben.
27.01.2015 - 22:55
![]() Nadine L. wrote:
Nadine L. wrote:
Les 2 fils proposés pour ce tricot sont de même grosseur, mais il en faut 200g de l'un et 300g de l'autre pour la plus petite taille. Les quantités de fil ne devraient-elles pas être égales?
30.12.2014 - 16:24DROPS Design answered:
Bonjour Nadine L., les quantités sont différentes pour chacune de ces 2 qualités car elles n'ont pas le même métrage, Silke Tweed (épuisée) faisait environ 200 m pour 50 g et Cotton Viscose environ 110 m pour 50 g, d'où la différence. Cliquez ici pour une équivalence à Silke Tweed et le calcul de la quantité. Bon tricot!
31.12.2014 - 12:35
![]() Anne wrote:
Anne wrote:
Bonjour. Pour la manche, après les diminutions pour la taille 2: 1fois 3m, 3 fois 2m et 1 fois 1m, il est écrit : et 2 m jusqu'à 55 cm de hauteur totale. Faut-il diminuer 2m une seule fois ou tous les 2rgs jusqu'à 55 cm, c'est à dire 3 ou 4 fois 2m? Merci beaucoup pour votre réponse. En tous cas modèle très sympa. Bonne journée.
14.11.2014 - 07:23DROPS Design answered:
Bonjour Anne, quand vous avez rabattu pour les manches de chaque côté 1 x 3m, 3 x 2m et 1 x 1 m, vous continuez en rabattant 2 m de chaque côté jusqu'à ce que la manche mesure 55 cm de hauteur totale, puis vous rabattez 1 fois 3 m de chaque côté avant de rabattre les mailles restantes. Le nombre de fois dépendra de votre tension (nbe de rangs) en hauteur, l'important ici étant de bien mesurer. Bon tricot!
14.11.2014 - 15:18
![]() Six-Trouilles wrote:
Six-Trouilles wrote:
Bonsoir, Je voudrais savoir s'il faut faire 3 m en point mousse sur le côté 2 une fois les premières augmentations réalisées (on est à 15 cm de hauteur totale). J'ai l'impression d'en voir sur la photo. D'avance merci pour votre aide. Marie-Laure
29.05.2013 - 22:38DROPS Design answered:
Bonjour Marie-Laure, on continue effectivement avec 3 m au point mousse de chaque côté après 15 cm (taille XL). Bon tricot !
30.05.2013 - 09:26
![]() Renée wrote:
Renée wrote:
Les diminutions À CHAQUE rang du côté 1 se font donc sur l'endroit ET l'envers du tricot du côté 1?!? Les 3 mailles point mousse sont-elles encore présentes? Merci! Merci
05.04.2012 - 14:23DROPS Design answered:
Les 3 m point mousse ont été rabattues avec les 8-10-13-16-18 m pour l'emmanchure, ensuite, vous *diminuez 1 m tous les rangs pendant 3 rangs (= sur les rangs endroit et sur les rangs envers), puis vous tricotez 1 rang sans diminuer*, et répétez de *-*. Bon tricot !
05.04.2012 - 15:35
![]() Renée wrote:
Renée wrote:
Il est inscrit dans les instructions du devant de continuer à diminuer jusqu'à ce que toutes les mailles soient rabattues...comment est-ce possible ensuite de coudre les épaules dos et devants? Si on regarde le schéma il semble que noys devrions garder des mailles pour l'epaule...
05.04.2012 - 03:36DROPS Design answered:
Bonjour Renée, le devant se tricote de biais, on augmente côté encolure pour remonter jusqu'en haut de l'épaule puis on diminue 1 m jusqu'à ce qu'il n'en reste plus = couture épaule. Bon tricot !
05.04.2012 - 08:56
![]() Lorraine wrote:
Lorraine wrote:
Nice...!
03.09.2010 - 20:09
![]() DROPS Design wrote:
DROPS Design wrote:
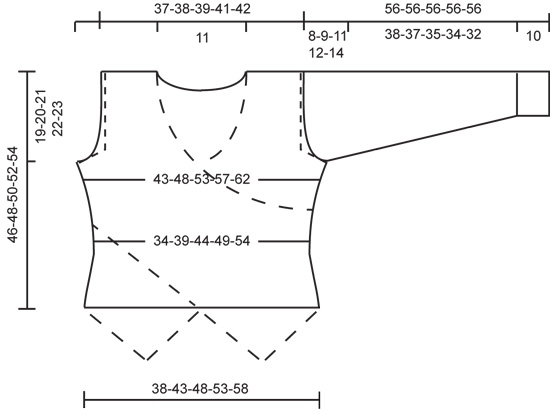
Look at the measure chart at the bottom. Before sewn together it do look like front pieces go up in a peak when holding them in your knitting direction. Once sewn together it looks right.
22.01.2009 - 22:10
![]() Lavidjio wrote:
Lavidjio wrote:
Lavidjio
21.01.2009 - 06:13
|
|
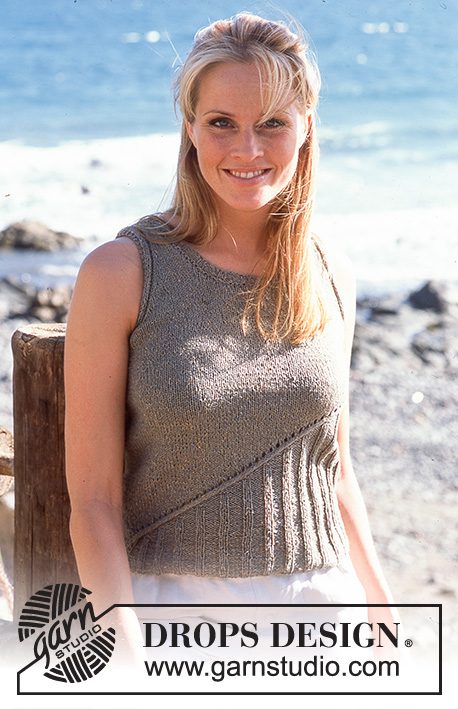
Sea Crossing |
|
|
|
|
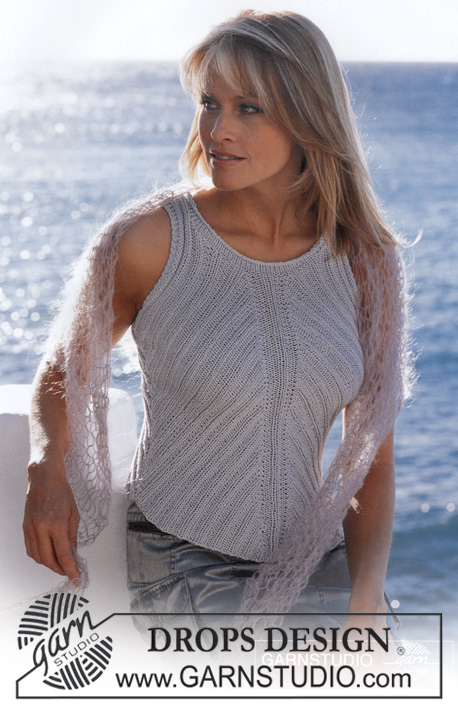
DROPS Jumper in Silke-tweed and Cotton Viscose with wrap-round at front
DROPS 81-28 |
|
|
Knitting Tension: 16 stitches x 20 rows using 5.5mm needle and 1 thread of each wool type in stocking stitch = 10 x 10 cm Increasing: (applies when referred to in pattern). All increases are done form the right side of the jumper within 3 garter sts as follows: yarn round needle, on next row, purl yarn round needle in order not to create a hole. Decreasing: (applies when referred to in pattern). All decreases are done from the right side of the jumper within 3 garter sts as follows: after 3 garter sts: slip st as if to knit, knit 1, psso, before 3 garter sts: knit 2 together. Back: Cast on 63-71-79-87-95 sts (incl 1 edge st each side) using 1 thread Silke-tweed + 1 thread Cotton Viscose and 5.5mm needle. Knit 4 rows garter stitch and continue in stocking stitch. When back measures 5, 7 and 9 cm, decrease 1 st each side = 57-65-73-81-89 sts. When back measures 12 cm, increase 1 st each side every 2-2-2-2.5-2.5 cm a total of 7-7-7-6-6 times = 71-79-87-93-101 sts. When back measures 27-28-29-30-31 cm, decrease for armhole each side on every other row as follows: 3 sts 1 time, 2 sts 1-2-3-4-5 times and 1 st 1-2-3-3-4 times = 59-61-63-65-67 sts. When back measures 43-45-47-49-51 cm knit 4 rows garter stitch over the middle 23 sts. Then cast off the middle 17 sts for neck = 21-22-23-24-25 sts left on each shoulder. Finish each shoulder separately, knitting the 3 sts on neck in garter on all rows. Cast off when back measures 46-48-50-52-54 cm. Right Front: Knitted diagonally! Read all of the following before knitting it: Cast on 22-24-26-28-30 using 1 thread Silke-tweed + 1 thread Cotton Viscose and 5.5mm needle. Knit 4 rows garter stitch and continue in stocking stitch, but 3 sts in garter on left side (= 1st side = mid front/bottom edge). At the same time, after 2 rows garter stitch, cast on, on right side (= 2nd side = side seam) on every other row as follows: 1 st 5-6-7-8-9 times, 2 sts 4 times, 3 sts 2 times and 4 sts 1 time = 45-48-51-54-57 sts. Right front measures approx 12-13-14-15-16 cm. Continue with 3 garter sts each side and decrease on 2nd side - see Decreasing – 1 st on every 4th row 6-7-11-12-13 times and 1 st on every 6th row 4-4-2-2-2 times = 35-37-38-40-42 sts. The front piece measures approx 36-39-42-45-48 cm. Now increase on 2nd side – see Increasing - 1 st on every 4th row 6-5-4-3-1 times and 1 st on every other row 4-6-9-11-15 times. At the same time, when front piece measures 40-44-48-52-56 cm, (from cast on edge), cast off on side-1 on every other row: 1 st 7 times (decrease at the edge, after the 3 garter sts have been cast off, knit stocking stitch over all sts). The front piece measures approx 47-51-55-59-63 cm. On next row, cast off 8-10-13-16-18 sts for armhole on 1st side and then 1 st x 20-20-20-20-21 as follows: *decrease on every row 3 times, knit one row without decreasing*, repeat from *-* (decrease from edge). After the last increase on 2nd side, the front piece measures approx 51-54-58-61-65 cm. Now decrease on 2nd side, 1 st (from the edge) on every other row until all sts have been decreased. The front piece measures approx 60-64-68-72-76 cm from casting on edge to outer shoulder. Left Front: Cast on and knit as right front, but mirrored. Sleeves: Cast on 36-38-40-42-42 sts (incl 1edge st each side) using 1 thread Silke-tweed + 1 thread Cotton Viscose and 5.5mm needle. Knit 4 rows garter stitch and continue as follows: *2 rows stocking stitch, purl 1 row l*. Repeat from *-* until sleeve measures 10 cm. Now continue in stocking stitch. When sleeve measures 13 cm, increase 1 st each side every 3.5-3-3-2.5-2 cm a total of 10-11-11-12-14 times = 56-60-62-66-70 sts. When sleeve measures 48-47-45-44-42 cm, decrease for armhole each side on every other row as follows: 3 sts 1 time, 2 sts 3 times, 1 0-1-3-4-6 times and thereafter 2 sts each side until sleeve measures 55 cm. Cast off 3 sts each side, knit 1 row and cast off remaining sts. Sleeve measures approx 56 cm. To make up: Join shoulders and set in sleeves. Place right front piece over the left front piece and stitch both layers to back piece. |
|
 |
|
Have you finished this pattern?Tag your pictures with #dropspattern or submit them to the #dropsfan gallery. Do you need help with this pattern?You'll find 17 tutorial videos, a Comments/Questions area and more by visiting the pattern on garnstudio.com. © 1982-2026 DROPS Design A/S. We reserve all rights. This document, including all its sub-sections, has copyrights. Read more about what you can do with our patterns at the bottom of each pattern on our site. |


With over 40 years in knitting and crochet design, DROPS Design offers one of the most extensive collections of free patterns on the internet - translated to 17 languages. As of today we count 324 catalogues and 12290 patterns translated into English (UK/cm). 12290
We work hard to bring you the best knitting and crochet have to offer, inspiration and advice as well as great quality yarns at incredible prices! Would you like to use our patterns for other than personal use? You can read what you are allowed to do in the Copyright text at the bottom of all our patterns. Happy crafting!
Post a comment to pattern DROPS 81-28
We would love to hear what you have to say about this pattern!
If you want to leave a question, please make sure you select the correct category in the form below, to speed up the answering process. Required fields are marked *.