
Popular categories
Looking for a yarn?


Comments / Questions (195)
![]() Lucie wrote:
Lucie wrote:
Bonjour, Pouvez me dire comment remplacer la fermeture éclair par des boutonnières. Merci
14.02.2025 - 14:31DROPS Design answered:
Bonjour Lucie, ouvrez les boutonnières aux endroits souhaités lors de la réalisation du gilet, autrement dit, lorsque vous tricotez les devants et le dos puis l'empiècement. Vous pouvez vous inspirer d'un modèle de tensions similaire pour savoir où placer les boutonnières. Bon tricot!
14.02.2025 - 16:20
![]() Heike Andraschko wrote:
Heike Andraschko wrote:
Die Jacke Richard hat sich sehr schön stricken lassen und ist super bequem. 👍
20.01.2025 - 18:52
![]() Adrija Laha Mukherji wrote:
Adrija Laha Mukherji wrote:
Oh! So while doing the raglan shaping for the shoulders, when the piece measures 49 cms, (I am knitting S/M size) I have to start shaping the neck alongside? So slipping the 3 stitches on stitch holder will happen while decreasing for the raglan?
17.01.2025 - 17:34DROPS Design answered:
Dear Adrija, that is correct, you will still be finishing some raglan decreases when you start shaping for the neck, so you will slip these 3 stitches before ending the raglan decreases. Happy knitting!
19.01.2025 - 19:14
![]() Adrija Laha Mukherji wrote:
Adrija Laha Mukherji wrote:
Dear team, thank you for clarifying my previous query. Can you please explain the following: When the piece measures 49-57-59-60-62 cm put 3-4-5-6-6 sts at each center front edge on st holders for the neck. Then bind off at each neck edge every other row: 2 sts 2-0-0-2-4 times and 1 st 2-6-6-4-2 times.\\r\\nAfter all shaping is complete 59-63-65-71-75 sts remain.
17.01.2025 - 12:13DROPS Design answered:
Dear Mrs Mukherji, you will now shape neckline (and continue raglan decrease at the same time), so work the first 3-6 sts from RS and slip them on a thread, work row to the end as before, turn. Work the first 3-6 sts from WS and slip them on a thread. These stitches will be knitted up later for neck. Work row to the end, turn. Cast off now as explain at the beg of each row on each side first 2 sts (except in size 2 and 3) then 1 st. Happy knitting!
17.01.2025 - 13:25
![]() Adrija Laha Mukherji wrote:
Adrija Laha Mukherji wrote:
Dear team, I am unable to understand when to start the decrease for the raglan. Once it's mentioned 3 stitches before and after the markers, and then it's mentioned 2 stitches before the marker on the sleeves and 5 stitches before the marker on front and back. I need an elaborate explanation. Please help!
13.01.2025 - 11:31DROPS Design answered:
Dear Mrs Mukherji, the raglan lines are worked (1 st in seed stitch, 1 st in stocking st, 1 st in seed stitch) and you will decrease on each side of these 3 stitches, so you will start when 5 sts remain before the marker on front/back piece and / or 2 sts before marker on sleeve, then decrease 1, work the 3 sts raglan, decrease 1. Happy knitting!
14.01.2025 - 09:29
![]() Maija Helinä Nivala wrote:
Maija Helinä Nivala wrote:
Kavennetaanko pääntietä varten aivan reunasta ts. reunan aina oikein silmukat ensin?
27.12.2024 - 18:08DROPS Design answered:
Aluksi siirretään (3) 4-5-6-6 silmukkaa apulangalle, tämän jälkeen pääntien reunasta päätetään silmukoita ohjeen mukaan.
02.01.2025 - 18:28
![]() Eveline wrote:
Eveline wrote:
Hallo, Ik begrijp niet helemaal waarom de 3st aan weerskanten ribbelst zijn (in het begin van de trui). Verder vroeg ik me ook af of het mogelijk is om deze trui zonder het patroon te breien (het lukt niet helemaal) en gewoon de tricotsteek te gebruiken. Kan dat? Dankjewel!
09.10.2024 - 21:15DROPS Design answered:
Dag Eveline,
Midden voor wordt over de hele lengte in ribbelsteek gebreid. Hier wordt later de rits tegenaan genaaid. En je kunt inderdaad gewoon tricotsteek breien in plaats van in patroon.
10.10.2024 - 18:51
![]() Liz Blaine wrote:
Liz Blaine wrote:
I thought by the picture this was a half zip - so I am knitting it as a s/m half zip not a cardigan (my mistake ) - my question is if I am using a 35cm zip - do I add 22cm neck length to 66cm cardigan length = 88cm total length - 35cm zip = 53cm? - so knitting from bottom up do I start allowing for the zip at 53cm? - thank you
18.09.2024 - 03:19DROPS Design answered:
Dear Mrs Blaine, note that collar will be folded double, so that it will measure only the half approximately. Happy knitting!
18.09.2024 - 08:32
![]() Lisa wrote:
Lisa wrote:
Hallo, müssen die Abnahmen an den Halsrändern (bei Größe L jeweils 6x1M) in Hin-und Rückreihen gemacht werden (=6 Reihen) oder nur in den Hinreihen (=12 Reihen)? LG
14.09.2024 - 08:32DROPS Design answered:
Liebe Lisa, diese Abnahmen entstehen auch in jeder Hinreihe (man wird wie zuvor in jeder 2. Reihe abnehmen aber diesmal nur je 1 Masche anstatt 2). Viel Spaß beim Stricken!
16.09.2024 - 08:10
![]() Heidi wrote:
Heidi wrote:
Hallo liebes Drops-Team, ich stricke die Jacke in Größe L. Nach den Zunahmen steht "nach 41cm" Maschen für die Ärmel abketten. Ab wo werden diese 41cm gemessen? Vom Bündchen oder nach der ersten Zunahme? Also wie lange muss das fertige Vorder-Rückenteil insgesamt sein? In der Skizze stehen 57cm. Ich bin mir jedoch nicht sicher, ob es dann hinterher beim Zusammenstricken aller Teilenoch wächst oder ob es schon 57cm lang sein muss. Liebe Grüße
01.09.2024 - 22:28DROPS Design answered:
Liebe Heidi, diese 41 cm messen Sie ab der Anschlagskante; die gesamte Höhe in L ist 68 cm (41 cm Rumpteil + 23 cm Passe + 4 cm Schulter). Die 57 cm in der Breite = vor der Teilung kurz vor der Passe. Viel Spaß beim Stricken!
02.09.2024 - 09:27
|
|||||||
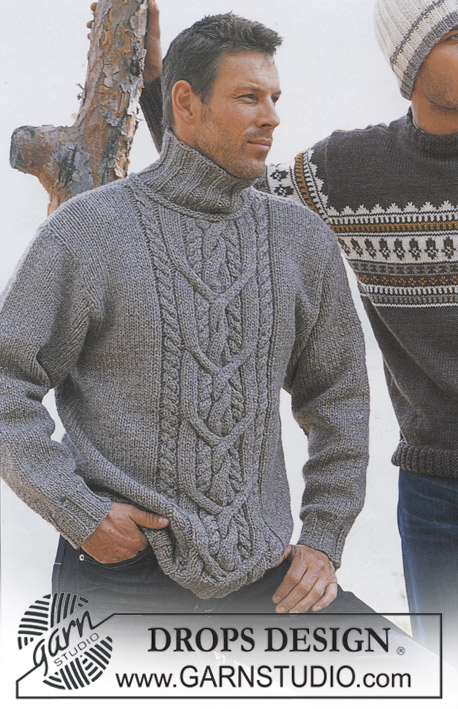
Richard |
|||||||
|
|
|||||||
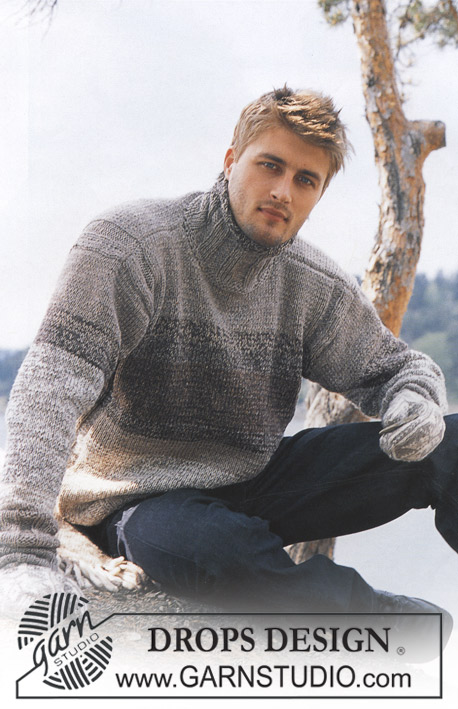
Knitted jacket for men, with raglan, high neck and zipper in DROPS Karisma and DROPS Alpaca
DROPS 85-13 |
|||||||
|
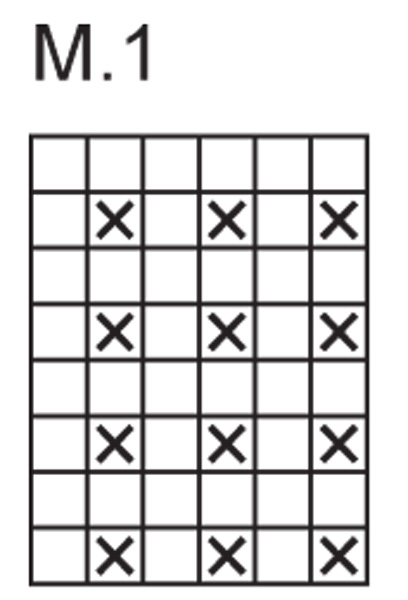
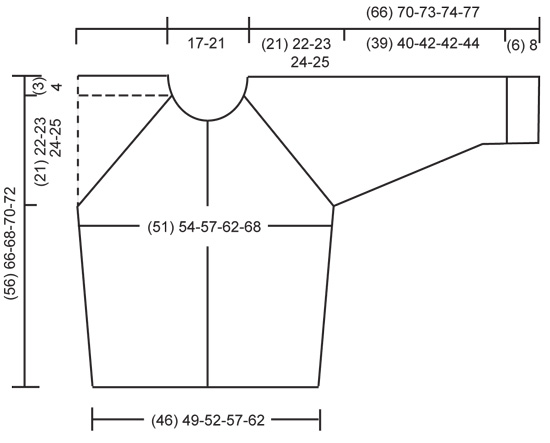
Gauge: 15 sts x 21 rows with 1 strand of each yarn on larger needles in stockinette st = 10 x 10 cm. Rib: *K 1, P 1*, repeat from *-*. Pattern: The diagrams are showing all rows seen from the right side. Decreasing tips (for raglan): All decs are made on the right side. On front- and back piece dec before the 3 sts before/after the marker, and on the sleeves dec right beside the marker. Start 2 sts before the marker on the sleeves and 5 sts before the marker on front and back, and work as follows: K 2 tog, 1 st in seed st, K 1, 1 st in seed st, slip 1 st as if to knit, K 1, psso. ___________________________________________________________________ BODY The cardigan are worked back and fort on circular needle. Cast on 137-147-155-171-187 sts on smaller circular needles with 1 strand Karisma + 1 strand Alpaca. Knit rib, keeping 3 sts in garter st at each side for front edges, and begin and end rib with K 1 (seen from the right side). When the piece measures 3-4-4-4-4 cm change to larger circular needles and Pattern 1, keeping 3 sts in garter st at each side for front edges. See that the K rib in the pattern is above the K rib in ribbing. Place a marker in the 36-38-40-44-48th st in from each side (it will be a K 1), there are 65-71-75-83-91 sts between markers on back. When the piece measures 10-12-12-12-12 cm inc 1 st at each side of both sts with markers. Inc every 5-6-6-6-6 cm a total of 4 times = 153-163-171-187-203 sts – knit the increased sts into the pattern as you go along. When the piece measures 32-40-41-42-43 cm bind off 7 sts at each side for armholes (= bind off the st with the marker + 3 sts each side of that st) = 67-73-77-85-93 sts on back and 36-38-40-44-48 sts on each front. Lay piece aside and knit the sleeves. SLEEVES Sleeves knitted in the round. Cast on 32-34-36-36-40 sts on smaller double-pointed needles with 1 strand Karisma + 1 strand Alpaca; join and place a marker at the join. Knit rib – start with K 1 at marker. When the piece measures 6-8-8-8-8 cm change to larger double-pointed needles and Pattern 1 – see that the K rib in the pattern is above the K rib in the ribbing. When the piece measures 10-14-10-14-10 cm inc 1 st each side of the K st at marker every 2.5-2-2.5-2-2.5 cm a total of 14-16-16-17-17 times = 60-66-68-70-74 sts – knit the increased sts in the pattern as you go along. When the piece measures 45-48-50-50-52 cm bind off 7 sts at marker (bind off the the K st at marker + 3 sts each side of it) = 53-59-61-63-67 sts. Lay piece aside and knit second sleeve. YOKE Put the sleeves in on the same circular needles as Body where you bound off for armholes = 245-267-279-299-323 sts Put a marker in each transition between Body and sleeves = 4 markers. Knit 3-1-1-1-0 rows before beginning shaping. Read entire section before knitting: Raglan shaping: Dec at each side of all markers (= 8 decs) – see Decreasing tips above – every other row 21-23-24-25-27 times. Neck: When the piece measures 49-57-59-60-62 cm put 3-4-5-6-6 sts at each center front edge on st holders for the neck. Then bind off at each neck edge every other row: 2 sts 2-0-0-2-4 times and 1 st 2-6-6-4-2 times. After all shaping is complete 59-63-65-71-75 sts remain. Neckband: Pick up and knit approx. 10-16 sts at each side of neck on fronts (including sts on st holders) with 1 strand of each yarn and put all sts on smaller circular needles. K 1 row from wrong side, then K 1 row from right side, adjusting (inc/dec) to 83-83-91-103-111 sts on 2nd row. Then knit rib, keeping 3 sts in garter st at each side and beginning rib with K 1 (as seen from the right side). When the collar measures 20-22-22-24-24 cm bind off all sts in rib. ASSEMBLY Sew opening under the sleeve. Sew in zipper – start at lower edge. Fold the collar in half to wrong side and stitch in place, covering end of zipper. |
|||||||
Diagram explanations |
|||||||
|
|||||||
 |
|||||||
 |
|||||||
Have you finished this pattern?Tag your pictures with #dropspattern or submit them to the #dropsfan gallery. Do you need help with this pattern?You'll find 23 tutorial videos, a Comments/Questions area and more by visiting the pattern on garnstudio.com. © 1982-2026 DROPS Design A/S. We reserve all rights. This document, including all its sub-sections, has copyrights. Read more about what you can do with our patterns at the bottom of each pattern on our site. |
|||||||


With over 40 years in knitting and crochet design, DROPS Design offers one of the most extensive collections of free patterns on the internet - translated to 17 languages. As of today we count 324 catalogues and 12290 patterns translated into English (UK/cm). 12290
We work hard to bring you the best knitting and crochet have to offer, inspiration and advice as well as great quality yarns at incredible prices! Would you like to use our patterns for other than personal use? You can read what you are allowed to do in the Copyright text at the bottom of all our patterns. Happy crafting!
Post a comment to pattern DROPS 85-13
We would love to hear what you have to say about this pattern!
If you want to leave a question, please make sure you select the correct category in the form below, to speed up the answering process. Required fields are marked *.