
Popular categories
Looking for a yarn?


Comments / Questions (195)
![]() Marie wrote:
Marie wrote:
Bonjour, j'ai commencé ce tricot avec les mesures pour XL et des aiguilles 5,5 en points fantaisie après les côtes. Et je n'obtiens pas du tout les mesures en cm. A la place de 57 cm, j'ai 46 cm en point fantaisie... J'ai l'habitude de vos modèles et je tricote sans avoir ces écarts. Merci de me dire ce qu'il en est d'après vous. Merci beaucoup Marie
27.03.2026 - 11:20DROPS Design answered:
Bonjour Marie, avez-vous le bon échantillon? Vous devez voir 15 m x 21 rangs jersey = 10 x 10 cm, et alors, les 171 mailles / 2 / 1,5 (tension) = 57 cm. Retrouvez ici plus d'infos sur l'échantillon. Bon tricot!
27.03.2026 - 15:56
![]() Emily wrote:
Emily wrote:
When you are going to do the first increase when working on the body it says to increase 1 on each side of both st markers. Does that mean you increase one stitch on each side of the stitch marker such that you would be increasing two stitches within the same lower bar? Or do you increase one stitch before the 40th stitch then knit the 40th stitch and then increase a stitch after the 40 the stitch as well? If so, how do you keep the knit one purl one pattern with the increase? Thank you so much!
15.03.2026 - 01:07DROPS Design answered:
Dear Emily, the markers on the sides are inserted in a stitch, which should be a knitted stitch of the pattern - you now increase before and after this stitch (on each side of the stitch with the marker) and incorporate these new stitches into the pattern make sure that the pattern fits the front/back pieces - it will not fit in the round on the sides until you have increased 2 times on each side of these stitches. Happy knitting!
16.03.2026 - 09:46
![]() Emily wrote:
Emily wrote:
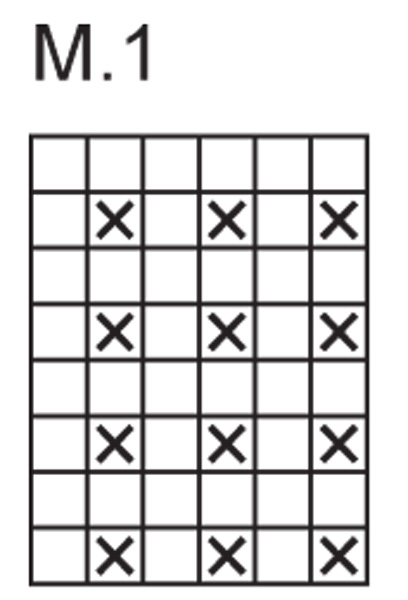
Hi, When you switch to working the pattern 1 chart it says to keep the k rib in the pattern above the k rib in the ribbing. However, pattern 1 starts with a purl from the RS when the RS ribbing started with a K after the three garter stitches. How am I to keep the K ribbing in the pattern 1 in line with that in the ribbing when the chart says to start with a P on the RS when you start with a K on the RS in the ribbing portion? Am I misunderstanding? Thank you
05.03.2026 - 03:53DROPS Design answered:
Hi Emily, M.1 is a repetetive pattern, so you can begin the first row by beginning the row with K1 after the 3 garter stitches, then continuing with P1, K1. Regards, Drops Team.
05.03.2026 - 06:28
![]() Isabel wrote:
Isabel wrote:
Ik ben bezig met het breien van het vest en loop vast op dit deel van het patroon: Hals: Zet bij een hoogte van 49-57-59-60-62 cm de 3-4-5-6-6 eerste st van de beide voorpanden op een hulpdraad voor de hals. Kant hierna aan beide halskanten af in elke 2e nld: 2-0-0-2-4 x 2 st en 2-0-0-2-4 x 1 st. Als alle minderingen voltooid zijn, resteren er 59-63-65-71-75 st. Ik ben bezig met maat M en zou dan in elke 2e naald 0 steken moeten minderen. Maar daardoor komt de hals er heel vreemd uit te zien.
03.03.2026 - 08:58DROPS Design answered:
Dag Isabel,
Er zat een fout in het patroon; het aantal af te kanten steken voor de hals klopte niet. Het is nu aangepast.
09.03.2026 - 20:57
![]() Tinca wrote:
Tinca wrote:
Dank voor je snelle reactie. De trui is nog niet gewassen. Het vest hangt uit door het dragen. Hoe kan ik dit in de toekomst vermijden? Andere wol? Of is een grote XXXL trui sowieso te zwaar?
10.01.2026 - 20:10DROPS Design answered:
Dag Tinca,
Dan denk ik dat het inderdaad door het gewicht komt en het dragen. Je zou hem eens kunnen wassen en daarna in vorm brengen om te drogen. Dus dan leg je hem plat neer waarbij je hem 'opspant' in de oorspronkelijke maten.
11.01.2026 - 17:28
![]() Tinca wrote:
Tinca wrote:
Eind vorig jaar heb ik dit vest gebreid. Ik heb toen een opmerking gemaakt over de geadviseerde hoeveelheid wol (ik had bijna de helft over), maar zo te zien is daar niets aan gecorrigeerd. Maar nu heb ik een andere vraag. Ik heb het vest gebreid in maat XXL. Mijn man heeft het nu enkele keren gedragen en het vest blijkt enorm uit te hangen. Het is eigenlijk geen gezicht meer. Wat is daar aan te doen? Kleinere maat preien? Andere wol gebruiken? Of hebben jullie een andere tip?
10.01.2026 - 15:08DROPS Design answered:
Dag Tinca,
Karisma is superwash behandeld en moet in de wasmachine gewassen worden (dus niet met de hand) op een wolprogramma. Vervolgens moet het kledingstuk plat liggen om te drogen. In principe zou het kledingstuk dan goed moeten blijven. Het hangt er natuurlijk wel een beetje vanaf hoe intensief het gedragen wordt en hoe vaak het gewassen wordt.
10.01.2026 - 16:42
![]() Anna wrote:
Anna wrote:
Ich hätte vom Bild in Kombination mit diesen Anweisungen gedacht: die ersten vier M vom Hilfsfaden wie gehabt stricken, Maschen aufnehmen, die restlichen M re stricken, Maschen aufnehmen, 4 M Rand stricken. Dann auf der Rückseite Rand wie gehabt den Rest re. Auf der Vorderseite die linken Maschen re stricken. Und in der nächsten Reihe mit dem Bündchen beginnen. Immer den Rand (4M) fortführen.
04.01.2026 - 08:08
![]() Anna wrote:
Anna wrote:
Hallo. Ich habe mir die Beschreibung durchgelesen und begreife etwas unter dem Abschnitt Hals nicht: ...1 R. re. auf links, danach 1 R. re. auf rechts... 1 R re ist klar, aber auf welches links? Und dann 1 R re auf rechts? Die vorherige Reihe wurde re auf der Rückseite gestrickt, ist also auf der Vorderseite links. Wo ist da das "auf rechts" zu finden? Ich kann das im Moment nicht nachvollziehen. Bitte 2. Kommentar dazu lesen.
04.01.2026 - 08:07DROPS Design answered:
Liebe Anna, die Anleitung wird heute noch sprachlich überarbeitet, dann ist es hoffentlich klarer!
13.01.2026 - 10:52
![]() Emily wrote:
Emily wrote:
Hi, would you have any advice as to how to turn this into a quarter zip sweater as opposed to full zip? Thank you so much for the advice!
30.12.2025 - 16:41
![]() Sylvie wrote:
Sylvie wrote:
Bonjour. Est-ce que les diminutions du raglan et du col doivent être terminées en même temps ou le raglan peut être fini avant les diminutions du col ?
23.12.2025 - 16:21DROPS Design answered:
Bonjour Sylvie, on va commencer l'encoure avant la fin des diminutions du raglan, vous allez, vers la fin, diminuer en même temps pour l'encolure et pour le raglan. Bon tricot!
23.12.2025 - 17:46
|
|||||||
Richard |
|||||||
|
|
|||||||
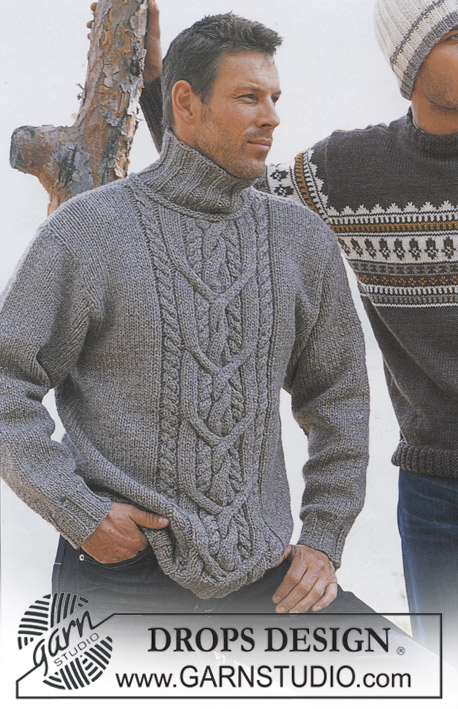
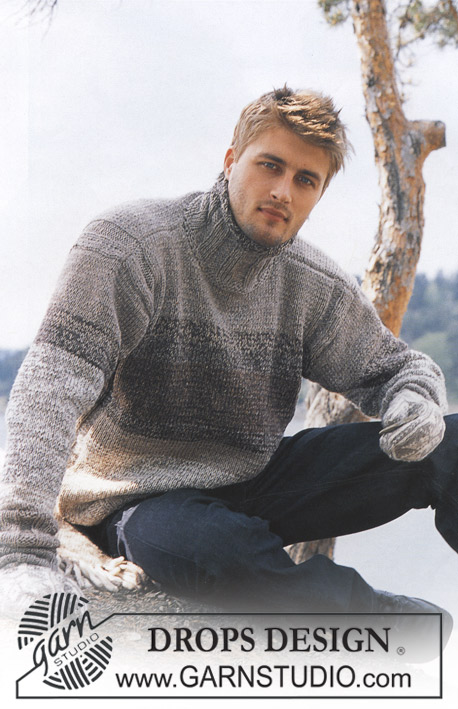
Knitted jacket for men, with raglan, high neck and zipper in DROPS Karisma and DROPS Alpaca
DROPS 85-13 |
|||||||
|
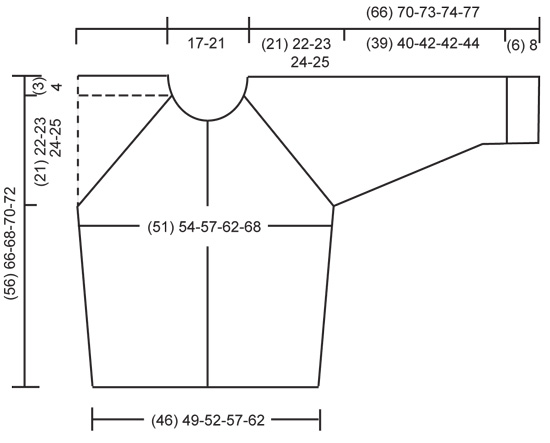
Gauge: 15 sts x 21 rows with 1 strand of each yarn on larger needles in stockinette st = 10 x 10 cm. Rib: *K 1, P 1*, repeat from *-*. Pattern: The diagrams are showing all rows seen from the right side. Decreasing tips (for raglan): All decs are made on the right side. On front- and back piece dec before the 3 sts before/after the marker, and on the sleeves dec right beside the marker. Start 2 sts before the marker on the sleeves and 5 sts before the marker on front and back, and work as follows: K 2 tog, 1 st in seed st, K 1, 1 st in seed st, slip 1 st as if to knit, K 1, psso. ___________________________________________________________________ BODY The cardigan are worked back and fort on circular needle. Cast on 137-147-155-171-187 sts on smaller circular needles with 1 strand Karisma + 1 strand Alpaca. Knit rib, keeping 3 sts in garter st at each side for front edges, and begin and end rib with K 1 (seen from the right side). When the piece measures 3-4-4-4-4 cm change to larger circular needles and Pattern 1, keeping 3 sts in garter st at each side for front edges. See that the K rib in the pattern is above the K rib in ribbing. Place a marker in the 36-38-40-44-48th st in from each side (it will be a K 1), there are 65-71-75-83-91 sts between markers on back. When the piece measures 10-12-12-12-12 cm inc 1 st at each side of both sts with markers. Inc every 5-6-6-6-6 cm a total of 4 times = 153-163-171-187-203 sts – knit the increased sts into the pattern as you go along. When the piece measures 32-40-41-42-43 cm bind off 7 sts at each side for armholes (= bind off the st with the marker + 3 sts each side of that st) = 67-73-77-85-93 sts on back and 36-38-40-44-48 sts on each front. Lay piece aside and knit the sleeves. SLEEVES Sleeves knitted in the round. Cast on 32-34-36-36-40 sts on smaller double-pointed needles with 1 strand Karisma + 1 strand Alpaca; join and place a marker at the join. Knit rib – start with K 1 at marker. When the piece measures 6-8-8-8-8 cm change to larger double-pointed needles and Pattern 1 – see that the K rib in the pattern is above the K rib in the ribbing. When the piece measures 10-14-10-14-10 cm inc 1 st each side of the K st at marker every 2.5-2-2.5-2-2.5 cm a total of 14-16-16-17-17 times = 60-66-68-70-74 sts – knit the increased sts in the pattern as you go along. When the piece measures 45-48-50-50-52 cm bind off 7 sts at marker (bind off the the K st at marker + 3 sts each side of it) = 53-59-61-63-67 sts. Lay piece aside and knit second sleeve. YOKE Put the sleeves in on the same circular needles as Body where you bound off for armholes = 245-267-279-299-323 sts Put a marker in each transition between Body and sleeves = 4 markers. Knit 3-1-1-1-0 rows before beginning shaping. Read entire section before knitting: Raglan shaping: Dec at each side of all markers (= 8 decs) – see Decreasing tips above – every other row 21-23-24-25-27 times. Neck: When the piece measures 49-57-59-60-62 cm put 3-4-5-6-6 sts at each center front edge on st holders for the neck. Then bind off at each neck edge every other row: 2 sts 2-0-0-2-4 times and 1 st 2-6-6-4-2 times. After all shaping is complete 59-63-65-71-75 sts remain. Neckband: Pick up and knit approx. 10-16 sts at each side of neck on fronts (including sts on st holders) with 1 strand of each yarn and put all sts on smaller circular needles. K 1 row from wrong side, then K 1 row from right side, adjusting (inc/dec) to 83-83-91-103-111 sts on 2nd row. Then knit rib, keeping 3 sts in garter st at each side and beginning rib with K 1 (as seen from the right side). When the collar measures 20-22-22-24-24 cm bind off all sts in rib. ASSEMBLY Sew opening under the sleeve. Sew in zipper – start at lower edge. Fold the collar in half to wrong side and stitch in place, covering end of zipper. |
|||||||
Diagram explanations |
|||||||
|
|||||||
 |
|||||||
 |
|||||||
Have you finished this pattern?Tag your pictures with #dropspattern or submit them to the #dropsfan gallery. Do you need help with this pattern?You'll find 23 tutorial videos, a Comments/Questions area and more by visiting the pattern on garnstudio.com. © 1982-2026 DROPS Design A/S. We reserve all rights. This document, including all its sub-sections, has copyrights. Read more about what you can do with our patterns at the bottom of each pattern on our site. |
|||||||


With over 40 years in knitting and crochet design, DROPS Design offers one of the most extensive collections of free patterns on the internet - translated to 17 languages. As of today we count 324 catalogues and 12290 patterns translated into English (UK/cm). 12290
We work hard to bring you the best knitting and crochet have to offer, inspiration and advice as well as great quality yarns at incredible prices! Would you like to use our patterns for other than personal use? You can read what you are allowed to do in the Copyright text at the bottom of all our patterns. Happy crafting!
Post a comment to pattern DROPS 85-13
We would love to hear what you have to say about this pattern!
If you want to leave a question, please make sure you select the correct category in the form below, to speed up the answering process. Required fields are marked *.