
Popular categories
Looking for a yarn?












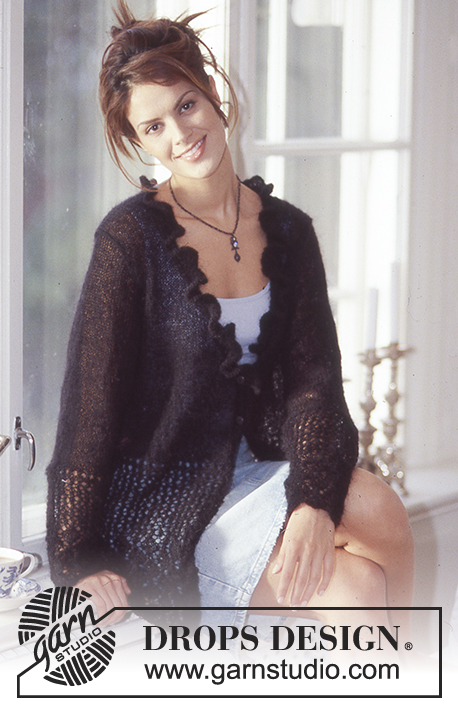

















Comments / Questions (78)
 Bien Foutu wrote:
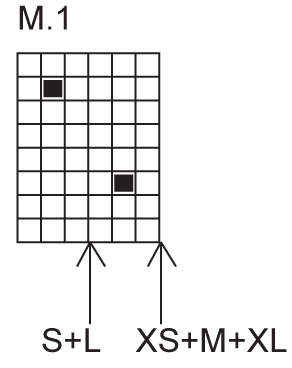
Noch ne Frage. Muster M1. Für Größe L. Reihe 1 und 2 des Diagramm nur rechte Maschen? R3 1 Re, 1li, 4 Re und wdh? Rückreihen wie Maschen erscheinen? Was bedeuten die Pfeile am unteren Rand des Diagramms? Danke.
10.09.2019 - 20:46DROPS Design answered:
Liebe Frau Bien Foutu, die 2 ersten Reihen in M.1 werden glatt rechts gestrickt (= Hinreihe rechts und alle Rückereihen links), dann stricken Sie (1 M re, 1 M li, 5 M re) und von (bis) wiederholen, Dann 3 Reihen glatt rechts stricken (Hinreihen rechts, Rückreihen links) und dann (4 M re, 1 M li, 1 M re), von (bis) wiederholen - das gilt für Rückentil und linken Vorderteil, beim rechten Vorderteil beginnen Sie beim Pfeil. Viel Spaß beim stricken!
11.09.2019 - 07:56
Bien Foutu wrote:
Hallo. Motiviert nach einem tollen Drops Tuch nun diese Jacke.... Allerdings verstehe ich die Anleitung nicht. Bitte was bedeutet "Ndl"? Zu Beginn steht 1. Bis 12. Ndl., kann ich das als Reihe interpretieren? Danke für Ihre Antwort.
05.09.2019 - 16:42DROPS Design answered:
Liebe Frau Bien Foutu, ja genau, hier wird "Reihe" gemeint, die deutsche Anleitung wird angepasst, danke für den Hinweis. Viel Spaß beim stricken!
06.09.2019 - 07:41
 Louise wrote:
L’explicar du patron ne correspond pas à l’image
06.04.2019 - 16:26DROPS Design answered:
Bonjour Louise, ce sont bien les bonnes explications qui sont indiquées sous ce modèle, pouvez-vous préciser ce que vous ne comprenez pas?
08.04.2019 - 10:31
 Rose Marie wrote:
Merci beaucoup Je n’avais pas compris que c’était une boudure Bonne journée
12.03.2019 - 12:42
 Rose Marie wrote:
Je voulais dire l’encolure des devants (24 mailles, puis 13 fois 1 maille) si on rabat 24 mailles devant , cela ne fait pas une encolure en v. Merci de m’éclairer
12.03.2019 - 11:27DROPS Design answered:
Bonjour Rose Marie - voir réponse précédente - on rabat d'abord les 24 premières mailles pour tricoter la bordure le long de l'encolure (le côté de cette bordure sera assemblé à ces 24 m) - on diminue ensuite 13 fois 1 m pour l'encolure V. Bon tricot!
12.03.2019 - 12:31
Rose Marie wrote:
Bonjour, je ne comprends pas les diminutions de l’enclure pourriez vous m’aider Je vous remercie
12.03.2019 - 11:20DROPS Design answered:
Bonjour Rose Marie, rabattez les 24 premières mailles sur l'endroit (devant droit) / sur l'envers (devant gauche) et diminuez ensuite 13 fois 1 maille alt. tous les 4 et 5 rangs. Vous tricotez ensuite la bordure devant droit et le col (le côté gauche en sens inverse) en relevant les mailles le long de l'encolure devant jusqu'au milieu dos. Bon tricot!
12.03.2019 - 12:30
 Nicole wrote:
Bonjour, pourriez vous m'expliquer la diminution des emenchures dos pour la petite taille (xs) svp. D'avance merci pour votre retour. Belle journée ;-)
23.04.2018 - 20:34DROPS Design answered:
Bonjour Nicole, pour les emmanchures, vous rabattez pour le dos au début de chaque rang de chaque côté (= sur l'endroit et sur l'envers): 1 x 3 m et 1 x 2 m, soit 5 m de chaque côté (= 10 m au total), il reste 82 m. Pour les emmanchures des devants, rabattez au début du rang qui commence par le côté emmanchure. Bon tricot!
24.04.2018 - 08:52
Bettina Foltas wrote:
Muster 2 soll am Vorderteil quer angestrickt werden. Wie verbinde ich das Muster mit den abgeketteten Maschen in Brusthöhe? Verläuft das Muster 2 dann im Vorderteil um 90° gedreht im Vergleich zum Ärmel?
17.04.2018 - 16:29DROPS Design answered:
Liebe Frau Fuchs, die 58 M Muster 2 werden nicht abgekettet sondern stillgelegt, bei der Blende/Halskante werden diese Maschen zurüick auf der Nadel gelegt, wenn Sie die Maschen auffassen. Viel Spaß beim stricken!
18.04.2018 - 08:54Helenor Dale wrote:
After completing the 5 rows of seed stitch rib, is my next row the right side or wrong side of the work?
10.03.2018 - 14:16DROPS Design answered:
Dear Helenor, cast on row + 5 rows in seed stitch = 6 rows. The next row is the right side.
11.03.2018 - 16:24
Frau Foltas wrote:
Muster M1 nach Diagramm ist klar. Aber was bedeutet M2 ?? Vielen Dank für die Antwort.
02.02.2018 - 09:39DROPS Design answered:
Liebe Frau Foltas, M.1 ist Diagram aber M.2 wird oben Reihe nach Reihe beschrieben - siehe am Anfang der schriftlichen Anleitung. Viel Spaß beim stricken!
02.02.2018 - 13:32
|
|||||||
Pauline |
|||||||
|
|
|||||||
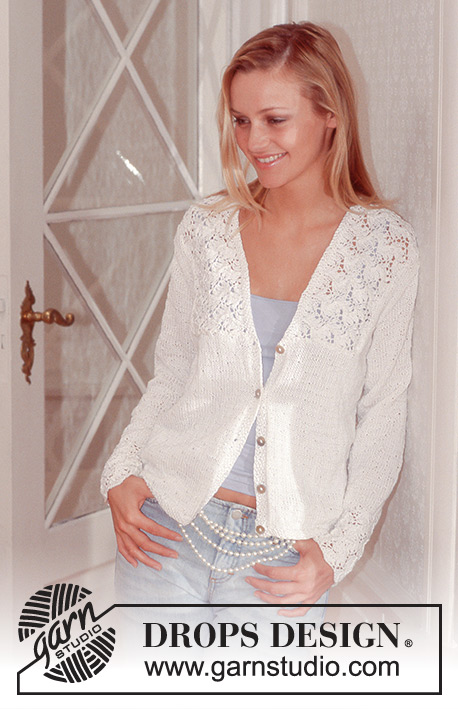
DROPS Cardigan in Muskat
DROPS 74-21 |
|||||||
|
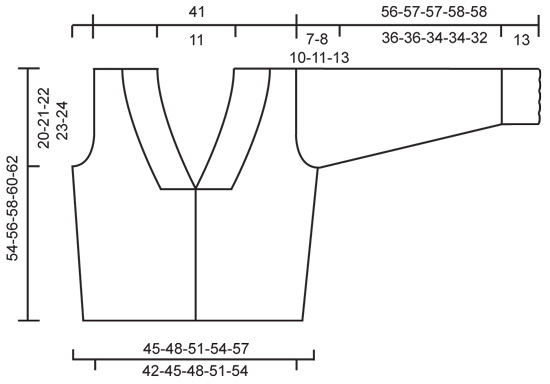
Gauge: 20 sts x 26 rows = 10 x 10 cm on larger needles in stockinette st. Seed Stitch (on an even number of sts): Row 1: * K 1, P 1 * Row 2: * P 1, K 1 * Repeat Rows 1-2. Pattern 1: See chart. The pattern is seen from the right side. Arrows indicate the starting point for different sizes for the right front only – the chart is the same for all sizes for the back and left front. Pattern 2: divisible by 8 + 2 sts (1 edge st each side) Row 1 (right side row): K 1 (edge st), * yo, K 1 through back of st, yo, sl 1, K 1, psso, K 5 *, repeat from * - *, K 1 (edge st). Row 2 (wrong side row): P 1 (edge st), * P 4, P 2 tog through back of sts, P 3 *, repeat from * - *, P 1 (edge st). Row 3: K 1, * yo, K 1 through back of st, yo, K 2, sl 1, K 1, psso, K 3 *, repeat from * - *, K 1. Row 4: P 1, * P 2, P 2 tog through back of sts, P 5*, repeat from * - *, P 1. Row 5: K 1, * K 1 through back of st, yo, K 4, sl 1, K 1, psso, K 1, yo *, repeat from * - *, K 1. Row 6: P 1, * P 1, P 2 tog through back of st, P 6 *, repeat from * - *, P 1. Row 7: K 1, * K 5, K 2 tog, yo, K 1 through back of st, yo *, repeat from * - *, K 1. Row 8: P 1, * P 3, P 2 tog, P 4 *, repeat from * - *, P 1. Row 9: K 1, * K 3, K 2 tog, K 2, yo, K 1 through back of st, yo *, repeat from * - *, K 1. Row 10: P 1, * P 5, P 2 tog, P 2 *, repeat from * - *, P 1. Row 11: K 1, * yo, K 1, K 2 tog, K 4, yo, K 1 through back of st *, repeat from * - *, K 1. Row 12: P 1, * P 6, P 2 tog, P 1 *, repeat from * - *, P 1. Repeat rows 1-12. ------------------------------------------------------------------ Back: Cast on 86-92-98-104-110 sts on smaller needles. Knit 5 rows seed st, change to larger needles and Pattern 1 - start pattern at lower right corner on chart for all sizes, but do not knit 1 edge st at each side in the pattern. When the piece measures 7 cm inc 1 st at each side every 8 cm a total of 3 times = 92-98-104-110-116 sts - the increased sts are knit in the pattern as you go along. When the piece measures 34-35-36-37-38 cm bind off for armhole at each side every other row: 3 sts 1 time, 2 sts 0-1-2-3-4 times and 1 st 2-3-4-5-6 times = 82 sts remain for all sizes. When the piece measures 52-54-56-58-60 cm bind off the center 20 sts for the neck. On the next row dec 1 st at each neck edge = 30 sts remain on each shoulder. Bind off when the piece measures 54-56-58-60-62 cm. Right front: Cast on 44-47-50-53-56 sts on smaller needles. Knit 5 rows seed st, change to larger needles and Pattern 1, starting from center front edge at appropriate arrow on the chart (1 edge st at each side is not knit in the pattern). When the piece measures 7 cm inc 1 st at the side edge every 8 cm a total of 3 times = 47-50-53-56-59 sts - the increased sts are knit in the pattern as you go along. Read the entire next section before knitting: Neckband: When the piece measures 30-32-34-36-38 cm bind off 24 sts at center front edge for neck. Then dec 1 st for the neck on alternately every 4th and 5th row a total of 13 times. Armhole: At the same time when the piece measures 34-35-36-37-38 cm bind off for armhole at the side as on back. After all armhole and neck shaping is complete 5 sts remain on each shoulder. Bind off when the piece measures 54-56-58-60-62 cm. Left front: Cast on and knit the same as the right - start Pattern 1 at lower right corner so that the pattern will be the same on each side at the center front – for armhole and neck reverse all shaping. Sleeve: Cast on 42-42-50-50-50 sts on smaller needles. Knit Pattern 2 for 13 cm. Change to larger needles and Pattern 1, increasing 8-8-6-6-6 sts evenly distributed on the 1st row = 50-50-56-56-56 sts. When the piece measures 16 cm inc 1 st at each side every 7-6-6-5-4 rows a total of 12-14-13-15-17 times = 74-78-82-86-90 sts - the increased sts are knit in the pattern as you go along. When sleeve measures 49-49-47-47-45 cm bind off for sleeve cap at each side every other row: 4 sts 1 time, 3 sts 1 time, 2 sts 3 times, 1 st 0-0-4-5-8 times, then bind off 2 sts at each side until the piece measures 55-56-56-57-57 cm and then bind off 3 sts 1 time. The piece measures approx. 56-57-57-58-58 cm, bind off the remaining sts. Assembly: Right collar: Pick up 58 sts on smaller needles along left neck edge and knit approx. 12 cm of Pattern 2 - see instructions above, put all sts on a st holder. Left collar: knit the same as the right collar. Sew shoulder seams. Right button band and neckband: Pick up on smaller circular needles approx. 62-76 sts along right button band, then put 58 sts from right collar back on needles and pick up approx. 12 sts to center back = 132 -146 sts. Knit 2 rows seed st. On the next row make 5 buttonholes evenly distributed along button bands - the bottom should be approx. 1 cm from bottom edge and the top should be just before the collar starts. 1 buttonhole = K 2 tog, yo. Knit 1 row seed st more, then bind off sts around back of the neck and along the collar in seed st. Continue with 3 rows seed st along button bands – K 2 tog the 2 sts at the top of button bands every row so that there will be a smooth transition from neckband. After these 3 rows bind off the remaining sts in seed st. Left button band and neckband: Knit the same as the right, reversing all shaping and without buttonholes. Sew in sleeves. Sew sleeve and side seams using edge sts as a seam allowance. Sew on buttons. |
|||||||
Diagram explanations |
|||||||
|
|||||||
 |
|||||||
 |
|||||||
Have you finished this pattern?Tag your pictures with #dropspattern or submit them to the #dropsfan gallery. Do you need help with this pattern?You'll find 12 tutorial videos, a Comments/Questions area and more by visiting the pattern on garnstudio.com. © 1982-2026 DROPS Design A/S. We reserve all rights. This document, including all its sub-sections, has copyrights. Read more about what you can do with our patterns at the bottom of each pattern on our site. |
|||||||






With over 40 years in knitting and crochet design, DROPS Design offers one of the most extensive collections of free patterns on the internet - translated to 17 languages. As of today we count 333 catalogues and 12532 patterns translated into English (UK/cm). 12532
We work hard to bring you the best knitting and crochet have to offer, inspiration and advice as well as great quality yarns at incredible prices! Would you like to use our patterns for other than personal use? You can read what you are allowed to do in the Copyright text at the bottom of all our patterns. Happy crafting!
Post a comment to pattern DROPS 74-21
We would love to hear what you have to say about this pattern!
If you want to leave a question, please make sure you select the correct category in the form below, to speed up the answering process. Required fields are marked *.