
Popular categories
Looking for a yarn?


Comments / Questions (46)
![]() Nella wrote:
Nella wrote:
Tjena! Jag fattar ingenting. Jag har gjort kragen och sedan stickades jag fram till att a ok skulle delas ,typ, men såg då att ökningar och raglarna var fel. Repade upp, gjorde om. Förstår inte ändå efter många upprepningar. Sett alla videos på drops samt andra. Kollat kommentarer osv. Hur ska jag räkna indelningen efter ett helpatent varv? Vad är vanlig maska och ragalnmaskan. Varför har jag 5 markeringar på ena sidan(en förstår jag är start på varv) och tre på andra?
14.03.2026 - 01:04
![]() Mar wrote:
Mar wrote:
Hvordan unngår man at man hopper 1 maske til høyre for hver runde?
08.02.2026 - 21:29DROPS Design answered:
Hei Mar. Har man riktig maskeantall og følger oppskriften, skal man ikke "hoppe" 1 maske til høyre for hver runde. Det er satt en merketråd ved omgangens begynnelse, pass på at man har strikket over riktig antall masker før man starter på neste omgang. Se gjerne hjelpevideoene ang. Helpatent som er lagt til denne oppskriften (klikk på Videoer til høyre/under bildet). mvh DROPS Design
09.02.2026 - 09:09
![]() Mar wrote:
Mar wrote:
Skal man øke 2 m i ved raglanmasken og i de 2 ermemaskene og der man markerte for og bakstykke. Slik st det til sammen er 8 områder med 5 m mellom man øker i? Strikker i strl s.
08.02.2026 - 21:27DROPS Design answered:
Hei Mar. Det er 8 områder ( = 1 område = 5 masker = 1 raglanlinje) og det økes på hver side av disse områdene. Du har 4 raglanslinjer som består av 5 masker, og det skal økes på hver side av disse raglanlinjenen = det økes 16 steder pr øke omgang. mvh DROPS Design
09.02.2026 - 09:03
![]() Maiju wrote:
Maiju wrote:
Minulla on sama ongelma kuin Marialla ja Manuelalla. Kun kierroksen alkamiskohta on keskellä raglania, kierros alkaa oikealla silmukalla ja M-koossa ensimmäiset 51 silmukkaa poimitaan hihoiksi, tällöin ensimmäinen ja viimeinen silmukka ovat nurjia. Väliin luodaan 5 silmukkaa, joista myös ensimmäisen ja viimeisen on oltava nurjia, jotta patenttineulekuvio säilyy. Hihoja tehdessä vierekkäin tulee siis kaksi nurjaa silmukkaa. Onko väliin luotava ylimääräiset oikeat silmukat?
02.02.2026 - 12:32
![]() Ilona wrote:
Ilona wrote:
Bonjour, Je ne comprend pas lors de la première augmentation pour le raglan il est noté 16 mailles en plus. Mais il y a seulement 4 repères raglan. Ca fait seulement 8 mailles en plus puisqu'il faut faire 2 augmentation par repères de raglan.
30.01.2026 - 15:57DROPS Design answered:
Bonjour Ilona, vous augmentez 2 m avant et 2 mailles après les raglans = 4 m par raglan x 4 raglans = 16 mailles par tour d'augmentations. (vous augmenterez ensuite 8 mailles: 2 m au début + 2 m à la fin du dos et du devant seulement (2 grandes tailles seulement). Bon tricot!
30.01.2026 - 16:43
![]() Yvonne Kluitman wrote:
Yvonne Kluitman wrote:
Goedemorgen, Er staat dat er gemeerderd moet worden voor de raglan bij de 5 markeerders , maar moeten dat geen 4 markeerders zijn. Er zijn toch 4 raglannaaden?
24.01.2026 - 13:05DROPS Design answered:
Dag Yvonne,
De raglanlijnen zitten inderdaad op 4 plekken, steeds tussen een mouw en een pand, maar de raglanlijnen lopen over een breedte van 5 steken. Je meerdert steeds voor en na deze 5 steken.
25.01.2026 - 10:14
![]() Manuela wrote:
Manuela wrote:
Jeg har samme problem som Maria. Jeg strikker i str S og etter å ha strikket opp de fem maskene under ermet, har jeg to vrange masker ved siden av hverandre på begge sider av de fem maskene. En på hver side av 'hullet'. Jeg har 52 masker på pinnen slik som oppskriften sier etter å ha strikket opp fem masker. Fortsetter jeg å strikke med to vrange ved siden av hverandre?
30.11.2025 - 22:08DROPS Design answered:
Hei Manuela. Etter alle økningene skal det være en rettmaske før/etter hver merketråd og når man legger opp 5 nye masker under ermet blir da første og siste maske av disse 5 vrang. Da skal man ikke få 2 vrangmasker etter hverandre. mvh DROPS Design
15.12.2025 - 07:57
![]() Maria wrote:
Maria wrote:
Jeg har lige sat mine masker på pind fra ærmet og taget 5 nye masker op fra under ærmet. Nu skal jeg til at lave hel patent, men der kommer til at sidde to vrang masker ved soden af hinanden, når man går fra under ærmet til dem der var på snor???
03.11.2025 - 00:02DROPS Design answered:
Hei Maria. Vi skal hjelpe deg så godt vi kan, men fint om du kan opplyse hvilken str. strikker du / hva er maskeantallet ditt før du strikker de 5 nye maskene? mvh DROPS Design
17.11.2025 - 11:12
![]() Beutel 🪷🌸🪷 wrote:
Beutel 🪷🌸🪷 wrote:
Tak
03.10.2025 - 12:38
![]() Iris wrote:
Iris wrote:
Dit is mijn eerste keer brioche, maar ik loop al vast bij de pas. Ik heb na het breien van de hals meteen een marker ingevoegd (=begin van de naald, rechterachterschouder) en vervolgens een de eerste rij van de Engelse rib gebreid. Na 28 steken moest ik ook een markeerder hangen, dit heb ik achteraf gedaan en ik heb de omslagen niet meegeteld. Deze zou "midden voor" van het werk moeten hangen, maar op een werk van 92 steken (ik brei maat XL), kan het na 28 steken toch nooit midden voor zijn?
17.07.2025 - 09:58
|
|
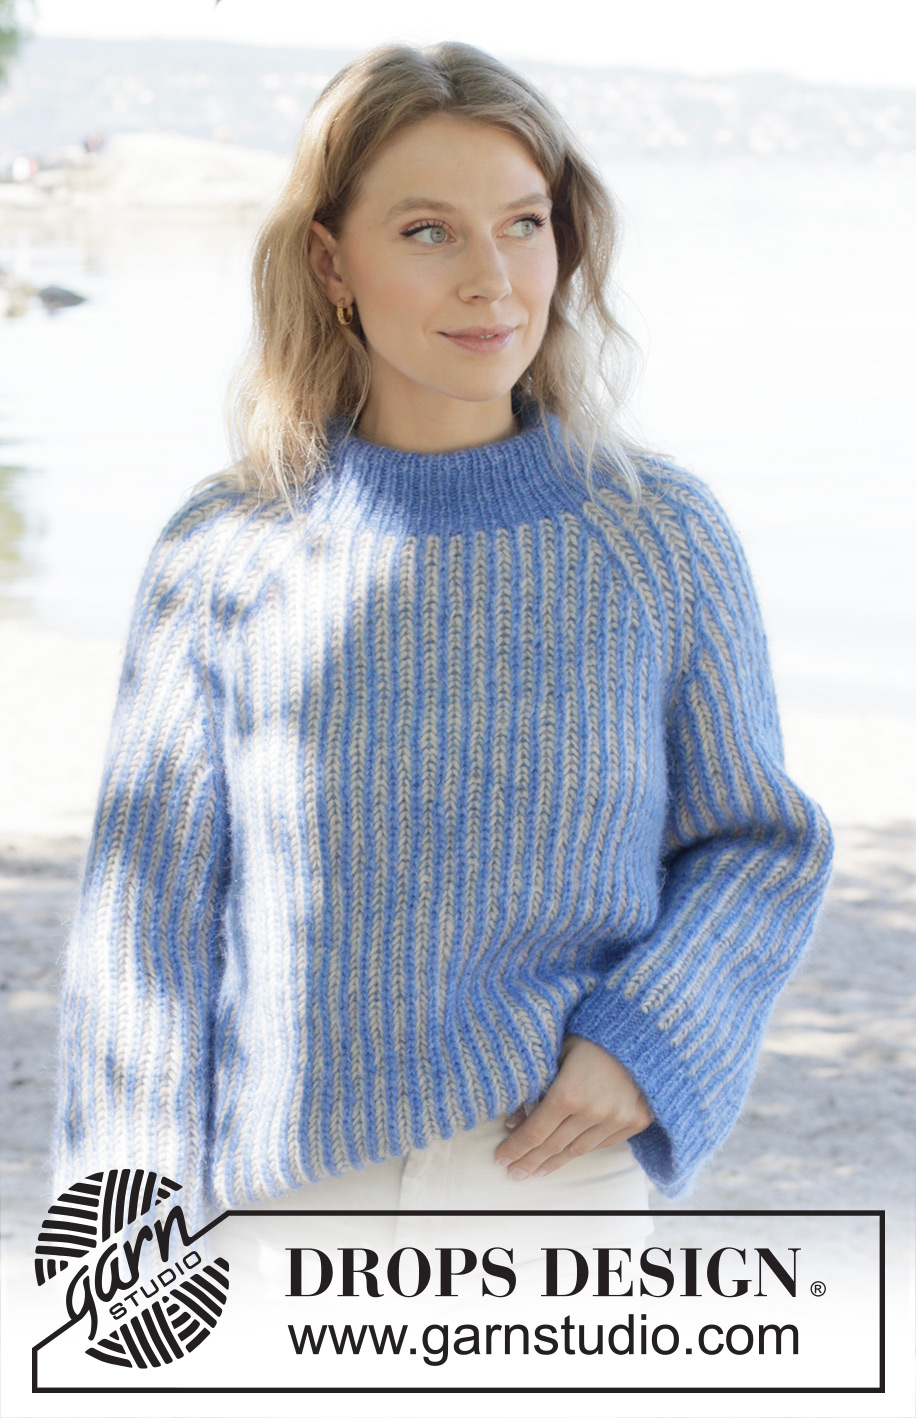
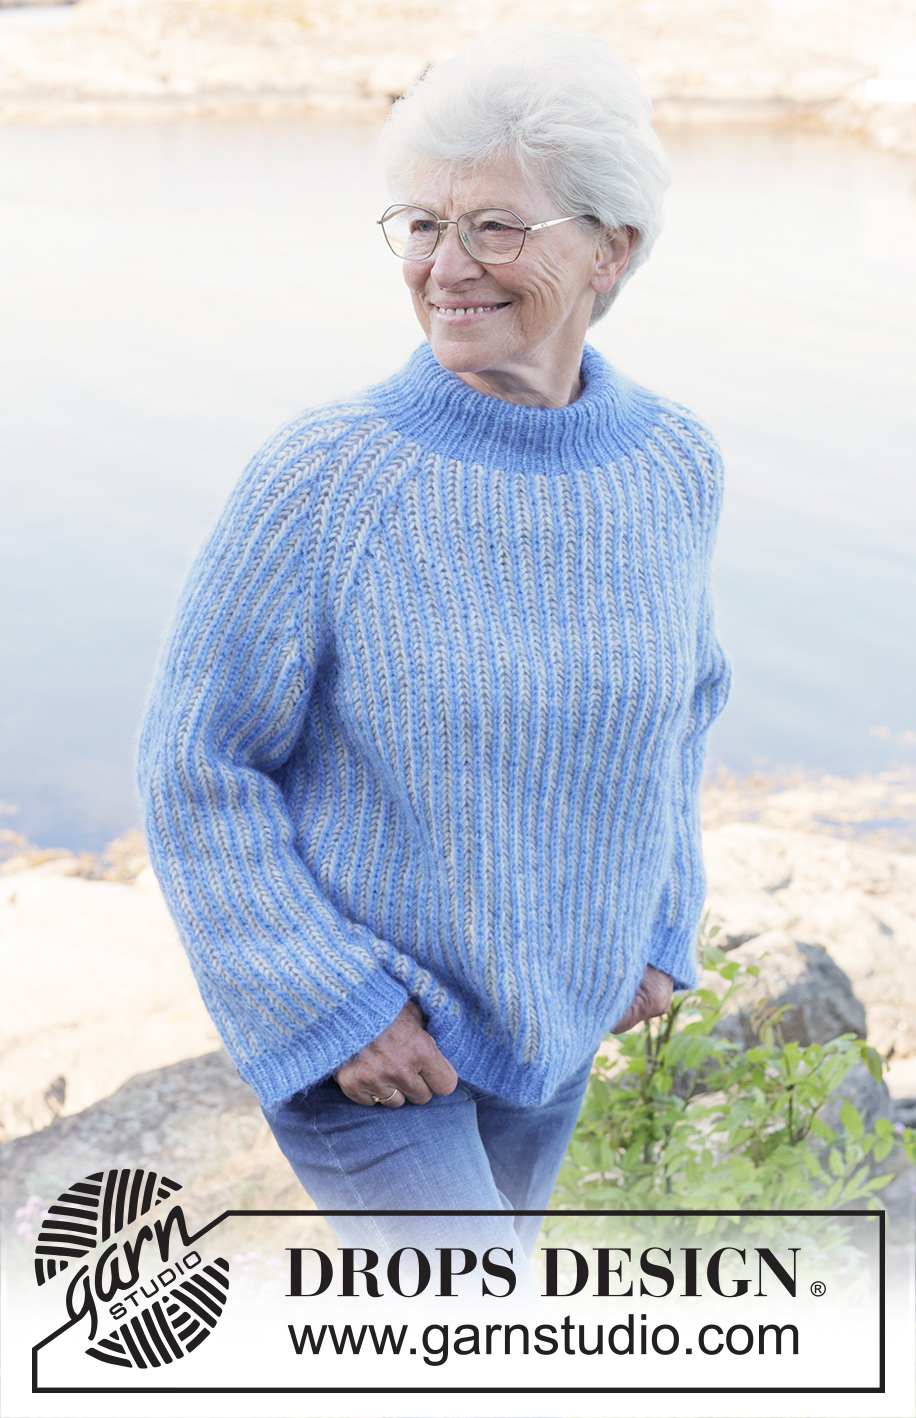
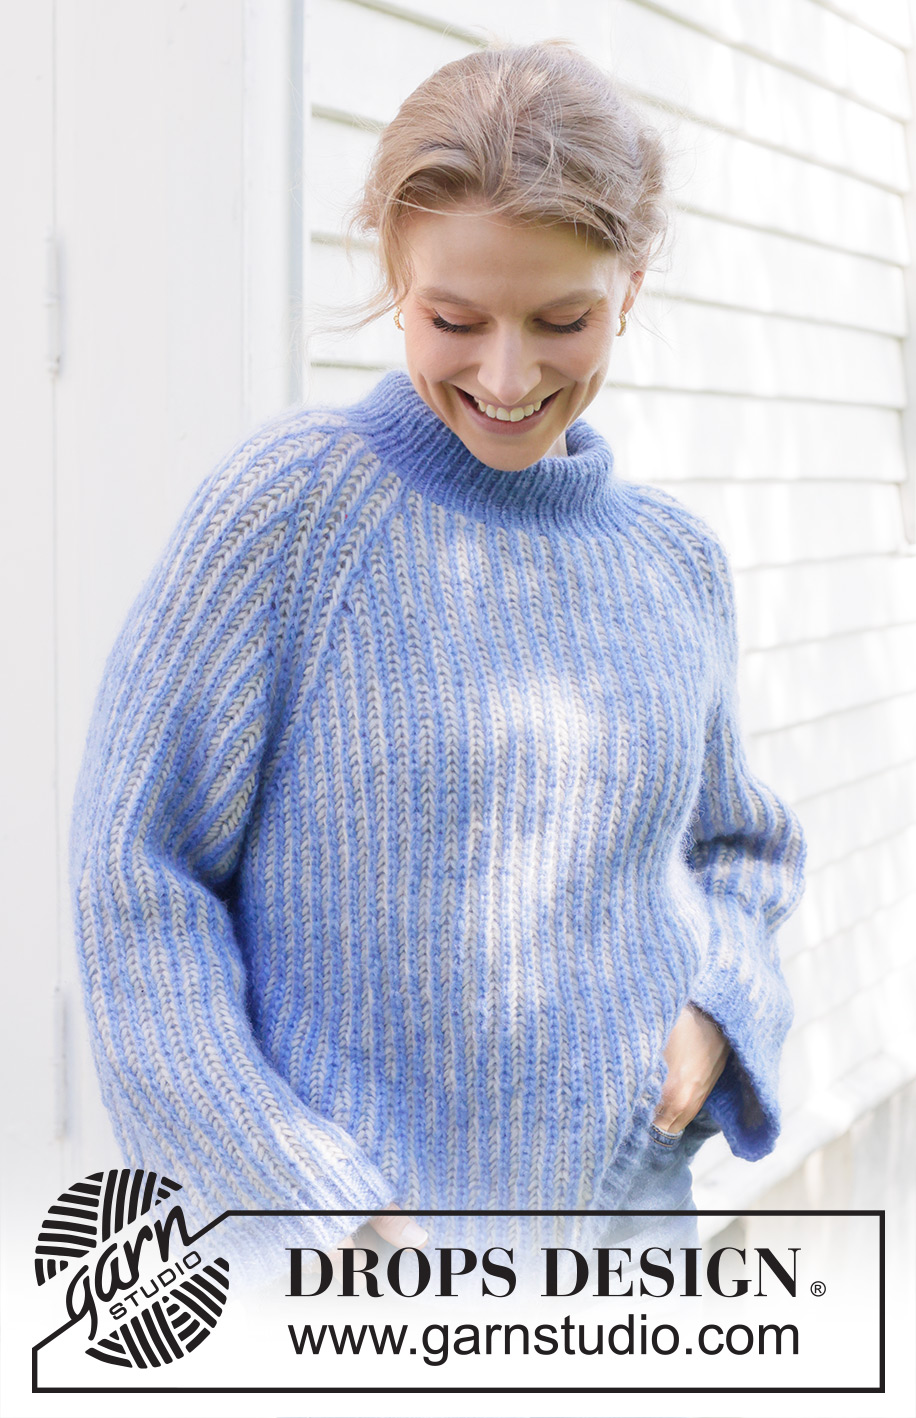
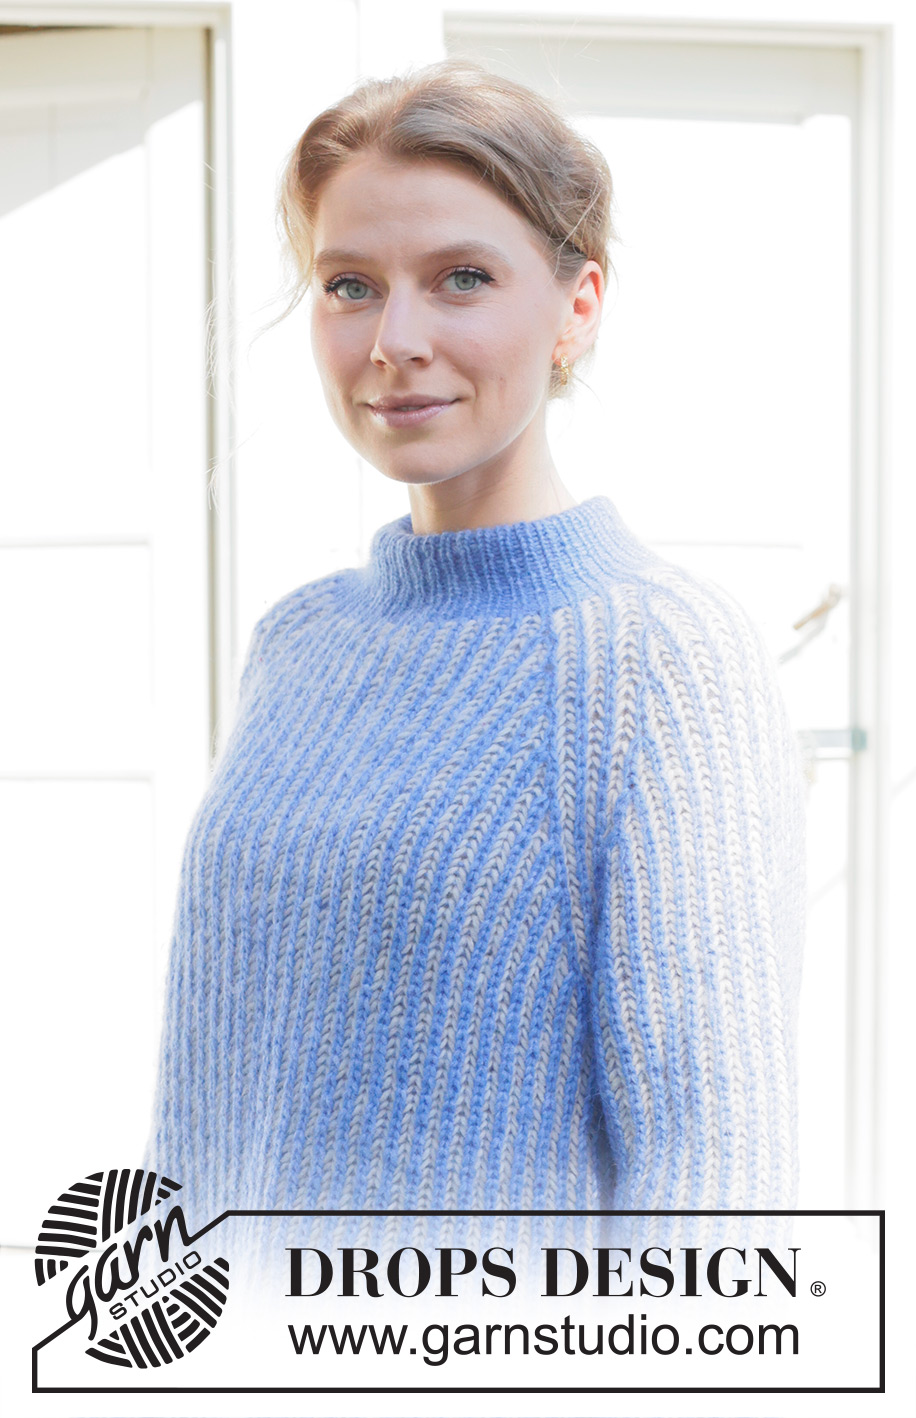
Ocean Lines#oceanlinessweater |
|
 |
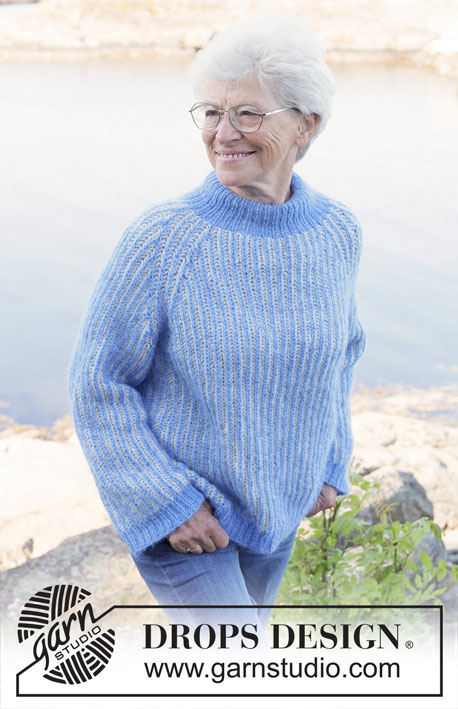 |
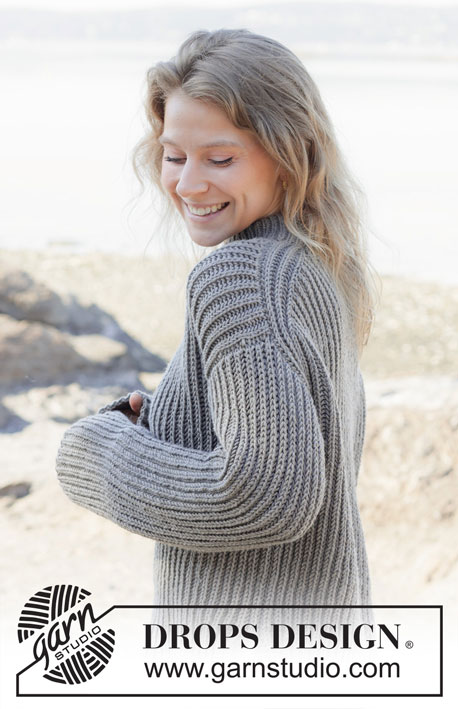
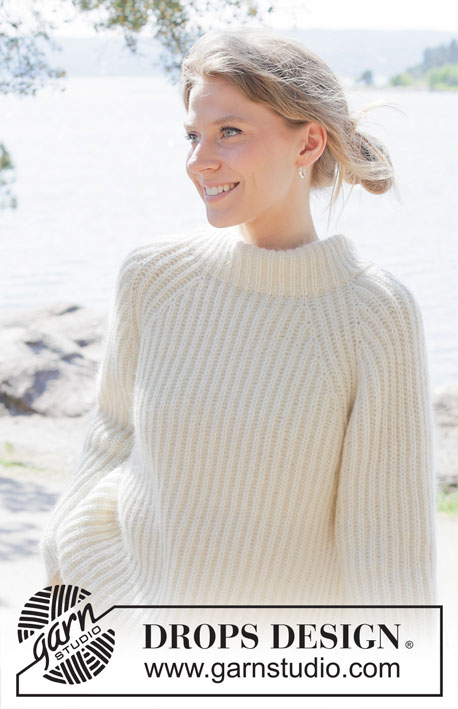
Knitted jumper in DROPS Air. The piece is worked top down with raglan, two-coloured English rib and double neck. Sizes S - XXXL.
DROPS 254-20 |
|
|
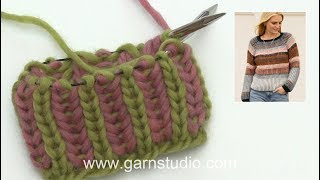
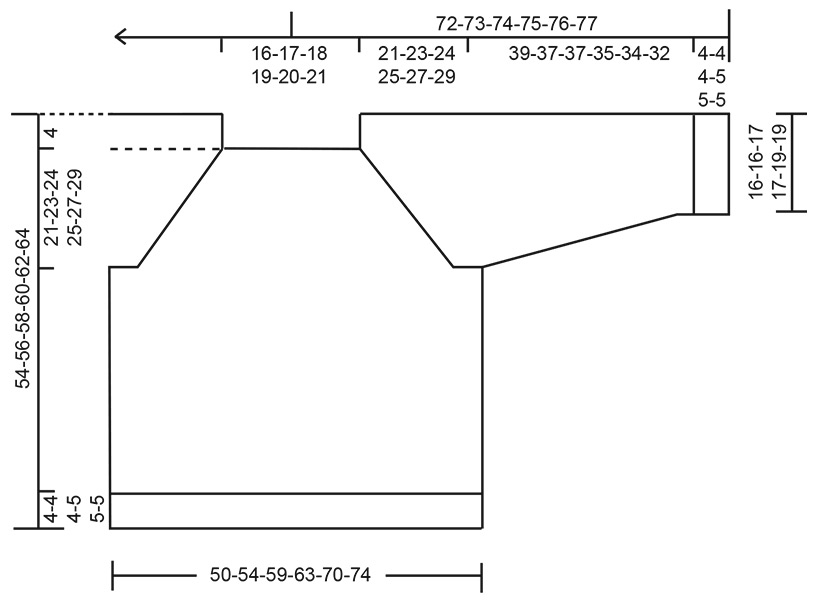
------------------------------------------------------- EXPLANATIONS FOR THE PATTERN: ------------------------------------------------------- KNITTING TIP: When doing stitch counts, the yarn-overs are not counted. INCREASE TIP: All increases are worked on a round with colour blue (2nd round of English rib). Increase 2 stitches in the knitted stitch + yarn over by working as follows: Knit the stitch and yarn-over together but do not slip them from the left needle, make 1 yarn over the right needle and knit together the stitch and yarn-over again (= 2 increased stitches). Work the new stitches in English rib; but be aware that on the next round these increased stitches do not have yarn-overs. ENGLISH RIB: ROUND 1: Work with colour blue. * Purl 1, make 1 yarn over, slip 1 stitch as if to purl-wise *, repeat from *-* to end of round. ROUND 2: Work with colour blue. *Make 1 yarn over, slip 1 stitch purl-wise, knit together the yarn over and slipped stitch *, repeat from *-* to end of round. ROUND 3: Work with colour wheat. * Purl together the yarn-over and slipped stitch, make 1 yarn over, slip 1 stitch as if to purl *, repeat from *-* to end of round. AFTER ROUND 3: Repeat rounds 2 and 3, working alternately with colours blue and wheat. DECREASE TIP (for sleeves): All decreases are worked on a round with colour blue (where yarn-over and knitted stitch are knitted together). Decrease as follows on each side of the marker-stitch: DECREASE 2 STITCHES AT BEGINNING OF ROUND: Start at the first knitted stitch after the marker-stitch, slip the stitch and yarn-over as if to knit together, knit together the next 2 stitches (i.e., 1 purled stitch + 1 knitted stitch + yarn-over), pass the slipped stitch and yarn-over over the knitted together stitches (= 2 stitches decreased). DECREASE 2 STITCHES AT END OF ROUND: Work as far as the next-to-last knitted stitch before the marker-stitch, slip the next knitted stitch + yarn-over as if to knit together, purl 1, pass the slipped stitch and yarn-over over the purled stitch, slip the stitch back onto the left needle, pass the stitch and yarn-over closest to the marker-stitch over the replaced stitch on the left needle, slip the remaining stitch onto the right needle (= 2 stitches decreased). ------------------------------------------------------- START THE PIECE HERE: ------------------------------------------------------- JUMPER – SHORT OVERVIEW OF THE PIECE: The pattern uses both long and short needles; start with the length which fits the number of stitches and change when necessary. The neck and yoke are worked in the round with circular needle, top down and from the right back shoulder. When the yoke is finished, it is divided for the body and sleeves and the body continued in the round, while the sleeves wait. The sleeves are worked top down, in the round. The neck is folded double and fastened to the inside. If there is a «0» in your chosen size, skip the information and go straight to the next instruction. NECK: Cast on 80-84-88-92-96-100 stitches with circular needle size 5 mm and colour blue DROPS Air. Change to circular needle size 4 mm (casting on with a larger needle size makes the cast-on edge elastic). Work rib in the round (purl 1, knit 1) for 9-9-9-11-11-11 cm. The neck is later folded double to give a neck-height of approx. 4-4-4-5-5-5 cm. YOKE: Change to circular needle size 5 mm. Work round 1 of ENGLISH PATENT - read description above. The round begins on the right back shoulder in the middle of 5 raglan-stitches. Insert 1 marker-thread at the beginning of the round. In addition, insert 1 marker after the first 26-27-28-28-29-30 stitches (approx. mid-front). The piece is now measured from here. Read KNITTING TIP and insert 8 marker-threads, each one between 2 stitches as follows: Count 3 stitches (= raglan-stitches), insert 1 marker-thread before the next stitch, count 5 stitches (= sleeve), insert 1 marker-thread before the next stitch, count 5 stitches (= raglan-stitches), insert 1 marker-thread before the next stitch, count 25-27-29-31-33-35 stitches (= front piece), insert 1 marker-thread before the next stitch, count 5 stitches (= raglan-stitches), insert 1 marker-thread before the next stitch, count 5 stitches (= sleeve), insert 1 marker-thread before the next stitch, count 5 stitches (= raglan-stitches), insert 1 marker-thread before the next stitch, count 25-27-29-31-33-35 stitches (= back piece), insert 1 marker-thread before the next stitch. There are 2 stitches left after the last marker-thread (= raglan-stitches). Continue English rib in the round, starting from round 2, increasing for RAGLAN as follows. Remember to maintain the knitting tension. RAGLAN: When you have worked a total of 5 rounds of English rib (the next round is round 2 with colour blue), increase 2 stitches in the knitted stitch + yarn-over on each side of the 5 raglan-stitches – read INCREASE TIP (= 16 increased stitches). Increase like this every 8th round (i.e., every 4th round with colour blue) a total of 9-10-11-11-11-11 times = 224-244-264-268-272-276 stitches. The sleeve-increases are now finished. Continue to increase for raglan on the front and back pieces every 8th round 0-0-0-0-1-2 more times = 224-244-264-268-280-292 stitches. Continue working, without further increases, until the yoke measures 21-23-24-25-27-29 cm from the marker on the neck – finishing after round 3 in English rib, with colour wheat. Now divide for the body and sleeves. DIVIDE FOR BODY AND SLEEVES: AT THE SAME TIME as working the next round, divide yoke as follows: Place the first 47-51-55-55-55-55 stitches on a thread for the sleeve, cast on 5-5-5-9-13-13 stitches (in side mid-under sleeve), work the next 65-71-77-79-85-91 stitches (= front piece), place the next 47-51-55-55-55-55 stitches on a thread for the sleeve, cast on 5-5-5-9-13-13 stitches (in side mid-under sleeve), work the last 65-71-77-79-85-91 stitches (= back piece). The body and sleeves are finished separately. BODY: = 140-152-164-176-196-208 stitches. Work with the same colour to mid-under one sleeve. Start the new round here and continue the English rib (round 3 and colour wheat) in the round until the piece measures 46-48-50-51-53-55 cm from the marker on the neck. Change to circular needle size 3.5 mm, continue with colour blue as follows: * Make 1 yarn over, purl the purled stitch, knit together the yarn over and slipped stitch *, work from *-* to end of round. Work rib (purl 2, knit 1) with colour blue as follows: Knit over knit and purl over purl, AT THE SAME TIME, purl all the yarn overs = 210-228-246-264-294-312 stitches. When the rib measures 4-4-4-5-5-5 cm cast off with rib. The jumper measures approx. 50-52-54-56-58-60 cm from the marker and 54-56-58-60-62-64 cm from top of shoulder. SLEEVES: Place the 47-51-55-55-55-55 sleeve-stitches from one thread on circular needle size 5 mm. Use colour blue and knit up 1 stitch in the middle of the 5-5-5-9-13-13 cast-on stitches under the sleeve, knit up 1 stitch in each of the next 2-2-2-4-6-6 stitches, continue the English rib from the yoke in the round, finish by knitting up 1 stitch in each of the last 2-2-2-4-6-6 cast-on stitches under the sleeve = 52-56-60-64-68-68 stitches. Insert 1 marker in the middle of the 5-5-5-9-13-13 cast-on stitches under the sleeve (in a knitted stitch) – start the round at this stitch. Allow the marker to follow your work onwards; it is used when decreasing under the sleeve. Continue the English rib (starting with round 3 and colour wheat). When the sleeve measures 4 cm, decrease 4 stitches under the sleeve – read DECREASE TIP. Decrease like this every 5 cm a total of 2-3-3-4-4-4 times = 44-44-48-48-52-52 stitches. Continue working until the sleeve measures 39-37-37-35-34-32 cm from the division – finishing with round 3 and colour wheat. Change to double pointed needles size 3.5 mm and colour blue. Work the next round as follows: * Knit together the knitted stitch and yarn-over, make 1 yarn over, purl 1 *, work from *-* to end of round. Work rib (knit 1, purl 2) with colour blue as follows: Knit over knit and purl over purl, AT THE SAME TIME, purl all yarn overs = 66-66-72-72-78-78 stitches. When the rib measures 4-4-4-5-5-5 cm cast off with rib. The sleeve measures approx. 43-41-41-40-39-37 cm from the division. ASSEMBLY: Fold the neck double to the inside and sew down. To avoid the neck being tight and rolling outwards, it is important that the seam is elastic. |
|
 |
|
Have you finished this pattern?Tag your pictures with #dropspattern #oceanlinessweater or submit them to the #dropsfan gallery. Do you need help with this pattern?You'll find 26 tutorial videos, a Comments/Questions area and more by visiting the pattern on garnstudio.com. © 1982-2026 DROPS Design A/S. We reserve all rights. This document, including all its sub-sections, has copyrights. Read more about what you can do with our patterns at the bottom of each pattern on our site. |
|


With over 40 years in knitting and crochet design, DROPS Design offers one of the most extensive collections of free patterns on the internet - translated to 17 languages. As of today we count 324 catalogues and 12290 patterns translated into English (UK/cm). 12290
We work hard to bring you the best knitting and crochet have to offer, inspiration and advice as well as great quality yarns at incredible prices! Would you like to use our patterns for other than personal use? You can read what you are allowed to do in the Copyright text at the bottom of all our patterns. Happy crafting!
Post a comment to pattern DROPS 254-20
We would love to hear what you have to say about this pattern!
If you want to leave a question, please make sure you select the correct category in the form below, to speed up the answering process. Required fields are marked *.