
Popular categories
Looking for a yarn?


Comments / Questions (69)
![]() Alzbeta wrote:
Alzbeta wrote:
Hi, I like the pattern and I'd love to make a sweater out of it. However I am not sure about the size. Could you, please, be so kind and give me the bust mesurements of sizes S, M and L ? And how much of the positive easy is the pattern ment to have ? Thank you
18.05.2022 - 14:21DROPS Design answered:
Dear Mrs Alzbeta, measure a similar garment you have and like the shape and compare these measurements to the chart at the bottom of the page, this is the best way to find the matching size and your own and desire ease. Read more here. Happy knitting!
18.05.2022 - 16:46
![]() Sara wrote:
Sara wrote:
Salve ho difficoltà a capire come devo intrecciare le maglie del corpo, cosa si intende con "Intrecciare a diritto sulla maglia legaccio e a sulle maglie a coste inglesi e con rovescio su rovescio "? Grazie
16.05.2022 - 22:59DROPS Design answered:
Buonasera Sara, grazie per la segnalazione, abbiamo corretto il testo per renderlo più chiaro. Buon lavoro!
17.05.2022 - 19:06
![]() Christiane Bruguier wrote:
Christiane Bruguier wrote:
Merci beaucoup tout va bien !j'ai trouvé la solution :j'intervertis tous les les 2 rangs les 2 mailles envers avant le point ajouré donc une fois avant le point ajouré comme sur le diagramme et 2 rangs après je place les 2 mailles envers après le point ajouré et celui-ci reste bien centré ...
19.04.2022 - 20:23
![]() Christiane Bruguier wrote:
Christiane Bruguier wrote:
Excusez moi on commence par 2 mailles envers puis les diminutions avec jeté puis on finit par une maille envers ... Je veux simplement savoir si ce diagramme est exact car le dessin avec les trous est décalé. .. Merci.
12.04.2022 - 18:00DROPS Design answered:
Est-ce que la réponse précédente à votre première question a pu vous aider? Sinon n'hésitez pas à nous indiquer à quel niveau vous bloquez encore dans A.3. Bon tricot!
19.04.2022 - 08:55
![]() Christiane Bruguier wrote:
Christiane Bruguier wrote:
Bonjour l'Équipe Est ce normal que le diagramme A3 ne soit pas centré et commence toujours par 1 maille envers puis les diminutions avec 1 jeté pour terminer par 2 mailles envers.... Merci pour la réponse. ..
12.04.2022 - 17:04DROPS Design answered:
Bonjour Mme Bruguier, je ne suis pas certaine de bien comprendre ce que vous entendez par "pas centré". A.3 est bien juste ainsi: vous commencez par *1 m env, 1 m end, 2 m env, les 2 m du point ajouré, 1 m env*, et vous répétez de *-* et vous terminez par les 3 premières mailes de A.3 soit 1 m env, 1 m end, 2 m env: le motif commence et se termine de la même façon. Est-ce que ceci peut vous aider?
19.04.2022 - 08:53
![]() Christiane Bruguier wrote:
Christiane Bruguier wrote:
Un grand merci pour votre réponse :effectivement les modèles avec manches marteau que vous me proposez vont beaucoup m'aider car je préfère les emmemchures classiques aux emmemchures top down ou bottom up qui sont moins "élégantes " quant à leurs fermetures sous les aisselles mais ce n'est que mon opinion bien sûr !
01.04.2022 - 08:23
![]() Christiane Bruguier wrote:
Christiane Bruguier wrote:
Bonjour à toute l'Équipe Drops Bravo pour tous vos beaux modèles et belles laines que j'apprécie énormément ! Je voudrais faire votre modèle mais en bottom up jusqu'aux emmemchures et après faire des diminutions classiques pour celles ci mais je ne sais pas comment m'y prendre pareil pour les manches 😟 pouvez vous m'aider SVP merci Cordialement Christiane.
31.03.2022 - 18:59DROPS Design answered:
Bonjour Mme Bruguier, nous ne sommes malheureusement pas en mesure de pouvoir adapter chacun de nos modèles à chaque demande; vous trouverez toutefois tous nos modèles de pulls tricotés de bas en haut, avec les manches marteau ici, en espérant qu'ils puissent vous aider et vous inspirer. Merci pour votre compréhension. Bon tricot!
01.04.2022 - 07:50
![]() Turid wrote:
Turid wrote:
Hei, kan du bruke italiensk opplegg/avfelling med Kid silk?
28.01.2022 - 19:19DROPS Design answered:
Hei Turid. Ja, det kan du. Men test det gjerne ut på en prøvelapp først. Litt vanskelig å rekke opp med Kid-Silk om du ikke blir fornøyd. mvh DROPS Design
31.01.2022 - 13:47
![]() Maria Encina wrote:
Maria Encina wrote:
Me gustaría confeccionar este modelo en brushed -alpaca-silk . El cuerpo en el color negro-16 y una manga en beige-05 y la otra en gris-03.. La talla sería la S y necesito ayuda para saber aproximadamente cuanta lana sería necesaria de cada color. Muchas gracias
29.09.2021 - 23:30DROPS Design answered:
Hola Maria, como vas a trabajar con más de un color, es probable que necesites más ovillos que en el patrón, porque para cada manga puede que necesites algo más de un ovillo. Por lo tanto, necesitarías aprox. 150gr de Brushed Alpaca Silk en un color, pero con más de un color necesitarías aprox. 50 gr de los colores de las mangas y 100 gr del color principal (del cuerpo),
06.10.2021 - 23:14
![]() Simone wrote:
Simone wrote:
Hej :) Jeg er ret ny indenfor strikkeverdenen, men nu har jeg givet mig i kast med denne mega fine sweater! Jeg er noget til punkterne: ærmeudtagning/bærestykkeudtagning. Jeg er simpelthen blevet i tvivl, om jeg skal lave 8 udtagninger i én omgang og så lade der være en omgang helt uden udtagninger, eller om jeg skal skiftes mellem at tage ud til henholdsvis ærmerne og bærestykket? (Så der bliver taget 4 masker ud i hver omgang?) Bh. Simone
26.09.2021 - 13:49
|
|||||||||||||||||||
White Water#whitewatersweater |
|||||||||||||||||||
 |
 |
||||||||||||||||||
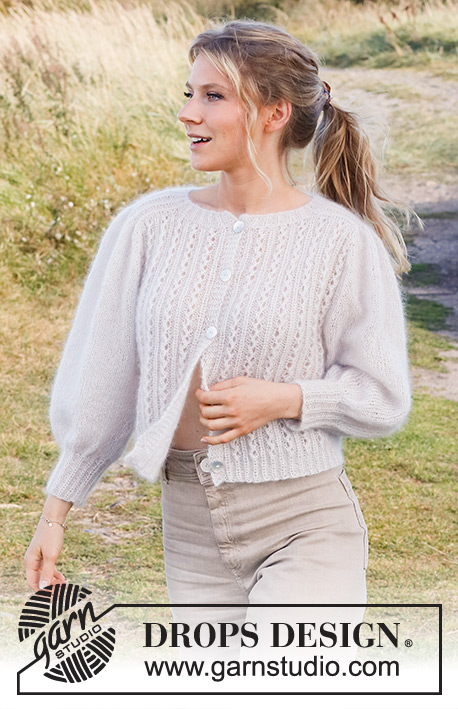
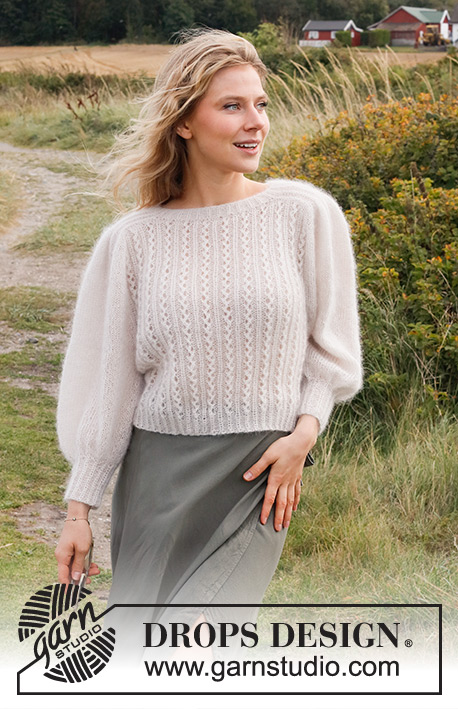
Knitted jumper in 2 strands DROPS Kid-Silk. Piece is knitted top down with round saddle shoulders, lace pattern and pouffe sleeves. Size: S - XXXL
DROPS 222-25 |
|||||||||||||||||||
|
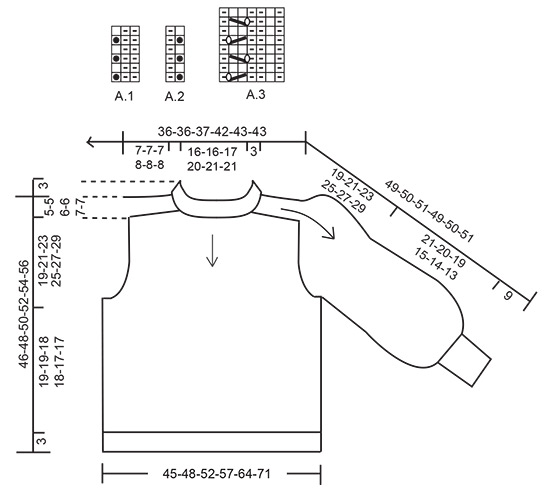
------------------------------------------------------- EXPLANATION FOR THE PATTERN: ------------------------------------------------------- PATTERN: See diagrams A.1 to A.3. Diagrams show all rows in pattern seen from the right side. INCREASE/DECREASE TIP (evenly): To calculate how to increase/decrease evenly, count the stitches to be increased/decreased (e.g. 17 stitches), and divide by stitches of increases/decreases to be done (e.g. 5) = 3.4. In this example increase by making 1 yarn over after alternately approx. every 3rd and 4th stitch. On next row work yarn overs twisted to avoid holes If decreasing knit in this example alternately approx. every 2nd and 3rd stitch and every 3rd and 4th stitch together. INCREASE TIP-1: Increase 1 stitch by making 1 yarn over. On next row (from wrong side) purl yarn over twisted to avoid holes. INCREASE TIP-2: BEFORE MARKER: The stitch is twisted towards the right. Use left needle to pick up thread between 2 stitches from round below, pick up thread from behind and knit stitch in front loop. AFTER MARKER: The stitch is twisted towards the left. Use left needle to pick up thread between 2 stitches from round below, pick up thread from front and knit stitch in back loop. CAST-OFF TIP: To avoid a tight cast-off edge you may use a larger needle size. If this also is too tight, work a 1 yarn over after approx. 3rd or every 6th stitch while casting off (cast off yarn overs as regular stitches). ------------------------------------------------------- START THE PIECE HERE: ------------------------------------------------------- JUMPER - SHORT OVERVIEW OF THE PIECE: Work neck edge in the round on circular needle from mid back, top down. Work shoulders back and forth separately. Then pick up stitches along shoulders, and work in the round over all stitches, at the same time increase for sleeves and for yoke. Now divide yoke for body and sleeves. Body is worked in the round on circular needle, top down. Work sleeves in the round on double pointed needles/short circular needle, top down. NECK EDGE: Cast on 90-90-94-106-110-110 stitches on circular needle size 3 mm with 2 strands Kid-Silk. Knit 1 round. Then work rib as follows: A.1 over the first 15-15-15-18-18-18 stitches, work the first 2 stitches in A.1 (= approx. half back piece), insert a marker here, A.2 over the next 13-13-15-15-17-17 stitches (= shoulder stitches), insert a marker, A.1 over the next 30-30-30-36-36-36 stitches, work the first 2 stitches in A.1 (= front piece), insert a marker here, A.2 over the next 13-13-15-15-17-17 stitches (= shoulder stitches), insert a marker here, A.1 over the last 15-15-15-18-18-18 stitches (= approx. half back piece). Continue in the round like this for 3 cm. Cut the yarn. Now divide the piece for back piece, front piece and saddle shoulders. Slip the first 17-17-17-20-20-20 stitches on a stitch holder (= approx. half back piece), skip the next 13-13-15-15-17-17 stitches (= saddle shoulder), slip the next 32-32-32-38-38-38 stitches on a stitch holder (= front piece), skip the next 13-13-15-15-17-17 stitches (= saddle shoulder), slip the last 15-15-15-18-18-18 stitches on a stitch holder (= approx. half back piece). Now work saddle shoulder in each side, separately. SADDLE SHOULDERS: = 13-13-15-15-17-17 stitches. Work back and forth over shoulder stitches in one side on circular needle size 3 mm, as follows: Cast on 1 stitch on row (= edge stitch), work the 13-13-15-15-17-17 stitches in pattern as before, at the same time increase all 1 purl stitch to 2 purl stitches – read INCREASE TIP-1 (= 6-6-7-7-8-8 stitches increased), cast on 1 stitch at the end of row (= edge stitch) = 21-21-24-24-27-27 stitches. Now work pattern (1 English rib stitch, purl 2) back and forth until piece measures 7-7-7-8-8-8 cm from where all 1 purl stitches were increased to 2 purl stitches, adjust so that last row is worked from wrong side. Slip stitches on a stitch holder. Work the other saddle shoulder the same way. Now work front pieces, back piece and shoulder stitch on to same circular needle size 5 mm, at the same time pick up stitches along the sides on saddle shoulders. Work as follows from right side: Begin approx. mid back and knit over the 17-17-17-20-20-20 stitches on half back piece and increase at the same time 5-5-5-5-5-5 stitches evenly – read INCREASE/DECREASE TIP (= 22-22-22-25-25-25 stitches), pick up 16-16-16-20-20-20 stitches inside edge stitch along the side on saddle shoulder, knit 1 * knit 1 in front and back loop of next stitch, make 1 yarn over *, work from *-* a total of 18-18-21-21-24-24 times, knit 1 in front and back loop of stitch, knit 1 (= 37-37-43-43-49-49 stitches increased to = 58-58-67-67-76-76 stitches on the saddle shoulder), pick up 16-16-16-20-20-20 stitches inside edge stitch along the other side of saddle shoulder, knit over the next 32-32-32-38-38-38 stitches on front piece and increase at the same time 9-9-9-9-9-9 stitches evenly (= 41-41-41-47-47-47 stitches), pick up 16-16-16-20-20-20 stitches inside edge stitch on the other saddle shoulder, knit 1, * knit 1 in front and back loop of next stitch, make 1 yarn over *, work from *-* a total of 18-18-21-21-24-24 times, knit 1 in front and back loop of stitch, knit 1 (= 37-37-43-43-49-49 stitches increased to = 58-58-67-67-76-76 stitches on the saddle shoulder), pick up 16-16-16-20-20-20 stitches inside edge stitch along the other side of saddle shoulder, knit over the 15-15-15-18-18-18 stitches on approx. half back piece and increase at the same time 4-4-4-4-4-4 stitches evenly (= 19-19-19-22-22-22 stitches). There are now 262-262-280-308-326-326 stitches on needle. Knit 1 round. YOKE: Insert a marker thread approx. mid back. NOW MEASURE PIECE FROM HERE! Now work pattern and 4 markers in the piece as follows: 1st marker: Work A.3 over the first 35-35-35-42-42-42 stitches, work the first 3 stitches in A.3, insert 1st marker in next stitch (= half back piece). 2nd marker: Work in stocking stitch over the next 56-56-65-65-74-74 stitches, insert 2nd marker in next stitch (= right sleeve). 3rd marker: Work A.3 over the next 70-70-70-84-84-84 stitches, work the first 3 stitches in A.3, insert 3rd marker in next stitch (= front piece). 4th marker: Work in stocking stitch over the next 56-56-65-65-74-74 stitches, insert 4th marker in next stitch (= left sleeve). Work A.3 over the last 35-35-35-42-42-42 stitches (= half back piece). Move these 4 markers upwards when working; increase at each of these markers. Continue in the round with pattern like this (stitches with markers are worked in stocking stitch), AT THE SAME TIME on the next round the increases for SLEEVE INCREASE and YOKE INCREASE starts, increase as follows: SLEEVE INCREASE: Work in stocking stitch on sleeves. AT THE SAME TIME on next round increase 4 stitches for sleeves as follows: Increase AFTER 1st and 3rd marker and increase BEFORE 2nd and 4th marker – read INCREASE TIP-2 (= 4 stitches increased). Increase stitches on sleeves, and work the increased stitches in stocking stitch. Increase like this every other round 7-10-7-9-6-8 times in total. YOKE INCREASE (applies to front and back piece): Work pattern as before on front pieces and back piece. AT THE SAME TIME on next round increase 4 stitches for yoke as follows: Increase BEFORE 1st and 3rd marker and increase AFTER 2nd and 4th marker – remember INCREASE TIP-2 (= 4 stitches increased). Increase on front pieces and back piece, and work the increased stitches in A.3. Increase like this every other round 0-7-7-7-14-21 times in total. When all increases are done there are 290-330-336-372-406-442 stitches on row. Work until piece measures 19-21-23-25-27-29 cm from marker after neck edge. Now divide piece for body and sleeves. Work next round as follows: Work the first 42-45-47-52-59-66 stitches as before (= back piece), slip the next 64-78-77-85-88-92 stitches on a stitch holder for sleeve, cast on 6-6-8-10-10-10 new stitches on row (= in the side under sleeve), work the next 81-87-91-101-115-129 stitches as before (= front piece), slip the next 64-78-77-85-88-92 stitches on a stitch holder for sleeve, cast on 6-6-8-10-10-10 new stitches on row (= in the side under sleeve), work the last 39-42-44-49-56-63 stitches as before (= back piece). Now finish body and sleeves separately. NOW MEASURE PIECE FROM HERE! BODY: = 174-186-198-222-250-278 stitches. Continue in the round with pattern as before, but over the 14-6-12-10-10-10 stitches in each side (i.e. the 6-6-8-10-10-10 new stitches cast on + 4-0-2-0-0-0 stitches on each side of these stitches) work in stocking stitch. Continue until piece measures 19-19-18-18-17-17 cm from division. Adjust so that the last round is worked as 2nd, 4th, 6th or 8th row in diagram A.3, and work the next round as follows: Work pattern as before, but skip yarn over in every repetition A.3 (= decrease 1 stitch in each repetition A.3), at the same time increase 4-3-6-5-5-5 stitches evenly over the 14-6-12-10-10-10 stitches knit in each side (= 20-24-24-28-32-36 stitches decreased and 8-6-12-10-10-10 stitches increased on round) = 162-168-186-204-228-252 stitches. Switch to circular needle size 3 mm. Now work rib as follows: Work the last 2 stitches in A.1, work A.1 until 1 stitch remains on round, work first stitch in A.1 – English rib stitch in A.1 should fit knit stitches in A.3. Continue rib like this for 3 cm. Cast off with knit over English rib stitches and purl over purl - read CAST-OFF TIP. Jumper measures approx. 46-48-50-52-54-56 cm from shoulder and down. SLEEVES: Slip the 64-78-77-85-88-92 stitches from stitch holder in one side back on a short circular needle/double pointed needles size 5 mm. Pick in addition up 1 stitch in each of the 6-6-8-10-10-10 new stitches under sleeve = 70-84-85-95-98-102 stitches. Work in stocking stitch in the round. When piece measures 21-20-19-15-14-13 cm from division - try the jumper on and work until desired length (approx. 9 cm rib remain until finished measurements), decrease 28-42-40-47-47-51 stitches evenly = 42-42-45-48-51-51 stitches. Switch to double pointed needles size 3 mm. Work A.1 in the round for 9 cm. Cast off with knit over English rib stitches and purl over purl - read CAST-OFF TIP. Sleeve measures approx. 30-29-28-24-23-22 cm from division. Work the other sleeve the same way. |
|||||||||||||||||||
Diagram explanations |
|||||||||||||||||||
|
|||||||||||||||||||
 |
|||||||||||||||||||
Have you finished this pattern?Tag your pictures with #dropspattern #whitewatersweater or submit them to the #dropsfan gallery. Do you need help with this pattern?You'll find 31 tutorial videos, a Comments/Questions area and more by visiting the pattern on garnstudio.com. © 1982-2026 DROPS Design A/S. We reserve all rights. This document, including all its sub-sections, has copyrights. Read more about what you can do with our patterns at the bottom of each pattern on our site. |
|||||||||||||||||||


With over 40 years in knitting and crochet design, DROPS Design offers one of the most extensive collections of free patterns on the internet - translated to 17 languages. As of today we count 324 catalogues and 12272 patterns translated into English (UK/cm). 12272
We work hard to bring you the best knitting and crochet have to offer, inspiration and advice as well as great quality yarns at incredible prices! Would you like to use our patterns for other than personal use? You can read what you are allowed to do in the Copyright text at the bottom of all our patterns. Happy crafting!
Post a comment to pattern DROPS 222-25
We would love to hear what you have to say about this pattern!
If you want to leave a question, please make sure you select the correct category in the form below, to speed up the answering process. Required fields are marked *.