
Popular categories
Looking for a yarn?


Comments / Questions (32)
![]() Sylvie wrote:
Sylvie wrote:
Bonjour Pour un bonnet à revers tricoté sur aiguille circulaire , Si je retourne le revers comme mentionné, POUR L\'ÉCHANTILLON. Tourner l\'ouvrage pour que l\'endroit soit maintenant à l\'intérieur du bonnet et tricoter dans le sens opposé (ainsi l\'endroit du revers sera sur l\'extérieur quand on replie le bas à la fin). Mon fil se trouve à gauche ? Comment faire pour avoir le fil à droite ? Je tricote en côte 2-2 6cm et le reste en jersey
16.12.2021 - 16:03DROPS Design answered:
Bonjour Sylvie, reprenez le fil dans la main droite et tricotez la 1ère maille du tour (qui est celle que vous aviez tricoté en dernier au tour précédent) et continuez ainsi, dans ce sens, en rond. Vous pouvez glisser cette première maille et serrer le fil par exemple pour éviter un petit trou. Bon tricot!
16.12.2021 - 16:47
![]() Lena wrote:
Lena wrote:
Mössan blir jättebra. Skön och fin. Har stickat tre stycken i olika färger. Bra beskrivning!!!
09.11.2021 - 00:39
![]() Natasja wrote:
Natasja wrote:
Jeg er ikke sikker på jeg forstår huen korrekt i starten, der står den skal bukkes ind og strikkes i modsat retning. Jeg er forvirret ?
10.05.2021 - 17:44DROPS Design answered:
Hej Natasja, når du vender og strikker den anden vej, så bliver den side nu fra retsiden. Det gør du for at få retsiden til at vende udad på opslaget :)
11.05.2021 - 13:37
![]() Mary wrote:
Mary wrote:
Hej, nu har det varit mycket frågor på finska Dom inte får svar. Nästan alla frågor är att: Var är diagrammen på finska? Tack med svaret.
11.03.2021 - 07:42DROPS Design answered:
Tak for info Mary, vi skal få dem lagt ud så hurtigt som muligt :)
11.03.2021 - 14:04
![]() Valerie Brovkin wrote:
Valerie Brovkin wrote:
It seems there is an error in neck warmer description. In the tip 3 it is said to increase every round, like in the saddle shoulder, while in the description is "Increase like this every other round ".
02.02.2021 - 17:42DROPS Design answered:
Dear Mrs Brovkin, you increase 4 stitches on every round worked with increases, but you have to increase as often as explained in the written pattern, ie on every other round (and increase 4 sts on every of these rounds). Happy knitting!
03.02.2021 - 09:21
![]() Minna wrote:
Minna wrote:
Mistä löydän kaavioiden suomenkieliset silmukka ohjeet?
23.01.2021 - 18:05DROPS Design answered:
Nyt piirros avautuu!
11.03.2021 - 14:31
![]() Ulrika wrote:
Ulrika wrote:
Hej! Diagrammen till mössan stämmer inte: om man stickar A5 över A2 så hamnar aviga maskor över räta maskor. Första varvet i A5 överensstämmer inte med varven i A2, de är tvärtom/omkastade. På bilden är det 9 linjer med räta maskor men med diagram A2 blir det 10, så antar att A2 är fel. Mvh Ulrika
13.01.2021 - 07:57DROPS Design answered:
Hej Ulrika, jo om du slutar med ett varv på A.2 som är rm och am, så stämmer första varv i A.5 över A.2. Ja du vill få 10 patentm mellan minskningarna för att det skall gå jämnt upp. Lycka till :)
20.01.2021 - 08:15
![]() Sanni wrote:
Sanni wrote:
Hei, tästä ohjeesta puuttuu piirrokset, voitteko lisätä?
08.01.2021 - 10:54DROPS Design answered:
Hei, nyt ne avautuvat!
11.03.2021 - 14:32
![]() Astrid Hediger wrote:
Astrid Hediger wrote:
Die Anleitung zum Kragenschal ist in Grösse XL vermutlich nicht korrekt, ANSCHLAG 124. Das Muster aber entspricht lt. Strickachrift in der Runde lediglich 122 Maschen. Können Sie mir weiterhelfen. Danke.
04.01.2021 - 09:47DROPS Design answered:
Liebe Frau Hediger - siehe Antwort unten :) Viel Spaß beim stricken!
05.01.2021 - 10:20
![]() Katariina wrote:
Katariina wrote:
Mia, löydät kuvapiirrokset vastaavasta ruotsinkileisestä ohjeesta.
30.12.2020 - 15:16
|
||||||||||||||||||||||||||||||||||
City Sweetheart#citysweetheartset |
||||||||||||||||||||||||||||||||||
 |
 |
|||||||||||||||||||||||||||||||||
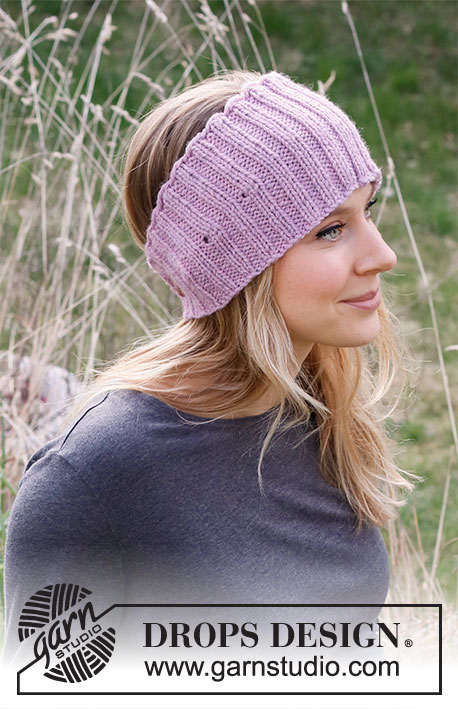
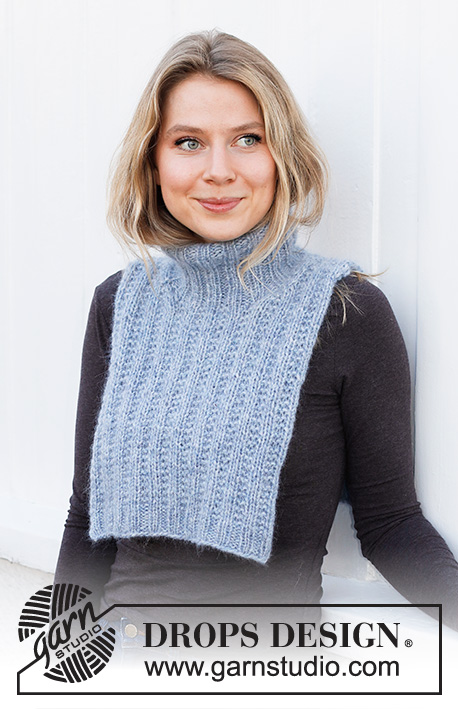
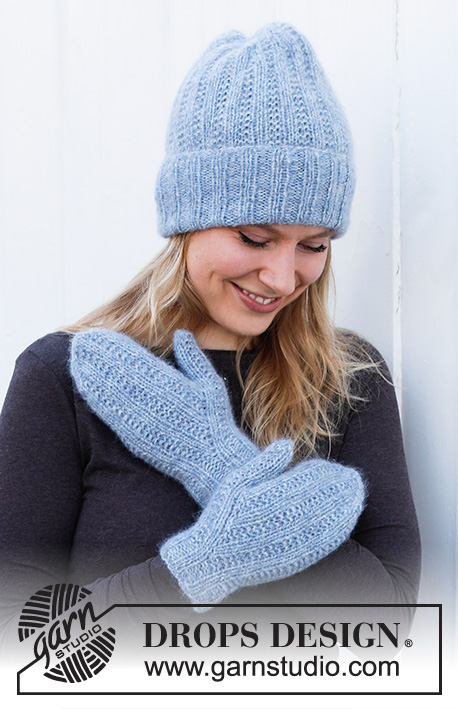
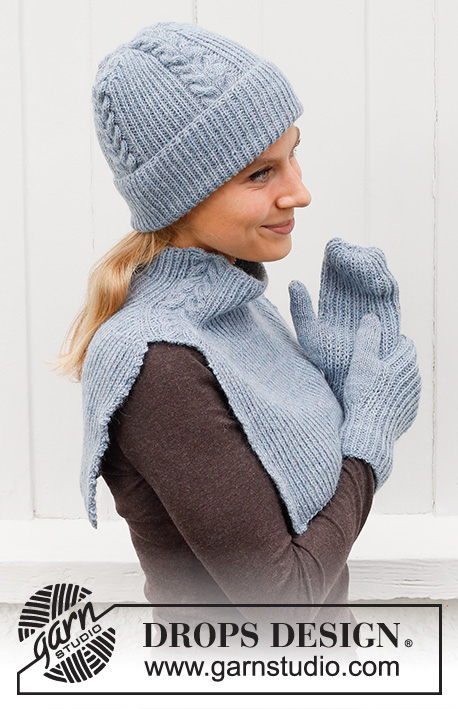
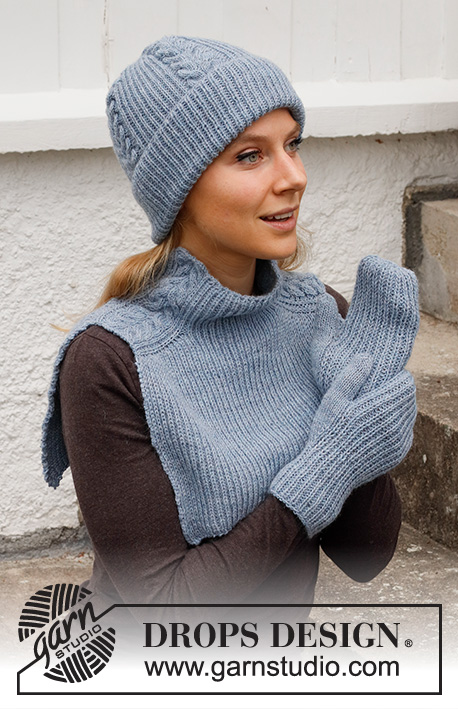
Knitted hat, mittens and neck warmer in DROPS Nord. Piece is knitted with cables, Fishermans rib and saddle shoulder increase.
DROPS 214-29 |
||||||||||||||||||||||||||||||||||
|
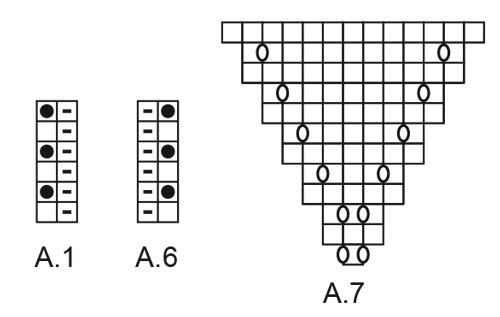
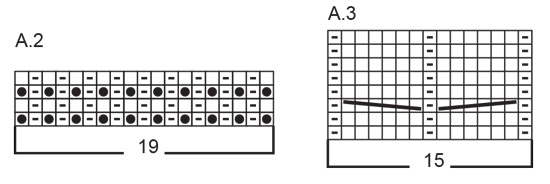
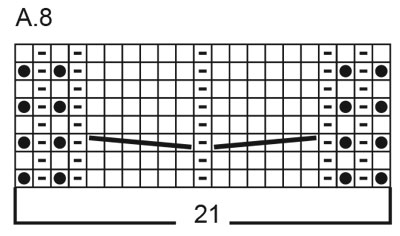
------------------------------------------------------- EXPLANATION FOR THE PATTERN: ------------------------------------------------------- GARTER STITCH (back and forth): Knit all rows. 1 ridge vertically = knit 2 rows. PATTERN: Hat: See diagrams A.1 to A.5. Mittens: See diagrams A.6 and A.7. Neck warmer: See diagrams A.1 and A.8. INCREASE TIP-1 (evenly): To calculate how to increase evenly, count the stitches to be increased (e.g. 11 stitches) and divide this number by stitches of increases to be done (e.g. 4) = 2.8. In this example increase by making 1 yarn over after approx. every 3rd stitch. On next round work yarn overs twisted to avoid holes. INCREASE TIP-2 (applies to mittens): Increase 1 stitch by making 1 yarn over. On next row work yarn overs twisted to avoid holes. Work the new stitches in stocking stitch. INCREASE TIP-3: Increase on each side of the 21 stitches for shoulder. Number of stitches for shoulder is always 21 stitches, and stitches are increased on the front piece and back piece. Increase 4 stitches on every round, increase 1 stitch on each side of A.8 as follows: BEFORE A.8: The new stitch will be twisted, leaning towards the right. Use left needle to pick up strand between 2 stitches from the round below, pick up strand from behind and knit stitch in front loop. AFTER A.8: The new stitch will be twisted, leaning towards the left. Use left needle to pick up strand between 2 stitches from the round below, pick up strand from the front and knit stitch in back loop. CAST-OFF TIP: To avoid a tight cast-off edge you may use a larger needle size. If this also is too tight, work a 1 yarn over after approx. every 4th stitch while casting off (cast off yarn overs as regular stitches). ------------------------------------------------------- START THE PIECE HERE: ------------------------------------------------------- HAT - SHORT OVERVIEW OF THE PIECE: Worked in the round on circular needle, bottom up. Switch to double pointed needles when needed. HAT: Cast on 120 stitches on circular needle size 3 mm with Nord. Knit 1 round. Then work A.1 in the round for 15 cm. REMEMBER THE KNITTING TENSION. Turn piece so that right side of piece is on the inside of hat, and work in opposite direction (so that right side of folding edge is outwards when folded up when hat is finished). Work next round as follows: * Knit the first 11 stitches and increase 4 stitches evenly - read INCREASE TIP-1, work A.2 (= 19 stitches) *, work from *-* 4 times in total = 136 stitches. Now work pattern as follows: * A.3 (= 15 stitches), A.2 *, work from *-* 4 times in total. Continue in the round like this until A.2 measures approx. 26 cm, finish after a whole repetition of A.3. Work A.4 over A.3, and work A.5 over A.2. When diagrams have been worked vertically, there are 32 stitches on round. Knit 1 round. Work 1 round where all stitches are knitted together 2 by 2 = 16 stitches. Cut the yarn and pull it through the remaining stitches, tighten together and fasten. Hat measures approx. 34 cm (= 26 cm with 7 cm fold at the bottom). ------------------------------------------------------- MITTENS - SHORT OVERVIEW OF THE PIECE: Worked in the round on double pointed needles. RIGHT MITTEN: Cast on 42-46 stitches on double pointed needles size 2.5 mm with Nord. Knit 1 round. Then work pattern A.6 in the round. When piece measures 4 cm, switch to double pointed needles size 3 mm. Continue with pattern as before. When piece measures 5-6 cm - adjust so that next round is a round that is 1st round in A.6, work A.7 over the first stitch on round, continue the remaining stitches as before. When A.7 has been worked 1 time vertically, there are 54-58 stitches on needle, and 13 stitch for thumb gusset (stitches from A.7). Continue to work without increase until piece measures 10-12 cm. On next round slip the 13 thumb gusset stitches on a stitch holder, continue in the round with pattern as before and cast at the same time on 1 new stitch on needle over stitches on stitch holder = 42-46 stitches. Work until mitten measures 22-25 cm (approx. 2 cm remain until finished measurements, try the mitten on and work to desired length). Work next round as follows: Knit 1, knit 2 and 2 stitches together until stitch 1 stitch remains, knit last stitch on round and first stitch on next round together = 21-23 stitches. Knit 2 rounds. Knit stitches together 2 by 2 until 1 stitch remains, knit 1 = 11-12 stitches. Knit 1 round. Knit stitches together 2 by 2 until 1 stitch remains, knit 1 = 6-6 stitches. Cut the yarn and pull it through the remaining stitches, tighten together and fasten. Mitten measures approx. 24-27 cm from top and down. THUMB: Slip the 13-13 thumb gusset stitches from stitch holder back on double pointed needles size 3 mm and pick in addition up 2 stitches behind thumb = 15-15 stitches. Work in stocking stitch in the round until the thumb measures 5½-6½ cm (approx. ½ cm remain until finished measurements, try the mitten on and work to desired length). Knit stitches together 2 by 2 until 4 stitches remain on round. Cut the yarn and pull it through the remaining stitches, tighten together and fasten. LEFT MITTEN: Cast on and work the same way as right mitten. ------------------------------------------------------- NECK WARMER - SHORT SUMMARY OF PIECE: Worked in the round on circular needle until increase is done. Then cast off stitches for shoulder, and work front piece and back piece back and forth separately. NECK WARMER: Cast on 108-116-124 stitches on circular needle size 3.5 mm with Nord. Knit 1 round. Then work pattern as follows: * Work A.8 (= 21 stitches), A.1 over the next 32-36-40 stitches, work first stitch in A.1 *, work from *-* 1 more time on round. Continue in the round like this until piece measures 8 cm, insert 1 marker here, now measure the piece from here. Now increase 1 stitch in each side of every A.8 - read INCREASE TIP-3. Increase like this every other round 28-32-36 times in total = 220-244-268 stitches. Work the new stitches in A.1. When all increases are done, work next round which is next to last round in A.1 as follows: Cast off the first 21 stitches for shoulder, work the next 89-101-113 stitches (= back piece), cast off the next 21 stitches for shoulder, work the last 89-101-113 stitches (= front piece). FRONT PIECE: Continue back and forth with pattern as before but work outermost stitch in each side in garter stitch. When piece measures 23-25-27 cm from marker, cast off with knit over Fisherman’s rib/knit and purl over purl - read CAST-OFF TIP. Cut and fasten the yarn. BACK PIECE: Work as on front piece. |
||||||||||||||||||||||||||||||||||
Diagram explanations |
||||||||||||||||||||||||||||||||||
|
||||||||||||||||||||||||||||||||||
 |
||||||||||||||||||||||||||||||||||
 |
||||||||||||||||||||||||||||||||||
 |
||||||||||||||||||||||||||||||||||
 |
||||||||||||||||||||||||||||||||||
Have you finished this pattern?Tag your pictures with #dropspattern #citysweetheartset or submit them to the #dropsfan gallery. Do you need help with this pattern?You'll find 25 tutorial videos, a Comments/Questions area and more by visiting the pattern on garnstudio.com. © 1982-2026 DROPS Design A/S. We reserve all rights. This document, including all its sub-sections, has copyrights. Read more about what you can do with our patterns at the bottom of each pattern on our site. |
||||||||||||||||||||||||||||||||||


With over 40 years in knitting and crochet design, DROPS Design offers one of the most extensive collections of free patterns on the internet - translated to 17 languages. As of today we count 324 catalogues and 12290 patterns translated into English (UK/cm). 12290
We work hard to bring you the best knitting and crochet have to offer, inspiration and advice as well as great quality yarns at incredible prices! Would you like to use our patterns for other than personal use? You can read what you are allowed to do in the Copyright text at the bottom of all our patterns. Happy crafting!
Post a comment to pattern DROPS 214-29
We would love to hear what you have to say about this pattern!
If you want to leave a question, please make sure you select the correct category in the form below, to speed up the answering process. Required fields are marked *.