
Popular categories
Looking for a yarn?


Comments / Questions (56)
![]() Liva wrote:
Liva wrote:
Hejsa, i starten af opskriften står der at strikkefastheden er 24 masker og 32 pinde = 10 x 10 cm, men hvilken pind er dette med :) Mvh Liva Bach Havemann
01.03.2026 - 13:56DROPS Design answered:
Hei Liva. Du må bruke den pinne str. som du må bruke for å få en strikkefasthet på 24 masker i bredden og 32 pinner i høyden med glattstrikk = 10 x 10 cm (tipper str. 3+/-). Denne toppen strikkes med et strukturmønsker, så du kan strikke en prøvelapp i strukturmønster istedenfor, og da er veiledene pinne str 3, men ha er det en annen strikkefasthet enn i glattstrikk. Se under: STRIKKEFASTHET. mvh DROPS Design
03.03.2026 - 13:19
![]() Pia wrote:
Pia wrote:
Kann ich das Strickmuster auch im 2x2 rib stricken? Was müsste ich beachten/abändern?
14.02.2026 - 19:33DROPS Design answered:
Liebe Pia, ein 2/2-Rippenmuster zieht sich mehr zusammen als das gezeigte Muster. Außerdem müssten Sie die Maschenzahl berücksichtigen, denn ein 2/2-Rippenmuster hat einen Mustersatz von 4 Maschen, hier sind es aber 6 Maschen pro Mustersatz. Ein 3/3-Rippenmuster wäre möglich (auch das zieht sich aber etwas mehr zusammen). Viel Spaß beim Stricken!
16.02.2026 - 11:35
![]() Johanna wrote:
Johanna wrote:
Ich habe eine Frage zu den Zunahmen: Ich nehme insgesamt 29 Maschen zu und stricke diese im A1 Muster ab. Dieses besteht aus 6 Maschen, die wiederholt werden. Die ersten 3 Zunahmen sollen laut Kommentar glatt rechts gestrickt werden, danach in A1 weiter (26 Zunahmen). Dabei kann man am Ende aber kein vollständiges A1 stricken, richtig? Bei 6xA1 (=24) bleiben 2 Zunahme Maschen übrig. Wie sollen die Zunahmen abgestrickt werden? Danke :)
15.01.2026 - 14:51DROPS Design answered:
Liebe Johanna, die Raglanzunahmen werden im Muster A.1 eingestrickt, das Muster kann am Ende der Passe nicht in der Runde stimmen, aber nach Aufteilung wird das Muster in der Runde passen. Viel Spaß beim Stricken!
16.01.2026 - 08:11
![]() Vanessa wrote:
Vanessa wrote:
Hi there. Is the raglan seam getting divided with the sleeve, or staying with the body? I'm on a different stitch count due to adapting the design, so the instructions don't work for me. Thanks
08.11.2025 - 07:44DROPS Design answered:
Hi Vanessa, The raglan seam stays on the body. Regards, Drops Team.
12.11.2025 - 07:00
![]() DD wrote:
DD wrote:
Bonjour, J'ai tricoté jusqu'ici : "Continuer en rond ainsi, et augmenter pour le raglan 29-29-35-41-41-47 fois tous les 2 tours = 360-360-420-468-480-528 mailles. Tricoter jusqu'à ce que l'ouvrage mesure 21-23-25-27-29-31 cm." Mais à la fin de mes augmentations j ai bien 360 mailles mais mon ouvrage ne fait pas 21cm. Sauf que si je continue jusqu a 21cm sans augmenter, le raglan ne fonctionne plus..? comment faut-il faire ?
14.10.2025 - 22:18DROPS Design answered:
Bonjour Mme DD, tricotez simplement les mailles comme avant en suivant A.1 et A.2 tout comme vous l'avez fait auparavant et ce jusqu'à la hauteur requise, mais n'augmentez plus pour le raglan car vous avez déjà le bon nombre de mailles. Bon tricot!
15.10.2025 - 10:44
![]() Hilde wrote:
Hilde wrote:
Får ikke 1 omgang til å stemme. Står at man skal strikke A1 over de siste 18 maskene etter siste raglan. Jeg har 21 masker igjen. Ser siste kommentarer går ut på det å, at hun ikke får det til å stemme.
13.10.2025 - 18:54DROPS Design answered:
Hei Hilde, Du har 128 masker på omgangen. 3 x A.1 (18 masker) + første 3 masken i A.1 + kast (som ikke regnes her) + A.2 (5 masker) + kast + A.1 (12 masker) + første 3 masken i A.1 + kast + A.2 (5 masker) + kast + 6 x A.1 (36 masker) + første 3 masken i A.1 + kast + A.2 (5 masker) + kast + A.1 x 2 (12 masker) + første 3 masken i A.1 + kast + A.2 (5 masker) + kast + 3 x A.1 (18 masker). Teller ikke med kasten siden de kommer i tillegg: 18 + 3 + 5 + 12 + 3 + 5 + 36 + 3 + 5 + 12 + 3 + 5 + 18 = 128 masker. Håper dette hjelper. Hilsen Drops Team.
15.10.2025 - 07:02
![]() Irene Lillemark wrote:
Irene Lillemark wrote:
Den første pind med ragland passer ikke med se opslået masker
05.10.2025 - 07:25
![]() Francesca wrote:
Francesca wrote:
Buongiorno. Per fare questo modello con le maniche lunghe quanti gomitoli in più devo calcolare per la taglia L? Grazie.
01.09.2025 - 20:28DROPS Design answered:
Buonasera Francesca, per un'assistenza così personalizzata può rivolgersi al suo rivenditore DROPS di fiducia. Buon lavoro!
02.09.2025 - 00:47
![]() Monika wrote:
Monika wrote:
Co to ścieg strukturalny
13.08.2025 - 00:09DROPS Design answered:
Witaj Moniko, ścieg strukturalny to w naszym przypadku ścieg fantazyjny A.1. Szerzej ścieg strukturalny to taki, który tworzy na powierzchni dzianiny określoną strukturę, może to być kombinacja oczek prawych i lewych, warkocze, ścieg perełkowy i wiele innych. Pozdrawiamy!
13.08.2025 - 06:39
![]() May-Brit wrote:
May-Brit wrote:
Hei, jeg ser dere har fått flere spørsmål ang følgende, men jeg ser ingen - for meg - forståelig forklaring; på andre omgang, når økningene skal inn i mønsteret, skal jeg da fortsette der mønsteret endte før A2 (altså med to rett, *3 vrang, 3 rett*... (- i str M) ) , eller skal jeg - etter A2 - starte med første maske i A1 igjen (altså *3 vrang, 3 rett*)? (Dette kunne gjerne vært bedre forklart i oppskriften.)
27.06.2025 - 15:12DROPS Design answered:
Hej May-Brit, jo alle nye masker skal strikkes ind i A.1 efterhånden som du tager ud :)
01.07.2025 - 08:20
|
|||||||
Smell the Rain#smelltherainsweater |
|||||||
 |
 |
||||||
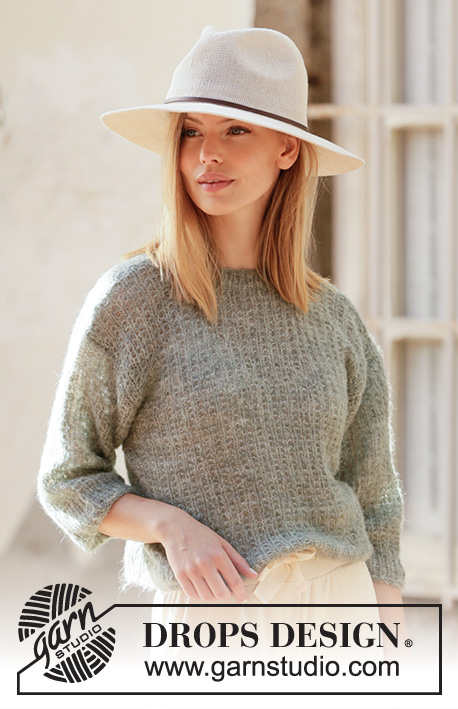
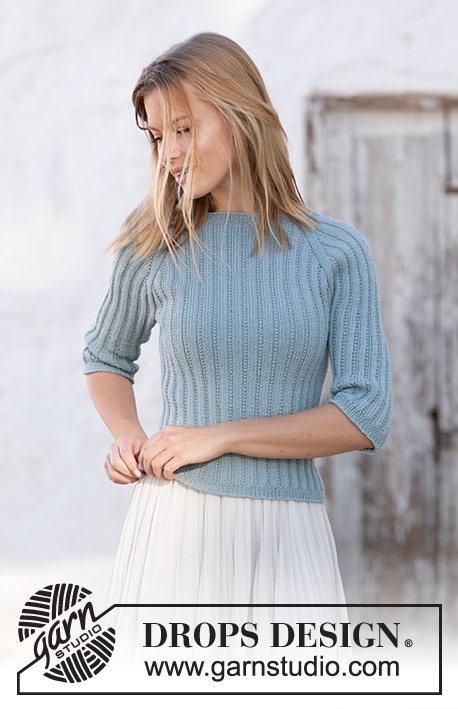
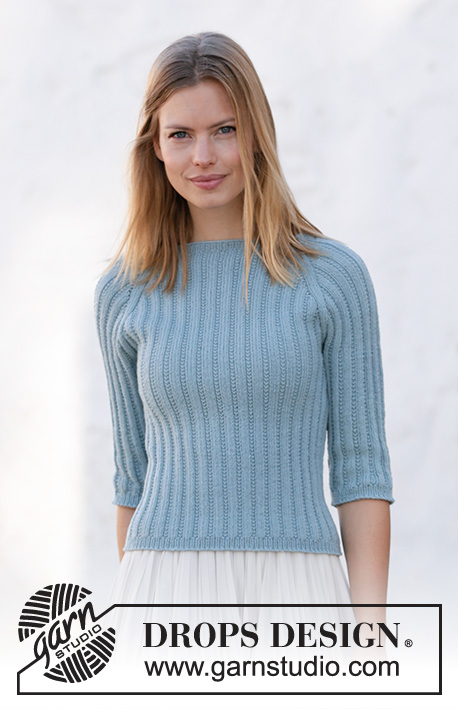
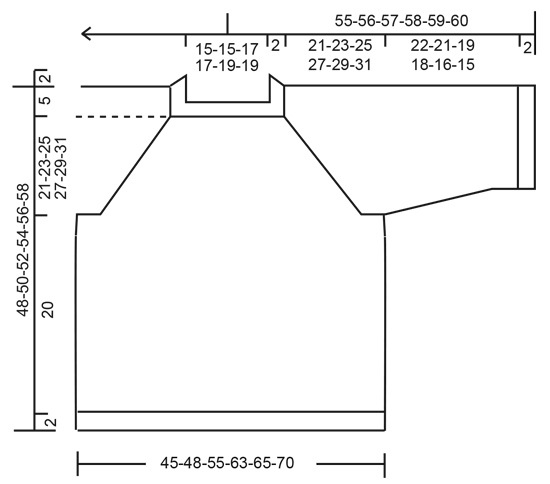
Knitted jumper with raglan in DROPS BabyMerino. Piece is knitted top down with textured pattern and ¾ sleeves. Size: S - XXXL
DROPS 210-37 |
|||||||
|
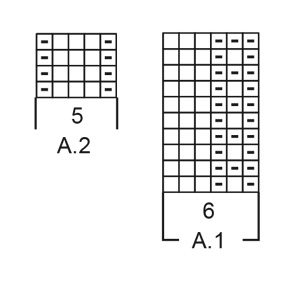
---------------------------------------------------------- EXPLANATION FOR THE PATTERN: ---------------------------------------------------------- PATTERN: See diagrams A.1 and A.2. RAGLAN: Increase 1 stitch on each side of A.2 in every transition between body and sleeves (= 8 stitches increased on round). Increase 1 stitch by making 1 yarn over. On next round work yarn overs twisted to avoid holes. Then work the new stitches in pattern. DECREASE TIP (applies to sleeves): Work until 3 stitches remain before stitch with marker, knit 2 together, knit 3, slip 1 stitch knitwise, knit 1, pass slipped stitch over stitch worked (= 2 stitches decreased). CAST-OFF TIP: To avoid a tight cast-off edge you may use a larger needle size. If this also is too tight, work a 1 yarn over after approx. every 4th stitch while casting off (cast off yarn overs as regular stitches). ---------------------------------------------------------- START THE PIECE HERE: ---------------------------------------------------------- JUMPER - SHORT OVERVIEW OF THE PIECE: Work neck edge and yoke in the round on circular needle from approx. mid back, top down. Now divide yoke for body and sleeves. Work body in the round on circular needle. Work sleeves in the round on double pointed needles/a short circular needle. NECK EDGE: Cast on 128-128-140-140-152-152 stitches on circular needle size 2 mm with BabyMerino. Knit 1 row. Then work rib (= knit 1/purl 1) in the round for 2 cm. Switch to circular needle size 3 mm. Insert 1 marker at the beginning of round (= approx. mid back), measure yoke from this marker! YOKE: Now work pattern as follows: Work A.1 (= 6 stitches) over the first 18-18-18-18-24-24 stitches, work the first 3 stitches in A.1, make 1 yarn over, A.2 over the next 5 stitches (= raglan), make 1 yarn over, A.1 over the next 12 stitches, work the first 3 stitches in A.1, 1 yarn over, A.2 (= raglan), make 1 yarn over, A.1 over the next 36-36-42-42-48-48 stitches, work the first 3 stitches in A.1, make 1 yarn over, A.2 (= raglan), make 1 yarn over, A.1 over the next 12 stitches, work the first 3 stitches in A.1, make 1 yarn over, A.2 (= raglan), make 1 yarn over, A.1 over the last 18-18-24-24-24-24 stitches. 1 stitch has been increased on each side of A.2 in every RAGLAN - read explanation above. Continue pattern in the round like this, and increase for raglan every other round 29-29-35-41-41-47 times = 360-360-420-468-480-528 stitches. Continue in pattern until piece measures 21-23-25-27-29-31 cm. Now divide piece for body and sleeves. Work next round as follows: Work the first 51-51-57-66-72-78 stitches in pattern as before (= approx. half back piece), slip the next 81-81-93-99-99-111 stitches on a stitch holder (= sleeve), cast on 9-15-15-15-15-15 new stitches on needle (= in the side under sleeve), work the next 99-99-117-135-141-153 stitches (= front piece), slip the next 81-81-93-99-99-111 stitches on a stitch holder (= sleeve) and cast on 9-15-15-15-15-15 new stitches on needle (= in the side under sleeve), work the last 48-48-60-69-69-75 stitches (= approx. half back piece). Then finish body and sleeves separately. NOW MEASURE PIECE FROM HERE! BODY: = 216-228-264-300-312-336 stitches. Continue with pattern as before. Pattern should fit the entire round. When piece measures 20 cm from division, switch to circular needle size 2 mm. Work rib (knit 1/purl 1) in the round for 2 cm. Cast off with knit over knit and purl over purl - read CAST-OFF TIP. Jumper measures approx. 48-50-52-54-56-58 cm from shoulder and down. SLEEVES: Slip the 81-81-93-99-99-111 stitches from stitch holder in one side back on double pointed needles/circular needle size 3 mm and pick in addition up 1 stitch in each of the new 9-15-15-15-15-15 stitches cast on in the side under sleeve = 90-96-108-114-114-126 stitches. Insert a marker in the middle stitch under sleeve. Move the marker upwards when working. Use marker later when decreasing under sleeve. Continue with textured pattern as before and work in stocking stitch over the new stitches under sleeve. On 2nd round begin decrease under sleeve - read DECREASE TIP. Decrease like this every other round 2 2-2-3-3-5-7 times in total, then decrease approx. every 3-2-1-1-1-1 cm 7-9-13-13-8-10 times in total = 72-74-76-82-88-92 stitches. Continue until sleeve measures 22-21-19-18-16-15 cm from division. Switch to double pointed needles size 2 mm. Work rib (knit 1/purl 1) in the round for 2 cm. Cast off with knit over knit and purl over purl - read CAST-OFF TIP. Sleeve measures 24-23-21-20-18-17 cm in total from division. Work the other sleeve the same way. |
|||||||
Diagram explanations |
|||||||
|
|||||||
 |
|||||||
 |
|||||||
Have you finished this pattern?Tag your pictures with #dropspattern #smelltherainsweater or submit them to the #dropsfan gallery. Do you need help with this pattern?You'll find 26 tutorial videos, a Comments/Questions area and more by visiting the pattern on garnstudio.com. © 1982-2026 DROPS Design A/S. We reserve all rights. This document, including all its sub-sections, has copyrights. Read more about what you can do with our patterns at the bottom of each pattern on our site. |
|||||||


With over 40 years in knitting and crochet design, DROPS Design offers one of the most extensive collections of free patterns on the internet - translated to 17 languages. As of today we count 324 catalogues and 12290 patterns translated into English (UK/cm). 12290
We work hard to bring you the best knitting and crochet have to offer, inspiration and advice as well as great quality yarns at incredible prices! Would you like to use our patterns for other than personal use? You can read what you are allowed to do in the Copyright text at the bottom of all our patterns. Happy crafting!
Post a comment to pattern DROPS 210-37
We would love to hear what you have to say about this pattern!
If you want to leave a question, please make sure you select the correct category in the form below, to speed up the answering process. Required fields are marked *.