
Popular categories
Looking for a yarn?


Comments / Questions (12)
![]() Bert wrote:
Bert wrote:
Waarom wordt een rondbreinaald geadviseerd? Ik zie geen extreem grote aantallen steken genoemd.
26.05.2022 - 08:20DROPS Design answered:
Dag Bert,
Dit vest zou inderdaad ook met rechte naalden gebreid kunnen worden. In de grotere maten heb je dan wel veel steken bij het achterpand en dat is waarschijnlijk de reden dat rondbreinaalden geadviseerd worden. Als je d mouwen met rechte naalden heen en weer breit, moet je aan beide kanten 1 extra steek opzetten als kantsteek, waarmee je de mouwnaad later dicht naait.
28.05.2022 - 18:47
![]() Bonita Poirier wrote:
Bonita Poirier wrote:
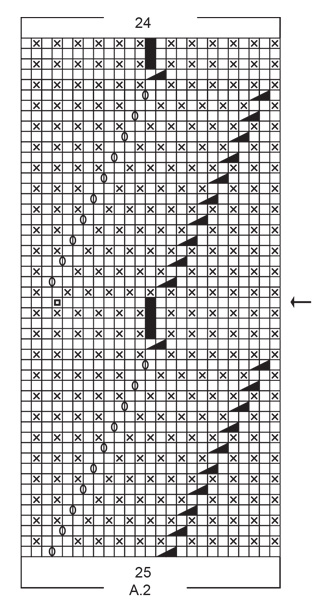
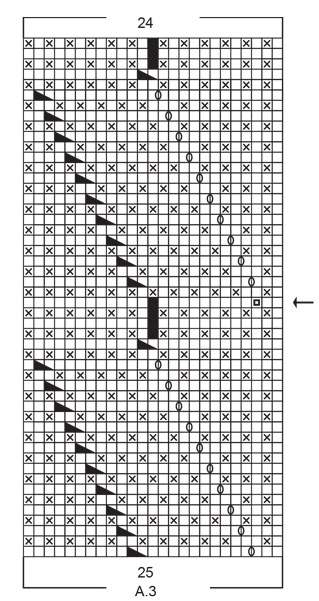
Since the sweater is worked top down, are the Charts A2 and A3 to be worked top down as well?
13.03.2019 - 16:25DROPS Design answered:
Hello Bonita. Although the jacket is worked top down, you read charts from right to left, bottom to top as usual. Happy knitting!
14.03.2019 - 08:23
![]() Oddveig Holstad wrote:
Oddveig Holstad wrote:
Ynskjer å få oppskrift på jakken tilsendt på mail adressa mi eg har kjøpt Nepal garn hjå dere å det kom i posten i dag. Oddveig
12.02.2019 - 19:04DROPS Design answered:
Hej Oddveig, du finder opskriften her på siden, lige til at følge online eller skrive ud helt gratis. God fornøjelse!
13.02.2019 - 12:16
![]() Anne Marie Vanwaterloo wrote:
Anne Marie Vanwaterloo wrote:
Comment fait on pour tricoter tous les modèles de bas en haut? Et non de haut en bas.Est ce que vous pouvez me donner les explications si je commande la laine.Merci beaucoup.
19.01.2019 - 16:50DROPS Design answered:
Bonjour Mme Vanwaterloo, nous ne pouvons modifier les explications pour les ajuster à chaque demande, pour obtenir le résultat sur la photo, il vous faudra tricoter comme dans ce modèle, de bas en haut. Lisez attentivement les explications et n'hésitez pas à poser votre question ici si besoin, ou bien à contacter votre magasin DROPS pour toute assistance complémentaire. Bon tricot!
21.01.2019 - 13:05
![]() Bernadette Van Duijvenbode wrote:
Bernadette Van Duijvenbode wrote:
Sorry, sorry sorry! Gelukkig heb ik een slimme buurvrouw die me er op wees , dat omdat het vest van boven naar beneden wordt gebreid, het patroon wel klopt. Nogmaals mijn excuses.
18.12.2018 - 19:18
![]() Bernadette Van Duijvenbode wrote:
Bernadette Van Duijvenbode wrote:
Sorry, ik blijf erbij dat als ik een naald aan de goeie kant brei bij het rechter voorpand ik aan het eind van de naald toch echt aan de schouderkant uitkom en niet aan de halskant.
18.12.2018 - 12:34DROPS Design answered:
Dag Bernadette,
Dankjewel voor je terugkoppeling hierboven in je opmerking, het patroon wordt inderdaad van boven naar beneden gebreid. Soms werkt het ook beter om gewoon te beginnen met breien, dan zie je vanzelf wat de bedoeling is. Veel breiplezier.
20.12.2018 - 10:47
![]() B A M Duijvenbode wrote:
B A M Duijvenbode wrote:
Patroon is niet juist. Re voorpand nld 1: 1 steek aan het einde van de nld is niet de halskant. Ook bij naald 3 wordt dit verkeerd aangegeven: 15 steken opzetten voor de hals en de voorbies aan het einde van de naald. Graag correctie.
17.12.2018 - 20:56DROPS Design answered:
Dag B A M Duijvenbode,
Je breit het rechter voorpand heen en weer tot het werk 4-4-4-4-5-5 cm meet, en je past dit zo aan dat de volgende naald aan de goede kant wordt gebreid. Hetzelfde doe je voor het linker voorpand, maar dan zorg je ervoor dat de volgende naald aan de verkeerde kant wordt gebreid.Op deze manier is bij zowel het linker- als rechter voorpand, de hals kant aan het eind van naald 1.
17.12.2018 - 22:24
![]() Maria wrote:
Maria wrote:
Ohjeessa takakappaleen kohdassa yhdistämisen jälkeen seuraavalla nurjalla puolella pääntien silmukat beulotaan nurin. Sitten on oikea puoli mallineuleen mukaan. Sitten tulee jatka tasoneuletta tähän tapaan. Tehdäänkö takakappaleessa siis koko ajan sileää pääntien kohdalla vai mallineuletta?
10.12.2018 - 07:15DROPS Design answered:
Hei, myös pääntien silmukoilla neulotaan jokaisella kerroksella mallineuletta.
20.12.2018 - 13:33
![]() Bernadette Van Duijvenbode wrote:
Bernadette Van Duijvenbode wrote:
Kan ik dit patroon ook breien met 2 draden alpaca? En zo ja, hoeveel heb ik dan nodig i.p.v. 750 gr Nepal?
22.11.2018 - 19:12DROPS Design answered:
Dag Bernadette,
Om dit uit te rekenen kun je de garenvervanger gebruiken. Deze vind je hier en staat ook bij ieder patroon bovenaan bij de materialen. Vul het garen van het patroon in , de hoeveelheid die staat aangegeven bij het patroon en het aantal draden dat in het patroon gebruikt wordt. De garenvervanger geeft vervolgens een lijst van alternatieven op.
25.11.2018 - 16:30
![]() Inger Lise Mindrebøe wrote:
Inger Lise Mindrebøe wrote:
Håper oppskriften kommer en av dagene ;for den gleder jeg meg til å strikke :)
12.08.2018 - 19:24
|
||||||||||||||||||||||
Aster Jacket#asterjacket |
||||||||||||||||||||||
 |
 |
|||||||||||||||||||||
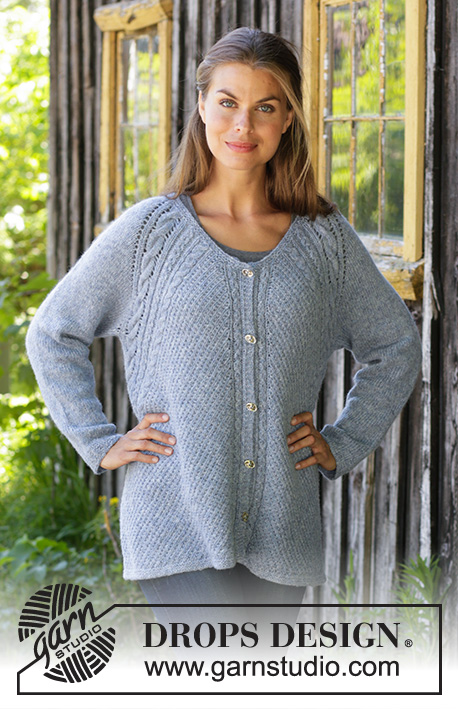
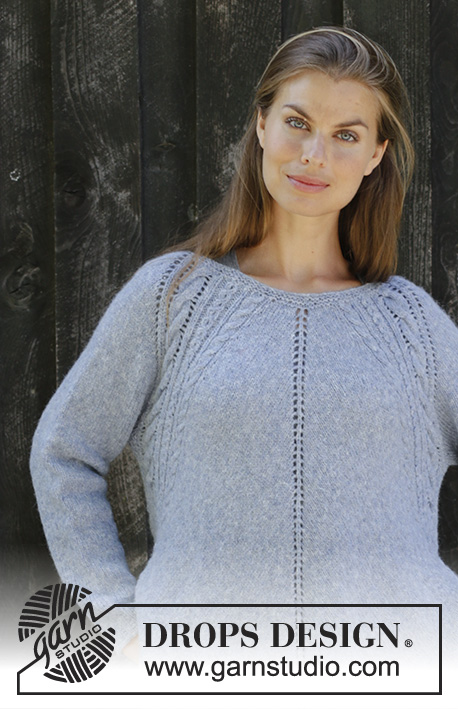
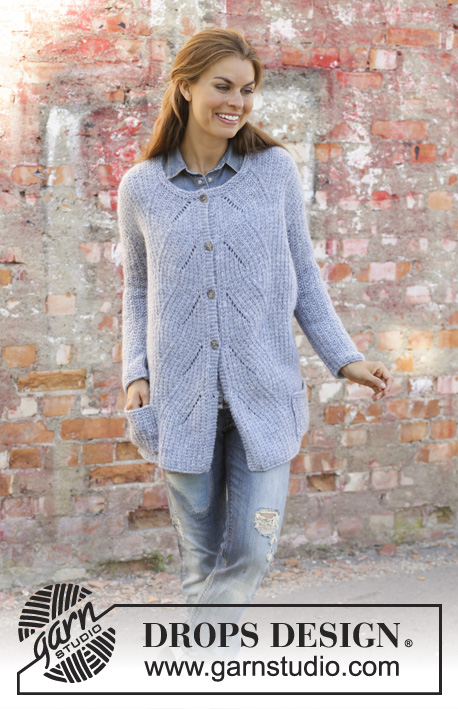
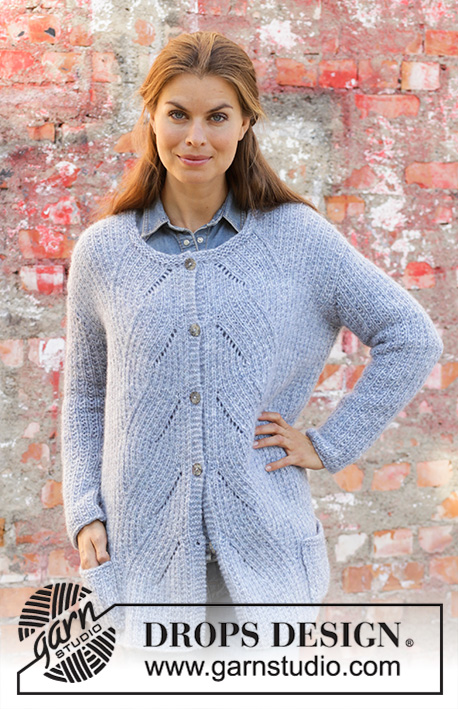
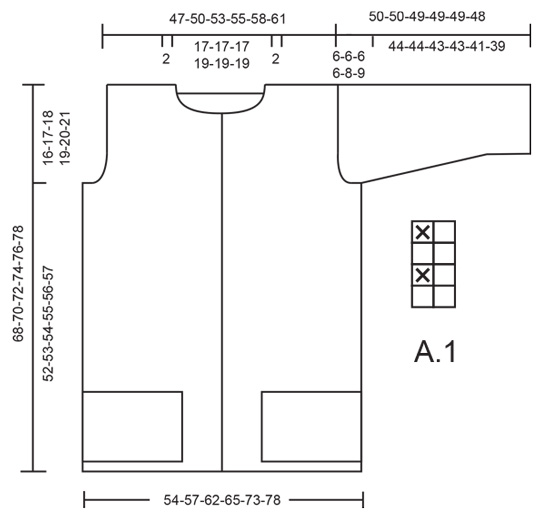
Knitted jacket in DROPS Nepal or DROPS Air. Piece is knitted top down with texture, lace pattern and pockets. Size: S - XXXL
DROPS 194-9 |
||||||||||||||||||||||
|
EXPLANATION FOR THE PATTERN: ---------------------------------------------------------- GARTER STITCH (back and forth): 1 ridge = knit 2 rows. PATTERN: See diagrams A.1 to A.3. Diagrams show all rows in pattern seen from the right side. DECREASE TIP (applies to sleeves): All decreases are done from the right side! Decrease as follows after 1 edge stitch in garter stitch: Slip 1 stitch knitwise, knit 1, pass slipped stitch over. Decrease as follows before 1 edge stitch in garter stitch: Work until 3 stitches remain, knit 2 together, 1 stitch in garter stitch. BUTTONHOLES: Decrease for buttonholes on right band (when garment is worn). Decrease from right side when 3 stitches remain on row as follows: Make 1 yarn over, knit the next 2 stitches together, knit last stitch. On next row knit yarn over to make holes. Decrease first buttonhole on first row from right side after casting on stitches for neck and band (= when first row in A.2 is worked). Then decrease the 4-4-4-4-4-4 next buttonholes 26 rows apart, i.e. decrease for buttonhole every time a new lace repeat is started in A.2 (= 5-5-5-5-5-5 buttonholes). ---------------------------------------------------------- START THE PIECE HERE: ---------------------------------------------------------- JACKET - SHORT OVERVIEW OF THE PIECE: Worked back and forth in several pieces and sewn together when finished. Worked top down on circular needle. RIGHT FRONT PIECE: Cast on 25-27-29-29-31-33 stitches on circular needle size 6 mm with Nepal or Air. Purl 1 row from wrong side. Then work pattern as follows from right side: 1 edge stitch in garter stitch, A.1 until 2 stitches remain on needle, work first stitch in A.1, 1 stitch in garter stitch. Continue back and forth like this until piece measures 4-4-4-4-5-5 cm, adjust so that next row is worked from right side: ROW 1: Work pattern as before over all stitches and cast on 1 new stitch at the end of row (= towards the neck) = 26-28-30-30-32-34 stitches. ROW 2: Work 1 edge stitch in garter stitch, work pattern as before until 1 stitch remains on needle, 1 edge stitch in garter stitch. REMEMBER THE KNITTING TENSION! ROW 3: Work pattern as before over all stitches and cast on 15-15-15-17-17-17 new stitches for neck and band at the end of row = 41-43-45-47-49-51 stitches. ROW 4: Purl the first 15-15-15-17-17-17 stitches and pattern as before over the remaining stitches on needle. Now work pattern as follows: Work pattern as before over the first 12-14-16-18-20-22 stitches, A.2 (= 25 stitches), 4 band stitches in garter stitch. Remember BUTTONHOLES on right band - read explanation above. Continue back and forth like this (on 21st row in A.2 decrease 1 stitch = 24 stitches in diagram). When piece measures 13-14-13-14-15-15 cm, cast on new stitches for armhole at the end of every row from wrong side as follows: Cast on 1 stitch 2-2-2-2-2-2 times, 2 stitches 0-0-1-1-3-4 times and 4 stitches 1 time (6-6-8-8-12-14 stitches increased in total for armhole) = 46-48-52-54-60-64 stitches. Work the new stitches in pattern A.1. Continue back and forth like this until entire A.2 has been worked vertically. Then repeat the last 26 rows in A.2 (i.e. from row marked with arrow in diagram) 3 more times vertically. The remaining stitches on needle are worked in pattern as before. Then work texture (A.1) over all stitches and 4 band stitches in garter stitch towards mid front until piece measures 68-70-72-74-76-78 cm from shoulder and down. Cast off stitches with knit over knit and purl over purl. LEFT FRONT PIECE: Cast on 25-27-29-29-31-33 stitches on circular needle size 6 mm with Nepal or Air. Purl 1 row from wrong side. Then work pattern as follows from right side: 1 edge stitch in garter stitch, A.1 (= 2 stitches) until 2 stitches remain on needle, work first stitch in A.1, 1 stitch in garter stitch. Continue back and forth like this until piece measures 4-4-4-4-5-5 cm, adjust so that next row is worked from wrong side. ROW 1: Work pattern as before over all stitches and cast on 1 new stitch at the end of row (= towards the neck) = 26-28-30-30-32-34 stitches. ROW 2: Work 1 edge stitch in garter stitch, work pattern as before until 1 stitch remains, 1 edge stitch in garter stitch. ROW 3: Work pattern as before over all stitches and cast on 15-15-15-17-17-17 new stitches for neck and band at the end of row = 41-43-45-47-49-51 stitches. Now work pattern as follows: Work 4 band stitches in garter stitch, A.3 (= 25 stitches), work pattern as before over the remaining stitches on needle. Continue back and forth like this (on 21st row in A.3 decrease 1 stitch = 24 stitches in diagram). When piece measures 13-14-13-14-15-15 cm, cast on new stitches for armhole at the end of every row from right side as follows: Cast on 1 stitch 2-2-2-2-2-2 times, 2 stitches 0-0-1-1-3-4 times and 4 stitches 1 time (6-6-8-8-12-14 stitches increased in total for armhole) = 46-48-52-54-60-64 stitches. Work the new stitches in pattern A.1. Continue back and forth like this until entire A.3 has been worked vertically. Then repeat the last 26 rows in A.3 (i.e. from row marked with arrow in diagram) 3 more times vertically. The remaining stitches on needle are worked in pattern as before. Then work texture (A.1) over all stitches and 4 band stitches in garter stitch towards mid front until piece measures 68-70-72-74-76-78 cm from shoulder and down. Cast off stitches with knit over knit and purl over purl. BACK PIECE: Right shoulder: Cast on 25-27-29-29-31-33 stitches on circular needle size 6 mm with Nepal or Air. Purl 1 row from wrong side. Then work pattern as follows from right side: ROW 1: 1 edge stitch in garter stitch, A.1 (= 2 stitches) until 2 stitches remain on needle, work first stitch in A.1, 1 stitch in garter stitch. ROW 2: Work pattern as before and cast on 1 new stitch at the end of row (= towards the neck) = 26-28-30-30-32-34 stitches. ROW 3: Work 1 edge stitch in garter stitch, work pattern as before until 1 stitch remains on needle, 1 edge stitch in garter stitch. ROW 4: Work pattern as before over all stitches. Put piece aside and work the left shoulder. Left shoulder: Cast on 25-27-29-29-31-33 stitches on circular needle size 6 mm with Nepal or Air. Purl 1 row from wrong side. Then work pattern as follows from right side: ROW 1: 1 edge stitch in garter stitch, A.1 until 2 stitches remain on needle, work first stitch in A.1, 1 stitch in garter stitch. ROW 2: Work pattern as before over all stitches. ROW 3: Work pattern as before and cast on 1 new stitch at the end of row = 26-28-30-30-32-34 stitches. ROW 4: Work 1 edge stitch in garter stitch, work pattern as before until 1 stitch remains, 1 edge stitch in garter stitch. Now work left and right shoulder together from right side as follows: Work as before over the 26-28-30-30-32-34 stitches on left shoulder, cast on 21-21-21-25-25-25 new stitches on needle for neck, work as before over the 26-28-30-30-32-34 stitches on right shoulder = 73-77-81-85-89-93 stitches on needle. Work 1 row from wrong side in pattern as before and with 1 edge stitch in garter stitch in each side (purl over the new stitches cast on for neck). Now work pattern as follows: 1 edge stitch in garter stitch, A.1 until 2 stitches remain on needle, work first stitch in A.1, 1 stitch in garter stitch. Continue back and forth like this. When piece measures 13-14-13-14-15-15 cm, cast on new stitches for armholes at the end of every row in each side as follows: Cast on 1 stitch 2-2-2-2-2-2 times, 2 stitches 0-0-1-1-3-4 times and 3 stitches 1 time (5-5-7-7-11-13 stitches increased in total for armholes in each side of piece - NOTE: Cast on 1 stitch less for armholes in each side on back piece than on front piece to make the pattern fit in the side of body) = 83-87-95-99-111-119 stitches. Work the new stitches in pattern A.1. When piece measures 68-70-72-74-76-78 cm from shoulder, cast off with knit over knit and purl over purl. SLEEVE: Cast on 19-23-25-27-27-27 stitches on circular needle size 6 mm with Nepal or Air. Work pattern A.1 until 1 stitch remains, work first stitch in A.1. Continue back and forth like this, AT THE SAME TIME at the end of each row cast on new stitches in each side for sleeve cap as follows: Cast on 2 stitches 3-3-3-3-2-2 times, 1 stitch 0-0-0-0-4-5 times, 2 stitches 2-2-2-2-2-2 times and 4 stitches 1 time = 47-51-53-55-59-61 stitches. Work the new stitches in pattern A.1. When all stitches have been cast on, insert a marker thread in piece. NOW MEASURE PIECE FROM HERE! Continue back and forth with pattern A.1 and 1 edge stitch in garter stitch in each side. When piece measures 4 cm, decrease 1 stitch in each side - read DECREASE TIP. Decrease like this approx. every 5-5-4-4-3-3 cm 7-8-8-9-10-10 times in total = 33-35-37-37-39-41 stitches. Continue until sleeve measures 44-44-43-43-41-39 cm from marker thread (shorter sleeves in the larger sizes because of wider shoulders). Cast off stitches with knit over knit and purl over purl. Work the other sleeve the same way. POCKETS: Cast on 29 stitches on circular needle size 6 mm with Nepal or Air. Work 1 ridge. Now work pattern as follows: 1 edge stitch in garter stitch, work A.1 until 2 stitches remain on needle, work first stitch in A.1, 1 stitch in garter stitch. Continue like this until pocket measures 12 cm from cast-on edge. Cast off. Knit another pocket the same way. ASSEMBLY: Sew shoulder seams inside cast-on edges. Sew sleeves in body inside cast-on edge on sleeves and inside 1 edge stitch in garter stitch on body. Sew seam under sleeves and side seams in one inside 1 edge stitch in garter stitch. Repeat in the other side. Place the pocket along the side seam and 4 cm from cast-off edge at the bottom of front piece and sew it to front piece by sewing one and one stitch with small invisible stitches. Repeat on the other front piece. Sew the buttons on to left band. NECK EDGE: Pick up 74-86 stitches from right side on a short circular needle size 6 mm. Work 2 ridges. Cast off by purling. |
||||||||||||||||||||||
Diagram explanations |
||||||||||||||||||||||
|
||||||||||||||||||||||
 |
||||||||||||||||||||||
 |
||||||||||||||||||||||
 |
||||||||||||||||||||||
Have you finished this pattern?Tag your pictures with #dropspattern #asterjacket or submit them to the #dropsfan gallery. Do you need help with this pattern?You'll find 25 tutorial videos, a Comments/Questions area and more by visiting the pattern on garnstudio.com. © 1982-2026 DROPS Design A/S. We reserve all rights. This document, including all its sub-sections, has copyrights. Read more about what you can do with our patterns at the bottom of each pattern on our site. |
||||||||||||||||||||||


With over 40 years in knitting and crochet design, DROPS Design offers one of the most extensive collections of free patterns on the internet - translated to 17 languages. As of today we count 324 catalogues and 12290 patterns translated into English (UK/cm). 12290
We work hard to bring you the best knitting and crochet have to offer, inspiration and advice as well as great quality yarns at incredible prices! Would you like to use our patterns for other than personal use? You can read what you are allowed to do in the Copyright text at the bottom of all our patterns. Happy crafting!
Post a comment to pattern DROPS 194-9
We would love to hear what you have to say about this pattern!
If you want to leave a question, please make sure you select the correct category in the form below, to speed up the answering process. Required fields are marked *.